


源码解读SpringMVC注解方式的启动过程
1.Servlet容器启动
1.1 原理
在Servlet3.0之前,配置Servlet容器的上下文,需要在WEB-INF/web.xml文件配置,而在Servlet3.0之后,提供了一种免Web.xml配置的方式,它提供了ServletContainerInitializer接口,容器会在启动的时候查找类中实现ServletContainerInitializer接口的类,然后在ServletContainerInitializer#onStartup方法进行配置即可。Springmvc以注解方式配置Servlet容器就是依靠这个接口,实现类为SpringServletContainerInitializer。
ServletContainerInitializer源码
public interface ServletContainerInitializer {

    public void onStartup(Set<Class<?>> c, ServletContext ctx)
        throws ServletException;
}
1.2 ServletContainerInitializer的使用
- 自定义一个类实现
ServletContainerInitializer接口,并在onStartup方法中配置Servlet容器 - 这个类必须在jar包中的
MATE-INF/services/javax.servlet.ServletContainerInitializer文件中进行声明,文件的内容就是这个实现类的全类名
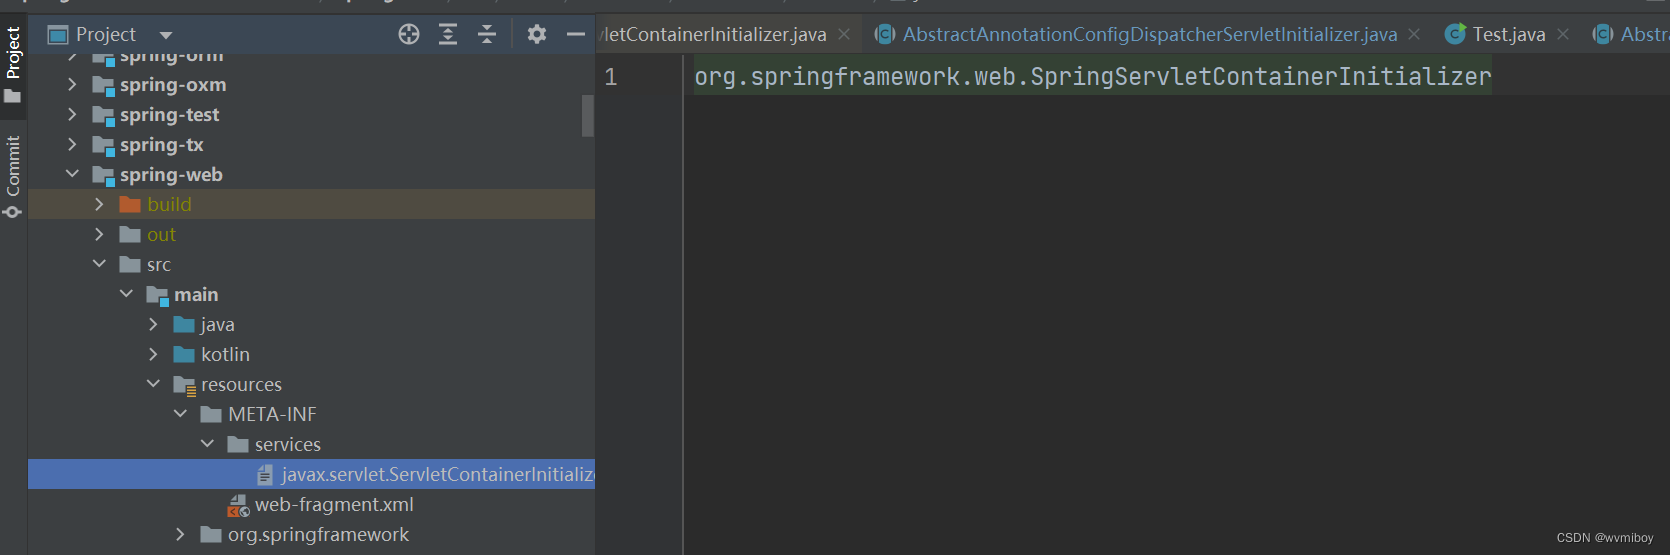
SpringMvc提供了一个默认实现SpringServletContainerInitializer类
@HandlesTypes(WebApplicationInitializer.class)
public class SpringServletContainerInitializer implements ServletContainerInitializer {

    @Override
	public void onStartup(@Nullable Set<Class<?>> webAppInitializerClasses, ServletContext servletContext)
			throws ServletException {
		// 忽略其他代码
		.......
		for (WebApplicationInitializer initializer : initializers) {
			initializer.onStartup(servletContext);
		}
	}
}
其中可以看到SpringServletContainerInitializer标注了@HandlesTypes注解,它的目的是,在容器中扫描到所有属于WebApplicationInitializer类型的类,放到数组中,并且传递给onStartup的第一个参数webAppInitializerClasses
1.3 WebApplicationInitializer
上面说到SpringServletContainerInitializer#onStartup方法第一个参数是WebApplicationInitializer类型数组,SpringServletContainerInitializer配置容器的任务就是委托给它们进行处理,调用WebApplicationInitializer#onStartup方法,SpringMvc提供了一个实现该接口方法的抽象类AbstractAnnotationConfigDispatcherServletInitializer,它的类关系图如下
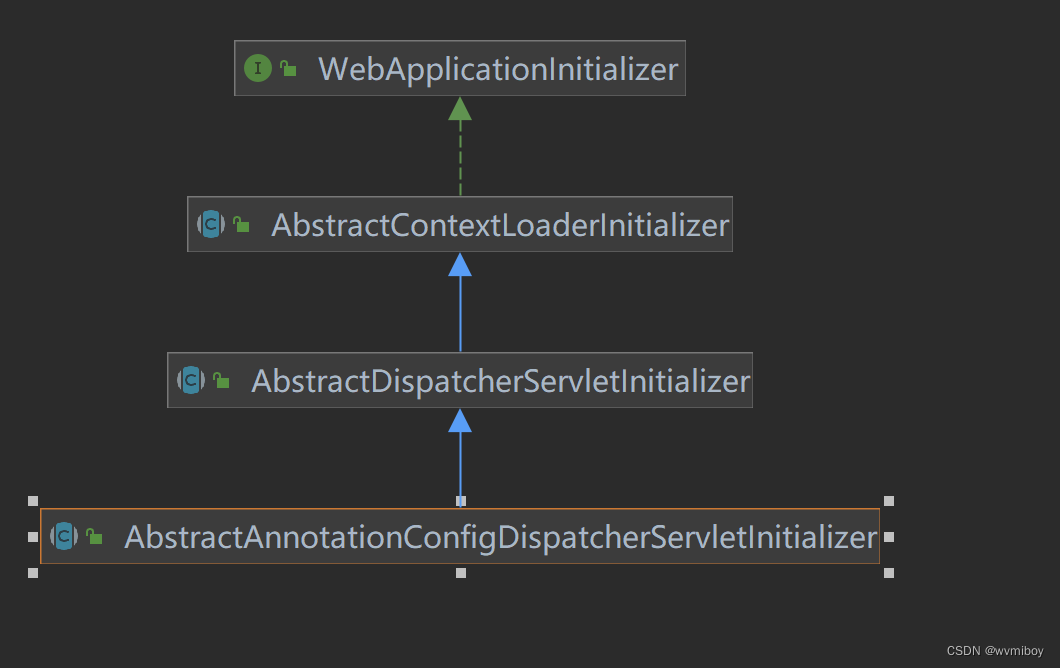
它的父类AbstractDispatcherServletInitializer 实现了onStartup方法
public abstract class AbstractDispatcherServletInitializer extends AbstractContextLoaderInitializer {
	.......

	public void onStartup(ServletContext servletContext) throws ServletException {
		// 调用父类方法,主要创建父容器
        super.onStartup(servletContext);
        //创建SpringMvc容器,创建DispatcherServlet
        this.registerDispatcherServlet(servletContext);
    }
   .......
}
2 Web父容器
创建Web父容器时调用了父类AbstractContextLoaderInitializer #onStartup方法,做了2件事情
1.创建父容器
2.注册ContextLoaderListener到Servlet容器中
2.1 创建Web父容器
除非配置了父类配置类,不然不会创建父容器,这里只做介绍,不深究
public abstract class AbstractContextLoaderInitializer implements WebApplicationInitializer {
	@Override
	public void onStartup(ServletContext servletContext) throws ServletException {
		registerContextLoaderListener(servletContext);
	}

	protected void registerContextLoaderListener(ServletContext servletContext) {
		// 如果配置了父容器的配置类,创建父容器,默认为null
		WebApplicationContext rootAppContext = createRootApplicationContext();
		if (rootAppContext != null) {
			// 创建ContextLoaderListener
			ContextLoaderListener listener = new ContextLoaderListener(rootAppContext);
			listener.setContextInitializers(getRootApplicationContextInitializers());
			// 添加监听器到Servlet中
			servletContext.addListener(listener);
		}
		else {
			logger.debug("No ContextLoaderListener registered, as " +
					"createRootApplicationContext() did not return an application context");
		}
	}
}
createRootApplicationContext方法主要是创建父容器,默认为null,不会创建,方法的实现在AbstractAnnotationConfigDispatcherServletInitializer#createRootApplicationContext
public abstract class AbstractAnnotationConfigDispatcherServletInitializer
		extends AbstractDispatcherServletInitializer {
@Override
	@Nullable
	protected WebApplicationContext createRootApplicationContext() {
		// 获取父容器的配置类
		Class<?>[] configClasses = getRootConfigClasses();
		if (!ObjectUtils.isEmpty(configClasses)) {
			// 创建父容器
			AnnotationConfigWebApplicationContext context = new AnnotationConfigWebApplicationContext();
			// 注册配置类
			context.register(configClasses);
			return context;
		}
		else {
			return null;
		}
	}
}
3.SpringMvc容器
在AbstractDispatcherServletInitializer#registerDispatcherServlet方法中,主要做了4件事情
- 创建SpringMvc容器
- 创建DispatcherServlet
- 将DispatcherServlet 添加到Servlet容器中
- 给Servlet注册过滤器
	protected void registerDispatcherServlet(ServletContext servletContext) {
		String servletName = getServletName();
		Assert.hasLength(servletName, "getServletName() must not return null or empty");

		// 创建SpringMvc容器
		WebApplicationContext servletAppContext = createServletApplicationContext();
		Assert.notNull(servletAppContext, "createServletApplicationContext() must not return null");

		// 创建DispatcherServlet
		FrameworkServlet dispatcherServlet = createDispatcherServlet(servletAppContext);
		Assert.notNull(dispatcherServlet, "createDispatcherServlet(WebApplicationContext) must not return null");
		dispatcherServlet.setContextInitializers(getServletApplicationContextInitializers());

		// 将DispatcherServlet 添加到Servlet容器中
		ServletRegistration.Dynamic registration = servletContext.addServlet(servletName, dispatcherServlet);
		if (registration == null) {
			throw new IllegalStateException("Failed to register servlet with name '" + servletName + "'. " +
					"Check if there is another servlet registered under the same name.");
		}

		// 启动立马加载
		registration.setLoadOnStartup(1);
		// 映射
		registration.addMapping(getServletMappings());
		registration.setAsyncSupported(isAsyncSupported());

		// 获取过滤器
		Filter[] filters = getServletFilters();
		if (!ObjectUtils.isEmpty(filters)) {
			for (Filter filter : filters) {
				// 给Servlet注册过滤器
				registerServletFilter(servletContext, filter);
			}
		}

		// 自定义扩展Servlet容器
		customizeRegistration(registration);
	}
3.1 创建SpringMvc容器
createServletApplicationContext方法仅仅是创建SpringMvc容器,并没有刷新启动该容器,启动过程后面再介绍,方法的实现在AbstractAnnotationConfigDispatcherServletInitializer
	protected WebApplicationContext createServletApplicationContext() {
		AnnotationConfigWebApplicationContext context = new AnnotationConfigWebApplicationContext();
		// 获取Sevlet配置类,这个配置类实现WebMvcConfigurer接口,主要配置视图解析器,拦截器等
		Class<?>[] configClasses = getServletConfigClasses();
		if (!ObjectUtils.isEmpty(configClasses)) {
			context.register(configClasses);
		}
		return context;
	}
3.2 创建DispatcherServlet
createDispatcherServlet这个方法很简单,里面就是new了一个DispatcherServlet对象
3.3 将DispatcherServlet 添加到Servlet容器中
将DispatcherServlet 添加到Servlet容器中,后续由它处理各种请求,getServletMappings是一个抽象方法,可以配置它处理的映射路径
3.4 给Servlet容器设置过滤器
设置过滤器时,可以重写getServletFilters方法
以上完成了容器的创建,接下来是启动容器
4.初始化DispatcherServlet
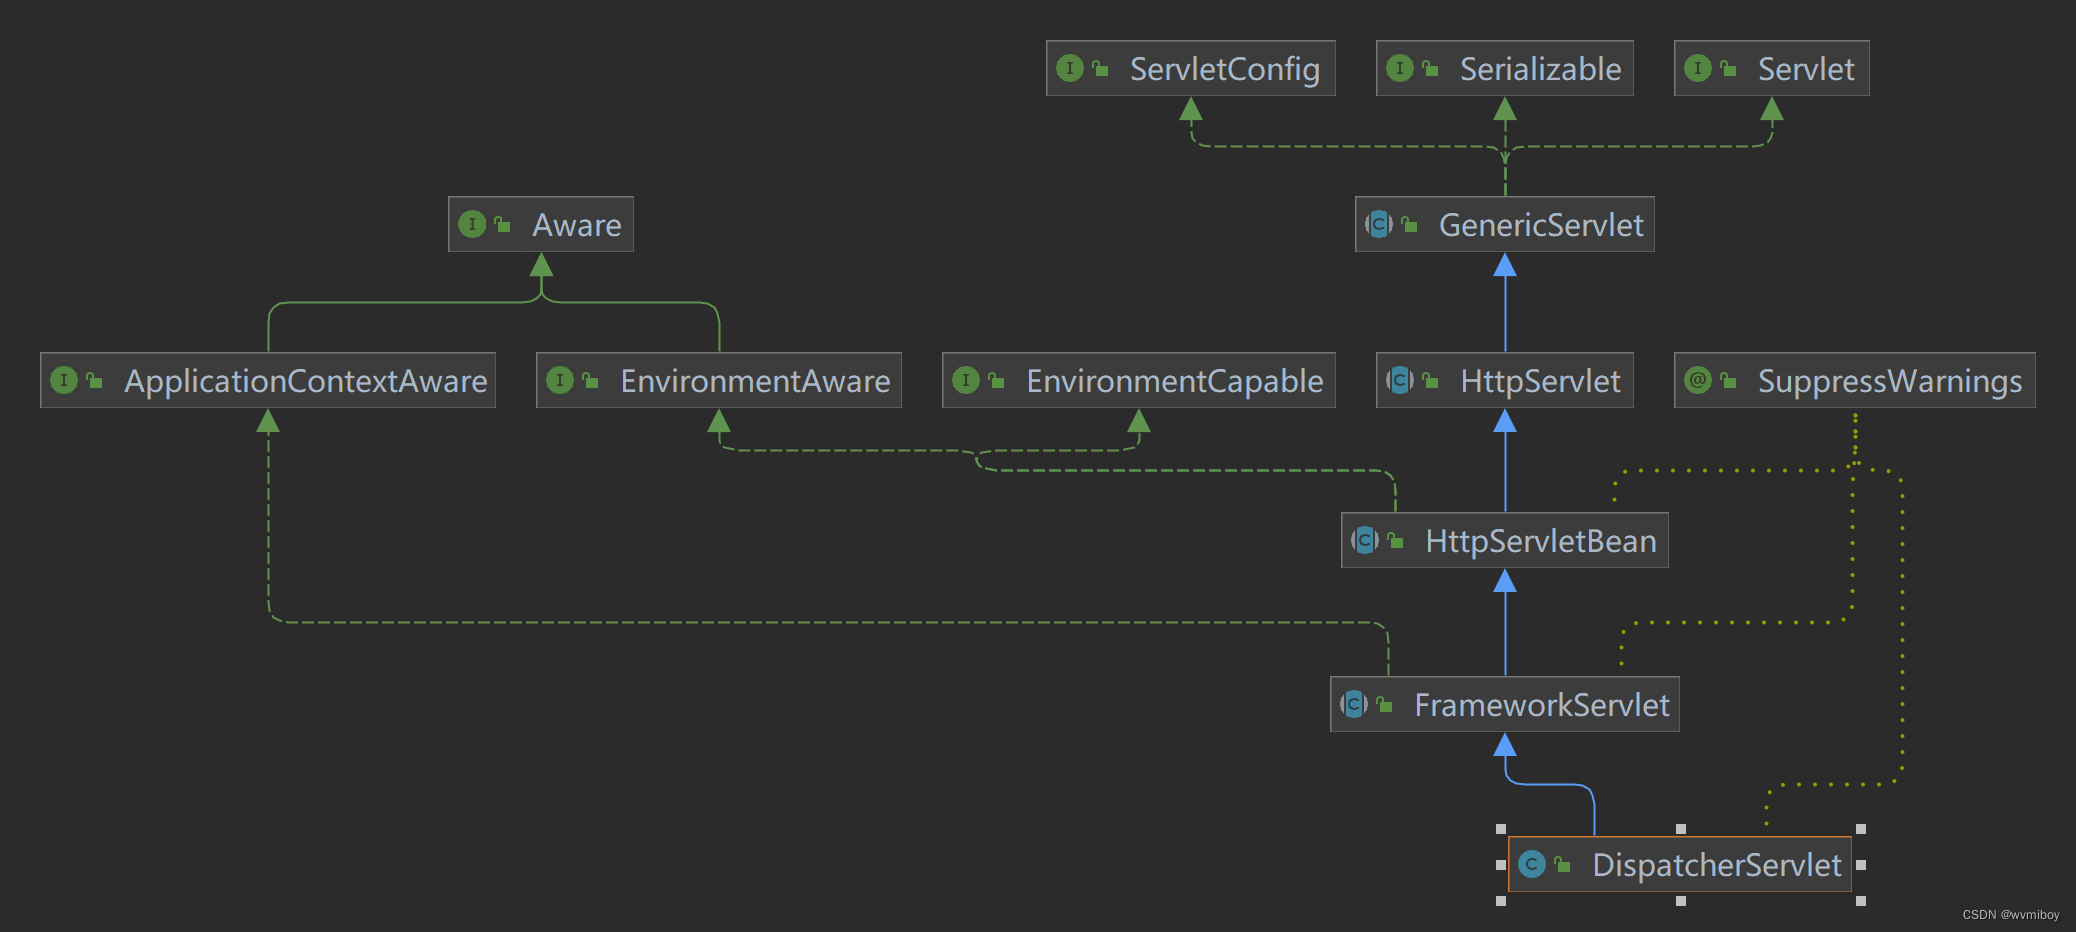
tomcat会自动调用DispatcherServlet#init方法进行初始化操作,具体的实现在HttpServletBean#init方法中,里面又调用initServletBean方法,实现在FrameworkServlet类中,重点关注FrameworkServlet#initWebApplicationContext方法,它的类关系图如下:
FrameworkServlet#initWebApplicationContext方法,里面重点关注configureAndRefreshWebApplicationContext方法
	protected WebApplicationContext initWebApplicationContext() {
		// 获取父容器
		WebApplicationContext rootContext =
				WebApplicationContextUtils.getWebApplicationContext(getServletContext());
		WebApplicationContext wac = null;

		// 此时的SprinMvc容器已经创建,所以不为null
		if (this.webApplicationContext != null) {
			// A context instance was injected at construction time -> use it
			wac = this.webApplicationContext;
			if (wac instanceof ConfigurableWebApplicationContext) {
				ConfigurableWebApplicationContext cwac = (ConfigurableWebApplicationContext) wac;
				// 容器未启动
				if (!cwac.isActive()) {
					// The context has not yet been refreshed -> provide services such as
					// setting the parent context, setting the application context id, etc
					if (cwac.getParent() == null) {
						// The context instance was injected without an explicit parent -> set
						// the root application context (if any; may be null) as the parent
						cwac.setParent(rootContext);
					}
					// 配置且刷新启动web容器
					configureAndRefreshWebApplicationContext(cwac);
				}
			}
		}
		// 忽略其他代码
		return wac;
	}
4.1 配置且刷新启动SprinMvc容器
configureAndRefreshWebApplicationContext方法以下事情
- 对SprinMvc容器进行配置
- 刷新启动容器
	protected void configureAndRefreshWebApplicationContext(ConfigurableWebApplicationContext wac) {

		// 设置Serlvet上下文
		wac.setServletContext(getServletContext());
		// 设置Servlet配置
		wac.setServletConfig(getServletConfig());
		wac.setNamespace(getNamespace());
		// web容器添加ContextRefreshListener监听器,监听ContextRefreshedEvent事件,执行DispatcherSevlet#onRefresh方法
		wac.addApplicationListener(new SourceFilteringListener(wac, new ContextRefreshListener()));

		// 对web容器的扩展,留给子类扩展
		postProcessWebApplicationContext(wac);
		// 应用初始化器,也是对容器的一个扩展
		applyInitializers(wac);
		// 刷新启动容器
		wac.refresh();
	}
上面注册了一个SourceFilteringListener监听器,这个接口是一个适配器,最后委托给ContextRefreshListener#onApplicationEvent方法处理监听事件,下面再讲
refresh()方法刷新容器,重点关注的是它发布了ContextRefreshedEvent事件,ContextRefreshListener正是监听处理该事件
		// Publish the final event.
		// 发布上下文Refreshed完成事件
		publishEvent(new ContextRefreshedEvent(this));
4.2 初始化DispatcherServlet的默认配置,如视图解析器等
这个的初始化操作就是在上面提到的监听ContextRefreshedEvent事件完成,具体实现在ContextRefreshListener#onApplicationEvent方法,如下
// ContextRefreshListener是FrameworkServlet内部类
private class ContextRefreshListener implements ApplicationListener<ContextRefreshedEvent> {

		@Override
		public void onApplicationEvent(ContextRefreshedEvent event) {
			FrameworkServlet.this.onApplicationEvent(event);
		}
	}
public void onApplicationEvent(ContextRefreshedEvent event) {
		this.refreshEventReceived = true;
		synchronized (this.onRefreshMonitor) {
			// 实际调用DispatcherServlet#onRefresh
			onRefresh(event.getApplicationContext());
		}
	}
DispatcherServlet#onRefresh
	protected void onRefresh(ApplicationContext context) {
		initStrategies(context);
	}

	protected void initStrategies(ApplicationContext context) {
		initMultipartResolver(context);
		initLocaleResolver(context);
		initThemeResolver(context);
		initHandlerMappings(context);
		initHandlerAdapters(context);
		initHandlerExceptionResolvers(context);
		initRequestToViewNameTranslator(context);
		initViewResolvers(context);
		initFlashMapManager(context);
	}
以上这些处理器,解析器都是通过@EnableMvcConfig 注入到容器中的,这里只是从容器中获取并赋值给DispatcherServlet相关属性
@EnableMvcConfig开启springmvc注解方式配置,它会委托DelegatingWebMvcConfiguration扫描到容器中所有实现WebMvcConfigurer接口的bean,而我们注入各种处理器和解析器也可以通过实现WebMvcConfigurer接口注入相关的处理器和解析器
在初始化的过程中先是从容器中获取,如果容器中没有,有些配置有兜底方案,比如initHandlerMappings方法
private void initHandlerMappings(ApplicationContext context) {
		this.handlerMappings = null;
		// 默认为true
		if (this.detectAllHandlerMappings) {
			// 在容器中找HandlerMapping类型的bean
			Map<String, HandlerMapping> matchingBeans =
					BeanFactoryUtils.beansOfTypeIncludingAncestors(context, HandlerMapping.class, true, false);

		}
		// 或略其他代码

		// 容器中没有,兜底方案
		if (this.handlerMappings == null) {
			// 加载DispatcherServlet.properties 文件中定义的相关实现类
			this.handlerMappings = getDefaultStrategies(context, HandlerMapping.class);
			if (logger.isTraceEnabled()) {
				logger.trace("No HandlerMappings declared for servlet '" + getServletName() +
						"': using default strategies from DispatcherServlet.properties");
			}
		}
	}
getDefaultStrategies 方法在类路径相同包名资源下的DispatcherServlet.properties文件中找默认的实现类,key为接口的全类名,value为相关实现类数组,如spring-webmvc中定义
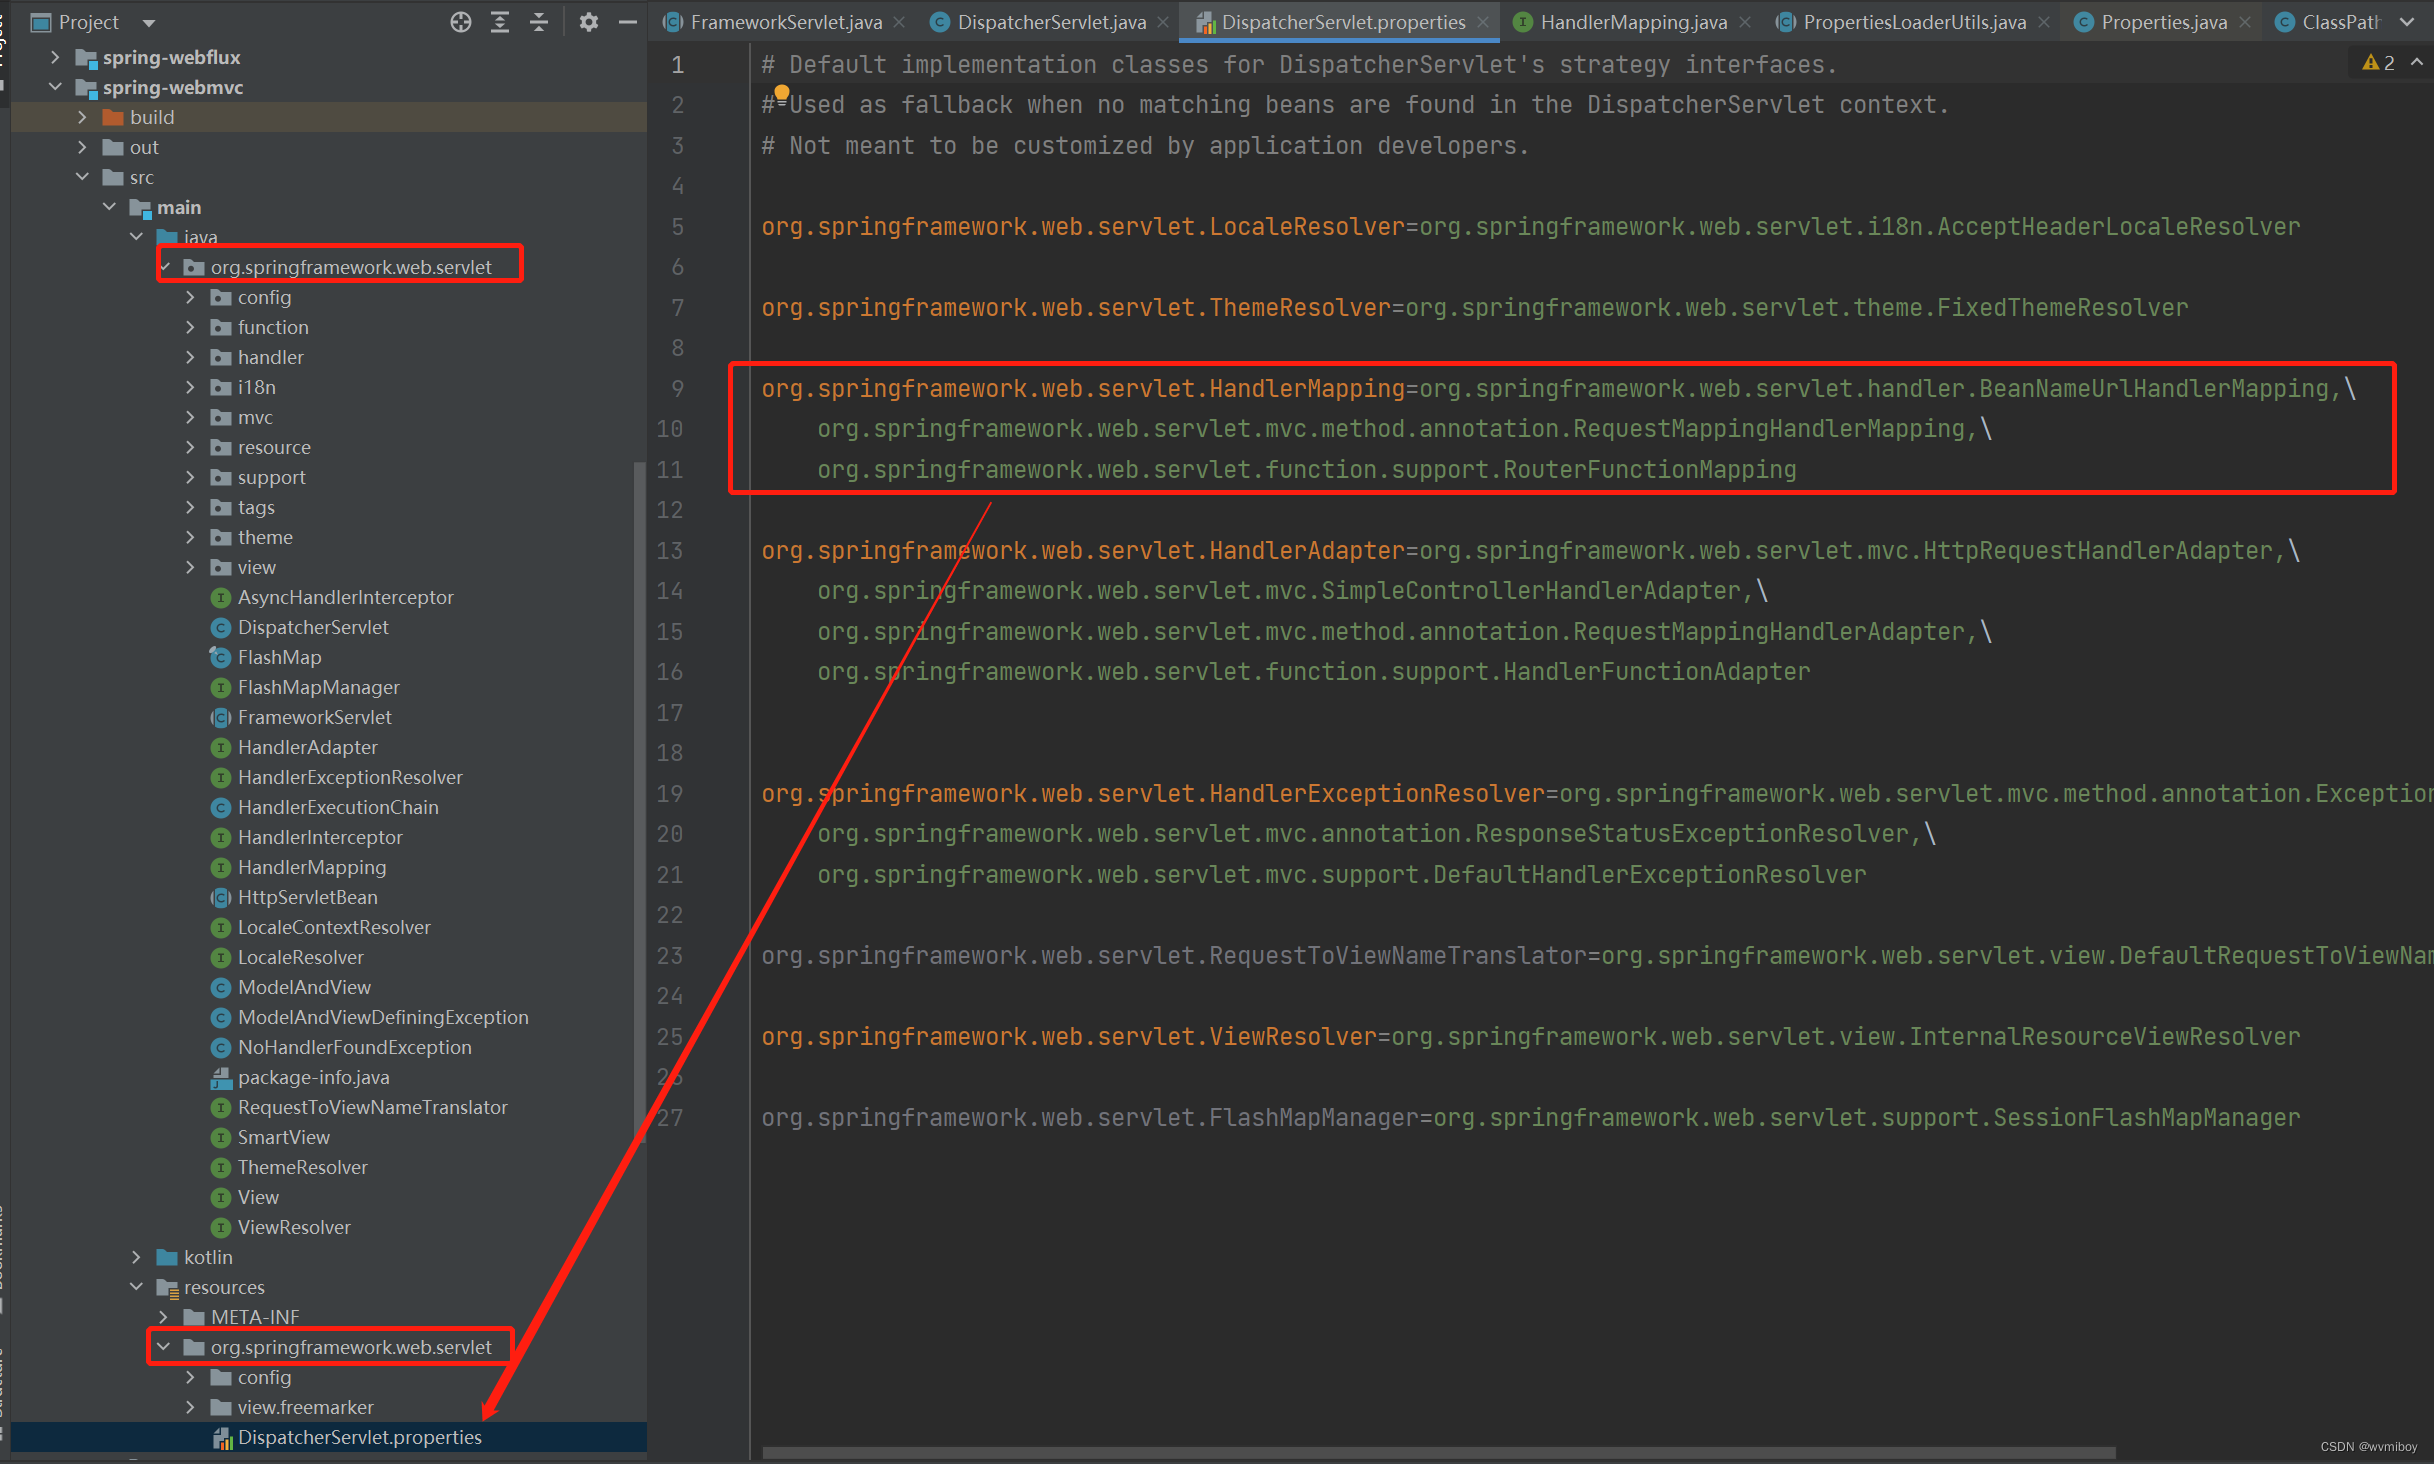
以上就是SpringMvc注解启动的大体流程,如有不对的地方,欢迎留言指正


 512
512


 被折叠的 条评论
为什么被折叠?
被折叠的 条评论
为什么被折叠?
 到【灌水乐园】发言


