RecyclerView 使用步骤

一,引入RecyclerView包

1. AndroidStudio

确保 Android support 包更新到最新版本 
这里写图片描述 
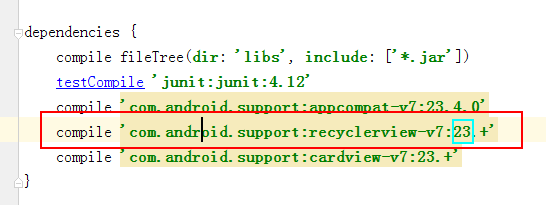
在model的build.gradle中添加依赖, 23表示当前使用的编译android版本 
这里写图片描述 
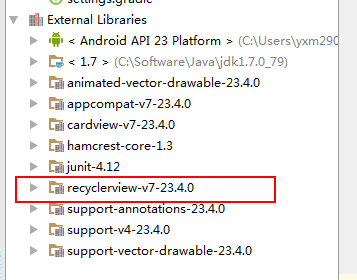
然后sync procjet, 就可以在project视图下看到包已经导入 
这里写图片描述

二 使用RecyclerView先实现ListView效果

MainActivity.Java

public class MainActivity extends AppCompatActivity {

    private static final String TAG = "MainActivity";
    private RecyclerView mRecyclerView;
    private MyAdapter mMyAdapter;

    @Override
    protected void onCreate(Bundle savedInstanceState) {
        super.onCreate(savedInstanceState);
        setContentView(R.layout.activity_main);

        mRecyclerView = (RecyclerView) findViewById(R.id.rv_main);
        mRecyclerView.setLayoutManager(new LinearLayoutManager(this));
        mMyAdapter = new MyAdapter(MainActivity.this, initData());
        mRecyclerView.setAdapter(mMyAdapter);
    }

    private List<String> initData() {
        List<String> datas = new ArrayList<String>();
        for (int i = 0; i <= 100; i++) {
            datas.add("item:" + i);
        }
        return datas;
    }
}
    
    
  • 1
  • 2
  • 3
  • 4
  • 5
  • 6
  • 7
  • 8
  • 9
  • 10
  • 11
  • 12
  • 13
  • 14
  • 15
  • 16
  • 17
  • 18
  • 19
  • 20
  • 21
  • 22
  • 23
  • 24
  • 25
  • 1
  • 2
  • 3
  • 4
  • 5
  • 6
  • 7
  • 8
  • 9
  • 10
  • 11
  • 12
  • 13
  • 14
  • 15
  • 16
  • 17
  • 18
  • 19
  • 20
  • 21
  • 22
  • 23
  • 24
  • 25

MyAdapter.java

public class MyAdapter extends RecyclerView.Adapter<MyAdapter.MyViewHolder> {

    private static final String TAG = "MyAdapter";
    private List<String> datas;
    private LayoutInflater inflater;

    public MyAdapter(Context context, List<String> datas) {
        this.datas = datas;
        inflater = LayoutInflater.from(context);
    }

    public class MyViewHolder extends RecyclerView.ViewHolder {
        private TextView title;

        public MyViewHolder(View itemView) {
            super(itemView);
            title = (TextView) itemView.findViewById(R.id.rv_main_item_title);
        }
    }

    @Override
    public MyViewHolder onCreateViewHolder(ViewGroup parent, int viewType) {
        Log.e(TAG, "create a new item");
        MyViewHolder holder = new MyViewHolder(inflater.inflate(R.layout.rv_main_item, parent, false));
        return holder;
    }

    @Override
    public void onBindViewHolder(MyViewHolder holder, int position) {
        Log.e(TAG, "set value to item:" + position);
        holder.title.setText(datas.get(position));
    }

    @Override
    public int getItemCount() {
        return datas.size();
    }
}
    
    
  • 1
  • 2
  • 3
  • 4
  • 5
  • 6
  • 7
  • 8
  • 9
  • 10
  • 11
  • 12
  • 13
  • 14
  • 15
  • 16
  • 17
  • 18
  • 19
  • 20
  • 21
  • 22
  • 23
  • 24
  • 25
  • 26
  • 27
  • 28
  • 29
  • 30
  • 31
  • 32
  • 33
  • 34
  • 35
  • 36
  • 37
  • 38
  • 1
  • 2
  • 3
  • 4
  • 5
  • 6
  • 7
  • 8
  • 9
  • 10
  • 11
  • 12
  • 13
  • 14
  • 15
  • 16
  • 17
  • 18
  • 19
  • 20
  • 21
  • 22
  • 23
  • 24
  • 25
  • 26
  • 27
  • 28
  • 29
  • 30
  • 31
  • 32
  • 33
  • 34
  • 35
  • 36
  • 37
  • 38

activity_main.xml

<?xml version="1.0" encoding="utf-8"?>
<RelativeLayout xmlns:android="http://schemas.android.com/apk/res/android"
    xmlns:tools="http://schemas.android.com/tools"
    android:layout_width="match_parent"
    android:layout_height="match_parent"
    tools:context="org.xm.recyclerviewsimple.MainActivity">

    <android.support.v7.widget.RecyclerView
        android:id="@+id/rv_main"
        android:layout_width="match_parent"
        android:layout_height="match_parent">

    </android.support.v7.widget.RecyclerView>

</RelativeLayout>
    
    
  • 1
  • 2
  • 3
  • 4
  • 5
  • 6
  • 7
  • 8
  • 9
  • 10
  • 11
  • 12
  • 13
  • 14
  • 15
  • 1
  • 2
  • 3
  • 4
  • 5
  • 6
  • 7
  • 8
  • 9
  • 10
  • 11
  • 12
  • 13
  • 14
  • 15

rv_main_item.xml

<?xml version="1.0" encoding="utf-8"?>
<RelativeLayout xmlns:android="http://schemas.android.com/apk/res/android"
    android:layout_width="match_parent"
    android:layout_height="wrap_content"
    android:orientation="vertical">

    <TextView
        android:id="@+id/rv_main_item_title"
        android:layout_width="match_parent"
        android:layout_height="50dp"
        android:gravity="center"
        android:text="T.T"
        android:textSize="20sp" />

</RelativeLayout>
这里图片就不上了

给每个item添加一条分解线:

1. 不需要添加分割线, 通过背景设置显示间隔

为每个item添加背景白色,并且设置间隔1dp 
rv_main_item.xml

<RelativeLayout xmlns:android="http://schemas.android.com/apk/res/android"
    android:layout_width="match_parent"
    android:layout_height="wrap_content"
    android:background="#ffffff"
    android:layout_marginBottom="1dp"
    android:orientation="vertical">

    ...

</RelativeLayout>
    
    
  • 1
  • 2
  • 3
  • 4
  • 5
  • 6
  • 7
  • 8
  • 9
  • 10
  • 1
  • 2
  • 3
  • 4
  • 5
  • 6
  • 7
  • 8
  • 9
  • 10

再给RecyclerView添加黑色背景 
activity_main.xml

    <android.support.v7.widget.RecyclerView
        android:id="@+id/rv_main"
        android:background="#000000"
        android:layout_width="match_parent"
        android:layout_height="match_parent">

    </android.support.v7.widget.RecyclerView>
    
    
  • 1
  • 2
  • 3
  • 4
  • 5
  • 6
  • 7
  • 1
  • 2
  • 3
  • 4
  • 5
  • 6
  • 7


2. 自定义分割线

自定义drawable文件 
rm_main_item_divicer.xml

<?xml version="1.0" encoding="utf-8"?>
<shape xmlns:android="http://schemas.android.com/apk/res/android"
    android:shape="rectangle">
    <gradient
        android:centerColor="#ff00ff00"
        android:endColor="#ff0000ff"
        android:startColor="#ffff0000"
        android:type="linear" />
    <size android:height="1dp"/>
</shape>
    
    
  • 1
  • 2
  • 3
  • 4
  • 5
  • 6
  • 7
  • 8
  • 9
  • 10
  • 1
  • 2
  • 3
  • 4
  • 5
  • 6
  • 7
  • 8
  • 9
  • 10

自定义分割线

class MyItemDivider extends RecyclerView.ItemDecoration {
    private Drawable mDrawable;

    public MyItemDivider(Context context, int resId) {
        mDrawable = context.getResources().getDrawable(resId);
    }

    @Override
    public void onDrawOver(Canvas c, RecyclerView parent, RecyclerView.State state) {
        int left = parent.getPaddingLeft();
        int right = parent.getWidth() - parent.getPaddingRight();
        int childCount = parent.getChildCount();
        for (int i = 0; i < childCount; i++) {
            View child = parent.getChildAt(i);
            RecyclerView.LayoutParams params = (RecyclerView.LayoutParams) child.getLayoutParams();
            int top = child.getBottom() + params.bottomMargin;
            int bottom = top + mDrawable.getIntrinsicHeight();
            mDrawable.setBounds(left, top, right, bottom);
            mDrawable.draw(c);
        }
    }

    @Override
    public void getItemOffsets(Rect outRect, View view, RecyclerView parent, RecyclerView.State state) {
        outRect.set(0, 0, 0, mDrawable.getIntrinsicWidth());
    }
}


  • 1
  • 2
  • 3
  • 4
  • 5
  • 6
  • 7
  • 8
  • 9
  • 10
  • 11
  • 12
  • 13
  • 14
  • 15
  • 16
  • 17
  • 18
  • 19
  • 20
  • 21
  • 22
  • 23
  • 24
  • 25
  • 26
  • 27
  • 28
  • 1
  • 2
  • 3
  • 4
  • 5
  • 6
  • 7
  • 8
  • 9
  • 10
  • 11
  • 12
  • 13
  • 14
  • 15
  • 16
  • 17
  • 18
  • 19
  • 20
  • 21
  • 22
  • 23
  • 24
  • 25
  • 26
  • 27
  • 28

然后添加到RecyclerView中: 
mRecyclerView.addItemDecoration(new MyItemDivider(this,R.drawable.rv_main_item_divider));


修改布局管理器

上面的代码布局管理器使用的是LinerlayoutManager, 如果这个时候我们将布局管理器修改为 GridLayoutManager 会是什么效果呢?

// mRecyclerView.setLayoutManager(new LinearLayoutManager(this));
mRecyclerView.setLayoutManager(new GridLayoutManager(this,3));

确实很屌, 就一行代码,就改成了gridview. 注意刚刚写得分割线, 如果修改为 grideview之后是不能用的,所以这里我使用的是 利用背景添加分割线的方式, 很简单了, 只需要同时添加 margin_bottom 和 margin_right 以及修改背景颜色即可.

<RelativeLayout xmlns:android="http://schemas.android.com/apk/res/android"
    android:layout_width="match_parent"
    android:layout_height="wrap_content"
    android:layout_marginRight="1px"
    android:layout_marginTop="1px"
    android:background="#ffffff"
    android:orientation="vertical">

    ...

</RelativeLayout>
   
   
  • 1
  • 2
  • 3
  • 4
  • 5
  • 6
  • 7
  • 8
  • 9
  • 10
  • 11
  • 1
  • 2
  • 3
  • 4
  • 5
  • 6
  • 7
  • 8
  • 9
  • 10
  • 11

如果使用 StaggeredGridLayoutManager, 可以很容易实现瀑布流布局

// mRecyclerView.setLayoutManager(new LinearLayoutManager(this));
// mRecyclerView.setLayoutManager(new GridLayoutManager(this,3));
mRecyclerView.setLayoutManager(new StaggeredGridLayoutManager(4, StaggeredGridLayoutManager.VERTICAL));

实现方法简单, 在onBindViewHolder中使用随机数来产生iteam的高度:

@Override
public void onBindViewHolder(MyViewHolder holder, int position) {
    Log.e(TAG, "set value to item:" + position);
    holder.title.setText(datas.get(position));

    int height = Math.abs((new Random().nextInt()) % 300);
    if (height < 200) {
        height += 200;
    }
    holder.title.setHeight(height);
}
   
   
  • 1
  • 2
  • 3
  • 4
  • 5
  • 6
  • 7
  • 8
  • 9
  • 10
  • 11
  • 1
  • 2
  • 3
  • 4
  • 5
  • 6
  • 7
  • 8
  • 9
  • 10
  • 11

注意将原来的item配置layout文件修改一下宽高:

<?xml version="1.0" encoding="utf-8"?>
<RelativeLayout xmlns:android="http://schemas.android.com/apk/res/android"
    android:layout_width="wrap_content"
    android:layout_height="wrap_content"
    android:layout_marginRight="1px"
    android:layout_marginTop="1px"
    android:background="#ffffff"
    android:orientation="vertical">

    <TextView
        android:id="@+id/rv_main_item_title"
        android:layout_width="match_parent"
        android:layout_height="match_parent"
        android:gravity="center"
        android:text="T.T"
        android:textSize="20sp" />

</RelativeLayout>
   
   
  • 1
  • 2
  • 3
  • 4
  • 5
  • 6
  • 7
  • 8
  • 9
  • 10
  • 11
  • 12
  • 13
  • 14
  • 15
  • 16
  • 17
  • 18
  • 1
  • 2
  • 3
  • 4
  • 5
  • 6
  • 7
  • 8
  • 9
  • 10
  • 11
  • 12
  • 13
  • 14
  • 15
  • 16
  • 17
  • 18

添加点击事件和长按事件

首先在 MyAdapter中定义两个click事件接口, 以及setter:

public interface OnItemClickListener {
    public void onClick(View parent, int position);
}

public interface OnItemLongClickListener {
    public boolean onLongClick(View parent, int position);
}

public void setOnItemClickListener(OnItemClickListener l) {
    this.mOnItemClickListener = l;
}

public void setOnItemLongClickListener(OnItemLongClickListener l) {
    this.mOnItemLongClickListener = l;
}
   
   
  • 1
  • 2
  • 3
  • 4
  • 5
  • 6
  • 7
  • 8
  • 9
  • 10
  • 11
  • 12
  • 13
  • 14
  • 15
  • 1
  • 2
  • 3
  • 4
  • 5
  • 6
  • 7
  • 8
  • 9
  • 10
  • 11
  • 12
  • 13
  • 14
  • 15

在onBindViewHolder中设置事件响应:

@Override
public void onBindViewHolder(final MyViewHolder holder, final int position) {
    //...

    // 设置事件响应
    if (mOnItemClickListener != null) {
        holder.itemView.setOnClickListener(new View.OnClickListener() {
            @Override
            public void onClick(View view) {
                int pos = holder.getLayoutPosition();
                mOnItemClickListener.onClick(holder.itemView, pos);
            }
        });
    }
    if (mOnItemLongClickListener != null) {
        holder.itemView.setOnLongClickListener(new View.OnLongClickListener() {
            @Override
            public boolean onLongClick(View view) {
                int pos = holder.getLayoutPosition();
                mOnItemLongClickListener.onLongClick(holder.itemView, pos);
                return false;
            }
        });
    }
}
   
   
  • 1
  • 2
  • 3
  • 4
  • 5
  • 6
  • 7
  • 8
  • 9
  • 10
  • 11
  • 12
  • 13
  • 14
  • 15
  • 16
  • 17
  • 18
  • 19
  • 20
  • 21
  • 22
  • 23
  • 24
  • 25
  • 1
  • 2
  • 3
  • 4
  • 5
  • 6
  • 7
  • 8
  • 9
  • 10
  • 11
  • 12
  • 13
  • 14
  • 15
  • 16
  • 17
  • 18
  • 19
  • 20
  • 21
  • 22
  • 23
  • 24
  • 25

在MainActivity中添加事件:

mMyAdapter.setOnItemClickListener(new MyAdapter.OnItemClickListener() {
    @Override
    public void onClick(View parent, int position) {
        mMyAdapter.addData(position,"add item:"+position);
        mMyAdapter.notifyItemInserted(position);
    }
});
mMyAdapter.setOnItemLongClickListener(new MyAdapter.OnItemLongClickListener() {
    @Override
    public boolean onLongClick(View parent, int position) {
        mMyAdapter.removeData(position);
        mMyAdapter.notifyItemRemoved(position);
        return false;
    }
});
   
   
  • 1
  • 2
  • 3
  • 4
  • 5
  • 6
  • 7
  • 8
  • 9
  • 10
  • 11
  • 12
  • 13
  • 14
  • 15
  • 1
  • 2
  • 3
  • 4
  • 5
  • 6
  • 7
  • 8
  • 9
  • 10
  • 11
  • 12
  • 13
  • 14
  • 15

注意: 
这里点击事件的操作是再添加一个item, 长按事件是删除一个item. 我们还需要在MyAdapter中添加 addData(), 和removeData() 两个方法:

    public void addData(int position, String content){
        datas.add(position,content);
    }

    public void removeData(int position){
        datas.remove(position);
    }
   
   
  • 1
  • 2
  • 3
  • 4
  • 5
  • 6
  • 7
  • 1
  • 2
  • 3
  • 4
  • 5
  • 6
  • 7

然后配合自带的 notifyItemInserted(), 和notifyItemRemoved() 可以很轻松实现添加item和删除item炒作. 赶紧试试吧!

最后的最后, 再给每个item添加上press的selector, 增加用户体验: 
定义rv_main_item_selector.xml文件

<?xml version="1.0" encoding="utf-8"?>
<selector xmlns:android="http://schemas.android.com/apk/res/android">
    <item android:state_pressed="true" android:drawable="@color/colorPrimary" />
    <item android:drawable="@android:color/white" />
</selector>
   
   
  • 1
  • 2
  • 3
  • 4
  • 5
  • 1
  • 2
  • 3
  • 4
  • 5

将item的背景设置成selector: 
android:background="@drawable/rv_main_item_selector" 

以上都没有贴图 自己可以试下效果

  • 0
    点赞
  • 0
    收藏
    觉得还不错? 一键收藏
  • 0
    评论
评论
添加红包

请填写红包祝福语或标题

红包个数最小为10个

红包金额最低5元

当前余额3.43前往充值 >
需支付:10.00
成就一亿技术人!
领取后你会自动成为博主和红包主的粉丝 规则
hope_wisdom
发出的红包
实付
使用余额支付
点击重新获取
扫码支付
钱包余额 0

抵扣说明:

1.余额是钱包充值的虚拟货币,按照1:1的比例进行支付金额的抵扣。
2.余额无法直接购买下载,可以购买VIP、付费专栏及课程。

余额充值