


目录
方式三:使用DriverManger 替代 Diver 进行统一管理,便于应对需要连接多个数据库的场景。
方式四:使用Class.forName自动完成注册驱动,简化代码,这种方式使用最多,推荐使用
方式五:在方式四的基础上改进,增加配置文件,使连接数据库更灵活(最好的一种方式)
演示PreparedStatement的使用(预处理查询):
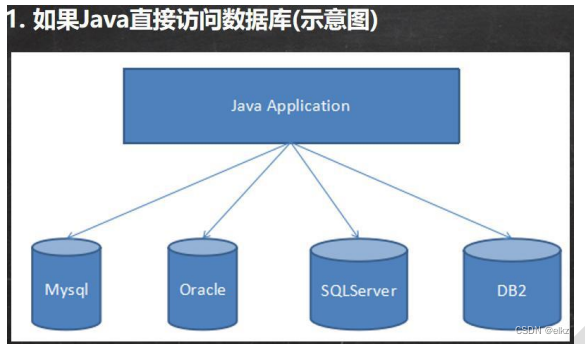
JDBC概述:
基本介绍:

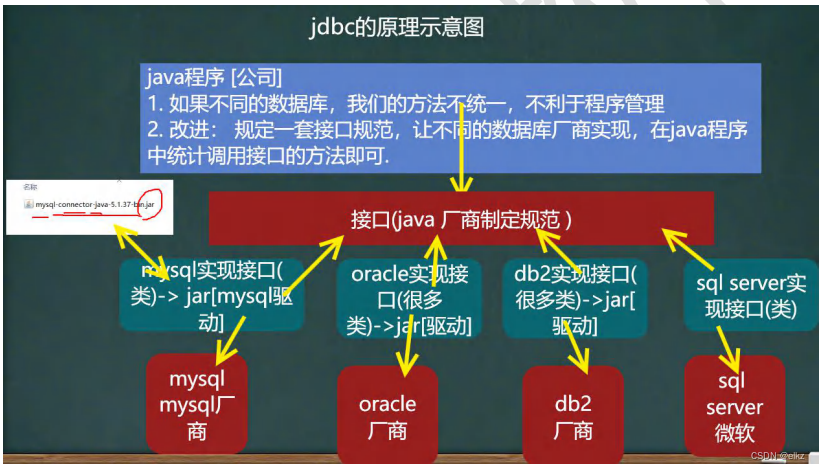
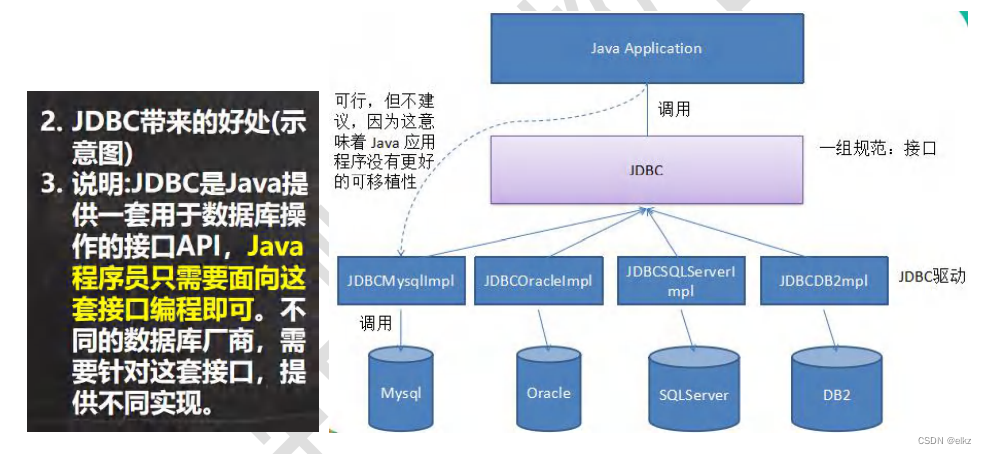
JDBC带来的好处:
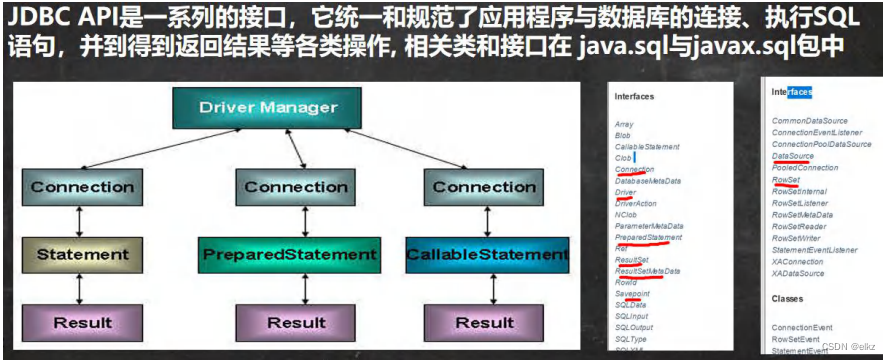
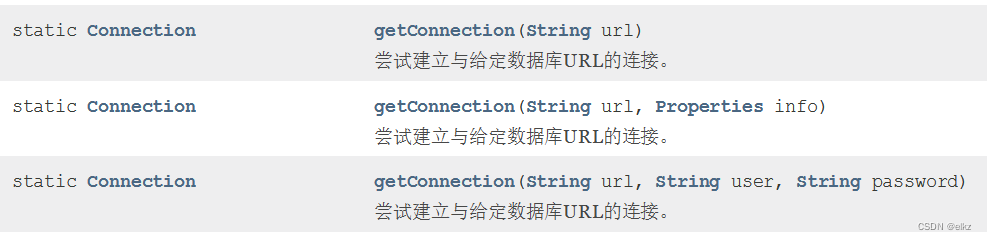
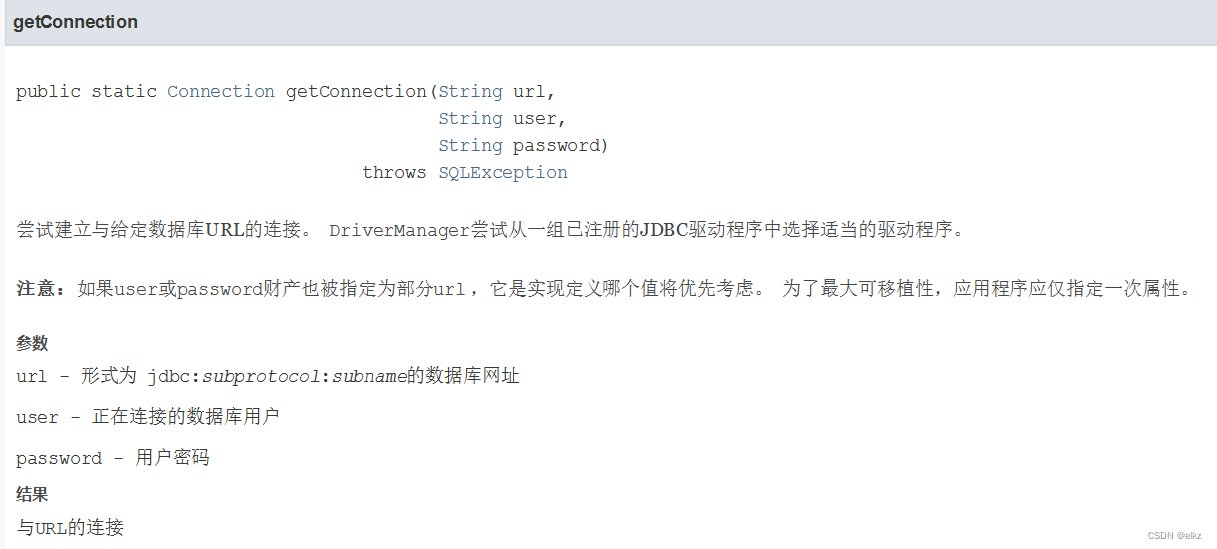
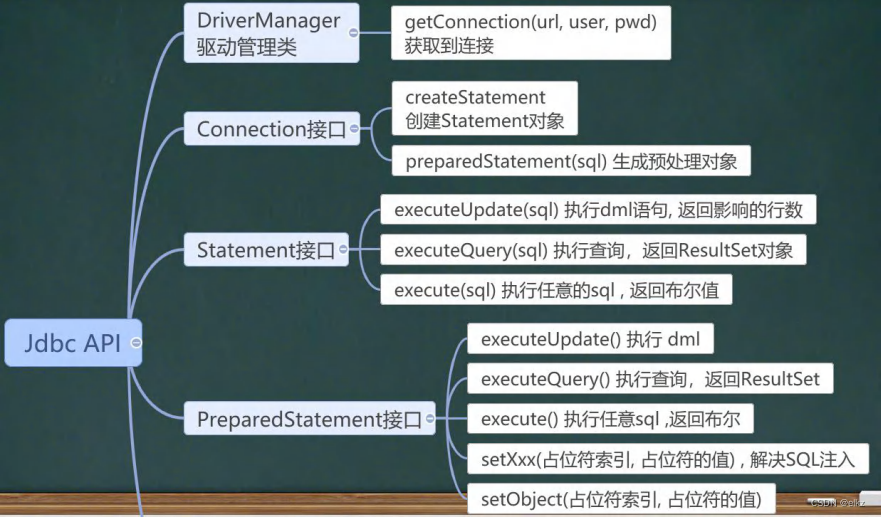
JDBC API :
JDBC 快速入门:

创建Driver对象:
![]()
url:
![]()
//第一个jdbc程序,完成简单的操作
public class jbbc01 {
public static void main(String[] args) throws SQLException {
/**
//前置工作,在项目下创建一个文件夹比如libs
//将mysql.jar拷贝到该目录下,点击add to project..加入到项目中
*/
//1.注册驱动
Driver driver = new Driver();
//2.得到连接
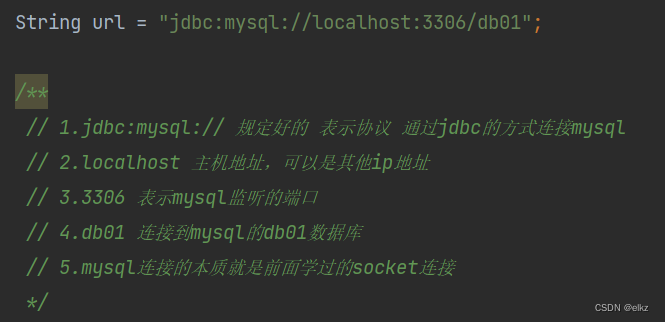
String url = "jdbc:mysql://localhost:3306/db01";
/**
// 1.jdbc:mysql:// 规定好的 表示协议 通过jdbc的方式连接mysql
// 2.localhost 主机地址,可以是其他ip地址
// 3.3306 表示mysql监听的端口
// 4.db01 连接到mysql的db01数据库
// 5.mysql连接的本质就是前面学过的socket连接
*/
//将用户名和密码放入到properties对象
//使用 Properties 类, 可以读写配置文件
Properties properties = new Properties();
//user 和 password是规定好的,不能乱改
properties.setProperty("user","root");//用户
properties.setProperty("password","zhx");//密码
Connection connect = driver.connect(url, properties);
//3.执行sql
String sql = "insert into dept values('50','kasldf','lskdfskl')";
Statement statement = connect.createStatement();//用于执行静态的sql语句,并返回其生成的结果的对象
int rows = statement.executeUpdate(sql); //如果是dml语句,返回的就是影响的行数,不成功返回0
//4.关闭连接资源
statement.close();
connect.close();
}
}driver:
Java SQL框架允许多个数据库驱动程序。
每个驱动程序都应该提供一个实现Driver接口的类。


获取数据库连接的五种方式:
方式一:
//方式一
    @Test
    public void connect01() throws SQLException {
        Driver driver = new Driver();

        String url = "jdbc:mysql://localhost:3306/db01";
        //将用户名和密码放入到properties对象 properties - 属性
        Properties properties = new Properties();
        //user 和 password是规定好的,不能乱改
        properties.setProperty("user", "root");//用户
        properties.setProperty("password", "zhx");//密码
        Connection connect = driver.connect(url, properties);
        System.out.println(connect);
    }
方式二:使用反射加载Driver类
//方式二
    @Test
    public void connect02() throws ClassNotFoundException, InstantiationException, IllegalAccessException, SQLException {
        //使用反射加载Driver类,动态加载,更加灵活,减少依赖性
        Class<?> aClass = Class.forName("com.mysql.jdbc.Driver");
        Driver driver = (Driver)aClass.newInstance();

        String url = "jdbc:mysql://localhost:3306/db01";
        //将用户名和密码放入到properties对象 properties - 属性
        Properties properties = new Properties();
        //user 和 password是规定好的,不能乱改
        properties.setProperty("user", "root");//用户
        properties.setProperty("password", "zhx");//密码
        Connection connect = driver.connect(url, properties);
        System.out.println(connect);
    }
方式三:使用DriverManger 替代 Diver 进行统一管理,便于应对需要连接多个数据库的场景。
得到连接 Connection对象//方式三 @Test public void connect03() throws ClassNotFoundException, InstantiationException, IllegalAccessException, SQLException { //使用DriverManger 替代 Diver 进行统一管理,可以不用创建properties类 Class<?> aClass = Class.forName("com.mysql.jdbc.Driver"); Driver driver = (Driver)aClass.newInstance(); //创建url和user和password String url = "jdbc:mysql://localhost:3306/db01"; String user = "root"; String password = "zhx"; DriverManager.registerDriver(driver);//注册Driver驱动 Connection connection = DriverManager.getConnection(url, user, password); System.out.println(connection); }
方式四:使用Class.forName自动完成注册驱动,简化代码,这种方式使用最多,推荐使用
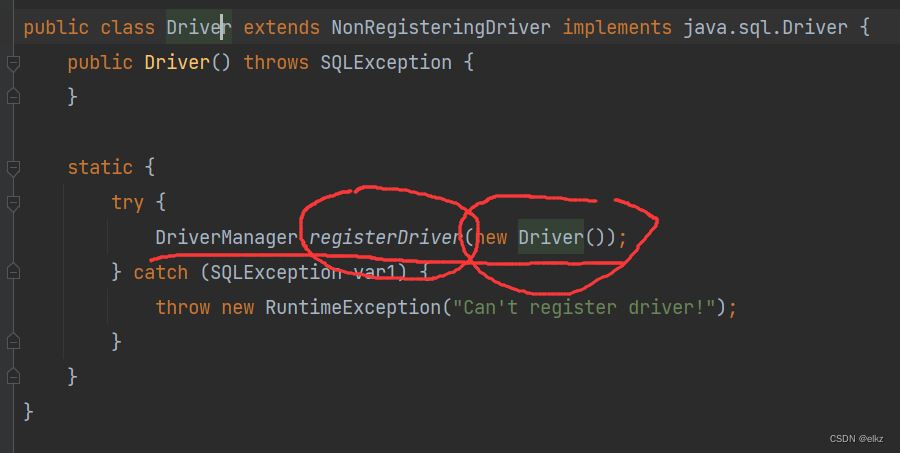
//方式四:使用class.forName 自动完成注册驱动,简化代码,不需要注册Driver驱动
    @Test
    public void connect04() throws ClassNotFoundException, SQLException {
        //使用反射加载了Driver类
        Class.forName("com.mysql.jdbc.Driver");

        //创建url和user和password
        String url = "jdbc:mysql://localhost:3306/db01";
        String user = "root";
        String password = "zhx";

        Connection connection = DriverManager.getConnection(url, user, password);
        System.out.println(connection);

    }
为什么可以这样写呢?我们来看一下Driver的底层源码:底层已经帮我们注册了java驱动

方式五:在方式四的基础上改进,增加配置文件,使连接数据库更灵活(最好的一种方式)
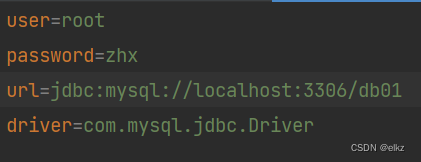
@Test
    public void connect05() throws IOException, ClassNotFoundException, SQLException {
        //通过properties对象获取配置文件的信息
        Properties properties = new Properties();
        properties.load(new FileInputStream("src\\mysql.properties"));
        //获取相关的值
        String user = properties.getProperty("user");
        String password = properties.getProperty("password");
        String url = properties.getProperty("url");
        String driver = properties.getProperty("driver");

        Class.forName(driver);
        Connection connection = DriverManager.getConnection(url, user, password);
        System.out.println(connection);
    }
配置文件:
properties对象加载API:


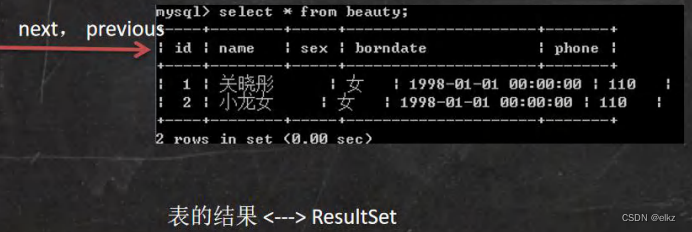
ResultSet [结果集]:
表示数据库结果集的数据表,通常通过执行查询数据库的语句生成。
ResultSet对象保持一个光标指向其当前的数据行。 最初,光标位于第一行之前。next方法将光标移动到下一行,并且由于在ResultSet对象中没有更多行时返回false,因此可以在while循环中使用循环来遍历结果集。
/**
* 演示Select语句返回 ResultSet,并取出结果
*/
public class ResultSet_ {
public static void main(String[] args) throws IOException, ClassNotFoundException, SQLException {
//加载配置文件
Properties properties = new Properties();
properties.load(new FileInputStream("src\\mysql.properties"));
//获取相关的值
String user = properties.getProperty("user");
String password = properties.getProperty("password");
String driver = properties.getProperty("driver");
String url = properties.getProperty("url");
//注册驱动
Class.forName(driver);
//得到连接
Connection connection = DriverManager.getConnection(url, user, password);
//得到Statement
Statement statement = connection.createStatement();
//组织Sql
String sql = "select deptno,dname,loc from dept";
//执行给定的sql语句,该语句返回单个 ResultSet对象
ResultSet resultSet = statement.executeQuery(sql);
//使用while取出数据
while(resultSet.next()){//让光标向后移动,如果没有更多行,则返回false
int deptno = resultSet.getInt(1);//获取该行的第一列数据
String dname = resultSet.getString(2);
String loc = resultSet.getString(3);
System.out.println(deptno+"\t"+dname+"\t"+loc);
}
//关闭连接
resultSet.close();
statement.close();
connection.close();
}
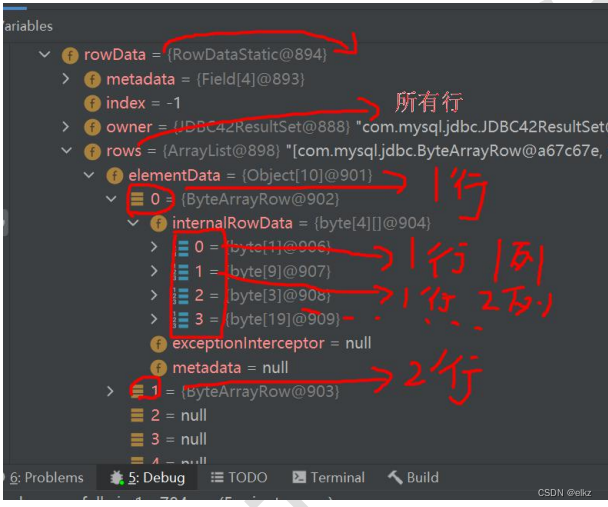
}debug代码 resultSet对象的结构:
Statement:
- 用于执行静态SQL语句并返回其生成的结果的对象。
- 默认情况下,每个
Statement对象只能有一个ResultSet对象同时打开。 因此,如果一个ResultSet对象的读取与另一个对象的读取交错,则ResultSet对象必须由不同的Statement对象生成。 在所有执行方法Statement接口隐式关闭当前ResultSet声明的对象。方法:
- executeQuery 可以执行查询语句
- executeUpdate不可以执行查询语句,只能执行增删改语句


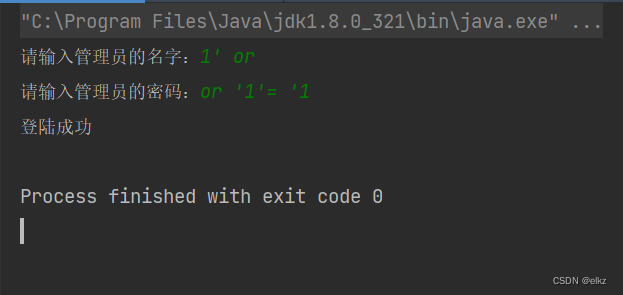
SQL注入:
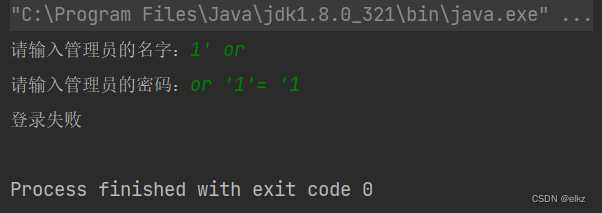
-- 演示 sql 注入
-- 创建一张表
CREATE TABLE admin ( -- 管理员表
	NAME VARCHAR(32) NOT NULL UNIQUE,
	pwd VARCHAR(32) NOT NULL DEFAULT '') CHARACTER SET utf8;

-- 添加数据
INSERT INTO admin VALUES('tom', '123');

-- 查找某个管理是否存在
SELECT *
	FROM admin
	WHERE NAME = 'tom' AND pwd = '123'

-- SQL注入
-- 输入用户名 为 1' or
-- 输入万能密码 为 or '1'= '1
SELECT *
	FROM admin
	WHERE NAME = '1' OR' AND pwd = 'OR '1'= '1'
	SELECT * FROM admin

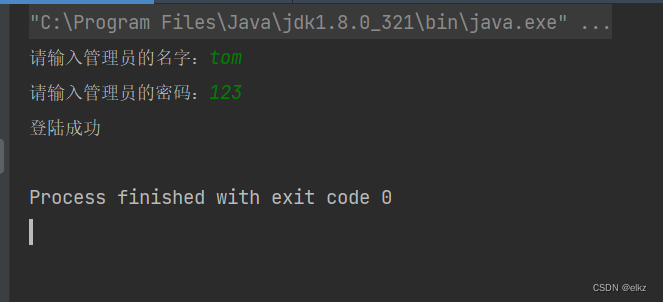
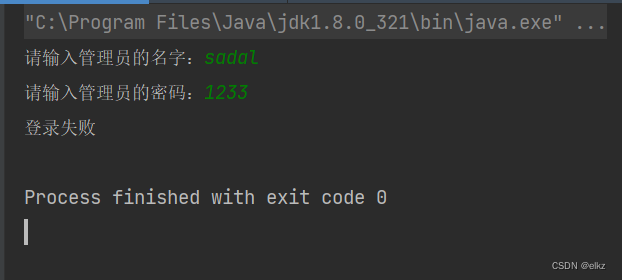
演示statement的注入问题:
/**
 * 演示Statement的注入问题
 */
public class Statement_ {
    public static void main(String[] args) throws IOException, ClassNotFoundException, SQLException {

        Scanner scanner = new Scanner(System.in);

        //让用户输入管理员名和密码
        System.out.print("请输入管理员的名字:");//next():当接受到空格或者 ' 就是表示结束
        String admin_name = scanner.nextLine(); //如果希望看到SQL注入这里需要用到nextLine,nextLine遇到回车才算结束
        System.out.print("请输入管理员的密码:");
        String admin_pwd = scanner.nextLine();

        //通过properties对象获取文件的信息
        Properties properties = new Properties();
        properties.load(new FileInputStream("src\\mysql.properties"));
        //获取相关的值
        String user = properties.getProperty("user");
        String password = properties.getProperty("password");
        String driver = properties.getProperty("driver");
        String url = properties.getProperty("url");

        //注册驱动
        Class.forName(driver);

        //得到连接
        Connection connection = DriverManager.getConnection(url, user, password);

        //得到Statement
        Statement statement = connection.createStatement();

        //组织Sql
        String sql = "select name , pwd from admin where name ='" + admin_name + "' and pwd = '" + admin_pwd + "'";


        ResultSet resultSet = statement.executeQuery(sql);
        if (resultSet.next()) {//如果查询到一条记录,则说明该管理存在
            System.out.println("登陆成功");
        }else{
            System.out.println("登录失败");
        }
        //关闭连接
        resultSet.close();
        statement.close();
        connection.close();
    }
}
这就很离谱了,按理说我们只有输入了正确的用户名和密码才能登录成功。这就出现了SQL注入问题。怎么解决呢?用预处理查询可以解决这个问题。
PreparedStatement(预处理查询):
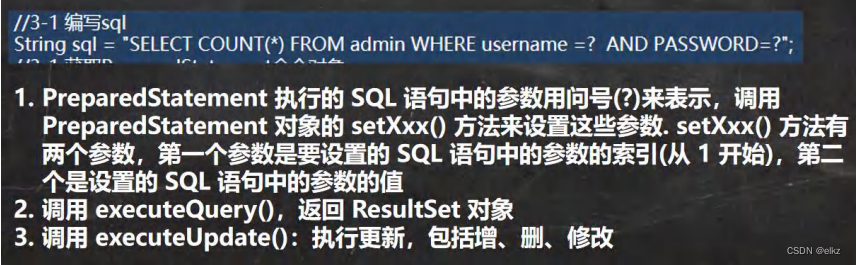
预处理的好处:

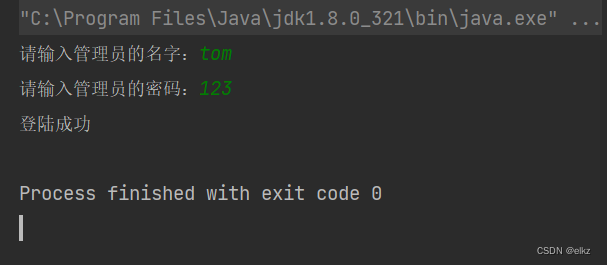
演示PreparedStatement的使用(预处理查询):
/**
 * 演示PreparedStatement的使用
 */
public class PreparedStatement_ {
    public static void main(String[] args) throws Exception {
        Scanner scanner = new Scanner(System.in);

        //让用户输入管理员名和密码
        System.out.print("请输入管理员的名字:");//next():当接受到空格或者 ' 就是表示结束
        String admin_name = scanner.nextLine(); //如果希望看到SQL注入这里需要用到nextLine,nextLine遇到回车才算结束
        System.out.print("请输入管理员的密码:");
        String admin_pwd = scanner.nextLine();

        //通过properties对象获取文件的信息
        Properties properties = new Properties();
        properties.load(new FileInputStream("src\\mysql.properties"));
        //获取相关的值
        String user = properties.getProperty("user");
        String password = properties.getProperty("password");
        String driver = properties.getProperty("driver");
        String url = properties.getProperty("url");

        //注册驱动
        Class.forName(driver);

        //得到连接
        Connection connection = DriverManager.getConnection(url, user, password);

        //得到PreparedStatement
        //组织Sql,?相当于占位符

        String sql = "select name , pwd from admin where name =? and pwd = ?";
        //prepareStatement是实现了PrepareStatement接口的实现类的对象
        PreparedStatement preparedStatement = connection.prepareStatement(sql);
        //给 ? 赋值
        preparedStatement.setString(1,admin_name);
        preparedStatement.setString(2,admin_pwd);

        //执行select语句用 executeQuery
        //执行 dml 用executeUpdate()
        //这里执行executeQuery语句不用填入sql,因为前面已经赋值了
        //如果填入相当于把select name , pwd from admin where name =? and pwd = ?填入,而问号无法识别。
        ResultSet resultSet = preparedStatement.executeQuery();

        if (resultSet.next()) {//如果查询到一条记录,则说明该管理存在
            System.out.println("登陆成功");
        } else {
            System.out.println("登录失败");
        }
        //关闭连接
        resultSet.close();
        preparedStatement.close();
        connection.close();
    }
}
预处理的DML操作:
public class PreparedStatementDML {
    public static void main(String[] args) throws Exception {
        Scanner scanner = new Scanner(System.in);

        //让用户输入管理员名和密码
//        System.out.print("请输入添加管理员的名字:");//next():当接受到空格或者 ' 就是表示结束
//        String admin_name = scanner.nextLine(); //如果希望看到SQL注入这里需要用到nextLine,nextLine遇到回车才算结束
//        System.out.print("请输入添加管理员的密码:");
//        String admin_pwd = scanner.nextLine();
        System.out.print("请输入你要删除的人的名字:");
        String admin_name = scanner.nextLine();


        //通过properties对象获取文件的信息
        Properties properties = new Properties();
        properties.load(new FileInputStream("src\\mysql.properties"));
        //获取相关的值
        String user = properties.getProperty("user");
        String password = properties.getProperty("password");
        String driver = properties.getProperty("driver");
        String url = properties.getProperty("url");

        //注册驱动
        Class.forName(driver);

        //得到连接
        Connection connection = DriverManager.getConnection(url, user, password);

        //得到PreparedStatement
        //组织Sql,?相当于占位符

        //添加
        //String sql = "insert into admin values(?,?)";

        //修改
        //String sql = "update admin set pwd = ? where name = ?";

        //删除
        String sql = "delete from admin where name = ?";

        //prepareStatement是实现了PrepareStatement接口的实现类的对象
        PreparedStatement preparedStatement = connection.prepareStatement(sql);

        //给 ? 赋值
        //preparedStatement.setString(1,admin_pwd);
        //preparedStatement.setString(2, admin_name);
        preparedStatement.setString(1,admin_name);

        //执行select语句用 executeQuery
        //执行 dml 用executeUpdate()
        int i = preparedStatement.executeUpdate();
        System.out.println(i > 0 ? "执行成功" : "执行失败");

        //关闭连接
        preparedStatement.close();
        connection.close();
    }
}
JDBC API小结:

JDBCUtils:
/**
 * 这是一个工具类,完成mysql的连接和关闭资源
 */
public class JDBCUtils {
    //定义相关的属性,因为只需要一份,我们做成static
    private static String user;//用户名
    private static String password;//密码
    private static String url;//url
    private static String driver;//驱动名

    //在static代码块中完成初始化
    static {
        try {
            Properties properties = new Properties();
            properties.load(new FileInputStream("src\\mysql.properties"));
            //读取相关的属性
            user = properties.getProperty("user");
            password = properties.getProperty("password");
            url = properties.getProperty("url");
            driver = properties.getProperty("driver");
        } catch (IOException e) {
            //在实际开发中,我们可以这样处理
            //将编译异常转成运行异常
            //这时调用者,可以选择捕获异常,也可以选择默认处理该异常,比较方便
            throw new RuntimeException(e);
        }
    }

    //连接数据库,返回Connection
    public static Connection getConnection(){
        try {
            return DriverManager.getConnection(url,user,password);
        } catch (SQLException e) {
            throw new RuntimeException(e);
        }
    }

    //关闭相关资源
    //如果需要关闭资源,就传入对象,否则传入空
    public static void close(ResultSet set, Statement statement,Connection connection){
        //判断是否为空
        try {
            if(set != null){
                set.close();
            }
            if(statement != null){
                statement.close();
            }
            if(connection != null){
                connection.close();
            }
        } catch (SQLException e) {
            throw new RuntimeException(e);
        }
    }

}
工具包的使用:
**
 * 演示该类如何使用JDBCUtils工具类,完成dml 和 select
 */

public class JDBCUtils_Use {
    @Test
    public void testDML() {
        //得到连接
        Connection connection = null;
        //组织sql
        String sql = "update account set name = ? where id = ?";
        PreparedStatement preparedStatement = null;
        try {
            connection = JDBCUtils.getConnection();
            preparedStatement = connection.prepareStatement(sql);
            //给占位符赋值
            preparedStatement.setString(1, "周杰伦");
            preparedStatement.setInt(2, 400);
            //执行
            preparedStatement.executeUpdate();
        } catch (SQLException e) {
            e.printStackTrace();
        } finally {
            //关闭资源
            JDBCUtils.close(null, preparedStatement, connection);
        }
    }

    @Test
    public void testSelect() {
        //得到连接
        Connection connection = null;
        //组织sql
        String sql = "select * from account where id = ?";
        PreparedStatement preparedStatement = null;
        ResultSet set = null;
        try {
            connection = JDBCUtils.getConnection();
            preparedStatement = connection.prepareStatement(sql);
            //给?赋值
            preparedStatement.setInt(1,400);

            //执行,得到结果集
            set = preparedStatement.executeQuery();
            //遍历结果集
            while(set.next()){
                int id = set.getInt("id");
                String name = set.getString("name");
                int money = set.getInt("money");
                System.out.println(id + "\t" + name + "\t" +money);
            }
        } catch (SQLException e) {
            e.printStackTrace();
        } finally {
            //关闭资源
            JDBCUtils.close(set, preparedStatement, connection);
        }
    }
}

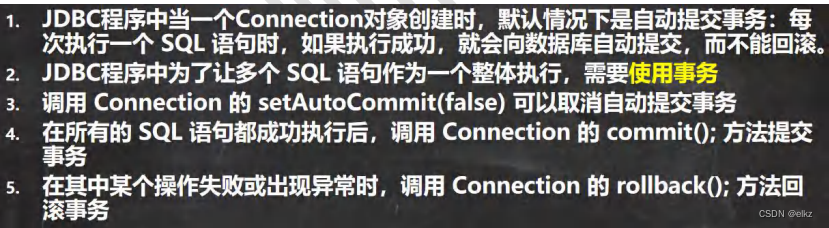
事务:
基本介绍:


应用实例:
模拟经典的转账业务:当一个人向另一个人转账100块时,一个人要增加一百元,另一个人要减少一百元,并且这两条语句要么都成功,要么都失败。
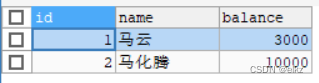
先创建一张表:
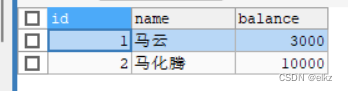
CREATE TABLE ACCOUNT(
	id INT PRIMARY KEY AUTO_INCREMENT,
	NAME VARCHAR(32) NOT NULL DEFAULT '',
	balance DOUBLE NOT NULL DEFAULT 0)CHARACTER SET utf8;


INSERT INTO ACCOUNT VALUES(NULL,'马云',3000);
INSERT INTO ACCOUNT VALUES(NULL,'马化腾',10000);

SELECT * FROM ACCOUNT
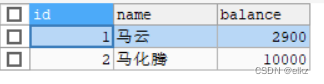
当我们不使用事务时,并且模拟发生异常的情况:
//没有使用事务.
    @Test
    public void noTransaction() {
        //操作转账的业务
        //1. 得到连接
        Connection connection = null;
        //2. 组织一个 sql
        String sql = "update account set balance = balance - 100 where id = 1";
        String sql2 = "update account set balance = balance + 100 where id = 2";
        PreparedStatement preparedStatement = null;
        //3. 创建 PreparedStatement 对象
        try {
            connection = JDBCUtils.getConnection(); // 在默认情况下,connection 是默认自动提交
            preparedStatement = connection.prepareStatement(sql);

            preparedStatement.executeUpdate(); // 执行第 1 条 sql

            int i = 1 / 0; //抛出异常

            preparedStatement = connection.prepareStatement(sql2);
            preparedStatement.executeUpdate(); // 执行第 2 条 sql
        } catch (SQLException e) {
            e.printStackTrace();
        } finally {
        //关闭资源
         JDBCUtils.close(null, preparedStatement, connection);
        }
    }
注意中间我们在两个执行语句的中间故意制造异常(int i = 1/0),这时有一条语句执行成功,这显然不是我们需要的:
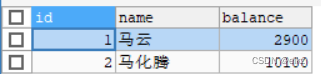
用事务来处理:
/**
 * 演示jdbc中如何使用事务
 */
public class Transaction_ {
    public static void main(String[] args) {
        //操作转账的业务
        //1.得到连接
        Connection connection = null;
        PreparedStatement preparedStatement = null;
        //2.组织一个sql
        String sql1 = "update account set balance = balance - 100 where id = 1";
        String sql2 = "update account set balance = balance + 100 where id = 2";
        //3.创建PrepareStatement对象
        try {
            connection = JDBCUtils.getConnection();

            //将connection设置为不自动提交
            connection.setAutoCommit(false);//相当于开启了一个事务

            preparedStatement = connection.prepareStatement(sql1);
            preparedStatement.executeUpdate();//执行第一条SQL语句

            int i = 1/0;

            preparedStatement = connection.prepareStatement(sql2);
            preparedStatement.executeUpdate();//执行第二条sql语句

            //最后提交事务
            connection.commit();
        } catch (SQLException e) {
            //如果出现异常,这里我们可以进行回滚,就是撤销执行的SQL、
            System.out.println("执行发生了异常,撤销事务,进行回滚");
            try {
                connection.rollback();//默认回滚到事务开始时的状态
            } catch (SQLException ex) {
                ex.printStackTrace();
            }
            e.printStackTrace();
        } finally {
            JDBCUtils.close(null, preparedStatement, connection);
        }
    }
}
这里我们同样在两条语句中间制造异常,此时会发生回滚,这是我们想要的,要失败两个都失败:
去掉中间的异常语句:
总结重要的几条语句:
在异常里:


批处理:
基本介绍:
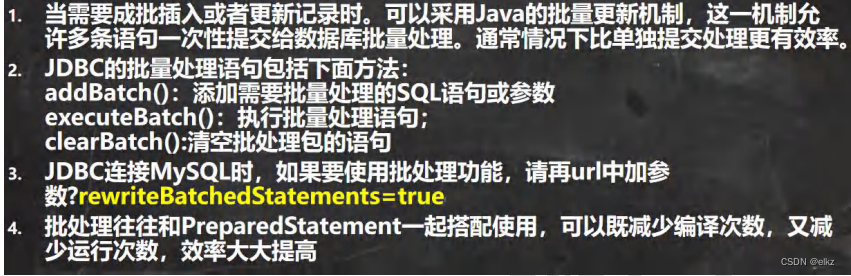
应用实例:
我们先创建一张表做测试:
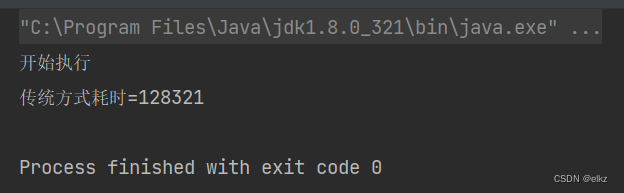
CREATE TABLE admin2(
	id INT PRIMARY KEY AUTO_INCREMENT,
	username VARCHAR(32) NOT NULL,
	PASSWORD VARCHAR(32) NOT NULL);
先使用传统方法插入五千条数据,看看其执行效率:
 @Test
    //传统方法,添加5000条数据到admin2
    public void noBatch() throws Exception {
        Connection connection = JDBCUtils.getConnection();
        String sql = "insert into admin2 values(null ,?,?)";
        PreparedStatement preparedStatement = connection.prepareStatement(sql);
        System.out.println("开始执行");
        long start = System.currentTimeMillis();//开始时间
        for (int i = 0; i < 5000; i++) {
            preparedStatement.setString(1,"jake" + i);
            preparedStatement.setString(2,"666");
            preparedStatement.executeUpdate();
        }
        long end = System.currentTimeMillis();
        System.out.println("传统方式耗时="+(end - start));

        //关闭连接
        JDBCUtils.close(null,preparedStatement,connection);
    }
运行结果:
使用批量方法,看看其效率:
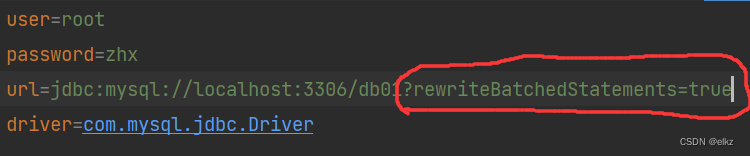
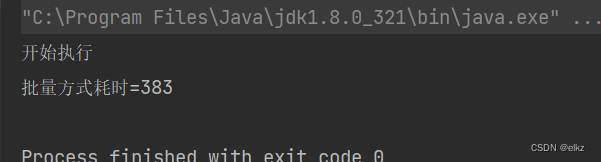
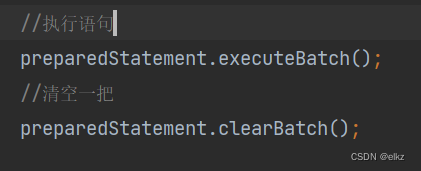
//使用批量方法添加数据
    @Test
    public void batch() throws Exception{
        Connection connection = JDBCUtils.getConnection();
        String sql = "insert into admin2 values(null ,?,?)";
        PreparedStatement preparedStatement = connection.prepareStatement(sql);
        System.out.println("开始执行");
        long start = System.currentTimeMillis();//开始时间
        for (int i = 0; i < 5000; i++) {
            preparedStatement.setString(1,"jake" + i);
            preparedStatement.setString(2,"666");
            //将sql语句加入到批处理包中
            preparedStatement.addBatch();
            //当有5000条记录时,在批量执行
            if((i + 1) % 1000 == 0){
                preparedStatement.executeBatch();
                //清空一把
                preparedStatement.clearBatch();
            }
        }
        long end = System.currentTimeMillis();
        System.out.println("批量方式耗时="+(end - start));

        //关闭连接
        JDBCUtils.close(null,preparedStatement,connection);
    }
注意需要修改配置文件:
运行结果:
几条重要语句:


批处理源码分析:
追进addBach方法中:
 public void addBatch() throws SQLException {
        synchronized(this.checkClosed().getConnectionMutex()) {
            if (this.batchedArgs == null) {
                this.batchedArgs = new ArrayList();
            }

            for(int i = 0; i < this.parameterValues.length; ++i) {
                this.checkAllParametersSet(this.parameterValues[i], this.parameterStreams[i], i);
            }

            this.batchedArgs.add(new PreparedStatement.BatchParams(this.parameterValues, this.parameterStreams, this.isStream, this.streamLengths, this.isNull));
        }
    }
- 第一就创建 ArrayList - elementData => Object[]
- elementData => Object[] 就会存放我们预处理的 sql 语句
- 当 elementData 满后,就按照 1.5 扩容
- 当添加到指定的值后,就 executeBatch
- 批量处理会减少我们发送 sql 语句的网络开销,而且减少编译次数,因此效率提高
数据库连接池 :
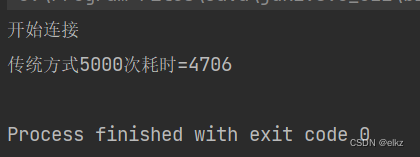
5k 次连接数据库问题(使用传统方法):
 @Test
    //连接mysql五千次
    public void testCon() {
        //看看连接-关闭 Connection 会耗用多久
        long start = System.currentTimeMillis();
        System.out.println("开始连接");
        for (int i = 0; i < 5000; i++) {
            //使用传统的jdbc方式,得到连接
            Connection connection = JDBCUtils.getConnection();
            //做一些工作,比如得到preparedStatement,发送SQL
            //...
            //关闭
            JDBCUtils.close(null,null,connection);
        }
        long end = System.currentTimeMillis();
        System.out.println("传统方式5000次耗时="+(end - start));
    }
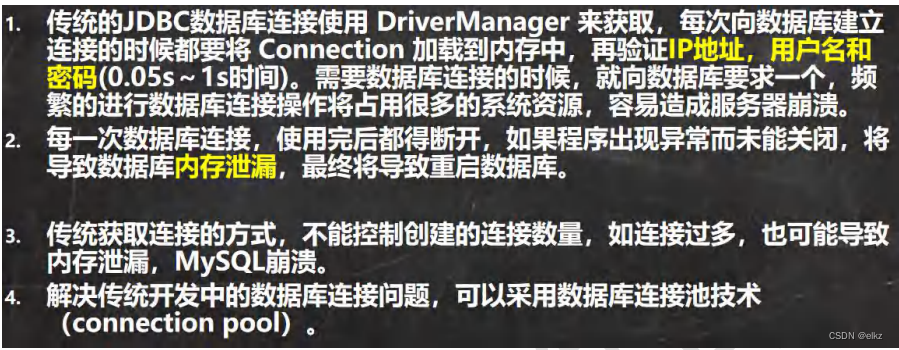
传统获取Connection问题分析:
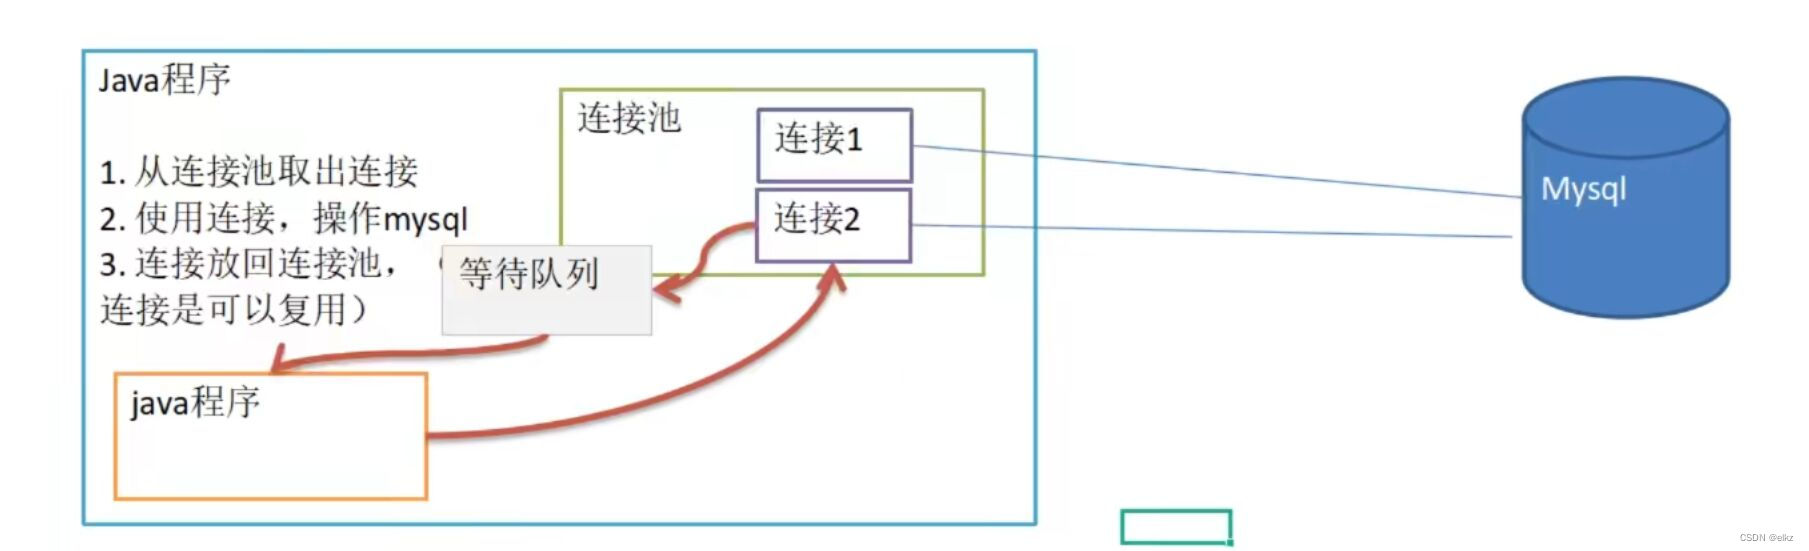
数据库连接池原理:

数据库连接池种类:
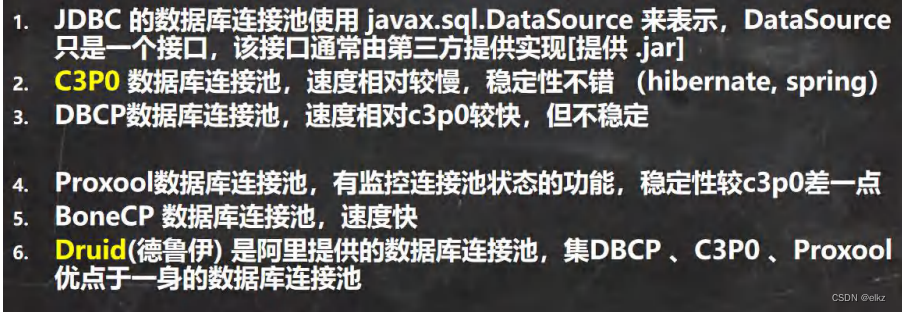
C3P0:
使用代码完成C3P0数据库连接池:
第一种方式,并测试效率,注意与传统方式对比:
//方式 1: 相关参数,在程序中指定 user, url , password 等
    @Test
    public void testC3P0_01() throws Exception {
        //1. 创建一个数据源对象
        ComboPooledDataSource comboPooledDataSource = new ComboPooledDataSource();

        //2. 通过配置文件 mysql.properties 获取相关连接的信息
        Properties properties = new Properties();
        properties.load(new FileInputStream("src\\mysql.properties"));
        //读取相关的属性值
        String user = properties.getProperty("user");
        String password = properties.getProperty("password");
        String url = properties.getProperty("url");
        String driver = properties.getProperty("driver");

        //给数据源 comboPooledDataSource 设置相关的参数
        //注意:连接管理是由 comboPooledDataSource 来管理
        comboPooledDataSource.setDriverClass(driver);
        comboPooledDataSource.setJdbcUrl(url);
        comboPooledDataSource.setUser(user);
        comboPooledDataSource.setPassword(password);

        //设置初始化连接数
        comboPooledDataSource.setInitialPoolSize(10);

        //最大连接数
        comboPooledDataSource.setMaxPoolSize(50);

        //测试连接池的效率,测试 mysql5000次 的操作
        long start = System.currentTimeMillis();
        for (int i = 0; i < 5000; i++) {
            Connection connection = comboPooledDataSource.getConnection();
            connection.close();
        }
        long end = System.currentTimeMillis();
        System.out.println("c3p0 5000 次所需时间 = " +(end - start));

    }

第二种方式,使用配置文件模板
//方式二:使用配置文件模板来完成
    //1. 将c3p0 提供的c3p0.config.xml 拷贝到 src目录下
    //2. 该文件指定了连接数据库和连接池的相关参数
    @Test
    public void testC3P0_02() throws SQLException {
        ComboPooledDataSource comboPooledDataSource = new ComboPooledDataSource("mysql");//参数是数据源名称,在配置文件中

        //测试连接池的效率,测试 mysql5000次 的操作
        long start = System.currentTimeMillis();
        for (int i = 0; i < 5000; i++) {
            Connection connection = comboPooledDataSource.getConnection();
            connection.close();
        }
        long end = System.currentTimeMillis();
        System.out.println("c3p0第二种方式 5000 次所需时间 = " + (end - start));
    }
德鲁伊连接池(druid):
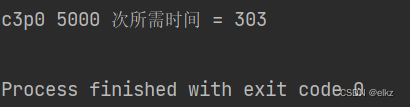
代码实现德鲁伊连接池并测试效率(运行五十万次):
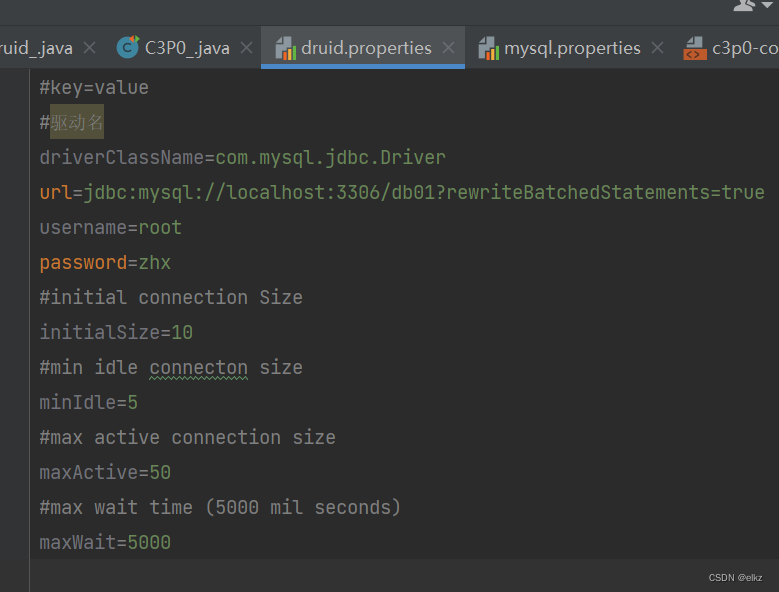
@Test
    public void testDruid() throws Exception {
        //1. 加入Druid jar包
        //2. 加入配置文件,将该文件拷贝到src 目录
        //3.创建properties对象,读取配置文件
        Properties properties = new Properties();
        properties.load(new FileInputStream("src\\druid.properties"));

        //4.创建一个指定参数的数据库连接池
        DataSource dataSource = DruidDataSourceFactory.createDataSource(properties);

        //测试连接池的效率,测试 mysql5000次 的操作
        long start = System.currentTimeMillis();
        for (int i = 0; i < 500000; i++) {
            Connection connection = dataSource.getConnection();
            connection.close();
        }
        long end = System.currentTimeMillis();
        System.out.println("druid 500000 次所需时间 = " + (end - start));//408
    }
配置文件:
运行结果:
我们同样让c3p0运行50万次,对比二者的效率:
重要代码:


德鲁伊工具类:
/**
 * 基于druid数据库连接池的工具类
 */
public class JDBCUtilsByDruid {
    private static DataSource ds;

    //使用静态代码块完成初始化
    static {
        Properties properties = new Properties();
        try {
            properties.load(new FileInputStream("src\\druid.properties"));
            ds = DruidDataSourceFactory.createDataSource(properties);
        } catch (Exception e) {
            e.printStackTrace();
        }
    }

    //编写getConnection方法
    public static Connection getConnection() throws SQLException {
        return ds.getConnection();
    }

    //关闭连接,(把连接放回到连接池)
    public static void close(ResultSet resultSet, Statement statement,Connection connection){
        try {
            if(resultSet != null){
                resultSet.close();
            }
            if(statement != null){
                statement.close();
            }
            if(connection != null){
                connection.close();
            }
        } catch (SQLException e) {
            throw new RuntimeException(e);
        }
    }

}
德鲁伊工具类使用:
 @Test
    public void testSelect() {
        //得到连接
        Connection connection = null;
        //组织sql
        String sql = "select * from account where id = ?";
        PreparedStatement preparedStatement = null;
        ResultSet set = null;
        try {
            connection = JDBCUtilsByDruid.getConnection();
            preparedStatement = connection.prepareStatement(sql);
            //给?赋值
            preparedStatement.setInt(1, 1);

            //执行,得到结果集
            set = preparedStatement.executeQuery();
            //遍历结果集
            while (set.next()) {
                int id = set.getInt("id");
                String name = set.getString("name");
                Double balance = set.getDouble("balance");
                System.out.println(id + "\t" + name + "\t" + balance);
            }
        } catch (SQLException e) {
            e.printStackTrace();
        } finally {
            //关闭资源
            JDBCUtilsByDruid.close(set, preparedStatement, connection);
        }
    }
Apache—DBUtils:
先分析一个问题:

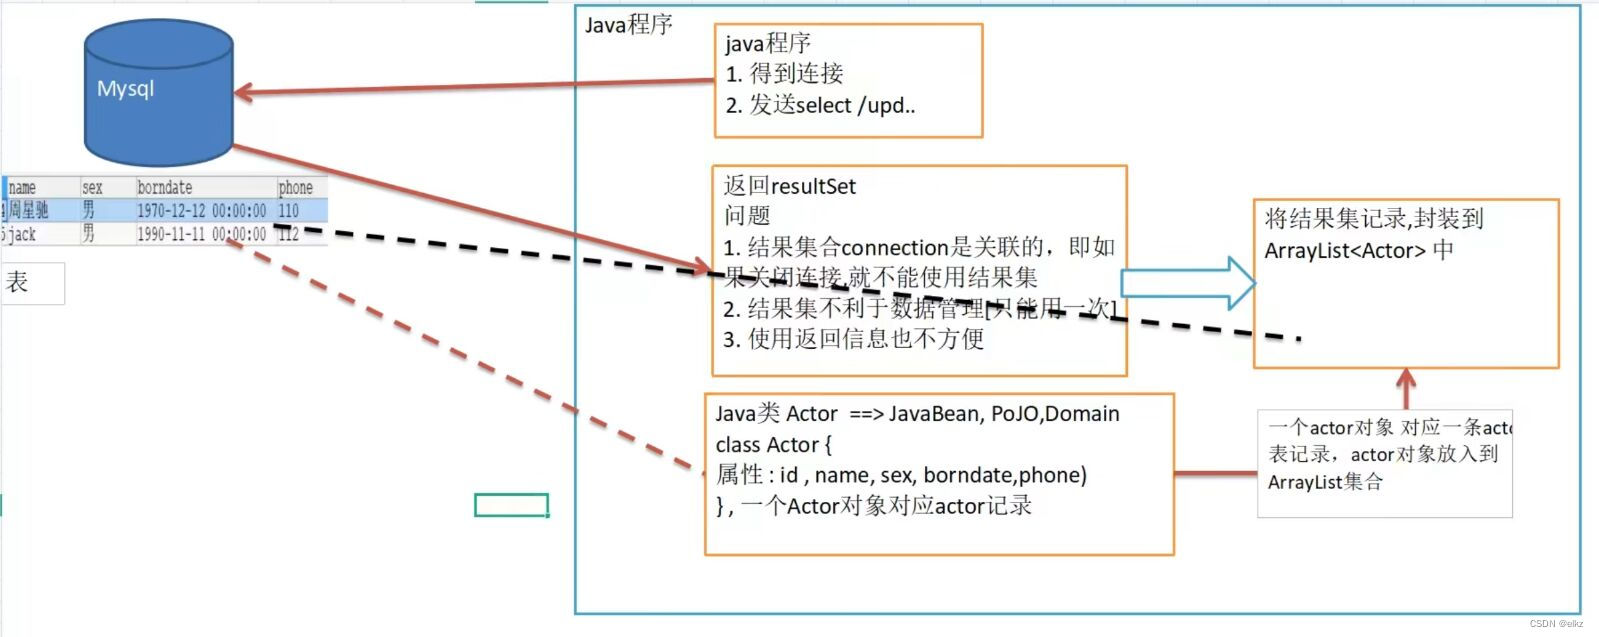
土办法完成封装:(将结果集记录封装到ArrayList中)
//使用土方法来解决ResultSet = 封装 ->ArrayList
    @Test
    public ArrayList<Actor> testSelectToArrayList() {
        //得到连接
        Connection connection = null;
        //组织sql
        String sql = "select * from actor where id >= ?";
        PreparedStatement preparedStatement = null;
        ResultSet set = null;

        //创建ArrayList对象,存放actor对象
        ArrayList<Actor> list = new ArrayList<Actor>();

        try {
            connection = JDBCUtilsByDruid.getConnection();
            preparedStatement = connection.prepareStatement(sql);
            //给?赋值
            preparedStatement.setInt(1, 1);

            //执行,得到结果集
            set = preparedStatement.executeQuery();
            //遍历结果集
            while (set.next()) {
                int id = set.getInt("id");
                String name = set.getString("name");
                String sex = set.getString("sex");
                Date borndate = set.getDate("borndate");
                int phone = set.getInt("phone");

                //把得到的resultSet的记录,封装到Actor对象,放入到list集合
                list.add(new Actor(id, name, sex, borndate, phone));
            }
            System.out.println(list);

        } catch (SQLException e) {
            e.printStackTrace();
        } finally {
            //关闭资源
            JDBCUtilsByDruid.close(set, preparedStatement, connection);
        }
        //因为ArryList 和 connection没有任何关联,所以该集合可以复用;
        return  list;
    }
Apache—DBUtils基本介绍:
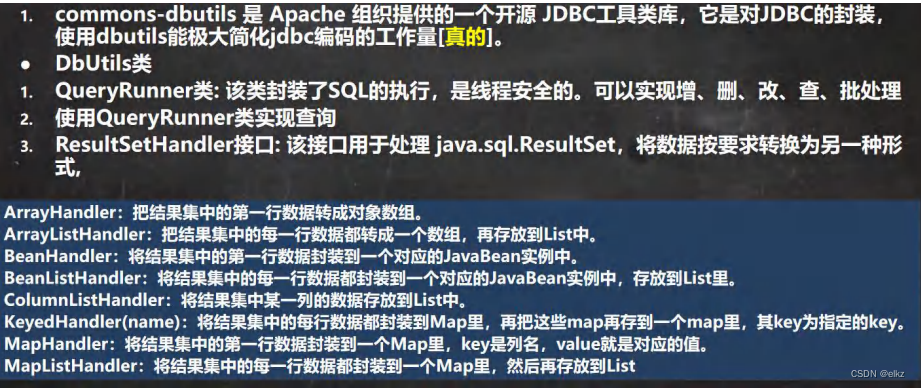

应用实例:
查询1:(返回结果是多行多列的情况)
 @Test
    public void testQueryMany() throws SQLException {//返回结果是多行的情况

        //1. 得到连接
        Connection connection = JDBCUtilsByDruid.getConnection();

        //2. 使用 DBUtils 类和接口,先引入DBUtils相关的jar文件,加入到项目中
        //3. 创建QueryRunner
        QueryRunner queryRunner = new QueryRunner();

        //4. 就可以执行相关的方法,返回ArrayList结果集
        //String sql = "select * from actor where id > ?";
        //注意:sql语句也可以查询部分列
        String sql = "select id,name from actor where id >= ?";

        //(1). query 方法就是执行sql语句,得到resultSet --封装到ArrayList集合中
        //(2). 返回集合
        //(3). connection :连接
        //(4). sql:执行的sql语句
        //(5). new BeanListHandler<>(Actor.class): 在将resultSet -> Actor对象 -> 封装到ArrayList
        //     底层使用反射机制 去获取Actor类的属性,进行封装
        //(6). 1 就是给sql语句中的?赋值,可以有多个值,因为他是可变参数
        //(7). 底层得到的resultSet,会在query关闭,PreparedStatement也在底层创建并关闭
        List<Actor> list =
                queryRunner.query(connection, sql, new BeanListHandler<>(Actor.class), 1);

        for (Actor actor : list) {
            System.out.println(actor);
        }

        //释放资源
        JDBCUtilsByDruid.close(null, null, connection);
    }
重要代码,注意对比:
运行结果:


查询2:(返回结果是单行多列的情况)
@Test
    //演示 apache + dbutils + druid 完成 返回的结果是单行记录,单个对象
    public void testQuerySingle() throws SQLException {
        //1. 得到连接
        Connection connection = JDBCUtilsByDruid.getConnection();

        //2. 使用 DBUtils 类和接口,先引入DBUtils相关的jar文件,加入到项目中
        //3. 创建QueryRunner
        QueryRunner queryRunner = new QueryRunner();

        //4. 就可以执行相关的方法,返回单个对象
        String sql = "select id,name from actor where id = ?";

        //因为我们知道我们返回的单行多列记录<--> 单个对象, 使用的Handler 是BeanHandler
        Actor actor = queryRunner.query(connection, sql, new BeanHandler<>(Actor.class), 4);
        System.out.println(actor);

        //释放资源
        JDBCUtilsByDruid.close(null,null,connection);

    }
运行结果:

查询3: (返回结果是单行单列的情况)
 @Test
    //演示 apache + dbutils + druid 完成 是单行单列的情况 - 返回的就是Object对象
    public void testScalar() throws SQLException {
        //1. 得到连接
        Connection connection = JDBCUtilsByDruid.getConnection();

        //2. 使用 DBUtils 类和接口,先引入DBUtils相关的jar文件,加入到项目中
        //3. 创建QueryRunner
        QueryRunner queryRunner = new QueryRunner();

        //4. 就可以执行相关的方法,返回单行单列,返回的就是Object
        String sql = "select name from actor where id = ?";

        //因为返回的是一个对象,使用的handle 就是 ScalarHandler
        Object query = queryRunner.query(connection, sql, new ScalarHandler(), 4);

        System.out.println(query);


        //释放资源
        JDBCUtilsByDruid.close(null,null,connection);
    }
运行结果:

DML操作:
 @Test
    //演示 apache-dbutils + druid 完成 dml(update,insert,delete)
    public void testDML() throws SQLException {
        Connection connection = JDBCUtilsByDruid.getConnection();
        QueryRunner queryRunner = new QueryRunner();

        //修改
        //String sql = "update actor set name = ? where id = ?";
        //添加
        //String sql = "insert into actor values(null,?,?,?,?)";
        //删除
        String sql = "delete from actor where id = ?";


        //执行 DML 操作都是 queryRunner.update()
        //返回值是受影响的行数 -》 affectedRow
        //int affectedRow = queryRunner.update(connection, sql,"张三丰",4);
        //int affectedRow = queryRunner.update(connection, sql, "林青霞", "女","1966-10-10",119);
        int affectedRow = queryRunner.update(connection, sql, 5);

        System.out.println(affectedRow > 0 ? "执行成功" : "执行没有影响到数据库");


        JDBCUtilsByDruid.close(null,null,connection);
    }
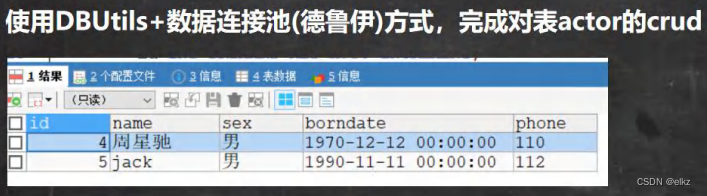
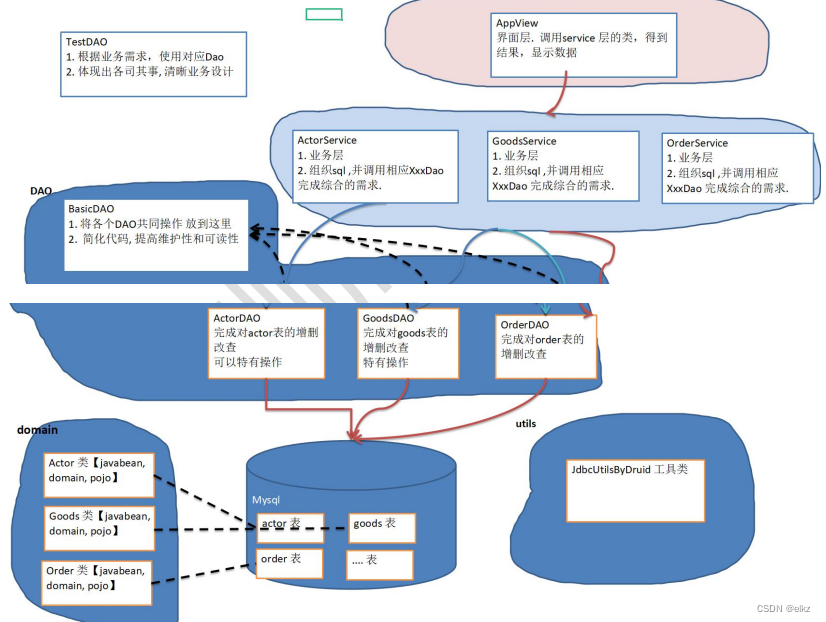
DAO 和增删改查通用方法-BasicDao:
先分析一个问题:

基本说明:

应用实例:
完成一个简单设计:
dao.utils ----工具类
dao.domain ----javabean
dao.dao ----存放XxxDao和BasicDAO
dao.test ----写测试类
dao.utils:
/**
 * 基于druid数据库连接池的工具类
 */
public class JDBCUtilsByDruid {
    private static DataSource ds;

    //使用静态代码块完成初始化
    static {
        Properties properties = new Properties();
        try {
            properties.load(new FileInputStream("src\\druid.properties"));
            ds = DruidDataSourceFactory.createDataSource(properties);
        } catch (Exception e) {
            e.printStackTrace();
        }
    }

    //编写getConnection方法
    public static Connection getConnection() throws SQLException {
        return ds.getConnection();
    }

    //关闭连接,(把连接放回到连接池)
    public static void close(ResultSet resultSet, Statement statement,Connection connection){
        try {
            if(resultSet != null){
                resultSet.close();
            }
            if(statement != null){
                statement.close();
            }
            if(connection != null){
                connection.close();
            }
        } catch (SQLException e) {
            throw new RuntimeException(e);
        }
    }

}
dao.domain:
/**
 * Actor 对象和Actor表的记录对应
 */
public class Actor {
    private Integer id;
    private String name;
    private String sex;
    private Date borndate; //用Util包下的date
    private Integer phone;

    public Actor() {//一定要给一个无参构造器,反射需要
    }

    public Actor(Integer id, String name, String sex, Date borndate, Integer phone) {
        this.id = id;
        this.name = name;
        this.sex = sex;
        this.borndate = borndate;
        this.phone = phone;
    }

    public Integer getId() {
        return id;
    }

    public void setId(Integer id) {
        this.id = id;
    }

    public String getName() {
        return name;
    }

    public void setName(String name) {
        this.name = name;
    }

    public String getSex() {
        return sex;
    }

    public void setSex(String sex) {
        this.sex = sex;
    }

    public Date getBorndate() {
        return borndate;
    }

    public void setBorndate(Date borndate) {
        this.borndate = borndate;
    }

    public Integer getPhone() {
        return phone;
    }

    public void setPhone(Integer phone) {
        this.phone = phone;
    }

    @Override
    public String toString() {
        return "Actor{" +
                "id=" + id +
                ", name='" + name + '\'' +
                ", sex='" + sex + '\'' +
                ", borndate=" + borndate +
                ", phone=" + phone +
                '}';
    }
}
dao.dao:
/**
 * 开发BasicDAO,是其他DAO的父类
 */
public class BasicDAO<T> {//泛型指定具体的类型

    private QueryRunner qr = new QueryRunner();


    //开发通用的DML方法,针对任意的表
    //Object... parameters给sql语句中的?补充相应的值
    public int update(String sql,Object... parameters){
        Connection connection = null;

        try {
            connection = JDBCUtilsByDruid.getConnection();

            int update = qr.update(connection, sql, parameters);
            return update;

        } catch (SQLException e) {
            throw new RuntimeException(e); //将编译异常 -> 运行异常,抛出
        }finally {
            JDBCUtilsByDruid.close(null,null,connection);
        }
    }

    //返回多个对象(及查询的结果是多行),针对任意表
    /**
     *
     * @param sql sql 语句,可以有?
     * @param tClass 传入一个类的Class对象,比如Actor.class
     * @param parameters 传入?的具体值,可以是多个
     * @return 根据 Actor.class 返回对应的 ArrayList集合
     */
    public List<T> queryMulti(String sql,Class<T> tClass, Object... parameters){
        Connection connection = null;

        try {
            connection = JDBCUtilsByDruid.getConnection();

            return qr.query(connection, sql, new BeanListHandler<T>(tClass), parameters);

        } catch (SQLException e) {
            throw new RuntimeException(e); //将编译异常 -> 运行异常,抛出
        }finally {
            JDBCUtilsByDruid.close(null,null,connection);
        }
    }

    //查询单行结果的通用方法
    public T querySingle(String sql,Class<T> tClass,Object... parameters){
        Connection connection = null;

        try {
            connection = JDBCUtilsByDruid.getConnection();

            return qr.query(connection,sql,new BeanHandler<T>(tClass),parameters);

        } catch (SQLException e) {
            throw new RuntimeException(e); //将编译异常 -> 运行异常,抛出
        }finally {
            JDBCUtilsByDruid.close(null,null,connection);
        }
    }

    //查询单行单列的方法,即返回单值的方法
    public Object queryScalar(String sql,Object... parameters){
        Connection connection = null;

        try {
            connection = JDBCUtilsByDruid.getConnection();

            return qr.query(connection, sql, new ScalarHandler(), parameters);

        } catch (SQLException e) {
            throw new RuntimeException(e); //将编译异常 -> 运行异常,抛出
        }finally {
            JDBCUtilsByDruid.close(null,null,connection);
        }
    }
}
public class ActorDAO extends BasicDAO<Actor>{
    //1. 继承了BasicDAO,有了BasicDAO的方法
    //2. 根据业务需求,可以编写特有的方法


}
Test.dao:
public class TestDAO {
    //测试ActorDAO 对 actor表的crud操作

    @Test
    public void testActorDAO(){
        ActorDAO actorDAO = new ActorDAO();

        //1. 查询多行记录
        List<Actor> actors = actorDAO.queryMulti("select * from actor where id >= ?", Actor.class, 4);
        for (Actor actor : actors) {
            System.out.println(actor);
        }

        //2. 查询单行记录
        Actor actor = actorDAO.querySingle("select * from actor where id = ?", Actor.class, 4);
        System.out.println(actor);


        //3. 查询单行单列
        Object o = actorDAO.queryScalar("select * from actor where id = ?", 4);
        System.out.println(o);

        //4. dml 操作
        int update = actorDAO.update("insert into actor values(null,?,?,?,?)", "张无忌", "男", "2000-11-11", 900);
        System.out.println(update > 0? "执行成功" : "执行没有影响表");
    }

}


 5867
5867


 被折叠的 条评论
为什么被折叠?
被折叠的 条评论
为什么被折叠?
 到【灌水乐园】发言


