自定义连接池

例如:一个线上商城应用,QPS 达到数千,如果每次都重新创建和关闭数据库连接,性能会受到极大影响。 这时预先创建好一批连接,放入连接池。一次请求到达后,从连接池获取连接,使用完毕后再还回连接池,这样既节约了连接的创建和关闭时间,也实现了连接的重用,不至于让庞大的连接数压垮数据库。

@Slf4j(topic = "c.Pool")
class Pool{
    //1.连接池大小
    private final int poolSize;

    //2.连接对象数组
    private Connection[] connections;

    //3.连接状态数组 0空闲 1繁忙 需要是线程安全的
    private AtomicIntegerArray states;

    //4.构造方法初始化
    public Pool(int poolSize) {
        this.poolSize = poolSize;
        this.connections = new Connection[poolSize];
        this.states = new AtomicIntegerArray(new int[poolSize]);
        for (int i = 0; i < poolSize; i++) {
            connections[i] = new MockConnection("连接"+(i+1));
        }
    }

    //5.借连接
    public Connection borrow(){
        while(true){
            for (int i = 0; i < poolSize; i++) {
                if (states.get(i) == 0) {
                    if (states.compareAndSet(i,0,1)) {
                        log.debug("borrow{}",connections[i]);
                        return connections[i];
                    }
                }
            }

            //如果没有空闲连接了,让当前线程进行等待
            synchronized (this){
                try {
                    log.debug("wait...");
                    this.wait();
                } catch (InterruptedException e) {
                    e.printStackTrace();
                }
            }

        }
    }

    //6.归还连接
    public void free(Connection connection){
        for (int i = 0; i < poolSize; i++) {
            if (connections[i] == connection) {
                states.set(i,0);//归还连接不用cas操作
                synchronized (this){//归还过后唤醒等待线程竞争
                    log.debug("free{}",connection);
                    this.notifyAll();
                }
                break;
            }
        }
    }
}
class MockConnection implements Connection{
    private String name;
     public MockConnection(String name) {
        this.name = name;
    }
    ...省略了实现的方法
}

测试代码:

public static void main(String[] args) {
    Pool pool = new Pool(2);
    for (int i = 0; i < 5; i++) {
        new Thread(()->{
            Connection conn = pool.borrow();
            try {
                Thread.sleep(new Random().nextInt(1000));
            } catch (InterruptedException e) {
                e.printStackTrace();
            }
            pool.free(conn);
        }).start();
    }
}

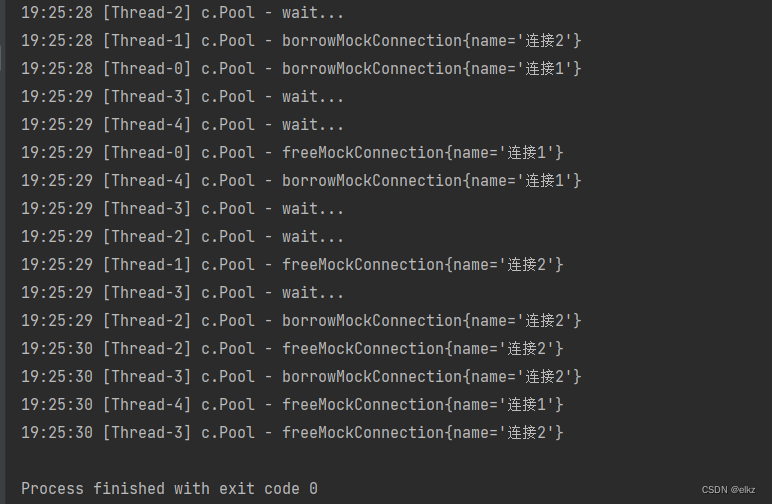
某次运行结果:

以上实现没有考虑:

  • 连接的动态增长与收缩

  • 连接保活(可用性检测)

  • 等待超时处理

  • 分布式 hash

对于关系型数据库,有比较成熟的连接池实现,例如c3p0, druid等

对于更通用的对象池,可以考虑使用apachecommons pool,例如redis连接池可以参考jedis中关于连接池的实现

  • 0
    点赞
  • 0
    收藏
    觉得还不错? 一键收藏
  • 1
    评论
在Spring Boot中,我们可以使用自定义连接来配置定时任务的数据源。我们可以在application.properties或application.yml文件中定义数据源的相关属性,然后在代码中使用@Bean注解来创建数据源对象。 以下是一个使用自定义连接的定时任务配置示例: 1. 在application.properties文件中配置数据源属性: ``` spring.datasource.url=jdbc:mysql://localhost:3306/test spring.datasource.username=root spring.datasource.password=password spring.datasource.driver-class-name=com.mysql.jdbc.Driver ``` 2. 在代码中创建数据源对象: ``` @Configuration public class DataSourceConfig { @Bean @ConfigurationProperties(prefix = "spring.datasource") public DataSource dataSource() { return DataSourceBuilder.create().build(); } } ``` 在这个示例中,我们使用了@ConfigurationProperties注解来从application.properties文件中读取数据源属性,并使用@Bean注解来将数据源对象注入到容器中。 3. 在定时任务代码中使用自定义数据源: ``` @Service public class MyService { @Autowired private DataSource dataSource; @Scheduled(cron = "0 0 3 * * ?") public void myTask() { try (Connection conn = dataSource.getConnection()) { // 执行任务代码 } catch (SQLException e) { // 异常处理 } } } ``` 在这个定时任务代码中,我们使用@Autowired注解来注入自定义数据源,并在任务执行时获取连接对象执行任务代码。需要注意的是,我们在获取连接对象时使用了try-with-resources语句来自动关闭连接对象,避免连接泄漏。 通过以上步骤,我们就可以使用自定义连接来配置定时任务的数据源了。

“相关推荐”对你有帮助么?

  • 非常没帮助
  • 没帮助
  • 一般
  • 有帮助
  • 非常有帮助
提交
评论 1
添加红包

请填写红包祝福语或标题

红包个数最小为10个

红包金额最低5元

当前余额3.43前往充值 >
需支付:10.00
成就一亿技术人!
领取后你会自动成为博主和红包主的粉丝 规则
hope_wisdom
发出的红包
实付
使用余额支付
点击重新获取
扫码支付
钱包余额 0

抵扣说明:

1.余额是钱包充值的虚拟货币,按照1:1的比例进行支付金额的抵扣。
2.余额无法直接购买下载,可以购买VIP、付费专栏及课程。

余额充值