


一 、前言
最近要做一个新的项目需要用到Google的Protocol Buffer,所以最近两天一直在学习这个。在网上看了很多人写的相关博客,发现他们写的配置环境的步骤不尽相同,并且不需要那么复杂,所以就想写一篇最新的文章。
配置环境:mac OS 10.11.1
本文若有叙述错误之处,欢迎指点。
二 、Protocol Buffer简介
Protocolbuffer(简称Protobuf或PB)是由Google推出的一种数据交换格式,它独立于语言,独立于平台。Google 提供了三种语言的实现:java、c++ 和 python,每一种实现都包含了相应语言的编译器以及库文件。可以把它用于分布式应用之间的数据通信或者异构环境下的数据交换。与传统的XML和JSON不同的是,它是一种二进制格式,免去了文本格式转换的各种困扰,并且转换效率非常快,由于它的跨平台、跨编程语言的特点,让它越来越普及,尤其是网络数据交换方面日趋成为一种主流。
PB目前托管在GitHub,链接地址:https://github.com/google/protobuf,源码的主要功能可以分为两部分:
- PB基础库:完成对象->二进制数据的序列化、二进制数据->对象的反序列化这两个转换过程的支持;
- PB编译器:源码生成器,将PB格式定义文件。proto(PB数据格式的一种定义文件)转换为对象源码(支持C++,JAVA,Python等格式)。
截止目前PB的最新版本为3.0.0-beta-2,已经加入了对Objective-C的支持(其它之前低版本中也已经有OC扩展支持)。
在使用cocoaPods的项目里使用pod search ProtocolBuffers进行搜索,搜索结果如下:
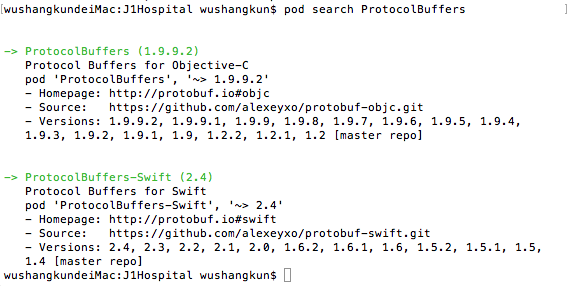
注意:本文是以ProtocolBuffers:https://github.com/alexeyxo/protobuf-objc.git 为例进行演示的,因为它生成的代码是支持ARC的。
三、Mac环境配置
安装很简单,对着README操作一遍即可,我贴出自己在终端的命令行。需要输入的命令行依次为:
1)打开终端,查看mac里面有没有装Homebrew,键入以下命令
brew -v
2)如果没有安装Homebrew就使用下面的命令安装
ruby -e “$(curl -fsSL
https://raw.githubusercontent.com/Homebrew/install/master/install)”
3)安装protobuf编译器和所需的工具
brew install automake
brew install libtool
brew install
Last login: Fri Jan  8 09:59:02 on ttys001
wushangkundeiMac:~ wushangkun$ brew -v
-bash: brew: command not found
wushangkundeiMac:~ wushangkun$ ruby -e "$(curl -fsSL https://raw.githubusercontent.com/Homebrew/install/master/install)"
==> This script will install:
/usr/local/bin/brew
/usr/local/Library/...
/usr/local/share/man/man1/brew.1

Press RETURN to continue or any other key to abort
==> /usr/bin/sudo /bin/chmod g+rwx /usr/local/. /usr/local/bin
Password:
==> /usr/bin/sudo /usr/sbin/chown wushangkun /usr/local/. /usr/local/bin
==> Downloading and installing Homebrew...
remote: Counting objects: 3934, done.
Resolving deltas: 100% (34/34), done.
From https://github.com/Homebrew/homebrew
 * [new branch]      master     -> origin/master
==> Summary
��  /usr/local/Cellar/autoconf/2.69: 70 files, 3.0M
==> Installing automake
==> Downloading https://homebrew.bintray.com/bottles/automake-1.15.el_capitan.bo
######################################################################## 100.0%
==> Pouring automake-1.15.el_capitan.bottle.2.tar.gz
��  /usr/local/Cellar/automake/1.15: 130 files, 3.2M
wushangkundeiMac:~ wushangkun$ brew install libtool
==> Downloading https://homebrew.bintray.com/bottles/libtool-2.4.6.el_capitan.bo
######################################################################## 100.0%
==> Pouring libtool-2.4.6.el_capitan.bottle.tar.gz
==> Summary
��  /usr/local/Cellar/libtool/2.4.6: 69 files, 3.6M
wushangkundeiMac:~ wushangkun$ brew install protobuf
==> Downloading https://homebrew.bintray.com/bottles/protobuf-2.6.1.el_capitan.b
######################################################################## 100.0%
==> Pouring protobuf-2.6.1.el_capitan.bottle.3.tar.gz
==> Caveats
Editor support and examples have been installed to:
  /usr/local/Cellar/protobuf/2.6.1/share/doc/protobuf
==> Summary
 /usr/local/Cellar/protobuf/2.6.1: 118 files, 6.9M
wushangkundeiMac:~ wushangkun$
4)以上步骤进行完之后,开始Clone this repository,在桌面新建protobuf-objc 文件夹,在终端里进入该文件下下载代码
5)Build it !
./scripts/build.sh
终端中操作演示:
Last login: Fri Jan  8 10:06:15 on ttys001
wushangkundeiMac:~ wushangkun$ cd /Users/wushangkun/Desktop/protobuf-objc
wushangkundeiMac:protobuf-objc wushangkun$ git clone https://github.com/alexeyxo/protobuf-objc.git
Cloning into 'protobuf-objc'...
remote: Counting objects: 2788, done.
remote: Total 2788 (delta 0), reused 0 (delta 0), pack-reused 2788
Receiving objects: 100% (2788/2788), 32.92 MiB | 683.00 KiB/s, done.
Resolving deltas: 100% (1761/1761), done.
Checking connectivity... done.
wushangkundeiMac:protobuf-objc wushangkun$ ls
protobuf-objc
wushangkundeiMac:protobuf-objc wushangkun$ cd protobuf-objc/
wushangkundeiMac:protobuf-objc wushangkun$ ./scripts/build.sh
+ ./autogen.sh
glibtoolize: putting auxiliary files in '.'.
glibtoolize: copying file './ltmain.sh'
glibtoolize: putting macros in AC_CONFIG_MACRO_DIRS, 'm4'.
glibtoolize: copying file 'm4/libtool.m4'
glibtoolize: copying file 'm4/ltoptions.m4'

……………………………………(省略部分。。。)
……………………………………

+ make install
Making install in src/compiler
 ../.././install-sh -c -d '/usr/local/bin'
  /bin/sh ../../libtool   --mode=install /usr/bin/install -c protoc-gen-objc '/usr/local/bin'
libtool: install: /usr/bin/install -c protoc-gen-objc /usr/local/bin/protoc-gen-objc
make[2]: Nothing to be done for `install-data-am'.
make[2]: Nothing to be done for `install-exec-am'.
make[2]: Nothing to be done for `install-data-am'.
运行完成后,最终会生成一个protoc-gen-objc插件,被安装到/usr/local/bin/目录下。如果没有错位的话,以后便可以用这个命令将.proto文件转换为不同语言的源代码文件。
四、为工程添加PB依赖库
添加PB依赖库有两种方式,可以直接把/src/runtime/ProtocolBuffers.xcodeproj作为子项目添加到你的工程里,具体添加方式和注意事项可自行参阅相关文档解决。我现在使用CocoaPod来添加依赖库:
1)在终端中进入你项目的文件夹,利用vim创建一个名为Podfile的文件,输入i进入vim编辑模式
2)在你的Podfile中添加:
platform:ios,’7.0’
pod ‘ProtocolBuffers’, ‘~> 1.9.9.2’
按ESC后取消编辑状态,输入:wq回车退出。需要注意的几点:platform那一行,ios三个字母都要小写,而且与前面的冒号之间不能有间隔,后面的版本号也可以不写,但是有些开源库对版本是有要求的,比如要在6.0以上才能运行,遇到这样的开源库就需要写上版本号。
3)在Terminal中执行 :pod install,完成后退出工程,再次进入就会看到PB依赖库了。以后使用的时候切记如下两点:
① 从此以后需要使用Cocoapods生成的 .xcworkspace文件来打开工程,而不是使用以前的.xcodeproj文件
② 每次更改了Podfile文件,都需要重新执行一次pod update命令
补充: 当执行pod install之后,除了Podfile,还会生成一个名为Podfile.lock的文件,它会锁定当前各依赖库的版本,之后即使多次执行pod install也不会更改版本,只有执行pod update才会改变Podfile.lock在多人协作的时候,这样可以防止第三方库升级时候造成大家各自的第三方库版本不一致。所以在提交版本的时候不能把它落下,也不要添加到.gitignore中。
wushangkundeiMac:~ wushangkun$ cd /Users/wushangkun/Desktop/J1Test/J1Hospital
wushangkundeiMac:J1Hospital wushangkun$ vim Podfile
wushangkundeiMac:J1Hospital wushangkun$ pod install
Updating local specs repositories

Analyzing dependencies
Downloading dependencies
Installing ProtocolBuffers (1.9.9.2)
Generating Pods project
Integrating client project

[!] Please close any current Xcode sessions and use `J1Hospital.xcworkspace` for this project from now on.
Sending stats
Pod installation complete! There is 1 dependency from the Podfile and 1 total
pod installed.
wushangkundeiMac:J1Hospital wushangkun$
注意:
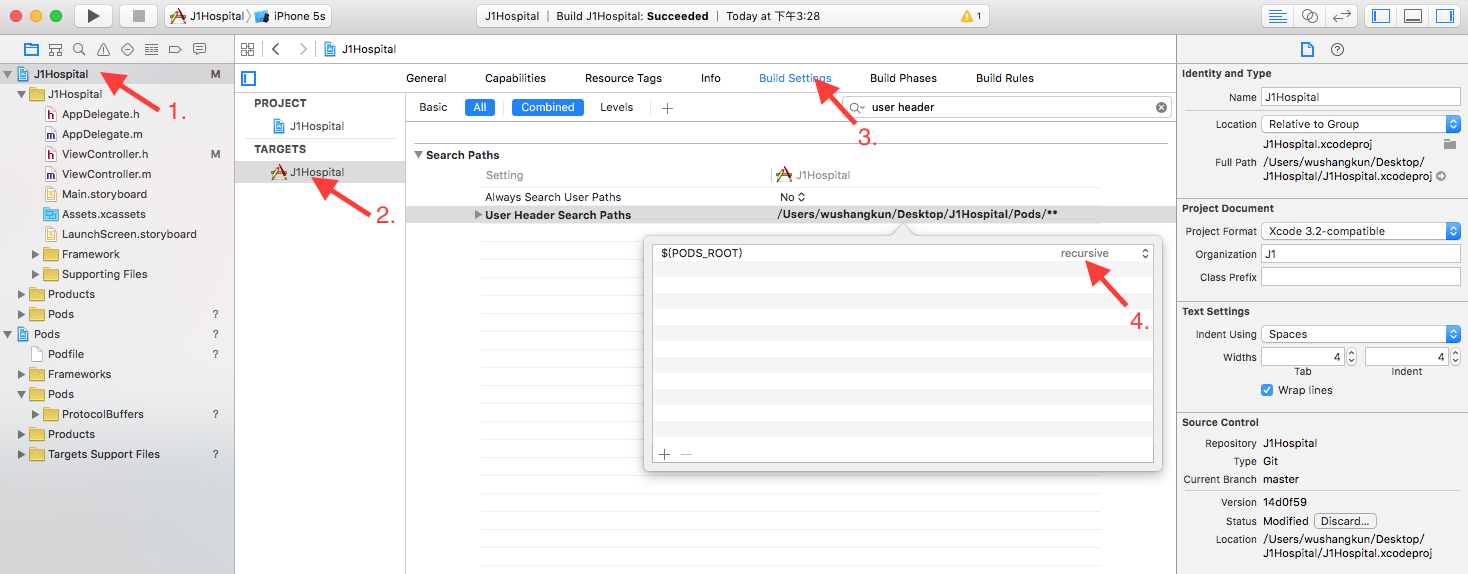
在使用的时候你可能会碰到在代码里导入(#import)头文件没有提示,虽然自己手写出来也能使用,但总觉得不方便。在stackoverflow上找到了解决办法:把pods目录添加到用户头文件检索的路径即可。具体实现方法如下:
选择target ——- BuildingSettings ——– User Header Search
Paths,双击空白区域点击“+”号,输入“$(PODS_ROOT)”,选择recursive(会在相应的目录递归搜索文件)
这样设置完成后,再导入第三方库就会有提示了。
四、使用PB编译器编译.proto文件
为了验证ProtocolBuffer环境已经搭建好了,我们就做个测试。在桌面建一个prototest文件夹,直接拷贝公司的一个已有的User.proto文件做测试,
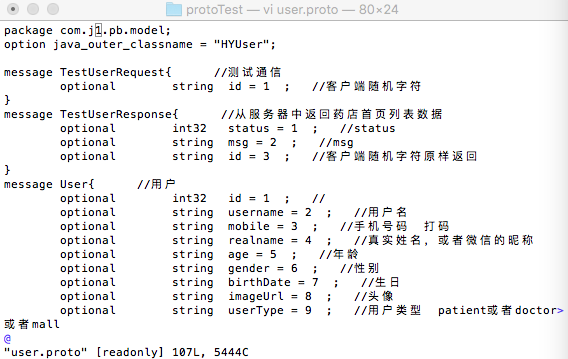
然后通过以下命令来生成model的源代码文件:
protoc --plugin=/usr/local/bin/protoc-gen-objc User.proto --objc_out="./"在当前目录下便可以看到User.pb.h和User.pb.m这两个文件了(需要注意的是生成的代码是支持ARC的!!)。将生成的文件添加到工程之中,你就可以直接使用他们。


 122
122

 被折叠的 条评论
为什么被折叠?
被折叠的 条评论
为什么被折叠?
 到【灌水乐园】发言


