


声明
- 在Android系统中经常会遇到一些系统原理性的问题,在此专栏中集中来讨论下。
- 比如:Android为了线程安全,不允许在UI线程外操作UI,很多时候做界面刷新都需要通过Handler来通知UI组件更新。
- 此篇参考一些博客和书籍,不方便逐一列出,仅供学习、知识分享。
1. 消息传递机制概述
1.1 问题引入

1.2 执行流程
| 概念 | 解释 |
|---|---|
| UI线程 | Activity主线程,系统在创建UI线程的时候会初始化一个Looper对象,同时也会创建一个与其关联的MessageQueue; |
| Handler | 发送与处理信息,如果希望Handler正常工作,在当前线程中要有一个Looper对象 |
| Message | Handler接收与处理的消息对象 |
| MessageQueue | 消息队列,先进先出管理Message,在初始化Looper对象时会创建一个与之关联的MessageQueue |
| Looper | 每个线程只能够有一个Looper,管理MessageQueue,不断地从中取出Message分发给对应的Handler处理 |
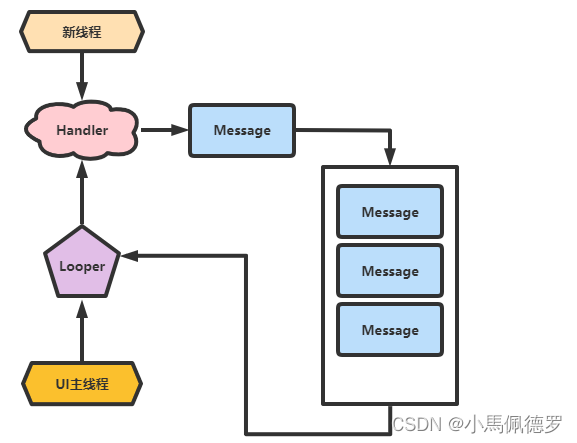
就应用程序而言,Android 系统中 Java 的应用程序和其他系统上相同,都是靠消息驱动来工作的,它们大致的工作原理如下:
- 有一个消息队列,可以往这个消息队列中投递消息。
- 有一个消息循环,不断从消息队列中取出消息,然后处理。
从图中可看出:
- 事件源把待处理的消息加入到消息队列中,一般是加至队尾,一些优先级高的消息也可以加至队列头。事件源提交的消息可以是按键、触摸屏等物理事件产生的消息,也可以是系统或应用程序本身发出的请求消息。
- 处理线程不断从消息队列头中取出消息并处理,事件源可以把优先级高的消息放到队列头,这样,优先级高的消息就会首先被处理。
在Android系统中,这些工作主要由 Looper 和 Handler 来实现。
- Looper 类,用于封装消息循环,并且有一个消息队列。
- Handler 类,有点像辅助类,它封装了消息投递、消息处理等接口。
1.3 Handler类中的相关方法
| Methods | 解释 |
|---|---|
| void handleMessage(Message msg) | 处理消息的方法,通常是用于被重写 |
| sendEmptyMessage(int what) | 发送空消息 |
| sendEmptyMessageDelayed(int what,long delayMillis) | 指定延时多少毫秒后发送空信息 |
| sendMessage(Message msg) | 立即发送信息 |
| sendMessageDelayed(Message msg) | 指定延时多少毫秒后发送信息 |
| final boolean hasMessage(int what) | 检查消息队列中是否包含what属性为指定值的消息。如果是参数为(int what,Object object):除了判断what属性,还需要判断Object属性是否为指定对象的消息 |
1.4 示例
1.4.1 Handler写在Activity UI主线程中
示例目的:定时切换图片的程序,通过Timer定时器,定时修改ImageView显示的内容,从而形成帧动画。
在主线程中,因为系统已经初始化了一个Looper对象,所以我们直接创建Handler对象,就可以进行信息的发送与处理了!
<RelativeLayout xmlns:android="http://schemas.android.com/apk/res/android"
    xmlns:tools="http://schemas.android.com/tools"
    android:id="@+id/RelativeLayout1"
    android:layout_width="match_parent"
    android:layout_height="match_parent"
    android:gravity="center"
    tools:context="com.jay.example.handlerdemo1.MainActivity" >

    <ImageView
        android:id="@+id/imgchange"
        android:layout_width="wrap_content"
        android:layout_height="wrap_content"
        android:layout_alignParentLeft="true"
        android:layout_alignParentTop="true" />

</RelativeLayout>
MainActivity.java
public class MainActivity extends Activity {

    //定义切换的图片的数组id
    int imgids[] = new int[]{
        R.drawable.s_1, R.drawable.s_2,R.drawable.s_3,
        R.drawable.s_4,R.drawable.s_5,R.drawable.s_6,
        R.drawable.s_7,R.drawable.s_8
    };
    int imgstart = 0;

    final Handler myHandler = new Handler()
    {
      @Override
      //重写handleMessage方法,根据msg中what的值判断是否执行后续操作
      public void handleMessage(Message msg) {
        if(msg.what == 0x123)
           {
            imgchange.setImageResource(imgids[imgstart++ % 8]);
           }
        }
    };


    @Override
    protected void onCreate(Bundle savedInstanceState) {
        super.onCreate(savedInstanceState);
        setContentView(R.layout.activity_main);
        final ImageView imgchange = (ImageView) findViewById(R.id.imgchange);

        //使用定时器,每隔200毫秒让handler发送一个空信息
        new Timer().schedule(new TimerTask() {
            @Override
            public void run() {
                myHandler.sendEmptyMessage(0x123);

            }
        }, 0,200);
    }

}
1.4.2 Handler写在子线程中
如果是Handler写在了子线程中的话,我们就需要自己创建一个Looper对象了!创建的流程如下:
- 直接调用Looper.prepare()方法即可为当前线程创建Looper对象,而它的构造器会创建配套的MessageQueue
- 创建Handler对象,重写handleMessage( )方法就可以处理来自于其他线程的信息了
- 调用Looper.loop()方法启动Looper
示例目的:输入一个数,计算后通过Toast输出在这个范围内的所有质数
<LinearLayout
    xmlns:android="http://schemas.android.com/apk/res/android"
    android:layout_width="match_parent"
    android:layout_height="match_parent"
    android:orientation="vertical">
    <EditText
        android:id="@+id/etNum"
        android:inputType="number"
        android:layout_width="match_parent"
        android:layout_height="wrap_content"
        android:hint="请输入上限"/>
    <Button
        android:layout_width="match_parent"
        android:layout_height="wrap_content"
        android:onClick="cal"
        android:text="计算"/>
</LinearLayout>
MainActivity.java
public class CalPrime extends Activity
{
    static final String UPPER_NUM = "upper";
    EditText etNum;
    CalThread calThread;
    // 定义一个线程类
    class CalThread extends Thread
    {
        public Handler mHandler;

        public void run()
        {
        	//调用prepare方法
            Looper.prepare();
            mHandler = new Handler()
            {
                // 定义处理消息的方法
                @Override
                public void handleMessage(Message msg)
                {
                    if(msg.what == 0x123)
                    {
                        int upper = msg.getData().getInt(UPPER_NUM);
                        List<Integer> nums = new ArrayList<Integer>();
                        // 计算从2开始、到upper的所有质数
                        outer:
                        for (int i = 2 ; i <= upper ; i++)
                        {
                            // 用i处于从2开始、到i的平方根的所有数
                            for (int j = 2 ; j <= Math.sqrt(i) ; j++)
                            {
                                // 如果可以整除,表明这个数不是质数
                                if(i != 2 && i % j == 0)
                                {
                                    continue outer;
                                }
                            }
                            nums.add(i);
                        }
                        // 使用Toast显示统计出来的所有质数
                        Toast.makeText(CalPrime.this , nums.toString()
                            , Toast.LENGTH_LONG).show();
                    }
                }
            };
            //进入消息循环
            Looper.loop();
        }
    }
    @Override
    public void onCreate(Bundle savedInstanceState)
    {
        super.onCreate(savedInstanceState);
        setContentView(R.layout.main);
        etNum = (EditText)findViewById(R.id.etNum);
        calThread = new CalThread();
        // 启动新线程
        calThread.start();
    }
    // 为按钮的点击事件提供事件处理函数
    public void cal(View source)
    {
        // 创建消息
        Message msg = new Message();
        msg.what = 0x123;
        Bundle bundle = new Bundle();
        bundle.putInt(UPPER_NUM ,
            Integer.parseInt(etNum.getText().toString()));
        msg.setData(bundle);
        // 向新线程中的Handler发送消息
        calThread.mHandler.sendMessage(msg);
    }
}
2. Looper 和 Handler 类分析
2.1 Looper类分析
代码位置:frameworks/base/core/java/android/os/Looper.java,第一个调用函数是 Looper 的 prepare 函数。它会做什么工作呢?其代码如下所示:
	// sThreadLocal.get() will return null unless you've called prepare().
    static final ThreadLocal<Looper> sThreadLocal = new ThreadLocal<Looper>();

     /** Initialize the current thread as a looper.
      * This gives you a chance to create handlers that then reference
      * this looper, before actually starting the loop. Be sure to call
      * {@link #loop()} after calling this method, and end it by calling
      * {@link #quit()}.
      */
    public static void prepare() {
        prepare(true);
    }

    private static void prepare(boolean quitAllowed) {
    	// 一个Looper只能调用一次prepare
        if (sThreadLocal.get() != null) {
            throw new RuntimeException("Only one Looper may be created per thread");
        }
        // 构造一个Looper对象,设置到调用线程的局部变量中。
        sThreadLocal.set(new Looper(quitAllowed));
    }
ThreadLocal是 Java 中的线程局部变量类,全名应该是 Thread Local Variable(可参考JDK API文档)。它的实现和操作系统提供的线程本地存储(TLS)有关系。该类有两个关键函数(set/get 的结果都和调用这个函数的线程有关):
- set:设置调用线程的局部变量。
- get:获取调用线程的局部变量。
根据上面的分析可知,prepare 会在调用线程的局部变量中设置一个 Looper 对象。这个调用线程就是 CalThread 的 run 线程。先看看 Looper 对象的构造如下所示:
    private Looper(boolean quitAllowed) {
    	//构造一个消息队列
        mQueue = new MessageQueue(quitAllowed);
        //获取当前线程的Thread对象
        mThread = Thread.currentThread();
    }
prepare 方法主要干了一件事:在调用 prepare 的线程中,设置了一个 Looper 对象,这个Looper 对象就保存在这个调用线程的 TLV 中。而 Looper 对象内部封装了一个消息队列。
也就是说,prepare 函数通过 ThreadLocal 机制,巧妙地把 Looper 和调用线程关联在起了。
    /**
     * Run the message queue in this thread. Be sure to call
     * {@link #quit()} to end the loop.
     */
    public static void loop() {
        final Looper me = myLooper();//myLooper返回保存在调用线程TLV中的Looper对象
        if (me == null) {
            throw new RuntimeException("No Looper; Looper.prepare() wasn't called on this thread.");
        }
        //取出这个Looper的消息队列
        final MessageQueue queue = me.mQueue;

        // Make sure the identity of this thread is that of the local process,
        // and keep track of what that identity token actually is.
        Binder.clearCallingIdentity();
        final long ident = Binder.clearCallingIdentity();

        for (;;) {
            Message msg = queue.next(); // might block
            // 处理消息,Message 对象中有一个 target,它是 Handler 类型。
            // 如果 target 为空,则表示常要退出消息循环。
            if (msg == null) {
                // No message indicates that the message queue is quitting.
                return;
            }

            // This must be in a local variable, in case a UI event sets the logger
            final Printer logging = me.mLogging;
            if (logging != null) {
                logging.println(">>>>> Dispatching to " + msg.target + " " +
                        msg.callback + ": " + msg.what);
            }

            final long traceTag = me.mTraceTag;
            if (traceTag != 0 && Trace.isTagEnabled(traceTag)) {
                Trace.traceBegin(traceTag, msg.target.getTraceName(msg));
            }
            try {
            	//调用该消息的Handler,交给它的dispatchMessage函数处理
                msg.target.dispatchMessage(msg);
            } finally {
                if (traceTag != 0) {
                    Trace.traceEnd(traceTag);
                }
            }

            if (logging != null) {
                logging.println("<<<<< Finished to " + msg.target + " " + msg.callback);
            }

            // Make sure that during the course of dispatching the
            // identity of the thread wasn't corrupted.
            final long newIdent = Binder.clearCallingIdentity();
            if (ident != newIdent) {
                Log.wtf(TAG, "Thread identity changed from 0x"
                        + Long.toHexString(ident) + " to 0x"
                        + Long.toHexString(newIdent) + " while dispatching to "
                        + msg.target.getClass().getName() + " "
                        + msg.callback + " what=" + msg.what);
            }

            msg.recycleUnchecked();
        }
    }

    /**
     * Return the Looper object associated with the current thread.  Returns
     * null if the calling thread is not associated with a Looper.
     */
    // 返回调用线程的线程局部变量,也就是存储在其中的Looper对象
    public static @Nullable Looper myLooper() {
        return sThreadLocal.get();
    }
通过分析会发现,Looper 的作用是:
- 封装了一个消息队列。
- Looper的 prepare 函数把这个 Looper 和调用 prepare 的线程绑定在一起了。
- 处理线程调用 loop 函数,处理来自该消息队列的消息。
当事件源向这个 Looper 发送消息的时候,其实是把消息加到这个 Looper 的消息队列里了。那么,该消息就将由和 Looper 绑定的处理线程来处理。可事件源又是怎么向 Looper 消息队列添加消息的呢?
Looper、Message 和 Handler 之间也存在暧昧关系:
- Looper 中有一个Message 队列,里面存储的是一个个待处理的 Message。
- Message 中有一个 Handler,这个 Handler 是用来处理 Message 的。
其中,Handler 类封装了很多琐碎的工作。下节分析下这个 Handler。
2.2 Handler类分析
2.2.1 Handler 构造函数
代码位置:frameworks/base/core/java/android/os/Handler.java,Handler中包括的成员:
    final Looper mLooper;
    final MessageQueue mQueue;
    final Callback mCallback;
    final boolean mAsynchronous;
    IMessenger mMessenger;
这几个成员变量是怎么使用的呢?这首先得分析 Handler 的构造函数。Handler 一共有四个构造函数,它们主要的区别是在对上面三个重要成员变量的初始化上。
    public Handler() {
        this(null, false);
    }

    public Handler(Callback callback) {
        this(callback, false);
    }

    public Handler(Looper looper) {
        this(looper, null, false);
    }

    public Handler(Looper looper, Callback callback) {
        this(looper, callback, false);
    }

    public Handler(Callback callback, boolean async) {
        if (FIND_POTENTIAL_LEAKS) {
            final Class<? extends Handler> klass = getClass();
            if ((klass.isAnonymousClass() || klass.isMemberClass() || klass.isLocalClass()) &&
                    (klass.getModifiers() & Modifier.STATIC) == 0) {
                Log.w(TAG, "The following Handler class should be static or leaks might occur: " +
                    klass.getCanonicalName());
            }
        }
		//获得调用线程的Looper
        mLooper = Looper.myLooper();
        if (mLooper == null) {
            throw new RuntimeException(
                "Can't create handler inside thread that has not called Looper.prepare()");
        }
        //得到Looper的消息队列
        mQueue = mLooper.mQueue;
        mCallback = callback;
        mAsynchronous = async;
    }

    public Handler(Looper looper, Callback callback, boolean async) {
        mLooper = looper;//外部传入一个Looper,是哪个线程的Looper不确定
        mQueue = looper.mQueue;
        mCallback = callback;
        mAsynchronous = async;
    }
在上述构造函数中,Handler 中的消息队列变量最终都会指向 Looper 的消息队列。
2.2.2 Handler 的真面目
根据前面的分析可知,Handler 中的消息队列实际就是某个 Looper 的消息队列,那么Handler如此安排的目的何在? 在回答这个问题之前,我先来问一个问题:怎么往 Looper 的消息队列插入消息?
如果不知道 Handler,这里有一个很原始的方法可解决上面这个问题:
- 调用 Looper 的 myQueue,它将返回消息队列对象 MessageQueue。
- 构造一个 Message,填充它的成员,尤其是 target 变量。
- 调用 MessageQueue 的 enqueueMessage,将消息插人消息队列。
这种原始方法的确很麻烦,且极容易出错。但有了 Handler 后,我们的工作就变得异常简单了。Handler 更像一个辅助类,帮助我们简化编程的工作。
2.2.2.1 Handler 和 Message
Handler 提供了一系列函数,帮助我们完成创建消息和插入消息队列的工作。这里只列举几个。要掌握详细的 API,则需要查看相关的文档。
	//查看消息队列中是否有详细码是what的消息
    public final boolean hasMessages(int what) {
        return mQueue.hasMessages(this, what, null);
    }
	//从消息队列中移除消息码是what的消息
    public final void removeMessages(int what) {
        mQueue.removeMessages(this, what, null);
    }
	//从Handler中创建一个消息码是what的消息
    public final Message obtainMessage(int what)
    {
        return Message.obtain(this, what);
    }
	//发送一个消息,该消息添加到队尾
    public final boolean sendMessage(Message msg)
    {
        return sendMessageDelayed(msg, 0);
    }
	//发送一个只填充了消息码的消息
    public final boolean sendEmptyMessage(int what)
    {
        return sendEmptyMessageDelayed(what, 0);
    }
	//发送一个消息,该消息添加到队头,优先级最高
    public final boolean sendMessageAtFrontOfQueue(Message msg) {
        MessageQueue queue = mQueue;
        if (queue == null) {
            RuntimeException e = new RuntimeException(
                this + " sendMessageAtTime() called with no mQueue");
            Log.w("Looper", e.getMessage(), e);
            return false;
        }
        return enqueueMessage(queue, msg, 0);
    }
看到上面这些函数我们可以预见,如果没有 Handler 的辅助,当我们自己操作 MessageQueue 的 enqueueMessage 时,得花费多大工夫。Handler 把 Message 的 target 设为自己,是因为 Handler 除了封装消息添加等功能外还封装了消息处理的接口。
2.2.2.1 Handler 的消息处理
刚才,我们往 Looper 的消息队列中加入了一个消息,按照 Looper 的处理规则,它在获取消息后会调用 target 的 dispatchMessage 函数,再把这个消息派发给 Handler 处理。Handler在这块是如何处理消息的呢?
    /**
     * Handle system messages here.
     */
    public void dispatchMessage(Message msg) {
    	//如果Message本身有mCallback ,则直接交给Message的mCallback 处理
        if (msg.callback != null) {
            handleCallback(msg);
        } else {
        	//如果本Handler设置了mCallback ,则交给mCallback 处理
            if (mCallback != null) {
                if (mCallback.handleMessage(msg)) {
                    return;
                }
            }
            //最后交给子类处理
            handleMessage(msg);
        }
    }
dispatchMessage 定义了一套消息处理的优先级机制,它们分别是:
- Message 如果自带了 callback 处理,则交给 callback 处理。
- Handler 如果设置了全局的 mCallback,则交给 mCallback 处理。
- 如果上述都没有,该消息则会被交给 Handler 子类实现的 handleMessage 来处理。当然,这需要从 Handler 派生并重载 handleMessage 函数。
在通常情况下,我们一般都是采用第三种方法,即在子类中通过重载 handleMessage 来完成处理工作的。
2.3 Looper和Handler的同步关系
Looper 和 Handler 会有什么同步关系呢?它们之间确实有同步关系,而且如果不注意此关系,定会铸成大错!同步关系肯定与多线程有关,我们来看下面的一个例子:
// 先定义一个 LooperThread 类
class LooperThread extends Thread {
	public Looper myLooper = null;//定义一个public 的成员myLooper,初值为空
	public void run() { // 假设 run 在线程2中执行
		Looper.prepare();
		// myLooper 必须在这个线程中赋值
		myLooper = Looper.myLooper();
		Looper.loop();
	}
}
//下面这段代码在线程 1中执行,并且会创建线程2
{
	LooperThread lpThread= new LooperThread();
	lpThread.start(); //start 后会创建线程 2
	Looper looper = lpThread.myLooper; //<======注意
	// thread2Handler 和线程 2 的 Looper 挂上钩
	Handler thread2Handler = new Handler(looper);
	//sendMessage 发送的消息将由线程 2处理
	threadHandler.sendMessage(...);
上面这段代码的目的:
- 线程1中创建线程2,并且线程2 通过 Looper 处理消息。
- 线程1中得到线程2的 Looper,并且根据这个 Looper 创建一个 Handler,这样发送给该 Handler 的消息将由线程2处理。
但很可惜,上面的代码是有问题的。如果我们熟悉多线,就会发现标有 “注意” 的那行代码存在着严重问题。myLoper 的创建是在线程2中,而looper 的赋值在线程1中很有可能此时线程2的run函数还没来得及给 myLooper 赋值,这样线程1中的 looper 将取到myLooper的初值,也就是 looper 等于null。另外,
Handler thread2Handler = new Handler(looper) 不能替换成
Handler thread2Handler = new Handler(Looper.myLooper())
这是因为,myLooper 返回的是调用线程的 Looper,即 Thread1 的 Looper,而不是我们想要的Thread2的 Looper。
解决此问题,可以采用同步的方式进行处理。其实, Android 早就替我们想好了,它提供了一个 HandlerThread 来解决这个问题。
2.4 HandlerThread介绍
HandlerThread 完美地解决了myLooper 可能为空的问题。下面来看看它是怎么做的,代码如下所示:
/**
 * Handy class for starting a new thread that has a looper. The looper can then be
 * used to create handler classes. Note that start() must still be called.
 */
public class HandlerThread extends Thread {
	......
    @Override
    // 线程2运行它的run函数,looper就是在run线程里创建的
    public void run() {
        mTid = Process.myTid();
        Looper.prepare();//创建这个线程上的Looper
        synchronized (this) {
            mLooper = Looper.myLooper();
            notifyAll(); //通知取Looper的线程1,此时Looper已经创建好了
        }
        Process.setThreadPriority(mPriority);
        onLooperPrepared();
        Looper.loop();
        mTid = -1;
    }

    /**
     * This method returns the Looper associated with this thread. If this thread not been started
     * or for any reason is isAlive() returns false, this method will return null. If this thread
     * has been started, this method will block until the looper has been initialized.
     * @return The looper.
     */
    // 线程1调用 getLooper来获取新线程的Looper
    public Looper getLooper() {
        if (!isAlive()) {
            return null;
        }

        // If the thread has been started, wait until the looper has been created.
        synchronized (this) {
            while (isAlive() && mLooper == null) {
                try {
                    wait(); //如果新线程还未创建Looper,等待
                } catch (InterruptedException e) {
                }
            }
        }
        return mLooper;
    }
	......
}
HandlerThread 很简单,通过 wait/notifyAll 就解决了问题。为了避免重复发明轮子,就使用 HandlerThread 类吧。


 190
190


 被折叠的 条评论
为什么被折叠?
被折叠的 条评论
为什么被折叠?
 到【灌水乐园】发言


