


安装docker
安装 Docker | Docker 从入门到实践![]() https://vuepress.mirror.docker-practice.com/install/
https://vuepress.mirror.docker-practice.com/install/
不需要设置防火墙
docker命令说明
docker images #查看所有本地主机的镜像
docker search 镜像名 #搜索镜像
docker pull 镜像名 [标签] #下载镜像(如果不写tag,默认是latest)
docker rmi 镜像名 [标签] #删除镜像 docker rmi -f $(docker images -aq) 删除全部镜像
docker tag 镜像名:版本 新镜像名:版本 #复制镜像并且修改名称
docker commit -a "xxx" -c "xxx" 镜像ID 名字:版本 #提交镜像
-a :提交的镜像作者;
-c :使用Dockerfile指令来创建镜像;
-m :提交时的说明文字;docker load -i /xxx/xxx.tar #导入镜像
docker save -o /xxx/xxx.tar #保存一个镜像为一个tar包
容器命令
docker run [可选参数] image 命令 #启动容器(无镜像会先下载镜像)
#参数说明
--name = "Name" 容器名字
-c 后面跟待完成的命令
-d 以后台方式运行并且返回ID,启动守护进程式容器
-i 使用交互方式运行容器,通常与t同时使用
-t 为容器重新分配一个伪输入终端。也即启动交互式容器
-p 指定容器端口 -p 容器端口:物理机端口 映射端口
-P 随机指定端口
-v 给容器挂载存储卷docker build #创建镜像 -f:指定dockerfile文件路径 -t:镜像名字以及标签
docker logs 容器实例的ID #查看容器日志
docker rename 旧名字 新名字 # 给容器重新命名
docker top 容器实例的ID #查看容器内进程
docker ps -a #列出所有容器(不加-a就是在运行的)
docker rm 容器实例的ID #删除容器(正在运行容器不能删除,除非加-f选项)
docker kill 容器实例的ID #杀掉容器
docker history 容器实例的ID #查看docker镜像的变更历史
docker start 容器实例的ID #启动容器
docker restart 容器实例的ID #重启容器
docker stop 容器实例的ID #停止正在运行的容器
docker attach /docker exec 容器实例的ID #同为进入容器命令,不同的是attach连接终止会让容器退出后台运行,而exec不会。并且,docker attach是进入正在执行的终端,不会情动新的进程,而docker exec则会开启一个新的终端,可以在里面操作。
docker image inspect 容器名称:容器标签 #查看容器内源数据
docker cp 容器id:容器内路径 目的主机路径 #从容器内拷贝文件到主机(常用)或者从主机拷贝到容器(一般用挂载)
exit #直接退出容器
crlt + P + Q #退出容器但是不终止运行
镜像的导入导出:
[root@docker1 ~]# docker run -itd ubuntu:18.04  bash
aaba782de4aa1de481caefca4c96e6cd32a902660015386d70450f459d7289df
[root@docker1 ~]# docker ps
CONTAINER ID   IMAGE          COMMAND   CREATED         STATUS         PORTS     NAMES
aaba782de4aa   ubuntu:18.04   "bash"    2 minutes ago   Up 2 minutes             quirky_khayyam
[root@docker1 ~]# docker exec -it quirky_khayyam bash
#为 quirky_khayyam 的容器内部启动一个交互式的 bash shell
root@aaba782de4aa:/# pwd
/
root@aaba782de4aa:/# touch test.txt
root@aaba782de4aa:/# exit
exit
[root@docker1 ~]# docker export aaba782de4aa  > ubuntu.tar
[root@docker1 ~]#
[root@docker1 ~]# docker stop quirky_khayyam
quirky_khayyam
[root@docker1 ~]# docker rm quirky_khayyam
quirky_khayyam
[root@docker1 ~]#

[root@docker1 ~]# cat ubuntu.tar | docker import - test/ubuntu:v1.0
sha256:2459841eac991ee8b0b6598e189ada679f1652e5ff95bcb27a38a9f863dc1d40
[root@docker1 ~]#

[root@docker1 ~]# docker image ls
REPOSITORY    TAG       IMAGE ID       CREATED          SIZE
test/ubuntu   v1.0      2459841eac99   55 seconds ago   63.2MB
ubuntu        18.04     f9a80a55f492   11 months ago    63.2MB
hello-world   latest    d2c94e258dcb   12 months ago    13.3kB
[root@docker1 ~]#

[root@docker1 ~]# docker run -it --name test test/ubuntu:v1.0 bash
root@bfe4f040f985:/# ls /test.txt
/test.txt
root@bfe4f040f985:/# exit
exit
[root@docker1 ~]# docker ps -a
CONTAINER ID   IMAGE              COMMAND   CREATED          STATUS                     PORTS     NAMES
bfe4f040f985   test/ubuntu:v1.0   "bash"    10 seconds ago   Exited (0) 2 seconds ago             test
[root@docker1 ~]# docker rm test
test
[root@docker1 ~]#

注:容器导出为镜像,从镜像运行容器,可恢复导出前的效果
Docker导入导出镜像:
[root@docker1 ~]# docker save hello-world:latest -o hello.tar
[root@docker1 ~]# ls hello.tar
hello.tar
[root@docker1 ~]#

[root@docker1 ~]# scp hello.tar 192.168.99.129:/
root@192.168.99.129's password:
hello.tar                                                100%   25KB  14.4MB/s   00:00
[root@docker1 ~]#

[root@docker2 ~]# docker load -i /hello.tar
ac28800ec8bb: Loading layer  14.85kB/14.85kB
Loaded image: hello-world:latest
[root@docker2 ~]# docker image ls
REPOSITORY    TAG       IMAGE ID       CREATED         SIZE
hello-world   latest    d2c94e258dcb   12 months ago   13.3kB
[root@docker2 ~]#
[root@docker2 ~]# docker rmi hello-world:latest

[root@docker1 ~]# docker save hello-world:latest ubuntu:18.04 -o hello_ubuntu.tar
[root@docker1 ~]# scp hello_ubuntu.tar 192.168.99.129:/
root@192.168.99.129's password:
hello_ubuntu.tar                                                           100%   63MB  71.0MB/s   00:00
[root@docker1 ~]#

[root@docker2 ~]# docker load -i /hello_ubuntu.tar
ac28800ec8bb: Loading layer  14.85kB/14.85kB
Loaded image: hello-world:latest
548a79621a42: Loading layer  65.53MB/65.53MB
Loaded image: ubuntu:18.04
[root@docker2 ~]# docker image ls
REPOSITORY    TAG       IMAGE ID       CREATED         SIZE
ubuntu        18.04     f9a80a55f492   11 months ago   63.2MB
hello-world   latest    d2c94e258dcb   12 months ago   13.3kB
[root@docker2 ~]#


[root@docker2 ~]# docker info 显示docker系统级别的一些信息
[root@docker1 ~]# docker inspect --help 返回docker对象的一些信息(镜像或容器)
[root@docker1 ~]# docker inspect hello-world:latest 输出略
利用 commit 理解镜像构成:
运行nginx镜像:
[root@docker1 ~]# docker pull nginx
[root@docker1 ~]# docker image ls nginx
REPOSITORY   TAG       IMAGE ID       CREATED       SIZE
nginx        latest    e784f4560448   13 days ago   188MB
[root@docker1 ~]#

[root@docker1 ~]# docker run -d --name nginx1 nginx
d4a4ee4c2ca600935ecf8c63681683c479f8c6d0ce68f093d93161bc7416a1e8
[root@docker1 ~]# docker ps
CONTAINER ID   IMAGE     COMMAND                  CREATED          STATUS          PORTS     NAMES
d4a4ee4c2ca6   nginx     "/docker-entrypoint.…"   15 seconds ago   Up 14 seconds   80/tcp    nginx1
[root@docker1 ~]#


[root@docker1 ~]# ip a s docker0
4: docker0: <BROADCAST,MULTICAST,UP,LOWER_UP> mtu 1500 qdisc noqueue state UP group default
    link/ether 02:42:4f:7c:ef:33 brd ff:ff:ff:ff:ff:ff
    inet 172.17.0.1/16 brd 172.17.255.255 scope global docker0
       valid_lft forever preferred_lft forever
    inet6 fe80::42:4fff:fe7c:ef33/64 scope link
       valid_lft forever preferred_lft forever
[root@docker1 ~]# curl -I 172.17.0.2
HTTP/1.1 200 OK
Server: nginx/1.25.5
Date: Fri, 17 May 2024 07:27:27 GMT
Content-Type: text/html
Content-Length: 615
Last-Modified: Tue, 16 Apr 2024 14:29:59 GMT
Connection: keep-alive
ETag: "661e8b67-267"
Accept-Ranges: bytes

[root@docker1 ~]#
如果镜像包含ip或ifconfig等命令,可以连接到容器查看ip:
[root@docker1 ~]# docker exec -it nginx1 bash

如果没有查看ip的命令:可以使用inspect子命令
[root@docker1 ~]# docker inspect nginx1 | grep -i ipaddress
            "SecondaryIPAddresses": null,
            "IPAddress": "172.17.0.2",
                    "IPAddress": "172.17.0.2",
[root@docker1 ~]# docker inspect nginx1 | grep -i ip
            "IpcMode": "private",
            "LinkLocalIPv6Address": "",
            "LinkLocalIPv6PrefixLen": 0,
            "SecondaryIPAddresses": null,
            "SecondaryIPv6Addresses": null,
            "GlobalIPv6Address": "",
            "GlobalIPv6PrefixLen": 0,
            "IPAddress": "172.17.0.2",
            "IPPrefixLen": 16,
            "IPv6Gateway": "",
                    "IPAMConfig": null,
                    "IPAddress": "172.17.0.2",
                    "IPPrefixLen": 16,
                    "IPv6Gateway": "",
                    "GlobalIPv6Address": "",
                    "GlobalIPv6PrefixLen": 0,
[root@docker1 ~]#
此时docker1访问正常:
[root@docker1 ~]# curl -I 172.17.0.2
HTTP/1.1 200 OK
Server: nginx/1.25.5
Date: Fri, 17 May 2024 07:32:55 GMT
Content-Type: text/html
Content-Length: 615
Last-Modified: Tue, 16 Apr 2024 14:29:59 GMT
Connection: keep-alive
ETag: "661e8b67-267"
Accept-Ranges: bytes

[root@docker1 ~]#
Docker2无法访问:
[root@docker2 ~]# curl 172.17.0.2
curl: (7) Failed to connect to 172.17.0.2 port 80: No route to host
[root@docker2 ~]#

[root@docker1 ~]# firewall-cmd --set-default-zone=trusted
success
[root@docker1 ~]# setenforce 0
[root@docker2 ~]# firewall-cmd --set-default-zone=trusted
success
[root@docker2 ~]#
[root@docker2 ~]# setenforce 0
此时docker2无法访问:
- 因为本机也有172.17.0.1的docker0网桥,找172.17.0.2时在本机找
- 即使本机没有172.17.0.1的docker0网桥,也无法访问,因为缺少到容器网段的路由,需手动添加静态路由,容器主机中也需要有返回的路由
如何使docker2能否访问docker1的容器web服务:
可以使用端口映射:将容器的端口映射到虚拟机的端口
[root@docker1 ~]# docker stop nginx1
nginx1
[root@docker1 ~]# docker rm nginx1
nginx1
[root@docker1 ~]# docker run -d --name nginx2 -p 80:80 nginx
db4296a9e0e2f6f84a8032e45567b39d5921ac613af89bea1b194842ed58b197
[root@docker1 ~]#

[root@docker1 ~]# docker exec -it nginx2 bash
root@db4296a9e0e2:/# find / -name "index.html"
find: '/proc/29/map_files': Permission denied
find: '/proc/30/map_files': Permission denied
find: '/proc/31/map_files': Permission denied
find: '/proc/32/map_files': Permission denied
/usr/share/nginx/html/index.html
root@db4296a9e0e2:/# echo docker1-nginx2 > /usr/share/nginx/html/test.html
root@db4296a9e0e2:/# exit
exit
[root@docker1 ~]#
[root@docker1 ~]# ip a s ens160
2: ens160: <BROADCAST,MULTICAST,UP,LOWER_UP> mtu 1500 qdisc mq state UP group default qlen 1000
    link/ether 00:50:56:31:08:49 brd ff:ff:ff:ff:ff:ff
    altname enp3s0
    inet 192.168.99.138/24 brd 192.168.99.255 scope global dynamic noprefixroute ens160
       valid_lft 1092sec preferred_lft 1092sec
    inet6 fe80::250:56ff:fe31:849/64 scope link noprefixroute
       valid_lft forever preferred_lft forever
[root@docker1 ~]# curl 192.168.99.138/test.html
docker1-nginx2
[root@docker1 ~]#

[root@docker2 ~]# curl  192.168.99.138/test.html
docker1-nginx2
[root@docker2 ~]#
注:
此时docker1和docker2的防火墙都是trusted状态,如果是public,自行放行服务或端口

注: -p 80:80  前面是宿主机端口,后面是容器端口
[root@docker1 ~]# docker stop nginx2
nginx2
[root@docker1 ~]# docker rm nginx2
nginx2
[root@docker1 ~]#
[root@docker1 ~]# docker run -d --name nginx3 -p 8080:80 nginx
566dfc7e1e699d5fc159421804fc1092f60c342f4d59fb7d7c77e44b1db659e6
[root@docker1 ~]# docker ps
CONTAINER ID   IMAGE     COMMAND                  CREATED         STATUS         PORTS                                   NAMES
566dfc7e1e69   nginx     "/docker-entrypoint.…"   4 seconds ago   Up 3 seconds   0.0.0.0:8080->80/tcp, :::8080->80/tcp   nginx3
[root@docker1 ~]# curl -I 192.168.99.138:8080
HTTP/1.1 200 OK
Server: nginx/1.25.5
Date: Fri, 17 May 2024 07:47:35 GMT
Content-Type: text/html
Content-Length: 615
Last-Modified: Tue, 16 Apr 2024 14:29:59 GMT
Connection: keep-alive
ETag: "661e8b67-267"
Accept-Ranges: bytes

[root@docker1 ~]#
[root@docker1 ~]# curl -I 192.168.122.1:8080
HTTP/1.1 200 OK
Server: nginx/1.25.5
Date: Fri, 17 May 2024 07:48:57 GMT
Content-Type: text/html
Content-Length: 615
Last-Modified: Tue, 16 Apr 2024 14:29:59 GMT
Connection: keep-alive
ETag: "661e8b67-267"
Accept-Ranges: bytes

[root@docker1 ~]#
[root@docker1 ~]# ss -antpul | grep 8080
tcp   LISTEN 0      128           0.0.0.0:8080       0.0.0.0:*    users:(("docker-proxy",pid=61079,fd=4))
tcp   LISTEN 0      128              [::]:8080          [::]:*    users:(("docker-proxy",pid=61085,fd=4))
[root@docker1 ~]#

可以只映射到宿主机指定ip的80端口:
[root@docker1 ~]# docker stop nginx3
nginx3
[root@docker1 ~]# docker rm nginx3
nginx3
[root@docker1 ~]# docker run -d --name nginx4 -p 192.168.99.138:8080:80 nginx
e5a62599706c1e7634ca763394340aa34f9436d3caeece143025524898f40607
[root@docker1 ~]# docker ps
CONTAINER ID   IMAGE     COMMAND                  CREATED         STATUS         PORTS                         NAMES
e5a62599706c   nginx     "/docker-entrypoint.…"   5 seconds ago   Up 4 seconds   192.168.99.138:8080->80/tcp   nginx4
[root@docker1 ~]# ss -antpul | grep 8080
tcp   LISTEN 0      128    192.168.99.138:8080       0.0.0.0:*    users:(("docker-proxy",pid=61383,fd=4))
[root@docker1 ~]#

[root@docker1 ~]# curl -I 192.168.122.1:8080
curl: (7) Failed to connect to 192.168.122.1 port 8080: Connection refused
[root@docker1 ~]# curl -I 192.168.122.1:8080
curl: (7) Failed to connect to 192.168.122.1 port 8080: Connection refused
[root@docker1 ~]# curl -I 192.168.99.138:8080
HTTP/1.1 200 OK
Server: nginx/1.25.5
Date: Fri, 17 May 2024 07:50:46 GMT
Content-Type: text/html
Content-Length: 615
Last-Modified: Tue, 16 Apr 2024 14:29:59 GMT
Connection: keep-alive
ETag: "661e8b67-267"
Accept-Ranges: bytes

[root@docker1 ~]#

-P:随机映射,前提是容器已经定义了需要暴露的端口
[root@docker1 ~]# docker stop nginx4
nginx4
[root@docker1 ~]# docker rm nginx4
nginx4
[root@docker1 ~]# docker run -d --name nginx5 -P nginx
60ca1a4b8ffca7328e5bf0dcf84a5b86829c68f2ba970d2a6281a796624cbbd8
[root@docker1 ~]# docker ps
CONTAINER ID   IMAGE     COMMAND                  CREATED         STATUS         PORTS                                     NAMES
60ca1a4b8ffc   nginx     "/docker-entrypoint.…"   4 seconds ago   Up 3 seconds   0.0.0.0:32768->80/tcp, :::32768->80/tcp   nginx5
[root@docker1 ~]#
[root@docker1 ~]# curl -I 192.168.99.138:32768
HTTP/1.1 200 OK
Server: nginx/1.25.5
Date: Fri, 17 May 2024 07:53:22 GMT
Content-Type: text/html
Content-Length: 615
Last-Modified: Tue, 16 Apr 2024 14:29:59 GMT
Connection: keep-alive
ETag: "661e8b67-267"
Accept-Ranges: bytes

[root@docker1 ~]#
查看容器要暴露的端口:
[root@docker1 ~]# docker inspect nginx5 | grep -A 5  ExposedPorts
            "ExposedPorts": {
                "80/tcp": {}
            },
            "Tty": false,
            "OpenStdin": false,
            "StdinOnce": false,
[root@docker1 ~]#
查看镜像定义的暴露端口:
[root@docker1 ~]# docker inspect nginx:latest | grep -A 5  ExposedPorts
            "ExposedPorts": {
                "80/tcp": {}
            },
            "Tty": false,
            "OpenStdin": false,
            "StdinOnce": false,
[root@docker1 ~]#
[root@docker1 ~]# docker stop nginx5
nginx5
[root@docker1 ~]# docker rm nginx5
nginx5
[root@docker1 ~]#
[root@docker1 ~]# docker run -d --name nginx6 -p 80:80 nginx
e31bc64cd4958b83394565d0fa269a00c33f59c3728a3eda1b70cf9e93452c9c
[root@docker1 ~]# docker exec -it nginx6 bash
root@e31bc64cd495:/# echo nginx-test > /usr/share/nginx/html/test.html
root@e31bc64cd495:/# exit
exit
[root@docker1 ~]#

[root@docker1 ~]# docker ps
CONTAINER ID   IMAGE     COMMAND                  CREATED          STATUS          PORTS                               NAMES
e31bc64cd495   nginx     "/docker-entrypoint.…"   39 seconds ago   Up 38 seconds   0.0.0.0:80->80/tcp, :::80->80/tcp   nginx6
[root@docker1 ~]# docker commit --message "add test.html" nginx6 nginx-test:v1
sha256:cb4960a17a3342101dd984daa6facba546c8c3952e94ac807f2f2ff4dc6de50d
[root@docker1 ~]# docker image ls nginx-test:v1
REPOSITORY   TAG       IMAGE ID       CREATED         SIZE
nginx-test   v1        cb4960a17a33   8 seconds ago   188MB
[root@docker1 ~]#

[root@docker1 ~]# docker image ls | grep nginx
nginx-test    v1        cb4960a17a33   44 seconds ago   188MB
nginx         latest    e784f4560448   13 days ago      188MB
[root@docker1 ~]#
[root@docker1 ~]# curl 192.168.99.138/test.html
nginx-test
[root@docker1 ~]#
[root@docker1 ~]# docker stop nginx6;docker rm nginx6
nginx6
nginx6
[root@docker1 ~]# docker run -d --name nginx7 -p 80:80 nginx-test:v1
11e90accf1772d7516f80a418ae5f53104c8819c8e2878831c970e10b0fa403e
[root@docker1 ~]# curl 192.168.99.138/test.html
nginx-test
[root@docker1 ~]#

[root@docker1 ~]# docker stop nginx7
nginx7
[root@docker1 ~]# docker rm nginx7
nginx7
[root@docker1 ~]# docker image rm nginx-test:v1
Untagged: nginx-test:v1
Deleted: sha256:cb4960a17a3342101dd984daa6facba546c8c3952e94ac807f2f2ff4dc6de50d
Deleted: sha256:b07365485892d137124c53286c7dd4a6464da9f187e4300110fcf2f863324056
[root@docker1 ~]# 有些层被nginx:latest镜像使用,没有删除
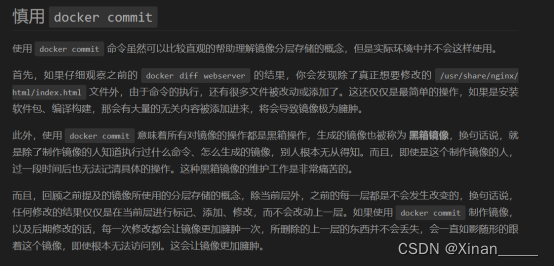
Docker export和docker commit的区别:
Docker export:Export a container's filesystem as a tar archive 保存文件系统快照
Docker commit:Create a new image from a container's changes 根据变更生成新镜像
Commit会保留元数据、运行时状态等内容:
[root@docker1 ~]# docker run ubuntu:18.04 /bin/sh -c "while true; do echo hello world; sleep 1; done"
此终端保留
另起一个终端:
[root@docker1 ~]# docker export vibrant_turing > test_export.tar
[root@docker1 ~]# docker commit --message "use while" vibrant_turing test_commit:v1
sha256:766f22a748b9102411744a377fa0f5c6b6c284756a40e984e41e700dfb0fffce
[root@docker1 ~]#

[root@docker1 ~]# docker stop vibrant_turing
vibrant_turing
[root@docker1 ~]# docker rm vibrant_turing
vibrant_turing
[root@docker1 ~]#

[root@docker1 ~]# cat test_export.tar | docker import - test_export:v1
sha256:de19b4e7f444c5495b9ae713664142a617b725e19ec58cf070a5ffa951c8b295
[root@docker1 ~]#

[root@docker1 ~]# docker image ls | grep test_
test_export   v1        de19b4e7f444   17 seconds ago       63.2MB
test_commit   v1        766f22a748b9   About a minute ago   63.2MB
[root@docker1 ~]#
[root@docker1 ~]# docker history ubuntu:18.04
IMAGE          CREATED         CREATED BY                                      SIZE      COMMENT
f9a80a55f492   11 months ago   /bin/sh -c #(nop)  CMD ["/bin/bash"]            0B
<missing>      11 months ago   /bin/sh -c #(nop) ADD file:3c74e7e08cbf9a876…   63.2MB
<missing>      11 months ago   /bin/sh -c #(nop)  LABEL org.opencontainers.…   0B
<missing>      11 months ago   /bin/sh -c #(nop)  LABEL org.opencontainers.…   0B
<missing>      11 months ago   /bin/sh -c #(nop)  ARG LAUNCHPAD_BUILD_ARCH     0B
<missing>      11 months ago   /bin/sh -c #(nop)  ARG RELEASE                  0B
[root@docker1 ~]#

[root@docker1 ~]# docker history test_commit:v1
IMAGE          CREATED         CREATED BY                                      SIZE      COMMENT
766f22a748b9   2 minutes ago   /bin/sh -c while true; do echo hello world; …   0B        use while
f9a80a55f492   11 months ago   /bin/sh -c #(nop)  CMD ["/bin/bash"]            0B
<missing>      11 months ago   /bin/sh -c #(nop) ADD file:3c74e7e08cbf9a876…   63.2MB
<missing>      11 months ago   /bin/sh -c #(nop)  LABEL org.opencontainers.…   0B
<missing>      11 months ago   /bin/sh -c #(nop)  LABEL org.opencontainers.…   0B
<missing>      11 months ago   /bin/sh -c #(nop)  ARG LAUNCHPAD_BUILD_ARCH     0B
<missing>      11 months ago   /bin/sh -c #(nop)  ARG RELEASE                  0B
[root@docker1 ~]#

[root@docker1 ~]# docker history test_export:v1 (没有历史元数据)
IMAGE          CREATED         CREATED BY   SIZE      COMMENT
de19b4e7f444   2 minutes ago                63.2MB    Imported from -
[root@docker1 ~]#


[root@docker1 ~]# docker run test_export:v1(没有保存程序运行的状态)
docker: Error response from daemon: no command specified.
See 'docker run --help'.
[root@docker1 ~]# docker run test_export:v1 cat /etc/hosts
127.0.0.1	localhost
::1	localhost ip6-localhost ip6-loopback
fe00::0	ip6-localnet
ff00::0	ip6-mcastprefix
ff02::1	ip6-allnodes
ff02::2	ip6-allrouters
172.17.0.2	328c0312c571
[root@docker1 ~]#
[root@docker1 ~]# docker ps -a
CONTAINER ID   IMAGE            COMMAND            CREATED          STATUS                      PORTS     NAMES
328c0312c571   test_export:v1   "cat /etc/hosts"   39 seconds ago   Exited (0) 38 seconds ago             hopeful_jemison
[root@docker1 ~]# docker rm hopeful_jemison
hopeful_jemison
[root@docker1 ~]#

[root@docker1 ~]# docker run test_commit:v1 (保留了程序的运行状态)
hello world
hello world
…….
[root@docker1 ~]# docker stop recursing_thompson
recursing_thompson
[root@docker1 ~]# docker rm recursing_thompson
recursing_thompson
[root@docker1 ~]#

[root@docker1 ~]# docker rmi test_export:v1 test_commit:v1
Untagged: test_export:v1
Deleted: sha256:de19b4e7f444c5495b9ae713664142a617b725e19ec58cf070a5ffa951c8b295
Deleted: sha256:52c27cd07f847f4a06c176cb00ac51e6459d9d8b557136320ad12111093a2a6c
Untagged: test_commit:v1
Deleted: sha256:766f22a748b9102411744a377fa0f5c6b6c284756a40e984e41e700dfb0fffce
[root@docker1 ~]#
使用 Dockerfile 定制镜像:
Dockerfile 是一个文本文件,其内包含了一条条的 指令(Instruction),每一条指令构建一层,因此每一条指令的内容,就是描述该层应当如何构建。
使用dockerfile构建nginx镜像:
[root@docker1 ~]# mkdir /nginxdir
[root@docker1 ~]# cd /nginxdir
[root@docker1 nginxdir]# touch Dockerfile
[root@docker1 nginxdir]# vim Dockerfile
[root@docker1 nginxdir]# cat Dockerfile
FROM nginx:latest
RUN echo '<h1>Hello, Docker!</h1>' > /usr/share/nginx/html/index.html
[root@docker1 nginxdir]#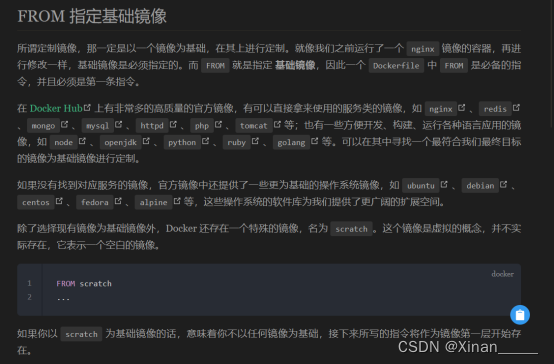


注:
Dockerfile 中每一个指令都会建立一层
Union FS 是有最大层数限制的,比如 AUFS,曾经是最大不得超过 42 层,现在是不得超过 127 层。
执行构建:
docker build [选项] <上下文路径/URL/->
下面命令中:.(点) 代表上下文路径
[root@docker1 nginxdir]# docker build -t nginx:v1 .
[+] Building 0.7s (6/6) FINISHED                                            docker:default
 => [internal] load build definition from Dockerfile                                  0.0s
 => => transferring dockerfile: 182B                                                  0.0s
 => [internal] load metadata for docker.io/library/nginx:latest                       0.0s
 => [internal] load .dockerignore                                                     0.0s
 => => transferring context: 2B                                                       0.0s
 => [1/2] FROM docker.io/library/nginx:latest                                         0.0s
 => [2/2] RUN echo '<h1>Hello, Docker!</h1>' > /usr/share/nginx/html/index.html       0.5s
 => exporting to image                                                                0.0s
 => => exporting layers                                                               0.0s
 => => writing image sha256:45619c5922baedbe007f2e632c592db9ffd2c6f4b8ea41608ee9e29a  0.0s
 => => naming to docker.io/library/nginx:v1                                           0.0s
[root@docker1 nginxdir]#
[root@docker1 nginxdir]# docker image ls | grep nginx
nginx v1 45619c5922ba 2 minutes ago 188MB
nginx latest e784f4560448 13 days ago 188MB
[root@docker1 nginxdir]# docker history nginx:v1
[root@docker1 nginxdir]# docker run -d -p 80:80 nginx:v1
ef8dd71f77eddded5e5b35ed698ba3b469c65c707998f89e5fe9ce7dddc86c9a
[root@docker1 nginxdir]# curl 192.168.99.138
<h1>Hello, Docker!</h1>
[root@docker1 nginxdir]# docker stop brave_kapitsa
brave_kapitsa
[root@docker1 nginxdir]# docker rm brave_kapitsa
brave_kapitsa
[root@docker1 nginxdir]#
COPY:复制
格式:
COPY [--chown=<user>:<group>] <源路径>... <目标路径>
COPY [--chown=<user>:<group>] ["<源路径1>",... "<目标路径>"]
参考:COPY 复制文件 | Docker 从入门到实践![]() https://vuepress.mirror.docker-practice.com/image/dockerfile/copy/
https://vuepress.mirror.docker-practice.com/image/dockerfile/copy/
添加两个页面到nginx容器中:
[root@docker1 nginxdir]# cat Dockerfile
FROM nginx:v1
COPY test*.html /usr/share/nginx/html/
[root@docker1 nginxdir]#
[root@docker1 nginxdir]# echo test2 > test2.html
[root@docker1 nginxdir]# echo test3 > test3.html
[root@docker1 nginxdir]# ls
Dockerfile  test2.html  test3.html
[root@docker1 nginxdir]#
[root@docker1 nginxdir]# docker build -t nginx:v2 . 输出略
注:如果dockerfile文件名不是Dockerfile,是其他名字,需用-f选项指定
如:docker build -f dfile -t nginx:v2
验证:
[root@docker1 nginxdir]# docker run -d --name nginxv2 --rm -p 80:80 nginx:v2
41f46e9bf3c86f63bd7edf22c6dc3a04d139bba8bc626593edf310fe0865da62
[root@docker1 nginxdir]# curl 192.168.99.138
<h1>Hello, Docker!</h1>
[root@docker1 nginxdir]# curl 192.168.99.138/test2.html
test2
[root@docker1 nginxdir]# curl 192.168.99.138/test3.html
test3
[root@docker1 nginxdir]# docker stop nginxv2
nginxv2
[root@docker1 nginxdir]# docker ps -a
CONTAINER ID   IMAGE     COMMAND   CREATED   STATUS    PORTS     NAMES
[root@docker1 nginxdir]#
Sed的替换命令:
[root@docker1 ~]# cat test.txt
book
booka
bookb
bookc
aabb
[root@docker1 ~]#
[root@docker1 ~]# sed 's/book/books/' test.txt(没有真正的修改文件内容)
books
booksa
booksb
booksc
aabb
[root@docker1 ~]#

-n选项和p命令一起使用表示只打印那些发生替换的行:
[root@docker1 ~]# sed -n 's/book/books/p' test.txt (没有真正的修改文件内容)
books
booksa
booksb
booksc
[root@docker1 ~]#


[root@docker1 ~]# sed -i 's/book/books/' test.txt(-i:真正修改文件)
[root@docker1 ~]# cat test.txt
books
booksa
booksb
booksc
aabb
[root@docker1 ~]#

可以使用正则表达式:
[root@docker1 ~]# sed -n 's/^a.*/bbaa/p' test.txt;
bbaa
[root@docker1 ~]#

/可以换成其他字符,和命令中的其他符号不冲突即可:
[root@docker1 ~]# sed -n 's,^a.*,books,p' test.txt
books
[root@docker1 ~]# sed -n 's;^a.*;books;p' test.txt
books
[root@docker1 ~]#


Sed根据正则表达式打印指定的行:
[root@docker1 ~]# vim test-nginx.conf (nginx配置文件的副本)
[root@docker1 ~]# sed -n '/root/p' test-nginx.conf
        root         /usr/share/nginx/html;
#        root         /usr/share/nginx/html;
[root@docker1 ~]#

[root@docker1 ~]# sed -n '/^#.*root.*/p' test-nginx.conf
#        root         /usr/share/nginx/html;
[root@docker1 ~]#
[root@docker1 ~]# sed -n '/^ .*root.*/p' test-nginx.conf
        root         /usr/share/nginx/html;
[root@docker1 ~]#

[root@docker1 ~]# sed -n 's,^ .*root.*$,        root /webdir;,p' test-nginx.conf
        root /webdir;
[root@docker1 ~]#实验1,使用Dockerfile构建镜像:
在docker1:
基于nginx的基础镜像,修改网站根目录为/webdir
使用RUN命令修改主页index.html的内容为index
使用COPY命令添加页面page1.html和page2.html,内容分别为page1和page2
构建镜像名为nginx-test:v1,构建完镜像后,将镜像发送到docker2
在docker2:
导入镜像,并运行容器,将nginx的80端口映射到docker2的82端口
设置防火墙默认区域为public
验证效果:
在docker1:
Curl docker2ip:82--------index
Curl docker2ip:82/page1.html--------page1
Curl docker2ip:82/page2.html--------index2
[root@docker1 ~]# mkdir /webdir/
[root@docker1 ~]# echo page1 > /webdir/page1.html
[root@docker1 ~]# echo page2 > /webdir/page2.html
[root@docker1 ~]# vim /webdir/Dockerfile
[root@docker1 webdir]# cat Dockerfile
FROM nginx:latest
RUN sed -i 's,^     .*root.*$,        root /webdir;,' /etc/nginx/conf.d/default.conf && mkdir /webdir && echo index > /webdir/index.html
COPY *.html /webdir
[root@docker1 webdir]#
[root@docker1 webdir]# docker build -t nginx-test:v1 .
[root@docker1 webdir]# docker image ls nginx-test
REPOSITORY   TAG       IMAGE ID       CREATED          SIZE
nginx-test   v1        6adced280b20   22 seconds ago   188MB
[root@docker1 webdir]#
[root@docker1 webdir]# docker run -d --name nginx-test1 --rm -p82:80 nginx-test:v1
056ea76311defbdc06cc75a821f86c62224fc9cb4fbc3358c5f21dfe0d9114db
[root@docker1 webdir]# curl 127.0.0.1:82
index
[root@docker1 webdir]# curl 127.0.0.1:82/page1.html
page1
[root@docker1 webdir]# curl 127.0.0.1:82/page2.html
page2
[root@docker1 webdir]#实验2使用scratch空白镜像创建一个镜像,并运行出容器,能查看执行命令的输出即可(+5/-0)
制作镜像时,可以将容器内的default.conf先复制出来,修改后使用COPY复制到容器指定位置,替换原来的配置文件
空白镜像:FROM scratch
[root@docker1 ~]# mkdir /hello-c
[root@docker1 ~]# cd /hello-c
[root@docker1 hello-c]# vim hello.c
[root@docker1 hello-c]# cat hello.c
#include<stdio.h>
int main(void)
{
  printf ("Hello world!\n");
  return 0;
}
[root@docker1 hello-c]# [root@docker1 hello-c]# yum -y install gcc gcc-c++ 安装编译工具
[root@docker1 hello-c]# gcc hello.c -o hello
[root@docker1 hello-c]# ls
hello  hello.c
[root@docker1 hello-c]#
[root@docker1 hello-c]# ./hello
Hello world!
[root@docker1 hello-c]#
实验3
以centos的镜像为基础镜像,在其中安装httpd,添加apache的用户和组(如果没有的话)
同时在dockerfile中暴露80端口,编写index.html和page1.html拷贝至容器网站根目录
安装后编写ep.sh作为entrypoint要执行的脚本:参照redis编写
如果第一个参数是apache,则将所有的httpd相关的文件属主修改为apache
可修改/etc/httpd目录和/var/www/html目录下的所有文件的属主为apache
如果第一个参数是httpd,则运行httpd -D FOREGROUND启动httpd服务,如果第一个参数不是httpd,则将参数作为命令执行
[root@docker1 custom_httpd]# echo index > index.html
[root@docker1 custom_httpd]# echo page1 > page1.html
[root@docker1 ~]# mkdir /custom_httpd
[root@docker1 ~]# cd /custom_httpd
[root@docker1 custom_httpd]# cat ep.sh
#! /bin/bash
if [ "$1" = 'httpd' ]; then
	chown -R apache /etc/httpd
	chown -R apache /var/www/html
	httpd -D FOREGROUND

fi
$@

[root@docker1 custom_httpd]#
[root@docker1 custom_httpd]# chmod +x ep.sh
[root@docker1 custom_httpd]# cat Dockerfile
FROM centos
RUN rm -rf /etc/yum.repos.d/* \
    && curl -o /etc/yum.repos.d/CentOS-Base.repo https://mirrors.aliyun.com/repo/Centos-vault-8.5.2111.repo \
    && yum -y install httpd \
    && yum clean all
COPY ep.sh /
COPY *.html /var/www/html
EXPOSE 80
ENTRYPOINT ["/ep.sh"]
CMD ["httpd"]

[root@docker1 custom_httpd]#
[root@docker1 custom_httpd]# docker build -t myhttpd:v1 .

[root@docker1 custom_httpd]# docker run --rm myhttpd:v1 id
uid=0(root) gid=0(root) groups=0(root)
[root@docker1 custom_httpd]# docker run -d --rm myhttpd:v1 httpd
f31efccb26405f73aaa0cc6ad6e6729947bc52b12e0a7dadc6df25128b9e25d8
[root@docker1 custom_httpd]# docker ps -a
CONTAINER ID   IMAGE        COMMAND          CREATED         STATUS         PORTS     NAMES
f31efccb2640   myhttpd:v1   "/ep.sh httpd"   3 seconds ago   Up 2 seconds   80/tcp    exciting_williams
[root@docker1 custom_httpd]#
[root@docker1 custom_httpd]# curl 172.17.0.2
index
[root@docker1 custom_httpd]# curl 172.17.0.2/page1.html
page1
[root@docker1 custom_httpd]# docker stop exciting_williams
exciting_williams
[root@docker1 custom_httpd]#

(
如果页面在容器生成,可修改Dockerfile如下:尽可能的减少层数
[root@docker1 custom_httpd]# cat Dockerfile
FROM centos
RUN rm -rf /etc/yum.repos.d/* \
    && curl -o /etc/yum.repos.d/CentOS-Base.repo https://mirrors.aliyun.com/repo/Centos-vault-8.5.2111.repo \
    && yum -y install httpd \
    && yum clean all \
    && echo index > /var/www/html/index.html \
    && echo page1 > /var/www/html/page1.html
COPY ep.sh /
EXPOSE 80
ENTRYPOINT ["/ep.sh"]
CMD ["httpd"]

[root@docker1 custom_httpd]#
[root@docker1 custom_httpd]#
[root@docker1 custom_httpd]# docker build -t myhttpd:v1 .

[root@docker1 custom_httpd]# docker run --rm myhttpd:v1 id
uid=0(root) gid=0(root) groups=0(root)
[root@docker1 custom_httpd]# docker run -d --rm myhttpd:v1 httpd
f31efccb26405f73aaa0cc6ad6e6729947bc52b12e0a7dadc6df25128b9e25d8
[root@docker1 custom_httpd]# docker ps -a
CONTAINER ID   IMAGE        COMMAND          CREATED         STATUS         PORTS     NAMES
f31efccb2640   myhttpd:v1   "/ep.sh httpd"   3 seconds ago   Up 2 seconds   80/tcp    exciting_williams
[root@docker1 custom_httpd]#
[root@docker1 custom_httpd]# curl 172.17.0.2
index
[root@docker1 custom_httpd]# curl 172.17.0.2/page1.html
page1
[root@docker1 custom_httpd]# docker stop exciting_williams
exciting_williams
[root@docker1 custom_httpd]#

(
如果页面在容器生成,可修改Dockerfile如下:尽可能的减少层数
[root@docker1 custom_httpd]# cat Dockerfile
FROM centos
RUN rm -rf /etc/yum.repos.d/* \
    && curl -o /etc/yum.repos.d/CentOS-Base.repo https://mirrors.aliyun.com/repo/Centos-vault-8.5.2111.repo \
    && yum -y install httpd \
    && yum clean all \
    && echo index > /var/www/html/index.html \
    && echo page1 > /var/www/html/page1.html
COPY ep.sh /
EXPOSE 80
ENTRYPOINT ["/ep.sh"]
CMD ["httpd"]

[root@docker1 custom_httpd]# 


 982
982

 被折叠的 条评论
为什么被折叠?
被折叠的 条评论
为什么被折叠?
 到【灌水乐园】发言


