


大家都知道 文字和图片的预训练方式有很多。一般只是在论文里看到这些预训练方式感觉还挺有道理的,但实际上去做的时候,有时候会感觉没有方向,挺迷茫的。那么常见的预训练该怎么做呢? 这篇文章我会主要记录对这些预训练的学习。
任务1:MLM。:
Masklanguage modeling
最常见的预训练任务。 遮住句子里的某一个字,用上下文来预测这个字。
代码来源:GitHub - zr2021/2021_QQ_AIAC_Tack1_1st: QQ浏览器2021AI算法大赛赛道一 第1名 方案
这个任务, 会mask掉百分之15词,然后让模型去预测这些词。
看代码怎么做的。
        if 'mlm' in sample_task:
            input_ids, lm_label = self.lm.torch_mask_tokens(text_input_ids.cpu())
            text_input_ids = input_ids.to(text_input_ids.device)
            lm_label = lm_label[:, :].to(text_input_ids.device) # [SEP] 卡 MASK 大师 [SEP]
            return_mlm = True
先看第一句, self.lm就是 下面的masklm 。他的初始化定义了两个参数 ,第一个是遮盖的比例是多少。第二个参数是分词编码器。一般是载入自己所用bert的分词器。比如bert-chinese。
class MaskLM(object):
def __init__(self, tokenizer_path='bert-base-chinese', mlm_probability=0.2):
self.mlm_probability = mlm_probability
self.tokenizer = AutoTokenizer.from_pretrained(tokenizer_path)
def torch_mask_tokens(self, inputs: Any, special_tokens_mask: Optional[Any] = None) -> Tuple[Any, Any]:
"""
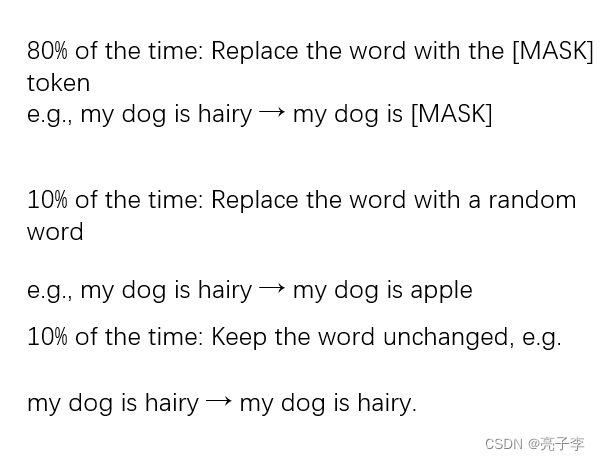
Prepare masked tokens inputs/labels for masked language modeling: 80% MASK, 10% random, 10% original.
"""
labels = inputs.clone()
# We sample a few tokens in each sequence for MLM training (with probability `self.mlm_probability`)
probability_matrix = torch.full(labels.shape, self.mlm_probability)
if special_tokens_mask is None:
special_tokens_mask = [
self.tokenizer.get_special_tokens_mask(val, already_has_special_tokens=True) for val in labels.tolist()
]
special_tokens_mask = torch.tensor(special_tokens_mask, dtype=torch.bool)
else:
special_tokens_mask = special_tokens_mask.bool()
probability_matrix.masked_fill_(special_tokens_mask, value=0.0)
masked_indices = torch.bernoulli(probability_matrix).bool()
labels[~masked_indices] = -100 # We only compute loss on masked tokens
# 80% of the time, we replace masked input tokens with tokenizer.mask_token ([MASK])
indices_replaced = torch.bernoulli(torch.full(labels.shape, 0.8)).bool() & masked_indices
inputs[indices_replaced] = self.tokenizer.convert_tokens_to_ids(self.tokenizer.mask_token)
# 10% of the time, we replace masked input tokens with random word
indices_random = torch.bernoulli(torch.full(labels.shape, 0.5)).bool() & masked_indices & ~indices_replaced
random_words = torch.randint(len(self.tokenizer), labels.shape, dtype=torch.long)
inputs[indices_random] = random_words[indices_random]
# The rest of the time (10% of the time) we keep the masked input tokens unchanged
return inputs, labels一句一句的看代码。 其实可以看出来 这个函数就是用来产生被mask过的id和标签的。
        labels = inputs.clone()
        # We sample a few tokens in each sequence for MLM training (with probability `self.mlm_probability`)
        probability_matrix = torch.full(labels.shape, self.mlm_probability)
标签 等于输入的克隆。标签 本身就应该是输入。 因为mask后的目标就是原来。
probability_matrix 是一个和label相同形状的矩阵, 每一个元素都是 概率值。
        if special_tokens_mask is None:
            special_tokens_mask = [
                self.tokenizer.get_special_tokens_mask(val, already_has_special_tokens=True) for val in labels.tolist()
            ]
            special_tokens_mask = torch.tensor(special_tokens_mask, dtype=torch.bool)
这里调用tokenizer的函数 得到特殊字符的mask 也就是有特殊字符的位置的mask 全是1 然后转张量。并转为true/false
比如下面 102 和 0 的位置的mask 都是1。108是字符,比如冒号,而不是bert里用的特殊字符。

probability_matrix.masked_fill_(special_tokens_mask, value=0.0)将 概率矩阵中 bert特殊字符的位置 全部变为0.没有特殊字符的地方为概率值
masked_indices = torch.bernoulli(probability_matrix).bool()伯努利概率函数。 就是从伯努利分布中提取二进制随机数。0.2输入进去, 就是0.2的概率取到1.
这样子, 文字部分就有0.2的比例,masked_indices是True。
labels[~masked_indices] = -100 没有mask的地方的标签变为-100. mask的地方 标签还是原来的。
![]()
        indices_replaced = torch.bernoulli(torch.full(labels.shape, 0.8)).bool() & masked_indices
        inputs[indices_replaced] = self.tokenizer.convert_tokens_to_ids(self.tokenizer.mask_token)
在被遮盖的地方 , 有0.8的概率 变为masktoken。
        indices_random = torch.bernoulli(torch.full(labels.shape, 0.5)).bool() & masked_indices & ~indices_replaced
        random_words = torch.randint(len(self.tokenizer), labels.shape, dtype=torch.long)
        inputs[indices_random] = random_words[indices_random]
0.2*0.5 = 0.1的地方 随机取一个词, 替换掉原来的。
剩下的0.1概率 啥也不干。
        # The rest of the time (10% of the time) we keep the masked input tokens unchanged
        return inputs, labels
返回标签和被遮盖的输入,标签中,被遮盖的地方是原来的词,没遮盖的地方都是-100. 。
            text_input_ids = input_ids.to(text_input_ids.device)
            lm_label = lm_label[:, :].to(text_input_ids.device) # [SEP] 卡 MASK 大师 [SEP]
            return_mlm = True
一些简单的设备处理,并且最终loss要加上mlm。至此得到了遮盖的文字和标签。
然后看如何计算的。 这里是一个视频和文字交互的任务,但是和纯文字任务区别不会很大。
        encoder_outputs = self.bert(video_feature, video_mask, text_input_ids, text_mask)
        if return_mlm:
            return encoder_outputs, self.cls(encoder_outputs)[:, 1 + video_feature.size()[1]: , :]
encoder_outputs 就是把被遮罩的输入 进入bert后出来的最后一层输出。 bat*len*dim
然后我们看这个cls , cls是下面这个。 这是官方的函数。
class BertLMPredictionHead(nn.Module):
    def __init__(self, config):
        super().__init__()
        self.transform = BertPredictionHeadTransform(config)

        # The output weights are the same as the input embeddings, but there is
        # an output-only bias for each token.
        self.decoder = nn.Linear(config.hidden_size, config.vocab_size, bias=False)

        self.bias = nn.Parameter(torch.zeros(config.vocab_size))

        # Need a link between the two variables so that the bias is correctly resized with `resize_token_embeddings`
        self.decoder.bias = self.bias

    def forward(self, hidden_states):
        hidden_states = self.transform(hidden_states)
        hidden_states = self.decoder(hidden_states)
        return hidden_states
这里面的transform 是一个(linear+act+layernorm)过渡性质的。然后一个decoder(linear) 就是一个分类。从768维度,分类到21128(vocab的字数)。 后面的切片,是因为bert的输入是cls+video +text这样的过程。 所以要切掉cls和video。
        if 'mlm' in sample_task:
            pred = lm_prediction_scores.contiguous().view(-1, self.vocab_size)
            masked_lm_loss = nn.CrossEntropyLoss()(pred, lm_label.contiguous().view(-1))
            loss += masked_lm_loss / 1.25 / len(sample_task)
计算loss。
第一个 得到预测值 并 展平 。这里的展平的意思就是 (bat,length,vocab_size)-》(bat*length,vocab_size)这样的好处是可以一下子计算整个batch的loss 而不用计算后相加。
loss 就是分类常用的cross。因为他相当于对每个单词分类,类别说是2W多。 在这个任务里, mlm的权重要除以1.25.
!!得到loss 我们mlm任务也就算完成啦!!!。
任务2: mfm任务。
应该是mask frame model
mlm任务是预测字。mfm任务就是预测frame了。也就是图片。基于全部时序的视觉特征预测掩盖掉的帧特征,掩盖掉的帧用全0代替
代码来源依然是上面那个。
GitHub - zr2021/2021_QQ_AIAC_Tack1_1st: QQ浏览器2021AI算法大赛赛道一 第1名 方案
下面看怎么做的。 又回到熟悉的起点。
        if 'mfm' in sample_task:
            vm_input = video_feature
            input_feature, video_label = self.vm.torch_mask_frames(video_feature.cpu(), video_mask.cpu())
            video_feature = input_feature.to(video_feature.device)
            video_label = video_label.to(video_feature.device)
vm_input 应该只是记录下吧 后面可能有用。 主要的还是下面这个遮盖函数。
class MaskVideo(object):
    def __init__(self, mlm_probability=0.15):
        self.mlm_probability = 0.15

    def torch_mask_frames(self, video_feature, video_mask):
        probability_matrix = torch.full(video_mask.shape, 0.9 * self.mlm_probability)
        probability_matrix = probability_matrix * video_mask

        masked_indices = torch.bernoulli(probability_matrix).bool()

        video_labels_index = torch.arange(video_feature.size(0) * video_feature.size(1)).view(-1, video_feature.size(1))
        video_labels_index = -100 * ~masked_indices + video_labels_index * masked_indices

        # 90% mask video fill all 0.0
        masked_indices_unsqueeze = masked_indices.unsqueeze(-1).expand_as(video_feature)
        inputs = video_feature.data.masked_fill(masked_indices_unsqueeze, 0.0)
        labels = video_feature[masked_indices_unsqueeze].contiguous().view(-1, video_feature.size(2))

        return inputs, video_labels_index
第一步 产生概率矩阵。 但是这里要乘以0.9 我不是很懂。 那你直接设置低点?然后因为文字可以用tokenizer找出无意义的位置,但是frame不行,所以需要mask出马。相乘就行。这样无意义的位置就都是0了
        probability_matrix = torch.full(video_mask.shape, 0.9 * self.mlm_probability)
        probability_matrix = probability_matrix * video_mask
masked_indices = torch.bernoulli(probability_matrix).bool()参考mlm 。,这里是用概率矩阵 输入进伯努利分布,得到0、1简单来说就是 概率矩阵为0.15得地方,就是0.15概率变成1,0.75概率变成0.可以看到下面随机产生了一些true。都是将来要遮盖得地方。
![]()
video_labels_index = torch.arange(video_feature.size(0) * video_feature.size(1)).view(-1, video_feature.size(1))产生一组编号。 注意是从0 到 bat*fram_len.
video_labels_index = -100 * ~masked_indices + video_labels_index * masked_indices这一步操作 ,加号前面是 遮盖的地方是0,没遮盖的地方是-100. 后面是 遮盖的地方是位置编号,没遮盖的地方是0.加起来就是: 遮盖的地方:位置编号,没遮盖的地方:-100.
masked_indices_unsqueeze = masked_indices.unsqueeze(-1).expand_as(video_feature)变成768维度。
inputs = video_feature.data.masked_fill(masked_indices_unsqueeze, 0.0)将图片遮罩位置的数 全改为0.
labels = video_feature[masked_indices_unsqueeze].contiguous().view(-1, video_feature.size(2)) 这句没用上,但还是看看干嘛的。
.contiguous()这个函数用来修改内存存放形式方便后面view。
可以 看到labels 是记录了被遮盖的那些位置的张量值 ,并且重新的改回原来形状。 相当于直接得标签,但是没用上。


返回的是位置标签。 也可以理解。 如果我们知道遮盖的是哪些位置,不就可以按位置去取了吗?
            video_feature = input_feature.to(video_feature.device)
            video_label = video_label.to(video_feature.device)
普通的换设备,至此得到了 遮盖后的图片特征,和遮盖的位置。
        encoder_outputs = self.bert(video_feature, video_mask, text_input_ids, text_mask)
        if return_mlm:
            return encoder_outputs, self.cls(encoder_outputs)[:, 1 + video_feature.size()[1]: , :]
输入的是图片,和文字信息。 encoder_outputs 就是bert最后一层的输出。后面那个是mlm需要的。 我们需要特征。
        features, lm_prediction_scores = self.roberta(video_feature, video_mask, text_input_ids, text_mask, return_mlm=return_mlm)
        if 'mfm' in sample_task:
            vm_output = self.roberta_mvm_lm_header(features[:, 1:video_feature.size()[1] + 1, :])
            masked_vm_loss = self.calculate_mfm_loss(vm_output, vm_input,
                                                     video_mask, video_label, normalize=False)
            loss += masked_vm_loss / 3 / len(sample_task)
features是bert输出。( bat,len,dim) 看这个lm函数。
self.roberta_mvm_lm_header = VisualOnlyMLMHead(uni_bert_cfg) class VisualLMPredictionHead(nn.Module):
def __init__(self, config):
super().__init__()
self.transform = VisualPredictionHeadTransform(config)
# The output weights are the same as the input embeddings, but there is
# an output-only bias for each token.
self.decoder = nn.Linear(config.hidden_size, 768, bias=False)
self.bias = nn.Parameter(torch.zeros(768))
# Need a link between the two variables so that the bias is correctly resized with `resize_token_embeddings`
self.decoder.bias = self.bias
def forward(self, hidden_states):
hidden_states = self.transform(hidden_states)
hidden_states = self.decoder(hidden_states)
return hidden_states溯源是上面这个。
这里面的transform 是一个(linear+act+layernorm)过渡性质的。然后一个decoder(linear) 就是一个生成维度。从768维度,生成到768(遮盖的图片维度)。
class VisualPredictionHeadTransform(nn.Module):
    def __init__(self, config):
        super().__init__()
        self.dense = nn.Linear(config.hidden_size, config.hidden_size)
        if isinstance(config.hidden_act, str):
            self.transform_act_fn = ACT2FN[config.hidden_act]
        else:
            self.transform_act_fn = config.hidden_act
        self.LayerNorm = nn.LayerNorm(config.hidden_size, eps=config.layer_norm_eps)

    def forward(self, hidden_states):
        hidden_states = self.dense(hidden_states)
        hidden_states = self.transform_act_fn(hidden_states)
        hidden_states = self.LayerNorm(hidden_states)
        return hidden_states
后面的切片,是因为bert的输入是cls+video +text这样的过程。 所以要切掉cls和text。
            masked_vm_loss = self.calculate_mfm_loss(vm_output, vm_input,
                                                     video_mask, video_label, normalize=False)
计算重建的loss。输入需要模型预测值,原来的图片特征,还有mask以及标签
这个函数 真的很长。
    def calculate_mfm_loss(self, video_feature_output, video_feature_input,
                           video_mask, video_labels_index, normalize=False, temp=0.1):
        if normalize:
            video_feature_output = torch.nn.functional.normalize(video_feature_output, p=2, dim=2)
            video_feature_input = torch.nn.functional.normalize(video_feature_input, p=2, dim=2)

        afm_scores_tr = video_feature_output.view(-1, video_feature_output.shape[-1])

        video_tr = video_feature_input.permute(2, 0, 1)
        video_tr = video_tr.view(video_tr.shape[0], -1)

        logits_matrix = torch.mm(afm_scores_tr, video_tr)
        if normalize:
            logits_matrix = logits_matrix / temp

        video_mask_float = video_mask.to(dtype=torch.float)
        mask_matrix = torch.mm(video_mask_float.view(-1, 1), video_mask_float.view(1, -1))
        masked_logits = logits_matrix + (1. - mask_matrix) * -1e8

        logpt = F.log_softmax(masked_logits, dim=-1)
        logpt = torch.diag(logpt)
        nce_loss = -logpt

        video_labels_index_mask = (video_labels_index != -100)
        nce_loss = nce_loss.masked_select(video_labels_index_mask.view(-1))
        nce_loss = nce_loss.mean()
        return nce_loss
这里跳过了标准化,应该差不多,跳不跳。
afm_scores_tr = video_feature_output.view(-1, video_feature_output.shape[-1])这是展平了的输出的feature。 从(bat,length,dim)-》(bat*length,dim),方便计算batloss。
        video_tr = video_feature_input.permute(2, 0, 1)
        video_tr = video_tr.view(video_tr.shape[0], -1)
这里将原始的图片信息 ,进行一个转置。现从(bat,length,dim)-》(dim,bat,length) 然后变为(dim,bat*length) 估计是方便后面相乘。
logits_matrix = torch.mm(afm_scores_tr, video_tr)果然,输入和输出来了一个相乘。
        video_mask_float = video_mask.to(dtype=torch.float)
        mask_matrix = torch.mm(video_mask_float.view(-1, 1), video_mask_float.view(1, -1))
        masked_logits = logits_matrix + (1. - mask_matrix) * -1e8
再和 mask相乘,表示我们只考虑那些mask为1的地方。 mask为0的地方说明原来就没有元素。 因为上面的输入输出相乘是x*x 每行每列都是 那个对应行列位置的特征乘积。所以这里mask也制作成了x*x.(这里假设bat*length=x) 两个相加,那些mask为0的地方的值 就变成无穷小了。
        logpt = F.log_softmax(masked_logits, dim=-1)
        logpt = torch.diag(logpt)
        nce_loss = -logpt
这里先softmax 后取对角线上的值。也就是遮盖的feature和预测的feature相乘结果。
video_labels_index_mask = (video_labels_index != -100)得到那些被遮盖的位置。 选出nceloss中 遮盖位置的值 相加取平均 就得到了nceloss。(可以搜下什么是nceloss)。得到loss 值 就可以回传啦。这就是mfm任务。
任务3: itm任务
Image-TextMatching 就是判断输入的图像和文字是否匹配的任务。
代码来源依然是上面那个。
GitHub - zr2021/2021_QQ_AIAC_Tack1_1st: QQ浏览器2021AI算法大赛赛道一 第1名 方案
按照我们的想法,本来的文字和图像肯定是匹配的,在数据集里,所以你要想办法打乱,那么怎么打乱呢 ?我还是比较好奇的,因为感觉随机抽一个,工作量其实挺大的。下面看代码里怎么做的。 又回到熟悉的起点。
        if 'itm' in sample_task:
            input_feature, video_text_match_label = self.sv.torch_shuf_video(video_feature.cpu())
            video_feature = input_feature.to(video_feature.device)
            video_text_match_label = video_text_match_label.to(video_feature.device)
class ShuffleVideo(object):
    def __init__(self):
        pass

    def torch_shuf_video(self, video_feature):
        bs = video_feature.size()[0]
        # batch 内前一半 video 保持原顺序,后一半 video 逆序
        shuf_index = torch.tensor(list(range(bs // 2)) + list(range(bs //2, bs))[::-1])
        # shuf 后的 label
        label = (torch.tensor(list(range(bs))) == shuf_index).float()
        video_feature = video_feature[shuf_index]
        return video_feature, label
这个就是打乱函数了。看到这里我们懂了一点点。原来打乱,不是在取数据的时候打乱的,而是在模型前向过程里打乱,这样就不需要在collect里花心思了,只需要把数据矩阵换换位置就行了,真机智。。。 但是他没想到 我这bat 大小就2啊
....................

        shuf_index = torch.tensor(list(range(bs // 2)) + list(range(bs //2, bs))[::-1])
        label = (torch.tensor(list(range(bs))) == shuf_index).float()
制作一个下标矩阵。 我觉得我和大佬们的差距就是他们经常用这种下标矩阵,而我经常想的是直接对操作对象动手。
如果打乱后的下标和原来的一样 说明没有打乱 标签为1 否则为0.
video_feature = video_feature[shuf_index]按下标取数据。
            input_feature, video_text_match_label = self.sv.torch_shuf_video(video_feature.cpu())
            video_feature = input_feature.to(video_feature.device)
            video_text_match_label = video_text_match_label.to(video_feature.device)
换设备。
       features, lm_prediction_scores = self.roberta(video_feature, video_mask, text_input_ids, text_mask, return_mlm=return_mlm)
       if 'itm' in sample_task:
            pred = self.newfc_itm(features[:, 0, :])
            itm_loss = nn.BCEWithLogitsLoss()(pred.view(-1), video_text_match_label.view(-1))
            loss += itm_loss / 100 / len(sample_task)
feature 是过bert得到的最后一层输出。
self.newfc_itm(features[:, 0, :])
这个newfc_itm 是一个linear(768,1) 下面又是一个bceloss 我们就知道了 他把itm做成了一个回归任务,而不是预测任务。 可能是觉得 预测任务提供的loss不够精确吧。 对于预测来说 0.9也是1,0.6也是1. 看不出差别。
但是请注意 这里的itm 是存在bug的。
BUG1 : 如果itm和mfm或者mlm一起使用 因为会将视频后面一半反向,所以视频会和文字不对应。
BUG2 ; 这里的itm没有对视频的mask进行反转 如果你的视频是有mask的 需要将mask做同样反转
这三个任务就是这样 后面看到继续加。
ita 图像文本对齐 image text align
此处会先涉及到mlm 和itm 后面把ita摘出来分析。
代码来源 : ALBEF: https://arxiv.org/abs/2107.07651
https://github.com/salesforce/ALBEF
此处我们需要知道,上面的QQ浏览器方案, 都是单流结构,而ALBEF是一个双流结构。
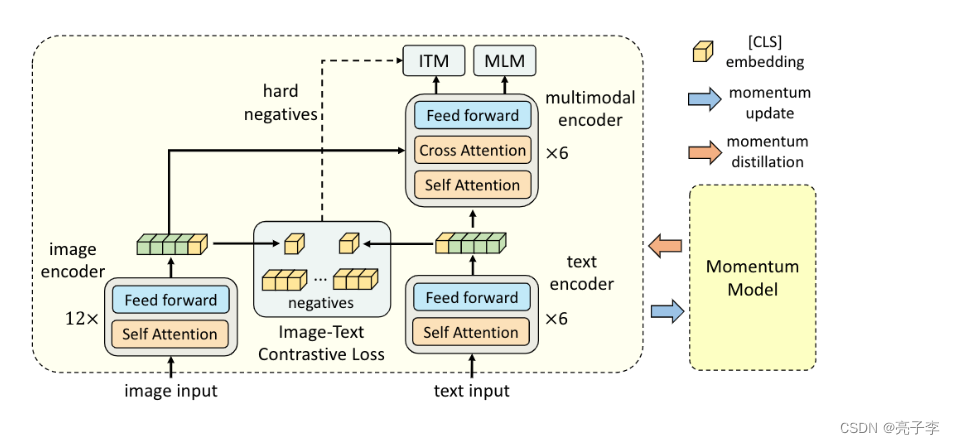
我们直接模型前向。代码很长 一句一句看。
        with torch.no_grad():
            self.temp.clamp_(0.001,0.5)
temp是温度系数, 这次需要进行裁剪 这里值是0.07 ,一个可学习的参数。
主要用来计算相似度。

        image_embeds = self.visual_encoder(image)
        image_atts = torch.ones(image_embeds.size()[:-1],dtype=torch.long).to(image.device)
这两句代码 对应上面的image encoder 这里使用VIT当作encoder。
image_feat = F.normalize(self.vision_proj(image_embeds[:,0,:]),dim=-1)proj是映射,这里将cls的特征进行映射作为图片特征。
        text_output = self.text_encoder.bert(text['input_ids'], attention_mask = text['attention_mask'],
                                             return_dict = True, mode = 'text')
        text_embeds = text_output.last_hidden_state
        text_feat = F.normalize(self.text_proj(text_embeds[:,0,:]),dim=-1)
同样 将文字 过bert 注意这里的bert是自己写的
是mlm的bert。

        # get momentum features
        with torch.no_grad():
            self._momentum_update()
            image_embeds_m = self.visual_encoder_m(image)
            image_feat_m = F.normalize(self.vision_proj_m(image_embeds_m[:,0,:]),dim=-1)
            image_feat_all = torch.cat([image_feat_m.t(),self.image_queue.clone().detach()],dim=1)
            text_output_m = self.text_encoder_m.bert(text['input_ids'], attention_mask = text['attention_mask'],
                                                     return_dict = True, mode = 'text')
            text_feat_m = F.normalize(self.text_proj_m(text_output_m.last_hidden_state[:,0,:]),dim=-1)
            text_feat_all = torch.cat([text_feat_m.t(),self.text_queue.clone().detach()],dim=1)

            sim_i2t_m = image_feat_m @ text_feat_all / self.temp
            sim_t2i_m = text_feat_m @ image_feat_all / self.temp

            sim_targets = torch.zeros(sim_i2t_m.size()).to(image.device)
            sim_targets.fill_diagonal_(1)

            sim_i2t_targets = alpha * F.softmax(sim_i2t_m, dim=1) + (1 - alpha) * sim_targets
            sim_t2i_targets = alpha * F.softmax(sim_t2i_m, dim=1) + (1 - alpha) * sim_targets
动量编码器。 _m的模型 可以理解为 更新后的模型 。模型是用当前模型的参数*0.05 加上之前参数乘以0.95 这样子做的。(动量0.95)
            image_embeds_m = self.visual_encoder_m(image)
            image_feat_m = F.normalize(self.vision_proj_m(image_embeds_m[:,0,:]),dim=-1)
            image_feat_all = torch.cat([image_feat_m.t(),self.image_queue.clone().detach()],dim=1)
            text_output_m = self.text_encoder_m.bert(text['input_ids'], attention_mask = text['attention_mask'],
                                                     return_dict = True, mode = 'text')
            text_feat_m = F.normalize(self.text_proj_m(text_output_m.last_hidden_state[:,0,:]),dim=-1)
            text_feat_all = torch.cat([text_feat_m.t(),self.text_queue.clone().detach()],dim=1)
动量模型求出的动量参数加入队列。
            sim_i2t_m = image_feat_m @ text_feat_all / self.temp
            sim_t2i_m = text_feat_m @ image_feat_all / self.temp
相似度。
            sim_targets = torch.zeros(sim_i2t_m.size()).to(image.device)
            sim_targets.fill_diagonal_(1)
目标值 是对角单位阵。
注意上面这段 不带梯度的。
        sim_i2t = image_feat @ text_feat_all / self.temp
        sim_t2i = text_feat @ image_feat_all / self.temp

        loss_i2t = -torch.sum(F.log_softmax(sim_i2t, dim=1)*sim_i2t_targets,dim=1).mean()
        loss_t2i = -torch.sum(F.log_softmax(sim_t2i, dim=1)*sim_t2i_targets,dim=1).mean()

        loss_ita = (loss_i2t+loss_t2i)/2
看 这就是ita了 。 说什么对齐。。 其实就是一个什么呢 算是。算是一个分类吧。 这个跟clip其实是比较像的。
就是凑出来 图像特征和文字特征,比如有256个图像特征和文字特征,然后将图像特征分256类,看能不能对应到文字。 onehot形式的。


 3008
3008


 被折叠的 条评论
为什么被折叠?
被折叠的 条评论
为什么被折叠?
 到【灌水乐园】发言


