博主这个系列的文章
另外,我在Github上建立了一个仓库来搜集优秀的React Native库和优秀的博客等
ReactNativeMaterials
资料
概述
目前,React Native的版本是0.28,主要的动画分为两大类
- LayoutAnimation 用来实现布局切换的动画
- Animated 更加精确的交互式的动画
目前React native的release速度还是比较快的,每隔2周左右就release一次。
准备工作
本文默认读者已经
- 安装好了React Native
- 安装好了IDE(本文使用Atom+Nuclide),如果没有安装过,可以参照最上面的链接进行安装
- 使用
react-native init Demo --verbose初始化了一个Demo项目
一个简单的动画
一个最基本的Animated创建过程如下
- 创建
Animated.Value,设置初始值,比如一个视图的opacity属性,最开始设置Animated.Value(0),来表示动画的开始时候,视图是全透明的。 - AnimatedValue绑定到Style的可动画属性,比如透明度,{opacity: this.state.fadeAnim}
- 使用
Animated.timing来创建自动的动画,或者使用Animated.event来根据手势,触摸,Scroll的动态更新动画的状态(本文会侧重讲解Animated.timing) - 调用
Animated.timeing.start()开始动画
基于上述的原理,我们来实现第一个动画。
创建一个Demo工程的时候,运行后,模拟器截图应该是酱紫的。
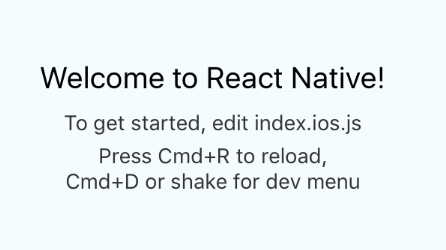
然后,只保留第一行文字,然后我们给这个默认的视图创建fade in动画,效果如下

代码
class Demo extends React.Component {
state: {
fadeAnim: Object,
};
constructor(props) {
super(props);
this.state = {
fadeAnim: new Animated.Value(0),
};
}
componentDidMount() {
Animated.timing(
this.state.fadeAnim,
{toValue: 1}
).start();
}
render() {
return (
<View style={styles.container}>
<Animated.Text style={{opacity: this.state.fadeAnim}}>
Welcome to React Native!
</Animated.Text>
</View>
);
}
}
- 1
- 2
- 3
- 4
- 5
- 6
- 7
- 8
- 9
- 10
- 11
- 12
- 13
- 14
- 15
- 16
- 17
- 18
- 19
- 20
- 21
- 22
- 23
- 24
- 25
- 26
- 1
- 2
- 3
- 4
- 5
- 6
- 7
- 8
- 9
- 10
- 11
- 12
- 13
- 14
- 15
- 16
- 17
- 18
- 19
- 20
- 21
- 22
- 23
- 24
- 25
- 26
所以说,简单的动画就是用Animated.Value指定初始值,然后在Animated.timing中设置结束值,其他的交给React native让它自动创建,我们只需要调用start开始动画即可。
在当前版本0.27种,可动画的视图包括
- View
- Text
- Image
- createAnimatedComponent(自定义)
Animated详解
方法
static decay(value, config) 阻尼,将一个值根据阻尼系数动画到 0static timing(value, config 根据时间函数来处理,常见的比如线性,加速开始减速结束等等,支持自定义时间函数static spring(value, config) 弹性动画static add(a, b) 将两个Animated.value相加,返回一个新的static multiply(a, b) 将两个Animated.value相乘,返回一个新的static modulo(a, modulus),将a对modulus取余,类似操作符%static delay(time)延迟一段时间static sequence(animations) 依次开始一组动画,后一个在前一个结束后才会开始,如果其中一个动画中途停止,则整个动画组停止static parallel(animations, config?),同时开始一组动画,默认一个动画中途停止,则全都停止。可以通过设置stopTogether来重写这一特性static stagger(time, animations),一组动画可以同时执行,但是会按照延迟依次开始static event(argMapping, config?),利用手势,Scroll来手动控制动画的状态static createAnimatedComponent(Component),自定义的让某一个Component支持动画
属性
Value,类型是AnimatedValue,驱动基本动画AnimatedValueXY,类型是AnimatedValueXY,驱动二维动画
AnimatedValue类型
一个AnimatedValue一次可以驱动多个可动画属性,但是一个AnimatedValue一次只能由一个机制驱动。比如,一个Value可以同时动画View的透明度和位置,但是一个Value一次只能采用线性时间函数
方法
constructor(value) 构造器setValue(value) 直接设置值,会导致动画终止setOffset(offset) 设置当前的偏移量flattenOffset() 将偏移量合并到最初值中,并把偏移量设为0,addListener(callback) ,removeListener(id),removeAllListeners(),增加一个异步的动画监听者stopAnimation(callback?) 终止动画,并在动画结束后执行callbackinterpolate(config) 插值,在更新可动画属性前用插值函数对当前值进行变换animate(animation, callback) 通常在React Native内部使用stopTracking(),track(tracking) 通常在React Native内部使用
AnimatedValueXY
和AnimatedValue类似,用在二维动画,使用起来和AnimatedValue类似,这里不在介绍,这里是文档。
一个更加复杂动画
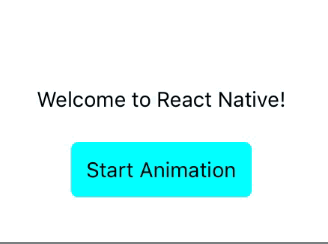
有了上文的知识支撑,我们可以设计并实现一个更加复杂的动画了。
- 这个动画由button驱动
- 一个AnimatedValue同时驱动两三个属性,透明度,Y的位置以及scale
效果
代码(省略了import和style)
class Demo extends React.Component {
state: {
fadeAnim: Animated,
currentAlpha:number,
};
constructor(props) {
super(props);
this.state = {
currentAlpha: 1.0,
fadeAnim: new Animated.Value(1.0)
};
}
startAnimation(){
this.state.currentAlpha = this.state.currentAlpha == 1.0?0.0:1.0;
Animated.timing(
this.state.fadeAnim,
{toValue: this.state.currentAlpha}
).start();
}
render() {
return (
<View style={styles.container}>
<Animated.Text style={{opacity: this.state.fadeAnim,
transform: [
{
translateY: this.state.fadeAnim.interpolate({
inputRange: [0, 1],
outputRange: [60, 0]
}),
},
{
scale:this.state.fadeAnim
},
],
}}>
Welcome to React Native!
</Animated.Text>
<TouchableOpacity onPress = {()=> this.startAnimation()} style={styles.button}>
<Text>Start Animation</Text>
</TouchableOpacity>
</View>
);
}
}
- 1
- 2
- 3
- 4
- 5
- 6
- 7
- 8
- 9
- 10
- 11
- 12
- 13
- 14
- 15
- 16
- 17
- 18
- 19
- 20
- 21
- 22
- 23
- 24
- 25
- 26
- 27
- 28
- 29
- 30
- 31
- 32
- 33
- 34
- 35
- 36
- 37
- 38
- 39
- 40
- 41
- 42
- 43
- 44
- 45
- 46
- 47
- 1
- 2
- 3
- 4
- 5
- 6
- 7
- 8
- 9
- 10
- 11
- 12
- 13
- 14
- 15
- 16
- 17
- 18
- 19
- 20
- 21
- 22
- 23
- 24
- 25
- 26
- 27
- 28
- 29
- 30
- 31
- 32
- 33
- 34
- 35
- 36
- 37
- 38
- 39
- 40
- 41
- 42
- 43
- 44
- 45
- 46
- 47
手动控制动画
通过上文的讲解,相信读者已经对如何用Animated创建动画有了最基本的认识。而有些时候,我们需要根据Scroll或者手势来手动的控制动画的过程。这就是我接下来要讲的。
手动控制动画的核心是Animated.event,
这里的Aniamted.event的输入是一个数组,用来做数据绑定
比如,
ScrollView中
onScroll={Animated.event(
           [{nativeEvent: {contentOffset: {x: this.state.xOffset}}}]//把contentOffset.x绑定给this.state.xOffset
)}
Pan手势中
   onPanResponderMove: Animated.event([
        null,//忽略native event
        {dx: this.state.pan.x, dy: this.state.pan.y},//dx,dy分别绑定this.state.pan.x和this.state.pan.y
      ])
目标效果 - 随着ScrollView的相左滑动,最左边的一个Image透明度逐渐降低为0

核心代码
var deviceHeight = require('Dimensions').get('window').height;
var deviceWidth = require('Dimensions').get('window').width;
class Demo extends React.Component {
  state: {
    xOffset: Animated,
  };
  constructor(props) {
     super(props);
     this.state = {
       xOffset: new Animated.Value(1.0)
     };
   }
  render() {
    return (
      <View style={styles.container}>
        <ScrollView horizontal={true} //水平滑动
                    showsHorizontalScrollIndicator={false}
                    style={{width:deviceWidth,height:deviceHeight}}//设置大小
                    onScroll={Animated.event(
                            [{nativeEvent: {contentOffset: {x: this.state.xOffset}}}]//把contentOffset.x绑定给this.state.xOffset
                            )}
                    scrollEventThrottle={100}//onScroll回调间隔
                    >
          <Animated.Image source={require('./s1.jpg')}
                          style={{height:deviceHeight,
                                  width:deviceWidth,
                                  opacity:this.state.xOffset.interpolate({//映射到0.0,1.0之间
                                                  inputRange: [0,375],
                                                  outputRange: [1.0, 0.0]
                                                }),}}
                          resizeMode="cover"
                           />
         <Image source={require('./s2.jpg')} style={{height:deviceHeight, width:deviceWidth}} resizeMode="cover" />
         <Image source={require('./s3.jpg')} style={{height:deviceHeight, width:deviceWidth}} resizeMode="cover" />
      </ScrollView>
      </View>
    );
  }
}
- 1
- 2
- 3
- 4
- 5
- 6
- 7
- 8
- 9
- 10
- 11
- 12
- 13
- 14
- 15
- 16
- 17
- 18
- 19
- 20
- 21
- 22
- 23
- 24
- 25
- 26
- 27
- 28
- 29
- 30
- 31
- 32
- 33
- 34
- 35
- 36
- 37
- 38
- 39
- 1
- 2
- 3
- 4
- 5
- 6
- 7
- 8
- 9
- 10
- 11
- 12
- 13
- 14
- 15
- 16
- 17
- 18
- 19
- 20
- 21
- 22
- 23
- 24
- 25
- 26
- 27
- 28
- 29
- 30
- 31
- 32
- 33
- 34
- 35
- 36
- 37
- 38
- 39
手势驱动
React Native最常用的手势就是PanResponser,
由于本文侧重讲解动画,所以不会特别详细的介绍PanResponser,仅仅介绍用到的几个属性和回调方法
onStartShouldSetPanResponder: (event, gestureState) => {}//是否相应pan手势
onPanResponderMove: (event, gestureState) => {}//在pan移动的时候进行的回调
onPanResponderRelease: (event, gestureState) => {}//手离开屏幕
onPanResponderTerminate: (event, gestureState) => {}//手势中断
其中,
- 通过event可以获得触摸de位置,时间戳等信息。
- 通过gestureState可以获取移动的距离,速度等
目标效果- View随着手拖动而移动,手指离开会到原点
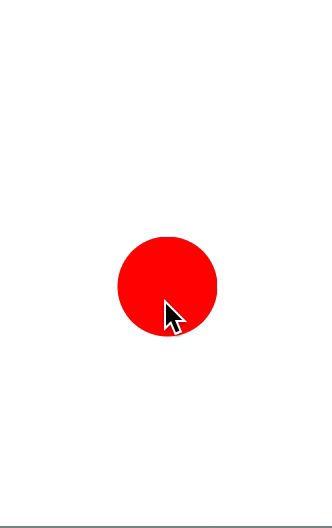
核心代码
class Demo extends React.Component {
state:{
trans:AnimatedValueXY,
}
_panResponder:PanResponder;
constructor(props) {
super(props);
this.state = {
trans: new Animated.ValueXY(),
};
this._panResponder = PanResponder.create({
onStartShouldSetPanResponder: () => true,
onPanResponderMove: Animated.event(
[null, {dx: this.state.trans.x, dy:this.state.trans.y}]
),
onPanResponderRelease: ()=>{
Animated.spring(this.state.trans,{toValue: {x: 0, y: 0}}
).start();
},
onPanResponderTerminate:()=>{
Animated.spring(this.state.trans,{toValue: {x: 0, y: 0}}
).start();
},
});
}
render() {
return (
<View style={styles.container}>
<Animated.View style={{width:100,
height:100,
borderRadius:50,
backgroundColor:'red',
transform:[
{translateY:this.state.trans.y},
{translateX:this.state.trans.x},
],
}}
{...this._panResponder.panHandlers}
>
</Animated.View>
</View>
);
}
}
- 1
- 2
- 3
- 4
- 5
- 6
- 7
- 8
- 9
- 10
- 11
- 12
- 13
- 14
- 15
- 16
- 17
- 18
- 19
- 20
- 21
- 22
- 23
- 24
- 25
- 26
- 27
- 28
- 29
- 30
- 31
- 32
- 33
- 34
- 35
- 36
- 37
- 38
- 39
- 40
- 41
- 42
- 43
- 44
- 1
- 2
- 3
- 4
- 5
- 6
- 7
- 8
- 9
- 10
- 11
- 12
- 13
- 14
- 15
- 16
- 17
- 18
- 19
- 20
- 21
- 22
- 23
- 24
- 25
- 26
- 27
- 28
- 29
- 30
- 31
- 32
- 33
- 34
- 35
- 36
- 37
- 38
- 39
- 40
- 41
- 42
- 43
- 44
LayoutAnimation
LayoutAnimation在View由一个位置变化到另一个位置的时候,在下一个Layout周期自动创建动画。通常在setState前掉用LayoutAnimation.configureNext
一个简单的Demo

代码
class Demo extends React.Component {
state: {
marginBottom:number,
};
constructor(props) {
super(props);
this.state = {
marginBottom:0
};
}
_textUp(){
LayoutAnimation.spring();
this.setState({marginBottom:this.state.marginBottom + 100})
}
render() {
return (
<View style={styles.container}>
<TouchableOpacity onPress = {()=>this._textUp()}
style={{ width:120,
height:40,
alignItems:'center',
marginBottom:this.state.marginBottom,
justifyContent:'center',
backgroundColor:'#00ffff',
borderRadius:20}}>
<Text>Text UP</Text>
</TouchableOpacity>
</View>
);
}
}
- 1
- 2
- 3
- 4
- 5
- 6
- 7
- 8
- 9
- 10
- 11
- 12
- 13
- 14
- 15
- 16
- 17
- 18
- 19
- 20
- 21
- 22
- 23
- 24
- 25
- 26
- 27
- 28
- 29
- 30
- 31
- 1
- 2
- 3
- 4
- 5
- 6
- 7
- 8
- 9
- 10
- 11
- 12
- 13
- 14
- 15
- 16
- 17
- 18
- 19
- 20
- 21
- 22
- 23
- 24
- 25
- 26
- 27
- 28
- 29
- 30
- 31
其实代码里只是调用了这一行LayoutAnimation.spring();,布局修改的时候就显得不那么生硬了
LayoutAnimation详解
配置相关
static configureNext(config, onAnimationDidEnd?)
static create(duration, type, creationProp) #
属性
对应三种时间函数
easeInEaseOut: CallExpression #
linear: CallExpression #
spring: CallExpression #
Navigator转场动画
我们先创建一个默认的Navigator转场Demo
回拉的时候,前一个时图的移动距离要小于后一个视图

这时候的核心代码如下,MainScreen和DetailScreen就是带一个Button的视图
class Demo extends React.Component{
    render(){
      return (
        <Navigator
          style = {styles.container}
          initialRoute={{id:"main",}}
          renderScene={this.renderNav}
          configureScene={(route, routeStack) => Navigator.SceneConfigs.PushFromRight}

          />
      );
    }
    renderNav(route,nav){
        switch (route.id) {
          case 'main':
            return <MainScreen navigator={nav} title="Main"/ >;
          case 'detail':
            return (<DetailScreen navigator={nav} title="Detail"/ >);
        }
    }
 }
- 1
- 2
- 3
- 4
- 5
- 6
- 7
- 8
- 9
- 10
- 11
- 12
- 13
- 14
- 15
- 16
- 17
- 18
- 19
- 20
- 21
- 1
- 2
- 3
- 4
- 5
- 6
- 7
- 8
- 9
- 10
- 11
- 12
- 13
- 14
- 15
- 16
- 17
- 18
- 19
- 20
- 21
Navigator的默认的转场动画的实现都可以在这里找到NavigatorSceneConfigs.js。
So,我们有两种方式来实现自定义的转场动画
篇幅限制,本文只修改默认的转场
比如,我想把默认的PushFromRight动画中,第一个视图的移动距离改为全屏幕。
var ToTheLeftCustom = {
transformTranslate: {
from: {x: 0, y: 0, z: 0},
to: {x: -SCREEN_WIDTH, y: 0, z: 0},
min: 0,
max: 1,
type: 'linear',
extrapolate: true,
round: PixelRatio.get(),
},
opacity: {
value: 1.0,
type: 'constant',
},
};
var baseInterpolators = Navigator.SceneConfigs.PushFromRight.animationInterpolators;
var customInterpolators = Object.assign({}, baseInterpolators, {
out: buildStyleInterpolator(ToTheLeftCustom),
});
var baseConfig = Navigator.SceneConfigs.PushFromRight;
var CustomPushfromRight = Object.assign({}, baseConfig, {
animationInterpolators: customInterpolators,
});
- 1
- 2
- 3
- 4
- 5
- 6
- 7
- 8
- 9
- 10
- 11
- 12
- 13
- 14
- 15
- 16
- 17
- 18
- 19
- 20
- 21
- 22
- 23
- 24
- 1
- 2
- 3
- 4
- 5
- 6
- 7
- 8
- 9
- 10
- 11
- 12
- 13
- 14
- 15
- 16
- 17
- 18
- 19
- 20
- 21
- 22
- 23
- 24
然后,修改Navigator的configScene
configureScene={(route, routeStack) => baseConfig}
这时候的动画如下


 1323
1323

 被折叠的 条评论
为什么被折叠?
被折叠的 条评论
为什么被折叠?
 到【灌水乐园】发言


