


目录
三、Java自定义实现BlockingQueue接口中的put()和take()
(1)ArrayBlockingQueue和BlockingQueueWithLock的兼容问题
(3)抛出异常IllegalArgumentException
一、前言 锁的另一种实现:ReentrantLock
写阻塞队列的时候我发现了一个锁的另一种实现。以往我们都是使用synchronized关键字进行加锁操作。但我们知道会有死锁的情况:死锁一但发生,程序线程将会停滞不前。这时我们可以使用ReentrantLock类对线程加锁。
用ReentrantLock类定义的变量引用lock()方法和unlock()方法对进程进行加锁和解锁:
 class X {
   private final ReentrantLock lock = new ReentrantLock();
   // ...

   public void m() {
     lock.lock();  //阻塞直到条件成立
     try {
       // 方法体
     } finally {
       lock.unlock()
     }
   }
 }
使用ReentrantLock类进行加锁时,整体必须先获取锁,然后进入try代码块,最后保证在finally中释放锁。相比于synchronized,使用ReentrantLock会更加安全。
ReentrantLock和synchronized一样,一个线程可以多次获取同一个锁。但ReentrantLock可以尝试获取锁:
if (lock.tryLock(1, TimeUnit.SECONDS)) {  //tryLock()函数:尝试获取锁
    try {
        ...
    } finally {
        lock.unlock();
    }
}上述代码在尝试获取锁的时候最多等待1s。如果1s后仍未获取到锁,tryLock()返回false,程序会做些额外处理,而不是无限等待下去(死锁情况)。
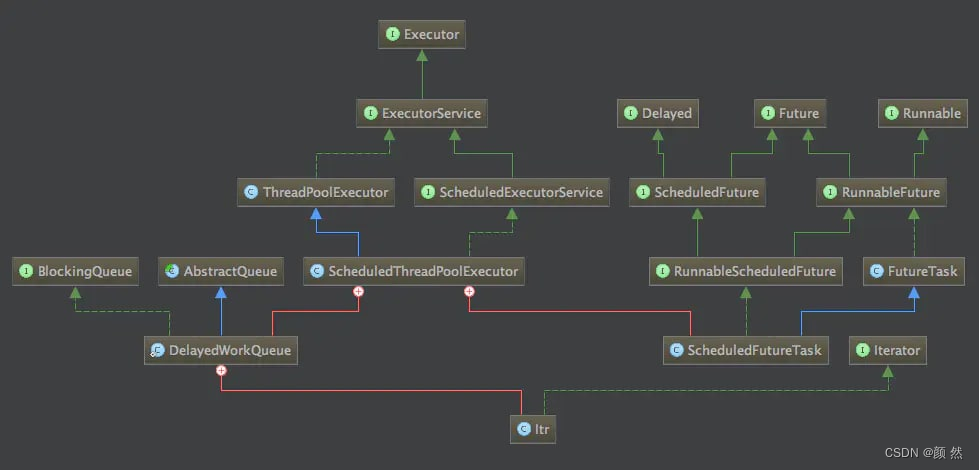
二、阻塞队列:BlockingQueue
BlockingQueue接口继承自Queue接口。
阻塞队列是一个先进先出的队列。“阻塞”理解为当获取队列元素但队列为空时,会阻塞等待队列中有元素再返回;添加元素时,如果队列已满,那么就等队列可以放入新元素时再放入。
常见阻塞队列有ArrayBlockingQueue和LinkedBlockingQueue,它们都实现BlockingQueue接口:
//BlockingQueue接口中的定义方法们:
public interface BlockingQueue<E> extends Queue<E> {
	// 添加元素到队尾,成功返回true,队列满抛出异常 IllegalStateException
    boolean add(E e);
	// 添加元素到队尾,成功返回 true,队列满返回 false
    boolean offer(E e);
	// 阻塞添加
    void put(E e) throws InterruptedException;
	// 阻塞添加,包含最大等待时长
    boolean offer(E e, long timeout, TimeUnit unit) throws InterruptedException;
	// 阻塞移除队顶元素
    E take() throws InterruptedException;
	// 阻塞移除队顶元素,包含最大等待时长
    E poll(long timeout, TimeUnit unit) throws InterruptedException;
	// 返回可以添加到队列不阻塞的最大数量
    int remainingCapacity();
	// 如果存在元素则删除,成功返回 true,失败返回 false
    boolean remove(Object o);
	// 是否包含某元素
    public boolean contains(Object o);
    // 批量移除元素并添加入指定集合
    int drainTo(Collection<? super E> c);
	// 批量移除包含最大数量
    int drainTo(Collection<? super E> c, int maxElements);
}
ArrayBlockingQueue基于数组实现。下面的代码在一个容量为3的阻塞队列中生产者和消费者由于容量限制依次阻塞运行:
public class ArrayBlockingQueueTest {
    // 容量为3的阻塞队列
    ArrayBlockingQueue<TestProduct> queue = new ArrayBlockingQueue<TestProduct>(3);
    public static void main(String[] args){
        ArrayBlockingQueueTest test = new ArrayBlockingQueueTest();
        new Thread(test.new Product()).start();
        new Thread(test.new Customer()).start();
    }

    class Product implements  Runnable { // 生产者
        @Override
        public void run(){
            while(true){
                try{
                    queue.put(new TestProduct());
                    System.out.println("生产者创建产品等待消费者消费");
                } catch(InterruptedException e){
                    e.printStackTrace();
                }
            }
        }
    }

    class Customer implements Runnable { // 消费者
        @Override
        public void run(){
            while(true){
                try{
                    Thread.sleep(1000);
                    queue.take();
                    System.out.println("消费者消费产品等待生产者创建");
                } catch(InterruptedException e){
                    e.printStackTrace();
                }
            }
        }
    }
    class TestProduct{

    }

}

/*
生产者创建产品等待消费者消费
生产者创建产品等待消费者消费
生产者创建产品等待消费者消费
消费者消费产品等待生产者创建
生产者创建产品等待消费者消费
消费者消费产品等待生产者创建
生产者创建产品等待消费者消费
.......
*/
接下来我们就要实现BlockingQueue接口中的put(阻塞添加)和take(阻塞移除队顶元素)
三、Java自定义实现BlockingQueue接口中的put()和take()
实现原理:
- put为生产者,向队尾添加元素
- take为消费者,从队头消费元素
- 并且确保添加和消费过程中线程是安全的
两种锁的实现方式
1、synchronized锁版本:
synchronized中搭配wait()和notify()方法让线程等待。
import java.util.Queue;

public abstract class BlockingQueueWithSyn<E> implements Queue<E> {

    private E[] array;
    private int head;  // 队头指针
    private int tail;  // 队尾指针

    private volatile int size; // 队列元素个数(volatile保证元素对所有线程均可见)

    public BlockingQueueWithSyn(int capacity) {
        array = (E[]) new Object[capacity];
    }

    public synchronized void put(E e) throws InterruptedException {
        // 当队列满的时候阻塞
        while (size == array.length) {
            this.wait();
        }

        array[tail] = e;
        // 队列装满后索引归零
        if (  tail == array.length) {
            tail = 0;
        }
        size++;
        // 通知其他消费端有数据了
        this.notifyAll();
    }

    public synchronized E take() throws InterruptedException {
        // 当队列空的时候阻塞
        while (isEmpty()) {
            this.wait();
        }

        E element = array[head];
        // 消费完后从0开始
        if (  head == array.length) {
            head = 0;
        }
        --size;
        // 通知其他生产者可以生产了
        this.notifyAll();
        return element;
    }

    @Override
    public synchronized boolean isEmpty() {
        return size == 0;
    }

    @Override
    public synchronized int size() {
        return size;
    }
}*2、ReentrantLock锁版本:
-
Condition类
因为RenntrantLock是可重入锁性质,所以刚好可以搭配Condition类。
通过Lock接口(ReentarntLock类实现了Lock接口)的Condition newCondition方法可生成一个与当前重入锁的Condition实例。利用此实例我们就可以让线程在合适的时间中等待(await())、或是在某一特定的时刻得到通知后继续执行(signal()):
import java.util.Queue;
import java.util.concurrent.ArrayBlockingQueue;
import java.util.concurrent.BlockingQueue;
import java.util.concurrent.locks.Condition;
import java.util.concurrent.locks.ReentrantLock;

public class BlockingQueueWithLock<E> extends ArrayBlockingQueue<E> implements Queue<E>{

    private E[] array;
    private int head;
    private int tail;

    private volatile int size;

    private ReentrantLock lock = new ReentrantLock();
    //使用了Condition类
    private Condition notFull  = lock.newCondition();
    private Condition notEmpty = lock.newCondition();

    public BlockingQueueWithLock(int capacity) {
        super(capacity);
        array = (E[]) new Object[capacity];
    }

    public void put(E e) throws InterruptedException {
        lock.lockInterruptibly();
        try {
            // 队列满,阻塞
            while (size == array.length) {
                notFull.await();
            }
            array[tail] = e;
            if (  tail == array.length) {
                tail = 0;
            }
            size++;
            notEmpty.signal();
        } finally {
            lock.unlock();
        }
    }

    public E take() throws InterruptedException {
        lock.lockInterruptibly();
        try {
            // 队列空,阻塞
            while (isEmpty()) {
                notEmpty.await();
            }
            E element = array[head];
            if (  head == array.length) {
                head = 0;
            }
            --size;
            // 通知isFull条件队列有元素出去
            notFull.signal();
            return element;
        } finally {
            lock.unlock();
        }
    }

    @Override
    public boolean isEmpty() {
        lock.lock();
        try {
            return size == 0;
        } finally {
            lock.unlock();
        }
    }

    @Override
    public int size() {
        lock.lock();
        try {
            return size;
        } finally {
            lock.unlock();
        }
    }

}
四、使用阻塞队列自定义实现ThreadPool
基于上面自定义实现的阻塞队列BlockingQueueWithLock类,我们实现以下接口:
- ThreadPool(int corePoolSize,int maxPoolSize,int timeout)
- 提交任务到线程池中:public void execute(Runnable task)
- 关闭:public BlockingQueueWithLock shutdown()
写之前先录入些知识点:
1、execute()方法和submit()方法的比较
execute方法和submit方法都存于ThreadPoolExecutor类中。
不同之处在于:
submit --> 提交需要返回值的任务
execute --> 提交不需要返回值的任务
因为submit()兼容Runnable类参数和Callable类参数,但execute()只支持Runnable类参数。
(Runnable类参数:不可返回结果 ;Callable类参数:可以返回结果)
 下面是execute方法的源码以及解析:
    public void execute(Runnable command) {
        if (command == null) {
            throw new NullPointerException();
        } else {
            int c = this.ctl.get();  //1、获取当前线程池状态
            if (workerCountOf(c) < this.corePoolSize) {  //2、当前线程数量小于coreSize时创建一个新的线程运行
                if (this.addWorker(command, true)) {
                    return;
                }

                c = this.ctl.get();
            }

            if (isRunning(c) && this.workQueue.offer(command))
            { //3、如果当前线程处于运行状态,并且写入阻塞队列成功
                int recheck = this.ctl.get();
                if (!isRunning(recheck) && this.remove(command))
            { //4、双重检查,再次获取线程状态;如果线程状态变了(非运行状态)就需要从阻塞队列移除任务,并尝试判断线程是否全部执行完毕。同时执行拒绝。
                    this.reject(command);
                } else if (workerCountOf(recheck) == 0)
            { //5、如果当前线程池为空,就新创建一个线程并执行
                    this.addWorker((Runnable)null, false);
                }
            } else if (!this.addWorker(command, false))
            { //6、如果在第三步判断为非运行状态,尝试新建线程,如果失败则执行拒绝
                this.reject(command);
            }

        }
    }
2、ThreadPool实现思路

3、实现
import java.util.ArrayList;
import java.util.HashSet;
import java.util.concurrent.*;
import java.util.concurrent.locks.ReentrantLock;

//final --> 不能被修改

public class MyThreadPool {
    private volatile ReentrantLock lock = new ReentrantLock();// ReentrantLock锁
    private volatile ArrayBlockingQueue<Runnable> queue = new BlockingQueueWithLock<Runnable>(10);// 任务阻塞队列
    private volatile ArrayList<Thread> threads = new ArrayList<>();// 可以动态修改的数组存储线程
    private volatile HashSet<MyThreadPool.Running> runningSet = new HashSet<>();// 不重复的运行集

    private volatile int poolSize;  // 当前运行线程数
    private volatile int coreSize;  // 核心线程数(min/基本)
    private volatile int maxSize;  // 最大线程数(max)
    //private final int timeOut;
    private volatile boolean RUNNING = true;// 是否正在运行
    private volatile boolean SHUTDOWN = false;// 是否停止工作

    // MyThreadPool(int corePoolSize, int maxPoolSize, int timeout)
    public MyThreadPool(int corePoolSize, int maxPoolSize) {
        ExecutorService ex = Executors.newFixedThreadPool(10);
        int num = ((ThreadPoolExecutor)ex).getActiveCount();  // 获取当前运行线程数

        this.coreSize = corePoolSize;
        this.maxSize = maxPoolSize;
        //this.timeOut = timeout;
        this.poolSize = 1;  // null error

        queue = new ArrayBlockingQueue<Runnable>(poolSize);

    }

    //class Running
    public final class Running implements Runnable {
        public Running(Runnable task) {
            queue.offer(task);  // 队尾添加
        }

        @Override
        public void run() {
            while (RUNNING) {
                if (SHUTDOWN) {
                    Thread.interrupted();
                }
                try {
                     Runnable task = queue.take();
                    task.run();
                } catch (InterruptedException e) {
                    e.printStackTrace();
                }
            }
        }
    }

    // execute(Runnable task)
    public void execute(Runnable task) {
        if (task == null) {
            throw new NullPointerException();
        }

        if (poolSize < maxSize || poolSize >= coreSize) { // 当前线程数>=基本大小 且任务队列未满时
            lock.lock();
            try {
                poolSize++;
                MyThreadPool.Running r = new MyThreadPool.Running(task); // 提交到阻塞队列排队等候处理
                runningSet.add(r);
                Thread thread = new Thread(r);
                threads.add(thread); // 新增线程处理
                thread.start();
            } finally {
                lock.unlock();
            }
        } else {
            try {
                queue.put(task);
            } catch (InterruptedException e) {
                e.printStackTrace();
            }
        }
    }

    // shutdown()
    public void shutdown() {
        RUNNING = false;
        if (!runningSet.isEmpty()) {
            for (MyThreadPool.Running r : runningSet) {  // 遍历运行集
                for (Thread thread : threads) {  // 遍历线程
                    System.out.println(thread.getName() + " interrupt!\n");
                    thread.interrupt();
                }
            }
        }
        SHUTDOWN = true;
        Thread.currentThread().interrupt();
    }

    // Main Test
    public static void main(String[] args) throws IllegalArgumentException {
        MyThreadPool ex = new MyThreadPool(2, 5);
        for (int i = 2; i < 5; i++) {
            ex.execute(() ->
                    System.out.println("Thread " + Thread.currentThread().getName() + " still working!\n"));
        }
        ex.shutdown();
    }
}

/**
 * IllegalArgumentException 方法收到非法参数
 * */

/*
Thread-0 interrupt!

Thread-1 interrupt!

Thread-2 interrupt!

Thread-0 interrupt!

Thread-1 interrupt!

Thread-2 interrupt!

Thread-0 interrupt!

Thread-1 interrupt!

Thread-2 interrupt!

Thread Thread-1 still working!

Thread Thread-0 still working!
* */
4、 过程中出现的问题
(1)ArrayBlockingQueue和BlockingQueueWithLock的兼容问题
此线程池所用到的任务阻塞队列BlockingQueueWithLock为我自己实现的阻塞队列,但是我又想让此队列能够使用ArrayBlockingQueue中的put、offer等方法。
最初我让BlockingQueueWithLock继承ArrayBlockingQueue:
extends ArrayBlockingQueue<E>
编译器报错:

我就将BlockingQueueWithLock构造函数改为:
public BlockingQueueWithLock(int capacity) {
super(capacity);
array = (E[]) new Object[capacity];
}
然后将MyThreadPool中的queue重赋值为:
queue = new ArrayBlockingQueue<Runnable>(poolSize);
编译器报错:

意思类型不兼容,接着我尝试使用强转:
queue = (BlockingQueueWithLOck)(new ArrayBlockingQueue<Runnable>(poolSize));
好的,编译器总算是不报错了。点击运行,迎来下一个bug:
(2)抛出异常ClassCastException
给出我的强转处抛出ClassCastException异常,用throws和catch语句都没办法解决。查了一下,我这样强转方法相当于把Animal接口下的dog类实例强转为cat实例,不合理也不恰当,所以强转是不奏效的,异常也无法忽视。
此时我的queue是这样定义的:
![]()
为了兼容,我把它改为了:
![]()
ClassCastException异常消失。点击运行,迎来下一个bug:
(3)抛出异常IllegalArgumentException

找了很久问题的报错(真的很久
IllegalArgumentException --> 表示方法收到非法参数
最后发现原来是在MyThreadPool方法中把里面的poolSize初始化了为null,而内部要求当前运行线程数最小为1。
修改如下:
 运行成功,完结撒花


 201
201


 被折叠的 条评论
为什么被折叠?
被折叠的 条评论
为什么被折叠?
 到【灌水乐园】发言


