


登录功能流程:
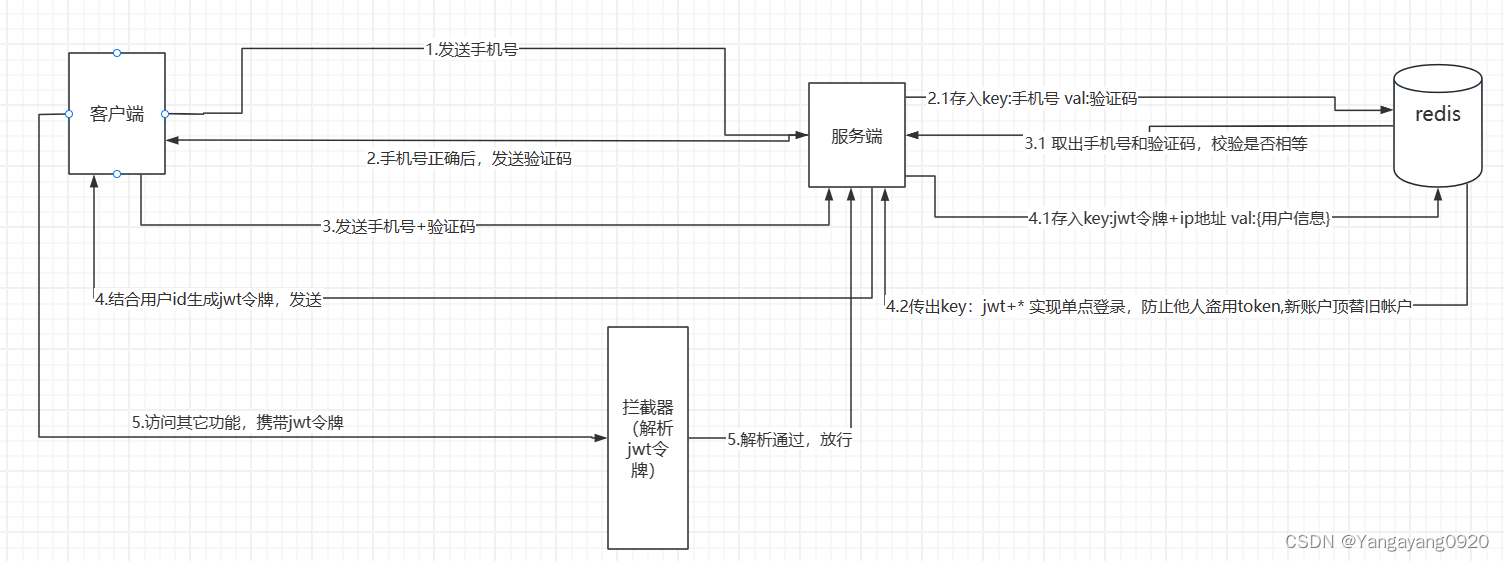
- 用户输入手机号,获取验证码
- 服务端使用正则判断手机号格式,无误后生成验证码传回给用户,并且为了验证手机号和验证码是否一致,将其存入redis中(使用字符串类型)
- 用户输入验证码,请求登录。服务端从redis中取出上一步存储好的手机号:验证码,进行比对。
- 在查找数据库里是否有该用户,没有,则让该用户先注册。
- 存在该用户继续往下步骤走
- 比对成功,
- 服务端结合用户的 id 生成 jwt 令牌,发送给用户的 token ‘authorization’里
- 服务端先查询 redis 中是否已有其它 ip 地方登录(异地已经登录)的情况,如果有,采用新用户顶旧用户方法,将旧用户的信息删除
- 服务端将 jwt + ip地址作为key, 新用户信息作为 val,使用哈希结构,存入redis
- 旧用户不会被强制退出,只有访问新功能时,会被提示要重新登录
- 用户的 token 携带 jwt 令牌,访问其它功能
- 拦截器登场:
- 在Redis 中查看用户是否已经合法登陆过
- Redis中不存在该用户信息则拦截
- 校验jwt令牌,不通过则拦截
- 刷新token 有效期,有请求就代表有操作,延长有效期
- 放行
代码解释:
以房东为实体类
RedisConfiguration类:
@Configuration
@Slf4j
public class RedisConfiguration {
    @Bean
    public RedisTemplate redisTemplate(RedisConnectionFactory redisConnectionFactory){
        log.info("开始创建Redis模板对象...");
        RedisTemplate redisTemplate = new RedisTemplate();
        //设置redis的连接工厂对象
        redisTemplate.setConnectionFactory(redisConnectionFactory);
        //设置redis key的序列化器
        redisTemplate.setKeySerializer(new StringRedisSerializer());
        return redisTemplate;
    }
    @Bean
    public StringRedisTemplate stringRedisTemplate(RedisConnectionFactory redisConnectionFactory){
        log.info("开始创建Redis模板对象...");
        StringRedisTemplate stringRedisTemplate = new StringRedisTemplate();
        //设置redis的连接工厂对象
        stringRedisTemplate.setConnectionFactory(redisConnectionFactory);
        //设置redis key的序列化器
        stringRedisTemplate.setKeySerializer(new StringRedisSerializer());
        return stringRedisTemplate;

    }
}
LandlordController类:设置用户请求验证码、注册、登录的接口
@RestController
@RequestMapping("/landlord")
@Slf4j
public class LandlordController {

    @Autowired
    private LandlordService landlordService;

    @PostMapping("/code")
    public Result sendCode(@RequestParam("phone")String phone){
        log.info("{} 请求验证码...",phone);
        return Result.success(landlordService.sendCode(phone));
    }

    @PostMapping("/register")
    public Result register(@RequestBody LandlordLoginDTO landlordLoginDTO){
        log.info("请求注册:{}",landlordLoginDTO.getPhone());
        LandlordLoginVO registerVO = landlordService.register(landlordLoginDTO);
        return Result.success("注册成功");
    }

    @PostMapping("/login")
    public Result login(@RequestBody LandlordLoginDTO landlordLoginDTO, HttpServletRequest request){
        log.info("请求登录:{}",landlordLoginDTO.getPhone());
        Result<LandlordLoginVO> loginVOResult = landlordService.login(landlordLoginDTO, request);
        return Result.success(loginVOResult);
    }
LandlordService接口:
public interface LandlordService {
    /**
     * 发送手机号验证码
     * @param phone
     * @param
     * @return
     */
    Result sendCode(String phone);

    Result<LandlordLoginVO> login(LandlordLoginDTO loginDTO, HttpServletRequest request);


    LandlordLoginVO register(LandlordLoginDTO landlordLoginDTO);
}
LandlordServiceImpl实现类:数据逻辑处理,令牌生成、手机号验证码对比在这实现
@Service
@Slf4j
public class LandlordServiceImpl  implements LandlordService {
    @Autowired
    private LandlordMapper landlordMapper;
    @Autowired
    private StringRedisTemplate stringRedisTemplate;
    @Autowired
    private JwtProperties jwtProperties;

    /**
     * 发送验证码
     *
     * @param phone
     * @param
     * @return
     */
    @Override
    public Result sendCode(String phone) {
        //1.验证手机号是否符合规范
        if (RegexUtils.isPhoneInvalid(phone)) {
            return Result.error(ACCOUNT_ERROR);
        }
        //2.符合,生成验证码
        String code = RandomUtil.randomNumbers(6);
        //3.保存验证码到redis 手机号为key 验证码为value
        stringRedisTemplate.opsForValue().set(LOGIN_CODE_KEY + phone, code ,LOGIN_CODE_TTL, TimeUnit.MINUTES);
        //4.发送验证码,短信商需要通过阿里云等平台
        log.info("发送短信验证码成功:{}", code);
        //5.返回ok
        return Result.success();
    }

    /**
     * 登录功能
     *
     * @param loginDTO
     * @param
     * @return
     */
    @Override
    public Result<LandlordLoginVO> login(LandlordLoginDTO loginDTO, HttpServletRequest request) {
        //获取登录的内容
        String phone = loginDTO.getPhone();
        String code = loginDTO.getCode();
        String ipAddr = IpUtil.getIpAddr(request);


        //方式一:手机号码获取验证码
        if (phone != null && code != null) {
            // 1.校验手机号
            if (RegexUtils.isPhoneInvalid(phone)) {
                throw new AccountNotFoundException(MessageConstant.ACCOUNT_NOT_FOUND);
            }
            // 2.校验验证码,从redis中取出,key为phone
            String cacheCode = stringRedisTemplate.opsForValue().get(LOGIN_CODE_KEY + phone);
            if (cacheCode == null || !cacheCode.equals(code)) {
                //3.不一致,报错
                throw new CodeNotValidException(MessageConstant.CODE_ERROR);
            }
            //4.一致,根据手机号查询用户
            Landlord landlord = landlordMapper.selectByPhone(phone);
            //5.判断用户是否存在
            if(landlord == null){
                throw new AccountNotFoundException(FIRST_REGISTER);
            }

            // 6.保存用户信息到redis中 采用token
            //6.1 随机生成token,作为登录令牌,采用jwt,选择landlord的id,方便后续从令牌中取出id并存入线程中
            //生成jwt令牌
            Map<String, Object> claims = new HashMap<>();
            claims.put(JwtClaimsConstant.LANDLORD_ID,landlord.getId());
            String token = JwtUtil.createJWT(
                    jwtProperties.getLandlordSecretKey(),
                    jwtProperties.getLandlordTtl(),
                    claims);
            //6.2 使用token+ip地址做key  id做value存储
            LandlordLoginVO landlordLoginVO = BeanUtil.copyProperties(landlord, LandlordLoginVO.class);
                //转化哈希结构
                //此处.setFieldValueEditor的优先级高于setIgnoreNullValue,token没有值不是null,不可忽略,所以还需要加多判断
            Map<String, Object> landlordMap = BeanUtil.beanToMap(landlordLoginVO,new HashMap<>(),
                    CopyOptions.create()
                            .setIgnoreNullValue(true)
                            .setFieldValueEditor((fieldName,fieldValue)-> {
                                if (fieldValue == null){
                                    fieldValue = "0";
                                }else {
                                    fieldValue = fieldValue.toString();
                                }
                                return fieldValue;
                            }));


            //6.3已有用户在异地登录,则删除Redis中的缓存,实现单点登录
            Set<String> keys = stringRedisTemplate.keys(LOGIN_LANDLORD_KEY + token  + "*");
            if(!keys.isEmpty()){
                stringRedisTemplate.delete(keys);
            }
            //6.4存储token到Redis中 采用哈希结构
            String tokenKey = LOGIN_LANDLORD_KEY + token  + ipAddr;
            stringRedisTemplate.opsForHash().putAll(tokenKey,landlordMap);
            //6.5设置redis中token有效期
            stringRedisTemplate.expire(tokenKey,LOGIN_LANDLORD_TTL,TimeUnit.MINUTES);
            // 7.返回含有token的VO类
            landlordLoginVO.setToken(token);
            return Result.success(landlordLoginVO);
        }

}
/**
     * 手机号注册
     * @param
     * @return
     */
    @Override
    public LandlordLoginVO register(LandlordLoginDTO loginDTO) {
        String phone = loginDTO.getPhone();
        String code = loginDTO.getCode();
        Landlord landlord = new Landlord();
        if (phone != null && code != null) {
            // 1.校验手机号
            if (RegexUtils.isPhoneInvalid(phone)) {
                throw new AccountNotFoundException(MessageConstant.ACCOUNT_NOT_FOUND);
            }
            // 2.校验验证码,从redis中取出,key为phone
            String cacheCode = stringRedisTemplate.opsForValue().get(LOGIN_CODE_KEY + phone);
            if (cacheCode == null || !cacheCode.equals(code)) {
                //3.不一致,报错
                throw new CodeNotValidException(MessageConstant.CODE_ERROR);

            }
            //4.一致,根据手机号查询用户
            landlord = landlordMapper.selectByPhone(phone);
            //5.判断用户是否存在
            if (landlord == null) {
                //不存在,创建新角色
                landlord = createLandlordWithPhone(phone);
            }else{
                System.out.println("您已有账号!请直接登录");
            }
        }else{
            System.out.println("请输入手机号或验证码!");
        }
        LandlordLoginVO loginVO = LandlordLoginVO.builder()
                .id(landlord.getId())
                .name(landlord.getName())
                .token(null)
                .build();

        return loginVO;
    }

/**
     * 根据手机号创建新用户
     *
     * @param phone
     * @return
     */
    private Landlord createLandlordWithPhone(String phone) {
        Landlord landlord = new Landlord();
        landlord.setName(LANDLORD_NAME_PREFIX + RandomUtil.randomString(5));
        landlord.setPhone(phone);
        try{
            landlordMapper.insert(landlord);
        }catch (Exception e){
            System.out.println(e);
        }

        log.info("创建新房东成功:{}",landlord);
        return landlord;
    }
}
具体拦截器设置:
@Component
@Slf4j
public class HandlordLoginInterceptor implements HandlerInterceptor {
    @Autowired
    private StringRedisTemplate stringRedisTemplate;
    @Autowired
    private JwtProperties jwtProperties;

    @Override
    public boolean preHandle(HttpServletRequest request, HttpServletResponse response, Object handler) throws Exception {
        //放行静态资源请求或其它非mvc处理的请求
        if(!(handler instanceof HandlerMethod)){
            return true;
        }

        //1.从请求中获取用户的token
        String token = request.getHeader("authorization");
        String ipAddr = IpUtil.getIpAddr(request);
        if(StrUtil.isBlank(token)){
            //不存在,拦截,返回401状态码
            response.setStatus(401);
            return false;
        }
        //2.将用户返回的token和redis来判断用户是否存在
        Map<Object, Object> landlordVOMap = stringRedisTemplate.opsForHash()
                .entries(RedisConstants.LOGIN_LANDLORD_KEY + token + ipAddr);

        if(landlordVOMap.isEmpty()){
            //不存在,拦截,返回401状态码
            response.setStatus(401);
            return false;
        }
        //3.校验jwt令牌
        try{
            log.info("jwt校验{},",token);
            Claims claims = JwtUtil.parseJWT(jwtProperties.getLandlordSecretKey(), token);
            Integer landlordId = Integer.valueOf(claims.get(JwtClaimsConstant.LANDLORD_ID).toString());
            log.info("当前房东id:{}",landlordId);
            //4.保存用户到ThreadLocal中,方便后续线程使用一些用户的属性
            BaseContext.setCurrentId(landlordId);

        }catch (Exception ex){
            //不通过,返回401状态码
            response.setStatus(401);
            return false;
        }

        // 5.刷新token有效期 有请求就代表有操作,就需要延长有效期
        stringRedisTemplate.expire(token,RedisConstants.LOGIN_LANDLORD_TTL, TimeUnit.MINUTES);
        //6.放行
        return true;
    }

    @Override
    public void afterCompletion(HttpServletRequest request, HttpServletResponse response, Object handler, Exception ex) throws Exception {
        //移除用户
        BaseContext.removeCurrentId();
    }
}
拦截器自行加入WebMvcConfiguration
@Configuration
@Slf4j
public class WebMvcConfiguration extends WebMvcConfigurationSupport {

     @Autowired
     private HandlordLoginInterceptor handlordLoginInterceptor;

    /**
     * 注册自定义拦截器
     *
     * @param registry
     */
    protected void addInterceptors(InterceptorRegistry registry) {
        log.info("开始注册自定义拦截器...");
        //添加房东web端登录的拦截器
        registry.addInterceptor(handlordLoginInterceptor )
                .addPathPatterns("/landlord/**")
                .excludePathPatterns(
                        "/landlord/code",
                        "/landlord/login",
                        "/landlord/register"
                );
    }
}


 2270
2270


 被折叠的 条评论
为什么被折叠?
被折叠的 条评论
为什么被折叠?
 到【灌水乐园】发言


