- 关于依赖的导入
在同时使用Spring security 5和Thymeleaf的情况下,除了导入Spring security的基本依赖,还要额外导入整合包的依赖,否则会出现静态资源不加载、js库引入失败等问题
        <dependency>
            <groupId>org.springframework.boot</groupId>
            <artifactId>spring-boot-starter-security</artifactId>
        </dependency>

		<!--与Thymeleaf整合包-->
        <dependency>
            <groupId>org.thymeleaf.extras</groupId>
            <artifactId>thymeleaf-extras-springsecurity5</artifactId>
            <version>3.0.4.RELEASE</version>
        </dependency>
        <dependency>
            <groupId>org.aspectj</groupId>
            <artifactId>aspectjweaver</artifactId>
            <version>1.9.4</version>
        </dependency>
- 关于自定义页面
关于自定义页面设置失败的问题,我在我的另一篇博文中进行了详细的讲解,点击跳转:
Spring security 自定义登录页面,登录后仍然跳转到登录页面 死循环的问题
另外还要说一个坑,Spring security的登录页面本质上是拦截
所以通俗的讲,应该是这样的流程
因此,自定义页面
		//自定义登录页面
		//loginPage代表拦截时转发到登录页面controller所接受的路径
		//loginProcessingUrl代表登录表单提交的路径
		//failureForwardUrl代表表单校验失败时controller转发到错误页面所接受的路径
		//usernameParameter、passwordParameter指定前端传入的用户名密码所对应的参数名(默认username、password)
		http.formLogin().loginPage("/toLogin").loginProcessingUrl("/login");

        //自定义注销页面
        //logoutUrl代表注销时controller接受的路径
        //logoutSuccessUrl代表注销成功后controller转发的路径
        http.logout().logoutUrl("/toLogout").logoutSuccessUrl("/");
- 关于内存读取与连接数据库两种方式
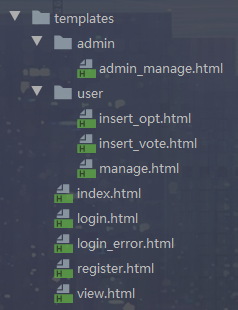
前端页面的目录结构

- 从内存中读取信息校验,只需要一个配置类
import org.springframework.beans.factory.annotation.Autowired;
import org.springframework.context.annotation.Bean;
import org.springframework.security.config.annotation.authentication.builders.AuthenticationManagerBuilder;
import org.springframework.security.config.annotation.web.builders.HttpSecurity;
import org.springframework.security.config.annotation.web.builders.WebSecurity;
import org.springframework.security.config.annotation.web.configuration.EnableWebSecurity;
import org.springframework.security.config.annotation.web.configuration.WebSecurityConfigurerAdapter;
import org.springframework.security.crypto.bcrypt.BCryptPasswordEncoder;
import org.springframework.security.web.firewall.HttpFirewall;
import org.springframework.security.web.firewall.StrictHttpFirewall;

@EnableWebSecurity
public class LoginConfig extends WebSecurityConfigurerAdapter {

	//授权
    @Override
    protected void configure(HttpSecurity http) throws Exception {
    	//关闭csrf,很重要!!!不然会出现2中所述问题
        http.csrf().disable();
        //设置访问的规则
        http.authorizeRequests().antMatchers("/").permitAll()
                .antMatchers("/user/**").hasRole("user")
                .antMatchers("/admin/**").hasRole("admin");
		//自定义登录页面
        http.formLogin().loginPage("/toLogin").failureForwardUrl("/errorLogin").loginProcessingUrl("/login");

        //自定义注销页面
        http.logout().logoutUrl("/toLogout").logoutSuccessUrl("/");
    }

	//认证
    @Override
    protected void configure(AuthenticationManagerBuilder auth) throws Exception {
    	//使用内存的方式认证admin
        auth.inMemoryAuthentication().passwordEncoder(new BCryptPasswordEncoder()).
        withUser("root").password(new BCryptPasswordEncoder().encode("123456")).roles("admin");

    }

	//一些其他的配置
    @Override
    public void configure(WebSecurity web) throws Exception {
        super.configure(web);
        web.httpFirewall(allowUrlEncodedSlashHttpFirewall());
    }

    @Bean
    public HttpFirewall allowUrlEncodedSlashHttpFirewall() {
        StrictHttpFirewall firewall = new StrictHttpFirewall();
        firewall.setAllowUrlEncodedDoubleSlash(true);
        return firewall;
    }

}
- 从数据库中读取信息校验,需要另外自定义CustomUserDetailsService
import com.demo.entity.User;
import com.demo.service.UserService;
import org.springframework.security.core.userdetails.UserDetails;
import org.springframework.security.core.userdetails.UserDetailsService;
import org.springframework.security.core.userdetails.UsernameNotFoundException;
import org.springframework.security.crypto.bcrypt.BCryptPasswordEncoder;
import org.springframework.stereotype.Service;


import javax.annotation.Resource;


@Service
public class CustomUserDetailsService implements UserDetailsService {

	//注入自己的service,以调用Dao
    @Resource
    private UserService userService;

    //参数s代表校验时传入的username
    @Override
    public UserDetails loadUserByUsername(String s) throws UsernameNotFoundException {
    	//使用mybatis依据username查询出实体user
        User user = userService.queryByUserName(s);
        //如果没查到,报错,用户名错误
        if (user == null){
            throw new RuntimeException("用户名错误!");
        }
        //返回Spring security提供的user对象,withUsername配置用户名,password配置加密后的密码,roles配置权限,使用build构建
        return org.springframework.security.core.userdetails.User.withUsername(user.UserName()).password(new BCryptPasswordEncoder().encode(user.getPassword())).roles("user").build();
    }

}
注意!这里有两个大坑要说一下
1. Spring security 5 一定要对密码进行加密,不然会直接报错(可以自定义加密方式,或者使用现成的加密方式,比如上述代码)
2. 看其他博文中,返回值很多都使用的是Spring security User提供的构造方法,传入(用户名,加密的密码,权限集合),但我不知道是不是版本的原因,我使用那种方法时一直权限认证失败,访问页面报403错误,只有使用上述代码中的返回方式才得以验证成功
import org.springframework.beans.factory.annotation.Autowired;
import org.springframework.context.annotation.Bean;
import org.springframework.security.config.annotation.authentication.builders.AuthenticationManagerBuilder;
import org.springframework.security.config.annotation.web.builders.HttpSecurity;
import org.springframework.security.config.annotation.web.builders.WebSecurity;
import org.springframework.security.config.annotation.web.configuration.EnableWebSecurity;
import org.springframework.security.config.annotation.web.configuration.WebSecurityConfigurerAdapter;
import org.springframework.security.crypto.bcrypt.BCryptPasswordEncoder;
import org.springframework.security.web.firewall.HttpFirewall;
import org.springframework.security.web.firewall.StrictHttpFirewall;

@EnableWebSecurity
public class LoginConfig extends WebSecurityConfigurerAdapter {

    @Autowired
    private CustomUserDetailsService customUserDetailsService;

    @Override
    protected void configure(HttpSecurity http) throws Exception {
        http.csrf().disable();
        //首页所有人都可以访问
        http.authorizeRequests().antMatchers("/").permitAll()
                .antMatchers("/user/**").hasRole("user")
                .antMatchers("/admin/**").hasRole("admin");
        http.formLogin().loginPage("/toLogin").failureForwardUrl("/errorLogin").loginProcessingUrl("/login");
        http.logout().logoutUrl("/toLogout").logoutSuccessUrl("/");
    }

    @Override
    protected void configure(AuthenticationManagerBuilder auth) throws Exception {
    	//内存读取admin
        auth.inMemoryAuthentication().passwordEncoder(new BCryptPasswordEncoder()).withUser("root").password(new BCryptPasswordEncoder().encode("123456")).roles("admin");
        //数据库读取user
        auth.userDetailsService(customUserDetailsService).passwordEncoder(new BCryptPasswordEncoder());
    }

    @Override
    public void configure(WebSecurity web) throws Exception {
        super.configure(web);
        web.httpFirewall(allowUrlEncodedSlashHttpFirewall());
    }

    @Bean
    public HttpFirewall allowUrlEncodedSlashHttpFirewall() {
        StrictHttpFirewall firewall = new StrictHttpFirewall();
        firewall.setAllowUrlEncodedDoubleSlash(true);
        return firewall;
    }

}
- 关于controller读取当前用户的信息
    @PostMapping("/insert")
    public String insert(Principal principal) {
    	//使用Principal在controller中获得相应的用户信息
		principal.getName();
        return "...";
    }


 9039
9039


 被折叠的 条评论
为什么被折叠?


