


一、简单介绍
最近也学习了下碰碰车的案例,这个案例是github上有人上传的案例:下载地址:案例地址,这里主要是做一个简单的总结,先看下效果把,主要就是车的旋转效果的制作以及碰撞检测,还有就是第三人称视角转换为第一人称视角的集合品。先看下效果图
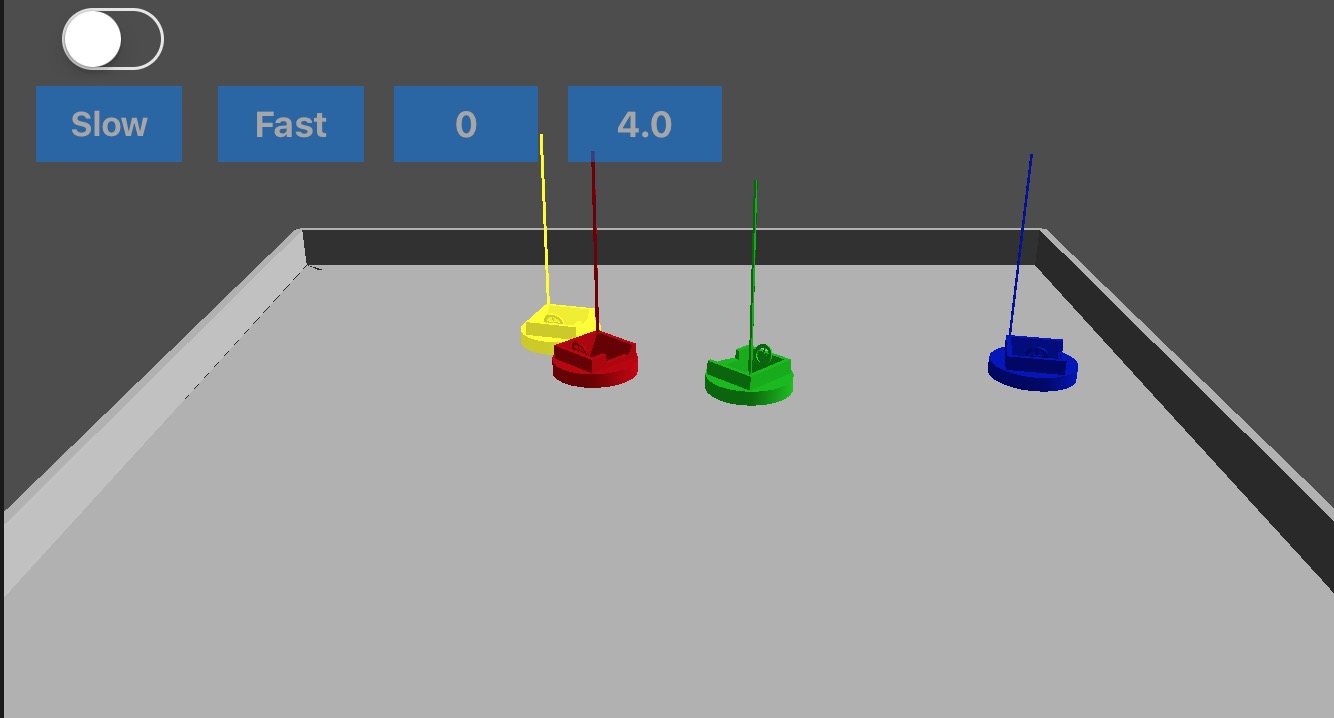
第三人称视角
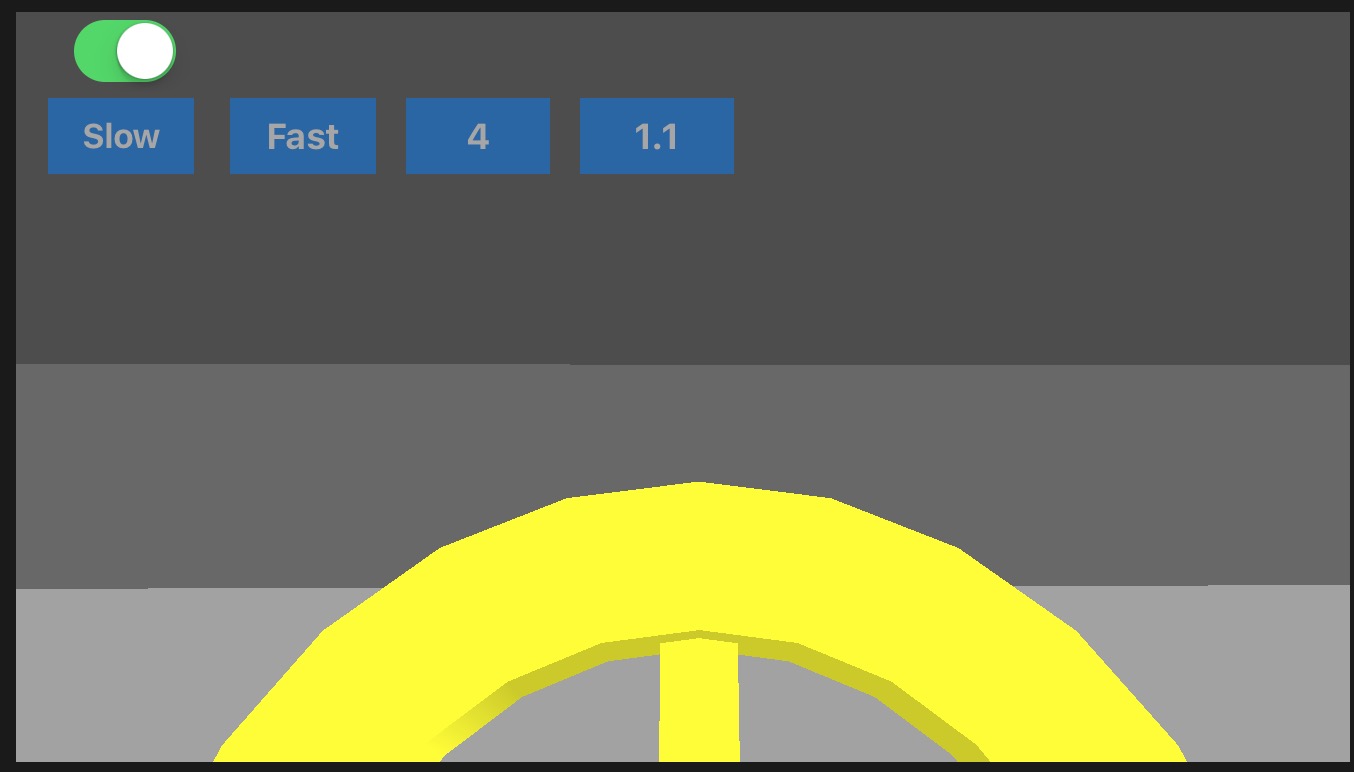
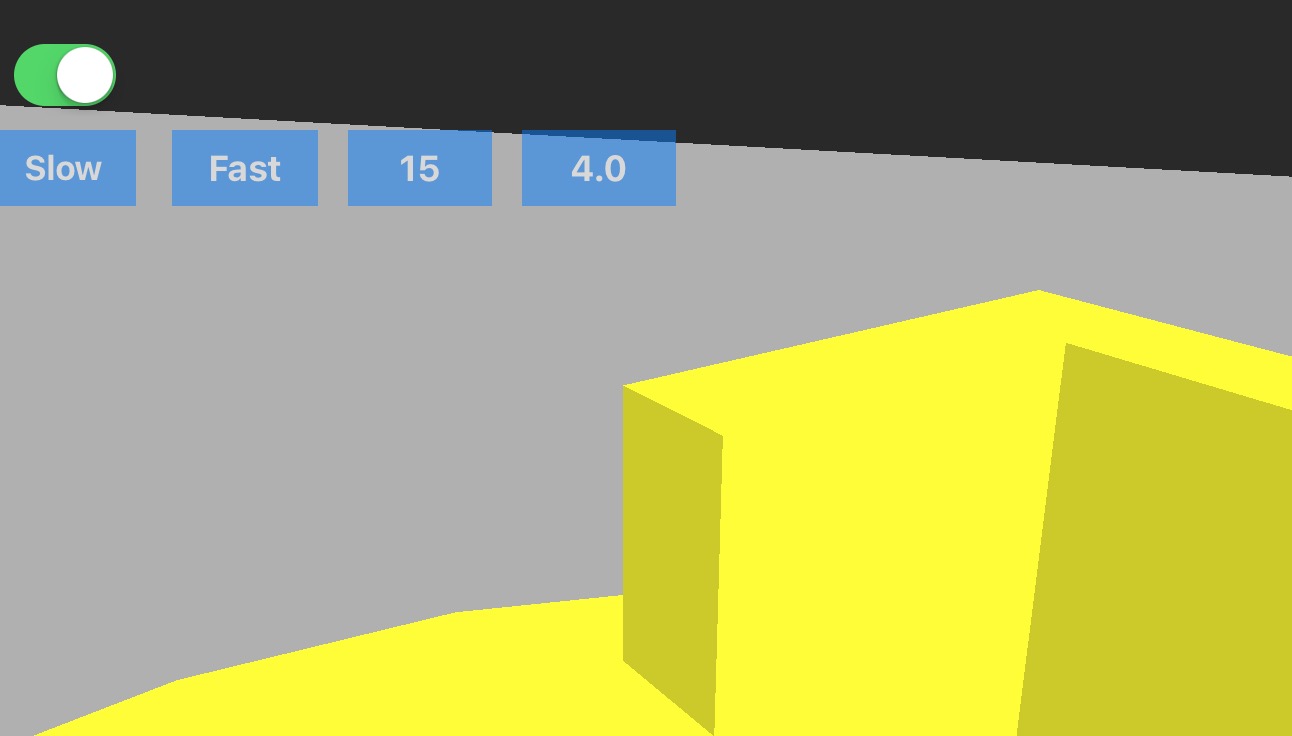
第一人称视角
每次碰撞到另一个车的时候,或者是撞到边界的时候,都会重新的去调整车头一直朝向前,也就是说我们的方向盘是会一直出现在我们的视野前面的,也就是我们看向的位置,下面也会有介绍。
在这里就介绍几个核心的功能。关于这个案例里面的其他几个类这边就提一下就不做过多介绍了,一个是SceneMesh类,关于这个类主要就是通过AGLKVertexAttribArrayBuffer管理顶点数据,发送顶点数据到GPU,分配顶点数据内存,绘制顶点数据。其实做的也就是一些glGenBuffers,glBindBuffer啊等等简单来说就是帮我们封装了这么一些操作,我们自己可以不用再去写了。
还有一个就是SceneModel类,是一个模型类,是SceneCarModel类和SceneRinkModel类的父类,它有属性axisAlignedBoundingBox主要用来计算模型的最大最小边界,还有个属性mesh用来管理顶点数据,其中axisAlignedBoundingBox属性是汽车模型和场地模型都有的。比如说car模型的axisAlignedBoundingBox会在SceneCar的init方法被用来算它的半径。以此来计算有没有超出边界。
关于SceneCarModel类,这个类是car的模型类,包括car的顶点数据和模型的基本属性,可以用于绘制car模型。
关于SceneRinkModel类,这个类是场景的模型类,包括场景的顶点数据和边界等基本属性,可以用于绘制场景。
还有一个类就是SceneCar类,这个类里面处理了汽车的速度、位置、偏航角、半径,还有滤波器函数、以及车的碰撞处理、车和场地的碰撞处理以及绘制了汽车模型。
之后再来介绍下首先我们的业务代码,渲染方法都是在一个继承自GLKViewController的控制器中去完成的,这个控制器中的代码主要就是拿来监听下按钮点击的事件啊,以及渲染的时候的设置啊还有就是上下文的设置啊等等。下面就简单的介绍下这个控制器当中的方法。
下面这个setup函数就是去配置OpenGL ES上下文以及去创建四个小车,以及去设置了场地也就是图一展示的车子是在一个盒子中开的。还有就是去设置了眼睛所在的位置以及眼睛看向的位置。
-(void)setUp
{
   //1.新建OpenGL ES 上下文
    EAGLContext *mContext = [[EAGLContext alloc]initWithAPI:kEAGLRenderingAPIOpenGLES2];

    GLKView *view = (GLKView *)self.view;
    view.context = mContext;
    view.drawableColorFormat = GLKViewDrawableColorFormatRGBA8888;
    view.drawableDepthFormat = GLKViewDrawableDepthFormat16;
    [EAGLContext setCurrentContext:view.context];
    //开启深度测试
    glEnable(GL_DEPTH_TEST);
    glEnable(GL_BLEND);

    _cars = [[NSMutableArray alloc]init];
    self.baseEffect = [[GLKBaseEffect alloc]init];
    //设置光照
    self.baseEffect.light0.enabled = GL_TRUE;
    self.baseEffect.light0.ambientColor = GLKVector4Make(0.6f, 0.6f, 0.6f, 1.0f);

    self.baseEffect.light0.position = GLKVector4Make(1.0f, 0.8f, 0.4f, 0.0f);

    //主要就是用于下面的汽车的init方法中传入做计算半径的
    self.carModel = [[SceneCarModel alloc]init];
    self.rinkModel = [[SceneRinkModel alloc]init];


    self.rinkBoundingBox = self.rinkModel.axisAlignedBoundingBox;

    //创建4辆汽车
    //绿色汽车,A
    /*
     参数1:汽车模型
     参数2:汽车初始位置
     参数3:速度
     参数4:颜色
     */
    SceneCar *newCar = [[SceneCar alloc]
                        initWithModel:self.carModel
                        position:GLKVector3Make(1.0f, 0.0f, 1.0f)
                        velocity:GLKVector3Make(1.5f, 0.0f, 1.5f)
                        color:GLKVector4Make(0.0f, 0.5f, 0.0f, 1.0f)];
    newCar.mCarID = 1;
    [_cars addObject:newCar];

    //红色汽车,B
    newCar =[[SceneCar alloc]
             initWithModel:self.carModel
             position:GLKVector3Make(1.0f, 0.0f, -1.0f)
             velocity:GLKVector3Make(-1.5f, 0.0f, -1.5f)
             color:GLKVector4Make(0.5f, 0.0f, 0.0f, 1.0f)];
    newCar.mCarID = 2;
    [_cars addObject:newCar];

    //蓝色汽车,C
    newCar =[[SceneCar alloc]
             initWithModel:self.carModel
             position:GLKVector3Make(2.0f, 0.0f, -2.0f)
             velocity:GLKVector3Make(-1.5f, 0.0f, -0.5f)
             color:GLKVector4Make(0.0f, 0.0f, 0.5f, 1.0f)];
    newCar.mCarID = 3;
    [_cars addObject:newCar];

    //黄色汽车,D
    newCar =[[SceneCar alloc]
             initWithModel:self.carModel
             position:GLKVector3Make(5.0f, 0.0f, -5.0f)
             velocity:GLKVector3Make(2.0f, 0.0f, -1.0f)
             color:GLKVector4Make(1.0f, 1.0f, 0.0f, 1.0f)];
    newCar.mCarID = 4;
    [_cars addObject:newCar];


    //eyePosition,表示当前eye所在位置
    self.eyePosition = GLKVector3Make(10.5f, 5.0f, 0.0f);
    //设置眼睛看向的位置
    self.lookAtPosition = GLKVector3Make(0.0f, 0.5f, 0.0f);

    //targetEyePosition 表示eye最终目标的位置
    /*
        之所以需要设置一个目标位置,是为了在视角切换,通过高通滤波器函数SceneVector3FastLowPassFilter和低通滤波器函数
       SceneVector3SlowLowPassFilter,实现视角平滑过渡。
     */

}
紧接着下面的update函数,这个函数在GLKViewController中会被自动的调用。在GLKViewController中还有个方法就是glkView:drawInRect方法,都是会自动调用的,然后调用顺序是先调用方法,都是会自动调用的,然后调用顺序是先调用glkView:drawInRect,再调用update方法。一般我们都是将场景数据变化放在update中,而渲染代码则放在glkView中。
-(void)update
{
    /*
     eyePosition表示的是当前eye所在的位置,targetEyePosition表示的eye最终的目的。
     之所以需要设置一个目标的位置,是为了做视角的切换,通过高通滤波器函数SceneVector3FastLowPassFilter和
     低通滤波器函数SceneVector3SlowLowPassFilter,实现视角平滑过渡。
     */
    /*下面的这个self.pointOfViewAnimationCountDown这个可以理解为是拿来做我视角切换时候的给人一种平滑效果的体验的,结合下面的
     SceneVector3SlowLowPassFilter来使用  */

 if (self.pointOfViewAnimationCountDown > 0) {
      //下面做的就是为了切换视角平滑的转换利用SceneVector3SlowLowPassFilter

     self.pointOfViewAnimationCountDown -= self.timeSinceLastUpdate;

     self.eyePosition = SceneVector3SlowLowPassFilter(self.timeSinceLastUpdate,
                                                     self.targetEyePosition, self.eyePosition);

     self.lookAtPosition = SceneVector3SlowLowPassFilter(
                                                        self.timeSinceLastUpdate, self.targetLookAtPosition, self.lookAtPosition);

    }
  //没有打开切换第一人称视角的开关时候都是调用的下面的方法
  else
    {
      //当前eye所在的位置
     self.eyePosition = SceneVector3FastLowPassFilter(
                                                      self.timeSinceLastUpdate,
                                                      self.targetEyePosition,
                                                      self.eyePosition);
        //看向的位置
        self.lookAtPosition = SceneVector3FastLowPassFilter(
                                                         self.timeSinceLastUpdate, self.targetLookAtPosition, self.lookAtPosition);
    }

    //每辆汽车更新car的位置、偏航角和速度
    [_cars makeObjectsPerformSelector:@selector(updateWithController:) withObject:self];
    //关于此方法下面也会介绍
    [self updatePointOfView];

}-(void)glkView:(GLKView *)view drawInRect:(CGRect)rect
{
glClearColor(0.3f, 0.3f, 0.3f, 1.0f);
glClear(GL_COLOR_BUFFER_BIT | GL_DEPTH_BUFFER_BIT);
self.baseEffect.light0.diffuseColor = GLKVector4Make(1.0f, 1.0f, 1.0f, 1.0f);
//设置投影矩阵
const GLfloat aspectRatio = (GLfloat)view.drawableWidth /(GLfloat)view.drawableHeight;
self.baseEffect.transform.projectionMatrix = GLKMatrix4MakePerspective(GLKMathDegreesToRadians(35.0f), aspectRatio, 0.1f, 25.0f);
//设置模型矩阵
/*
GLKMatrix4 GLKMatrix4MakeLookAt(float eyeX,
float eyeY,
float eyeZ,
float centerX,
float centerY,
float centerZ,
float upX,
float upY,
float upZ)
返回一个4x4矩阵变换的世界坐标系坐标
摄像机位置,目标点位置以及UP向量
参数列表
eyeX 眼睛(观察者)位置的x坐标
eyeY 眼睛(观察者)位置的y坐标
eyeZ 眼睛(观察者)位置的z坐标
centerX 目标点位置,x
centerY 目标点位置,y
centerZ 目标点位置,z
upX UP向量x
upY UP向量y
upZ UP向量z
*/
//可以理解为设置观察者的位置
self.baseEffect.transform.modelviewMatrix =
GLKMatrix4MakeLookAt(self.eyePosition.x,
self.eyePosition.y,
self.eyePosition.z,
self.lookAtPosition.x,
self.lookAtPosition.y,
self.lookAtPosition.z,
0, 1, 0);
//绘制场景
[self.baseEffect prepareToDraw];
[self.rinkModel draw];
//让数组中的每一辆汽车都去调用drawWithBaseEffect的方法
[_cars makeObjectsPerformSelector:@selector(drawWithBaseEffect:) withObject:self.baseEffect];
//碰撞次数
self.myBounceLabel.text = [NSString stringWithFormat:@"%ld",[SceneCar getBounceCount]];
//获取数组中的最后一辆汽车
SceneCar *viewCar = [_cars lastObject];
//更新label上面显示的速度
self.myVelocityLabel.text = [NSString stringWithFormat:@"%.1f",GLKVector3Length(viewCar.velocity)];
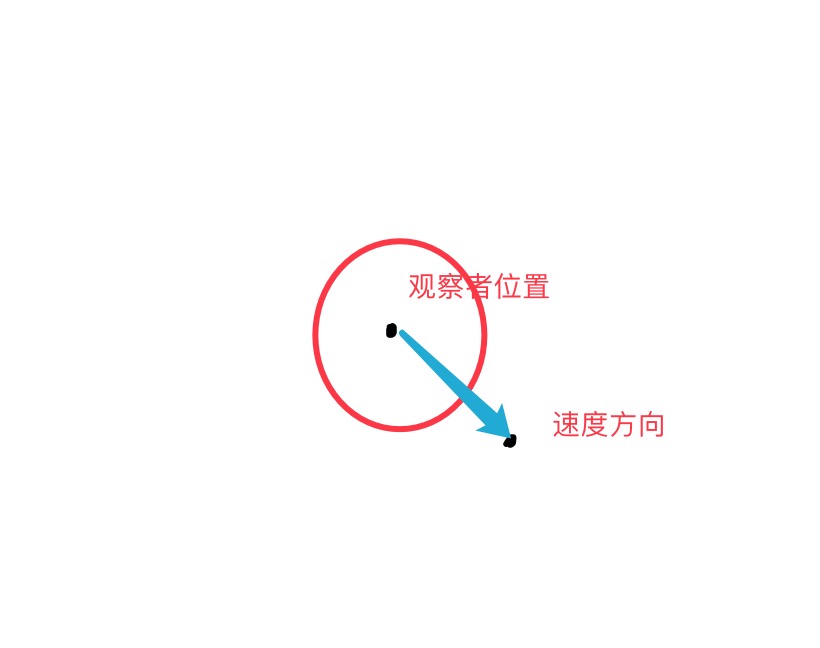
}下面再去看看这个方法,这里面主要就是在腰切换成为第一人称视角的时候需要做的,就是设置目标眼睛的位置也就是车上面0.45个距离,以及设置眼睛看向的位置,看向的是车的速度方向。所以这里就设置了我切换到第一人称所能看到的东西。
-(void)updatePointOfView
{
    if (!self.shouldUseFirstPersonPOV) {
        self.targetEyePosition = GLKVector3Make(10.5f, 5.0f, 0.0f);
        self.targetLookAtPosition = GLKVector3Make(0.0f, 0.5f, 0.0f);

    }else
    {
        SceneCar *viewCar = [_cars lastObject];

        self.targetEyePosition = GLKVector3Make(viewCar.position.x, viewCar.position.y + 0.45f, viewCar.position.z);
        /*
         //如果直接为viewCar.velocity在靠近边界还没有发生碰撞的时候视线直接转了,包括和其他碰碰车碰撞的时候也是虽然速度方向改变了,但是还没有撞到,
          还没有碰撞视线就歪了,这里加上了_eyePosition可以实现一个在碰到边界之后抖动一下,然后并且视线一直在方向盘。
        */
        self.targetLookAtPosition =GLKVector3Add(_eyePosition, viewCar.velocity);

    }
}
对于上面的self.targetLookAtPosition =GLKVector3Add(_eyePosition, viewCar.velocity); 如果我们改成是self.targetLookAtPosition = viewCar.velocity;还没到边界,看向的方法直接就偏了
所以我们要做的就是基于观察者所处的位置,然后和速度向量相加起来。可以理解为直接两个点所处的位置连线起来然后确定一个方向,然后我方向盘就能更好的转动了。
接下来就是一些事件的监听了
//减速
- (IBAction)onSlow:(id)sender {

    SceneCar *car = [_cars lastObject];
    [car onSpeedChange:YES];
}

//加速
- (IBAction)onFast:(id)sender {

    SceneCar *car = [_cars lastObject];
    [car onSpeedChange:NO];

}

//修改视角
- (IBAction)takeShouldUseFirstPersonPOVFrom:(UISwitch *)sender {

    self.shouldUseFirstPersonPOV = [sender isOn];

    //POV(第一人称视角-point of view)场景动画秒数
_pointOfViewAnimationCountDown = SceneNumberOfPOVAnimationSeconds;
}
下面我们再去SceneCar类中去看一下更新汽车的位置,偏航角以及速度的方法
- (void)updateWithController: (id <SceneCarControllerProtocol>)controller
{
//产生一个时间,在0.01-0.5秒之间
NSTimeInterval elapsedTimeSeconds = MIN(MAX([controller timeSinceLastUpdate], 0.01f), 0.5f);
//行驶距离 = 速度 * 时间
GLKVector3 travelDistance = GLKVector3MultiplyScalar(self.velocity, elapsedTimeSeconds);
//下一个点 = 当前位置 + 行驶距离
self.nextPosition = GLKVector3Add(self.position, travelDistance);
//获取场景box
SceneAxisAllignedBoundingBox rinkBoundingBox = [controller rinkBoundingBox];
//检测car之间的碰撞
[self bounceOffCars:[controller cars] elapsedTime:elapsedTimeSeconds];
//检测car是否碰墙面
[self bounceOffWallsWithBoundingBox:rinkBoundingBox];
if (GLKVector3Length(self.velocity) < 0.1) {
//速度太小,方向可能是一个死角。所以我们去随机产生有一个新方向
GLfloat randTemp = (random() / (0.5f * RAND_MAX)) - 1.0f;
self.velocity = GLKVector3Make(randTemp, 0.0f, randTemp);
}else if(GLKVector3Length(self.velocity) < 4)
{
//速度太慢,调整一下速度
self.velocity = GLKVector3MultiplyScalar(self.velocity, 1.01f);
}
//这里按照我的理解就是计算两者之间的夹角,然后再转到那个相应的角度
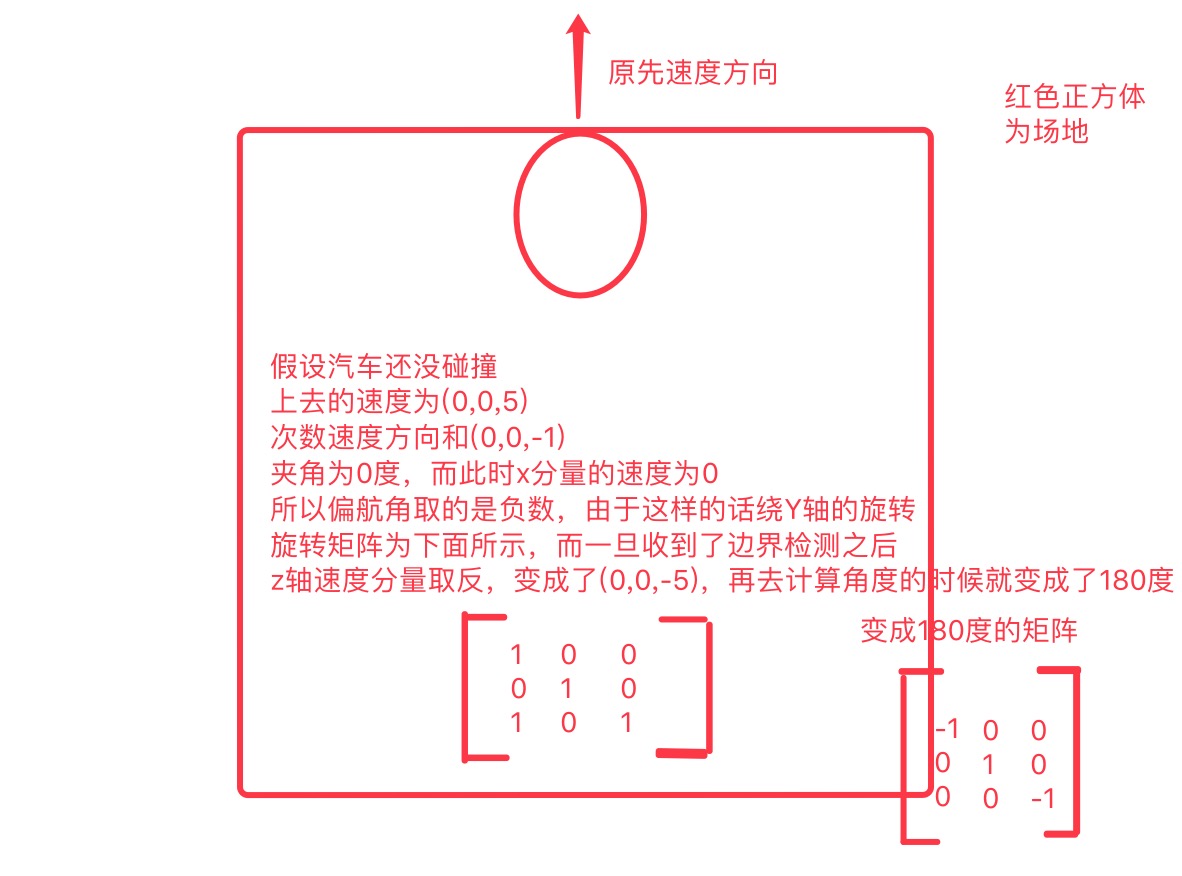
float dotProduct = GLKVector3DotProduct(GLKVector3Normalize(self.velocity), GLKVector3Make(0.0f, 0.0f, -1.0f));
if (self.velocity.x >= 0.0f) {
//设置偏航角为负其实就是要设置我模型视图矩阵中的旋转的角度
self.targetYawRadians = -acosf(dotProduct);
}else
{
//设置偏航角为正
self.targetYawRadians = acosf(dotProduct);
}
//慢慢的进行旋转改变方向的操作,不对偏航角进行低通滤波器处理的话,就会马上就转换角度,就不会有我从一个角度平滑的到另外一个角度了
[self spinTowardDirectionOfMotion:elapsedTimeSeconds];
//更新self.position的位置
self.position = self.nextPosition;
}这里再介绍下为什么当self.velocity.x>0.0的时候角度取负数,然后小于0.0的时候取正,首先我们考虑个情况,速度反向只有z方向分量的情况,其他也可以一次类推
再去看看计算两车之间碰撞的方法
- (void)bounceOffCars:(NSArray *)cars elapsedTime:(NSTimeInterval)elapsedTimeSeconds
{
for (SceneCar *currentCar in cars) {
if (currentCar != self) {
//距离 GLKVector3Distance(A,B),获取向量AB之间的距离
float distance = GLKVector3Distance(self.nextPosition, currentCar.nextPosition);
//距离小于边框直径距离,即可理解为2个图形已经处于重叠,即碰撞状态
//汽车碰撞了
if (distance < self.radius * 2.0f) {
//碰撞次数+1
bounceCount++;
//汽车A的速度
GLKVector3 ownVelocity = self.velocity;
//汽车B速度
GLKVector3 otherVeloctiy = currentCar.velocity;
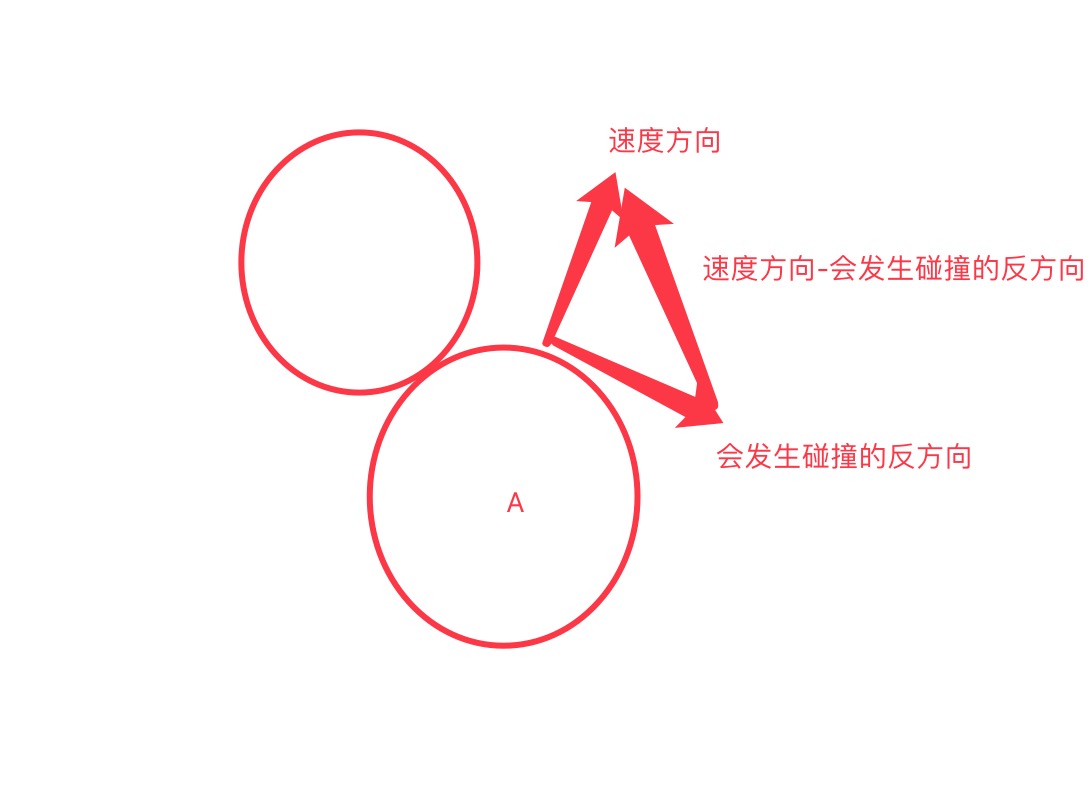
// B.position - A.position = 可能会发送碰撞的路线直线
GLKVector3 directionToOtherCar = GLKVector3Subtract(currentCar.position, self.position);
//将directionToOtherCar 规范化
directionToOtherCar = GLKVector3Normalize(directionToOtherCar);
//directionToOtherCar 的负方向向量
//获取碰撞路线 相反的负方向向量
GLKVector3 negDirectionToOtherCar = GLKVector3Negate(directionToOtherCar);
//计算出来的是ownVelocity*cosθ,其实可以理解成速度在negDirectionToOtherCar这个方向上的速度的分量
GLfloat A_DotProduct = GLKVector3DotProduct(ownVelocity, negDirectionToOtherCar);
//得到是一个向量是标量和一个向量的乘积
GLKVector3 tanOwnVelocity = GLKVector3MultiplyScalar(negDirectionToOtherCar,A_DotProduct);
//还是一样的方法
GLfloat B_DotProduct = GLKVector3DotProduct(otherVeloctiy, directionToOtherCar);
GLKVector3 tanOtherVelocity = GLKVector3MultiplyScalar(directionToOtherCar,B_DotProduct);
//距离
GLKVector3 travelDistance;
//更新A汽车碰撞后速度 ownVelocity - tanOwnVelocity
self.velocity = GLKVector3Subtract(ownVelocity, tanOwnVelocity);
//计算A汽车行驶距离 = 速度 * 时间
travelDistance = GLKVector3MultiplyScalar(self.velocity, elapsedTimeSeconds);
//更新A汽车下个位置 = 当前位置 + 距离
self.nextPosition = GLKVector3Add(self.position, travelDistance);
//更新汽车B碰撞后的速度 otherVeloctiy - tanOwnVelocity
currentCar.velocity = GLKVector3Subtract(otherVeloctiy, tanOtherVelocity);
//计算B汽车行驶距离 = 速度 * 时间
travelDistance = GLKVector3MultiplyScalar(currentCar.velocity, elapsedTimeSeconds);
//更新B汽车下个位置 = 当前位置 + 距离
currentCar.nextPosition = GLKVector3Add(currentCar.position, travelDistance);
}
}
}这个速度的变换我是这么理解的
检查汽车和场地边界相碰撞的方法
- (void)bounceOffWallsWithBoundingBox:(SceneAxisAllignedBoundingBox)rinkBoundingBox
{
     /*通过rinkBoundingBox,可以获取最大、最小边界。根据car的radius属性得到半径,通过半径radius + nextPosition
       与 rinkBoundingBox的最大与最小边界比较判断是否到达边界,如果到达边界,则把对应轴的速度向量,反向。*/

    if ((rinkBoundingBox.min.x + self.radius) > self.nextPosition.x) {

        //下一点X的位置超过了最小的边界
        self.nextPosition = GLKVector3Make(rinkBoundingBox.min.b + self.radius, self.nextPosition.y, self.nextPosition.z);

        //撞墙后X方向,相反
        self.velocity = GLKVector3Make(-self.velocity.x, self.velocity.y, self.velocity.z);
    }else if((rinkBoundingBox.max.x - self.radius) < self.nextPosition.x)
    {
        //下一点X的位置超过了最大的边界
        self.nextPosition = GLKVector3Make((rinkBoundingBox.max.x - self.radius), self.nextPosition.y, self.nextPosition.z);

        //撞墙后X方向,相反
        self.velocity = GLKVector3Make(-self.velocity.x, self.velocity.y, self.velocity.z);
    }

    //Z的边界判断
    if ((rinkBoundingBox.min.z + self.radius)> self.nextPosition.z) {

        self.nextPosition = GLKVector3Make(self.nextPosition.x, self.nextPosition.y, rinkBoundingBox.min.z + self.radius);

        self.velocity = GLKVector3Make(self.velocity.x, self.velocity.y, -self.velocity.z);

    }else if((rinkBoundingBox.max.z - self.radius)< self.nextPosition.z)
    {
        self.nextPosition = GLKVector3Make(self.nextPosition.x, self.nextPosition.y, (rinkBoundingBox.max.z - self.radius));

        self.velocity = GLKVector3Make(self.velocity.x, self.velocity.y, -self.velocity.z);
    }


}
下面再去看看绘制的方法
- (void)drawWithBaseEffect:(GLKBaseEffect *)anEffect
{
    //模型视图矩阵
    GLKMatrix4 savedModelViewMatrix = anEffect.transform.modelviewMatrix;

    //设置漫射色。先存起来
    GLKVector4 savedDiffuseColor = anEffect.material.diffuseColor;

    //设置环境颜色
    GLKVector4 savedAmbientColor = anEffect.material.ambientColor;

    //转换到模型视图
    anEffect.transform.modelviewMatrix = GLKMatrix4Translate(savedModelViewMatrix,_position.x, _position.y, _position.z);

    //绕Y轴旋转偏航角大小
    anEffect.transform.modelviewMatrix = GLKMatrix4Rotate(anEffect.transform.modelviewMatrix, self.yawRadians, 0.0f, 1.0f, 0.0f);

    //设置颜色
    anEffect.material.diffuseColor = self.color;
    anEffect.material.ambientColor = self.color;
    [anEffect prepareToDraw];

    [_model draw];

    //绘制完毕则还原矩阵、颜色
    anEffect.transform.modelviewMatrix = savedModelViewMatrix;
    anEffect.material.diffuseColor = savedDiffuseColor;
    anEffect.material.ambientColor = savedAmbientColor;

}
速度太慢或者太快调用的函数
- (void)onSpeedChange:(BOOL)slow
{
    if (slow) {
        self.velocity = GLKVector3MultiplyScalar(self.velocity, 0.9);
    }else
    {
        self.velocity = GLKVector3MultiplyScalar(self.velocity, 1.1);
    }
}
关于和偏航角计算有关的函数,主要就是为了做角度的平滑切换的以及下面的高通滤波器函数,50.0是一个可替换的较大的常数。可以模拟撞墙后震动的效果。
- (void)spinTowardDirectionOfMotion:(NSTimeInterval)elapsed
{
    //偏航角
    self.yawRadians = SceneScalarSlowLowPassFilter(elapsed, self.targetYawRadians, self.yawRadians);

    if (self.mCarID > 0) {

        NSLog(@"yawRadius %f",GLKMathRadiansToDegrees(self.yawRadians));

    }
}

#pragma mark - SpinMethod
//50.0,是可以更改。模型撞墙后震动效果。因为50.0比较大,current值再增加后可能超过target。
GLfloat SceneScalarFastLowPassFilter(NSTimeInterval timeSinceLastUpdate,GLfloat target,GLfloat current)
{
    //YawRadius + (50.0 * 时间 * (targetYawRadians - YawRadius))
    return current + (50.0 * timeSinceLastUpdate * (target - current));
}

//4.0,是可以更改的。可以模拟视角切换过程的效果。因为4.0比较小,current会逐渐接近target。
GLfloat SceneScalarSlowLowPassFilter(NSTimeInterval timeSinceLastUpdate, GLfloat target,GLfloat current)
{
    //YawRadius + (4.0 * 时间 * (targetYawRadians - YawRadius))
    return current + (4.0 * timeSinceLastUpdate * (target - current));

}

//高通滤波器函数- 为了视角切换能平滑切换
GLKVector3 SceneVector3FastLowPassFilter(NSTimeInterval timeSinceLastUpdate, GLKVector3 target,GLKVector3 current)
{

    return GLKVector3Make(
                          SceneScalarFastLowPassFilter(timeSinceLastUpdate, target.x, current.x),
                          SceneScalarFastLowPassFilter(timeSinceLastUpdate, target.y, current.y),
                          SceneScalarFastLowPassFilter(timeSinceLastUpdate, target.z, current.z));


}

//低通滤波器函数 -为了视角切换能平滑切换
GLKVector3 SceneVector3SlowLowPassFilter(NSTimeInterval timeSinceLastUpdate,GLKVector3 target,GLKVector3 current)
{
    return GLKVector3Make(
                          SceneScalarSlowLowPassFilter(timeSinceLastUpdate, target.x, current.x),
                          SceneScalarSlowLowPassFilter(timeSinceLastUpdate, target.y, current.y),
                          SceneScalarSlowLowPassFilter(timeSinceLastUpdate, target.z, current.z));

}


 369
369


 被折叠的 条评论
为什么被折叠?
被折叠的 条评论
为什么被折叠?
 到【灌水乐园】发言


