


目录
14.Dubbo框架的服务提供方与服务消费方的参数传递,隐式参数和上下文信息
1.注册中心

官网推荐的提供者,消费者之外,还需要有注册中心。通过将服务统一管理起来,可以有效的优化内部应用对服务发布/使用的流程和管理。服务注册中心可以通过特定协议来完成服务队外的统一。dubbo提供的注册中心有如下几种类型可供选择:
(1)Multicast注册中心:组播方式
(2)Redis注册中心:使用Redis作为注册中心
(3)Simple注册中心:就是一个dubbo服务,作为注册中心,提供查找服务的功能
(4)Zookeeper注册中心:使用Zookeeper作为注册中心
推荐使用Zookeeper作为注册中心
2.Zookeeper注册中心
Zookeeper是Apache Hadoop的子项目,是一个树形的目录服务,支持变更推送,适合作为Dubbo服务的注册中心,工业强度较高,可用于生产环境,并推荐使用。

流程说明:
服务提供者启动时:向/dubbo/com.foo.BarService/providers目录下写入自己的url地址。
服务消费者启动时:订阅/dubbo/com.foo.BarService/providers目录下的提供者url地址,并向/dubbo/com.foo.BarService/consumers目录下写入自己的url地址。
监控中心启动时:订阅/dubbo/com.foo.BarService目录下的所有提供者和消费者url地址。
Zookeeper是一个高性能的,分布式的,开发源码的分布式应用程序协调服务,简称zk。Zookeeper树中的每个节点被称为Znode,每个节点可以拥有子节点,每个节点表示一个唯一的服务资源,Zookeeper运行需要java环境(安装jdk)。

3.Zookeeper安装启动
(1)zookeeper官网:https://zookeeper.apache.org/
(2)下载zookeeper:https://mirrors.tuna.tsinghua.edu.cn/apache/zookeeper/zookeeper-3.7.0/apache-zookeeper-3.7.0-bin.tar.gz,解压下载的tar.gz文件,此文件为window和linux公用的安装包

(3)修改配置文件,到conf配置目录下

复制一份zoo_sample.cfg文件,命名为zoo.cfg

zoo.cfg配置说明
# 心跳检查时间,2000毫秒
tickTime=2000
#初始化连接大小
initLimit=10
# 临时数据存放的文件夹
dataDir=/tmp/zookeeper
# zookeeper服务默认端口号,消费者或者提供者连接zookeeper的端口号,消费者调用提供者使用20880端口
clientPort=2181
# zookeeper启动默认会占用8080端口,在这里可以配置成其它端口号
admin.serverPort=8090
admin.serverPort是新添加的配置,为了解决zookeeper启动默认占用8080端口的问题。
(4)启动zookeeper:点击bin/zkServer.cmd双击启动

可以看去zookeeper启动成功,绑定了2181端口。
4.使用zookeeper作为注册中心访问接口工程
项目工程结构:
.接口工程:写接口和实体类,java工程
.提供者工程:实现接口工程中的方法,指定注册中心zookeeper地址,暴露接口服务到zookeeper,指定dubbo协议和端口,web工程
.消费者工程:指定注册中心zookeeper地址,依赖调用远程接口服务,web工程
(1)接口工程创建:创建步骤见Dubbo入门到实战(一)的第5点

(2)创建提供者工程DubboZkProvider
①创建maven的web项目

②添加pom.xml依赖
<?xml version="1.0" encoding="UTF-8"?>

<project xmlns="http://maven.apache.org/POM/4.0.0" xmlns:xsi="http://www.w3.org/2001/XMLSchema-instance"
  xsi:schemaLocation="http://maven.apache.org/POM/4.0.0 http://maven.apache.org/xsd/maven-4.0.0.xsd">
  <modelVersion>4.0.0</modelVersion>

  <groupId>com.qingyun</groupId>
  <artifactId>DubboZkProvider</artifactId>
  <version>1.0-SNAPSHOT</version>
  <packaging>war</packaging>

  <dependencies>
    <dependency>
      <groupId>junit</groupId>
      <artifactId>junit</artifactId>
      <version>4.11</version>
      <scope>test</scope>
    </dependency>

    <!--dubbo依赖-->
    <dependency>
      <groupId>com.alibaba</groupId>
      <artifactId>dubbo</artifactId>
      <version>2.6.2</version>
    </dependency>

    <!--spring依赖-->
    <dependency>
      <groupId>org.springframework</groupId>
      <artifactId>spring-context</artifactId>
      <version>4.3.16.RELEASE</version>
    </dependency>

    <dependency>
      <groupId>org.springframework</groupId>
      <artifactId>spring-webmvc</artifactId>
      <version>4.3.16.RELEASE</version>
    </dependency>

    <!--引入接口提供项目-->
    <dependency>
      <groupId>com.qingyun</groupId>
      <artifactId>DubboInterface01</artifactId>
      <version>1.0-SNAPSHOT</version>
    </dependency>

    <!--引入zookeeper注册中心依赖,curator需要dubbo2.6.0以上的版本-->
    <dependency>
      <groupId>org.apache.curator</groupId>
      <artifactId>curator-framework</artifactId>
      <version>4.1.0</version>
    </dependency>


  </dependencies>
</project>
③实现接口工程的接口类中定义的方法
/**
 * 接口实现类
 */
public class SomeServiceImpl implements SomeService {
    public String sayHello(String msg) {
        return "hello zookeeper"+msg;
    }

    public User getUserById(Integer id) {
        User user = new User();
        user.setId(id);
        user.setName("张三"+id);
        return user;
    }
}
④配置dubbo服务dubbo-zk-provider.xml文件
与直连N/A方式不同的是,不需要再dubbo:service中指定registry,而是使用标签dubbo:registry表示zookeeper注册中心的地址。直连N/A方式配置:
<?xml version="1.0" encoding="UTF-8"?>
<beans xmlns="http://www.springframework.org/schema/beans"
       xmlns:xsi="http://www.w3.org/2001/XMLSchema-instance" xmlns:dubbo="http://code.alibabatech.com/schema/dubbo"
       xsi:schemaLocation="http://www.springframework.org/schema/beans http://www.springframework.org/schema/beans/spring-beans.xsd http://code.alibabatech.com/schema/dubbo http://code.alibabatech.com/schema/dubbo/dubbo.xsd">

    <!--声明服务提供者名称,保证它的唯一性,它是dubbo内部使用的唯一标识-->
    <dubbo:application name="dubbo-provider"/>

    <!--指定dubbo服务的协议名称和端口号,指定dubbo,默认端口号20880-->
    <dubbo:protocol name="dubbo" port="20880"/>


    <!--暴露服务dubbo:service
    interface:暴露服务的接口全限定类名
    ref:引用接口在spring容器中的标识名称
    register:注册方式,使用直连方式,不适用注册中心,配置为N/A
    -->
    <dubbo:service interface="com.qingyun.service.SomeService"
                   ref="someServiceImpl" registry="N/A"/>

    <!--把接口实现类添加到spring容器中-->
    <bean id="someServiceImpl" class="com.qingyun.service.impl.SomeServiceImpl"/>


</beans>
使用注册中心zookeeper配置
<?xml version="1.0" encoding="UTF-8"?>
<beans xmlns="http://www.springframework.org/schema/beans"
       xmlns:xsi="http://www.w3.org/2001/XMLSchema-instance" xmlns:dubbo="http://dubbo.apache.org/schema/dubbo"
       xsi:schemaLocation="http://www.springframework.org/schema/beans http://www.springframework.org/schema/beans/spring-beans.xsd http://dubbo.apache.org/schema/dubbo http://dubbo.apache.org/schema/dubbo/dubbo.xsd">

    <!--声明服务提供者名称,保证它的唯一性,它是dubbo内部服务的唯一标识-->
    <dubbo:application name="DubboZkProvider"/>

    <!--指定dubbo的协议和端口,默认dubbo协议,20880端口-->
    <dubbo:protocol name="dubbo" port="20880"/>

    <!--指定zookeeper注册中心-->
    <dubbo:registry address="zookeeper://localhost:2181"/>

    <!--暴露接口服务
    interface:需要暴露的接口类
    ref:引用接口实现类在spring容器中的标识名称
    与直连N/A方式不同的是,不需要再dubbo:service中指定registry,而是使用标签dubbo:registry表示zookeeper注册中心的地址
    -->
    <dubbo:service interface="com.qingyun.service.SomeService" ref="someServiceImpl"/>

    <!--定义暴露接口类的具体实现类-->
    <bean id="someServiceImpl" class="com.qingyun.service.impl.SomeServiceImpl"/>
</beans>
⑤dubbo配置文件条件到web.xml中进行启动加载(只用文本加载监听,不用拦截)
<?xml version="1.0" encoding="UTF-8"?>
<web-app xmlns="http://xmlns.jcp.org/xml/ns/javaee"
         xmlns:xsi="http://www.w3.org/2001/XMLSchema-instance"
         xsi:schemaLocation="http://xmlns.jcp.org/xml/ns/javaee
          http://xmlns.jcp.org/xml/ns/javaee/web-app_4_0.xsd"
         version="4.0">

    <context-param>
        <param-name>contextConfigLocation</param-name>
        <param-value>classpath:dubbo-zk-provider.xml</param-value>
    </context-param>
    <listener>
        <listener-class>org.springframework.web.context.ContextLoaderListener</listener-class>
    </listener>
</web-app>
⑥配置tomcat启动项目

(3)创建消费者工程DubboZkConsumer
①创建maven的web项目

②添加pom.xml依赖
<?xml version="1.0" encoding="UTF-8"?>
<project xmlns="http://maven.apache.org/POM/4.0.0"
         xmlns:xsi="http://www.w3.org/2001/XMLSchema-instance"
         xsi:schemaLocation="http://maven.apache.org/POM/4.0.0 http://maven.apache.org/xsd/maven-4.0.0.xsd">
    <modelVersion>4.0.0</modelVersion>

    <groupId>com.qingyun</groupId>
    <artifactId>DubboZkConsumer</artifactId>
    <version>1.0-SNAPSHOT</version>

    <dependencies>
        <dependency>
            <groupId>junit</groupId>
            <artifactId>junit</artifactId>
            <version>4.11</version>
            <scope>test</scope>
        </dependency>

        <!--dubbo依赖-->
        <dependency>
            <groupId>com.alibaba</groupId>
            <artifactId>dubbo</artifactId>
            <version>2.6.2</version>
        </dependency>

        <!--spring依赖-->
        <dependency>
            <groupId>org.springframework</groupId>
            <artifactId>spring-context</artifactId>
            <version>4.3.16.RELEASE</version>
        </dependency>

        <dependency>
            <groupId>org.springframework</groupId>
            <artifactId>spring-webmvc</artifactId>
            <version>4.3.16.RELEASE</version>
        </dependency>

        <!--引入接口提供项目-->
        <dependency>
            <groupId>com.qingyun</groupId>
            <artifactId>DubboInterface01</artifactId>
            <version>1.0-SNAPSHOT</version>
        </dependency>

        <!--引入zookeeper注册中心依赖,curator需要dubbo2.6.0以上的版本-->
        <dependency>
            <groupId>org.apache.curator</groupId>
            <artifactId>curator-framework</artifactId>
            <version>4.1.0</version>
        </dependency>


    </dependencies>
</project>
③创建controller控制层调用接口服务
/**
 * 后台控制层
 */
@Controller
public class SomeController {

    @Autowired
    SomeService someService;

    @RequestMapping(value = "/hello")
    public String hello(Model model){
        String hello = someService.sayHello("dubbo");
        model.addAttribute("hello",hello);
        return "hello";
    }

    @RequestMapping(value = "/userDetail")
    public String userDetail(Model model,Integer id){
        User user = someService.getUserById(id);
        model.addAttribute("user",user);
        return "userDetail";
    }


}
④创建视图jsp页面

⑤配置dubbo服务xml文件
与直连N/A方式不同的是,依赖远程接口时不需要制定url,替代为dubbo:registry中指定注册服务地址。
直连N/A方式配置
<?xml version="1.0" encoding="UTF-8"?>
<beans xmlns="http://www.springframework.org/schema/beans"
       xmlns:xsi="http://www.w3.org/2001/XMLSchema-instance" xmlns:dubbo="http://code.alibabatech.com/schema/dubbo"
       xsi:schemaLocation="http://www.springframework.org/schema/beans http://www.springframework.org/schema/beans/spring-beans.xsd http://code.alibabatech.com/schema/dubbo http://code.alibabatech.com/schema/dubbo/dubbo.xsd">

    <!-- 声明服务消费者名称,保证它的唯一性,它是dubbo内部服务名称的唯一标识-->
    <dubbo:application name="dubbo-consumer"/>

    <!-- 引用远程接口
       id:远程接口服务的代理对象名称
       interface:接口的全限定类名
       url:调用远程接口服务的url地址,协议方式和端口都需要和提供者配置中的一致
       registry:直连方式,不适用注册中心,N/A
    -->
    <dubbo:reference id="someService" interface="com.qingyun.service.SomeService"
                     url="dubbo://localhost:20880" registry="N/A"/>


</beans>
使用注册中心zookeeper方式
<?xml version="1.0" encoding="UTF-8"?>
<beans xmlns="http://www.springframework.org/schema/beans"
       xmlns:xsi="http://www.w3.org/2001/XMLSchema-instance" xmlns:dubbo="http://dubbo.apache.org/schema/dubbo"
       xsi:schemaLocation="http://www.springframework.org/schema/beans http://www.springframework.org/schema/beans/spring-beans.xsd http://dubbo.apache.org/schema/dubbo http://dubbo.apache.org/schema/dubbo/dubbo.xsd">

    <!--声明消费者名称,保证它的唯一性,在dubbo服务内保证唯一-->
    <dubbo:application name="DubboZkConsumer"/>

    <!--指定注册中心zookeeper-->
    <dubbo:registry address="zookeeper://localhost:2181"/>

    <!--引用远程接口服务
    interface:需要引用的接口名
    与直连N/A方式不同的是,依赖远程接口时不需要制定url,替代为dubbo:registry中指定注册服务地址。
    -->
    <dubbo:reference interface="com.qingyun.service.SomeService" id="someService"/>

</beans>
⑥创建view视图访问的配置springmvc.xml
<?xml version="1.0" encoding="UTF-8"?>
<beans xmlns="http://www.springframework.org/schema/beans"
       xmlns:xsi="http://www.w3.org/2001/XMLSchema-instance"
       xmlns:context="http://www.springframework.org/schema/context"
       xmlns:mvc="http://www.springframework.org/schema/mvc"
       xsi:schemaLocation="http://www.springframework.org/schema/beans
         http://www.springframework.org/schema/beans/spring-beans.xsd
        http://www.springframework.org/schema/context
        http://www.springframework.org/schema/context/spring-context-4.3.xsd
        http://www.springframework.org/schema/mvc
        http://www.springframework.org/schema/mvc/spring-mvc-4.3.xsd">

    <!-- 自动扫描包,实现支持注解的IOC -->
    <context:component-scan base-package="com.qingyun.controller" />

    <!-- Spring MVC不处理静态资源 -->
    <mvc:default-servlet-handler />

    <!-- 支持mvc注解驱动 -->
    <mvc:annotation-driven />

    <!-- 视图解析器 -->
    <bean class="org.springframework.web.servlet.view.InternalResourceViewResolver"
          id="internalResourceViewResolver">
        <!-- 前缀 -->
        <property name="prefix" value="/" />
        <!-- 后缀 -->
        <property name="suffix" value=".jsp" />
    </bean>
</beans>
⑦dubbo配置文件和视图xml添加到web.xml中进行servlet拦截加载
<?xml version="1.0" encoding="UTF-8"?>
<web-app xmlns="http://xmlns.jcp.org/xml/ns/javaee"
         xmlns:xsi="http://www.w3.org/2001/XMLSchema-instance"
         xsi:schemaLocation="http://xmlns.jcp.org/xml/ns/javaee
          http://xmlns.jcp.org/xml/ns/javaee/web-app_4_0.xsd"
         version="4.0">

    <servlet>
        <servlet-name>springmvc</servlet-name>
        <servlet-class>com.alibaba.dubbo.remoting.http.servlet.DispatcherServlet</servlet-class>
        <init-param>
            <param-name>contextConfigLocation</param-name>
            <param-value>classpath*:dubbo-zk-consumer.xml,classpath*:springmvc.xml</param-value>
        </init-param>
        <load-on-startup>1</load-on-startup>
    </servlet>

    <servlet-mapping>
        <servlet-name>springmvc</servlet-name>
        <url-pattern>/</url-pattern>
    </servlet-mapping>

</web-app>
⑧配置tomcat启动项目

⑨访问视图页面


5.dubbo的配置
(1)配置原则
在服务提供者配置访问参数,因为服务提供者更了解各种参数。
(2)关闭检查
dubbo在启动会检查依赖的服务是否可用,不可用时会抛出异常,阻止spring初始化完成,以便上线时,能及早发现问题,默认check=true。通过设置check=false关闭检查,比如,测试时,有些服务不关心,或者出现循环依赖,必须有一方先启动。
例1:关闭某个服务启动时检查
<dubbo:reference interface="com.foo.BarService' check="false"/>
例2:关闭注册中心启动时检查
<dubbo:registry check="false"/>
默认启动服务时,检查注册中心已经存在并已运行,注册中心不启动会报错。

(3)重试次数
消费者访问提供者,如果访问失败,则切换重试访问其他服务器,但重试会带来更长延迟,访问时间变长,用户的体验较差。多次重试访问服务器有可能访问成功。可通过retries="2"来设置访问次数(不含第一次)
重试次数配置如下:
<dubbo:service retries="2"/>
<dubbo:reference retries="2"/>
(4)超时时间
由于网络或服务端不可靠,会导致调用出现一种不确定的中间状态(超时)。为了避免超时导致客户端资源(线程)挂起耗尽,必须设置超时时间。一般在服务提供者中设置,因为只有服务提供者知道业务具体需要花费多少时间。
timeout:调用远程服务超时时间(毫秒)
<dubbo:service interface="com.foo.BarService" timeout="2000"/>6.使用版本号来区分不同的接口实现类
一个接口类可以被多个实现类实现,这是java的多态特性,但是提供者和消费者暴露、依赖的都是接口类,所以针对接口类不同的实现,dobbo使用版本version进行标识。
(1)提供者使用版本
①创建两个实现类实现同一个接口类

SomeServiceImpl类
/**
 * 接口实现类
 */
public class SomeServiceImpl implements SomeService {
    public String sayHello(String msg) {
        return "hello zookeeper"+msg;
    }

    public User getUserById(Integer id) {
        User user = new User();
        user.setId(id);
        user.setName("张三"+id);
        return user;
    }
}
NewSomeServiceImpl类
public class NewSomeServiceImpl implements SomeService {
    public String sayHello(String msg) {
        return "这是NewSomeServiceImpl中实现的方法"+msg;
    }

    public User getUserById(Integer id) {
        User user = new User();
        user.setId(id);
        user.setName("这是NewSomeServiceImpl中创建的实体"+id);
        return user;
    }
}
②暴露接口的dubbo-zk-privider.xml配置中使用version标识两个实现类,ref分别依赖对应的实现类
<?xml version="1.0" encoding="UTF-8"?>
<beans xmlns="http://www.springframework.org/schema/beans"
       xmlns:xsi="http://www.w3.org/2001/XMLSchema-instance" xmlns:dubbo="http://dubbo.apache.org/schema/dubbo"
       xsi:schemaLocation="http://www.springframework.org/schema/beans http://www.springframework.org/schema/beans/spring-beans.xsd http://dubbo.apache.org/schema/dubbo http://dubbo.apache.org/schema/dubbo/dubbo.xsd">

    <!--声明服务提供者名称,保证它的唯一性,它是dubbo内部服务的唯一标识-->
    <dubbo:application name="DubboZkProvider"/>

    <!--指定dubbo的协议和端口,默认dubbo协议,20880端口-->
    <dubbo:protocol name="dubbo" port="20880"/>

    <!--指定zookeeper注册中心-->
    <dubbo:registry address="zookeeper://localhost:2181"/>

    <!--暴露接口服务
    interface:需要暴露的接口类
    ref:引用接口实现类在spring容器中的标识名称
    与直连N/A方式不同的是,不需要再dubbo:service中指定registry,而是使用标签dubbo:registry表示zookeeper注册中心的地址
    -->
    <dubbo:service interface="com.qingyun.service.SomeService" ref="someServiceImpl" version="1.0"/>
    <dubbo:service interface="com.qingyun.service.SomeService" ref="newSomeServiceImpl" version="2.0"/>

    <!--定义暴露接口类的具体实现类-->
    <bean id="someServiceImpl" class="com.qingyun.service.impl.SomeServiceImpl"/>
    <bean id="newSomeServiceImpl" class="com.qingyun.service.impl.NewSomeServiceImpl"/>
</beans>
(2)消费者使用版本
①依赖接口dubbo-zk-consumer.xml的配置中指明版本号,给依赖的接口类定义一个加载在spring容器中的id
<?xml version="1.0" encoding="UTF-8"?>
<beans xmlns="http://www.springframework.org/schema/beans"
       xmlns:xsi="http://www.w3.org/2001/XMLSchema-instance" xmlns:dubbo="http://dubbo.apache.org/schema/dubbo"
       xsi:schemaLocation="http://www.springframework.org/schema/beans http://www.springframework.org/schema/beans/spring-beans.xsd http://dubbo.apache.org/schema/dubbo http://dubbo.apache.org/schema/dubbo/dubbo.xsd">

    <!--声明消费者名称,保证它的唯一性,在dubbo服务内保证唯一-->
    <dubbo:application name="DubboZkConsumer"/>

    <!--指定注册中心zookeeper-->
    <dubbo:registry address="zookeeper://localhost:2181"/>

    <!--引用远程接口服务
    interface:需要引用的接口名
    与直连N/A方式不同的是,依赖远程接口时不需要制定url,替代为dubbo:registry中指定注册服务地址。
    -->
    <dubbo:reference interface="com.qingyun.service.SomeService" id="someService" version="1.0"/>
    <dubbo:reference interface="com.qingyun.service.SomeService" id="newSomeService" version="2.0"/>

</beans>
②控制层controller中注入接口时,使用dubbo-zk-consumer.xml中定义的依赖接口id名进行注入


③注入加载在spring容器中的接口类,虽然是同一个接口类,但是分为不同的版本及不同的接口实现类,调用相同的接口方法,分别执行对应的接口实现类方法
④在jsp视图页面中添加显示新实现接口类的查询结果
<%--
  Created by IntelliJ IDEA.
  User: zhanglizeng
  Date: 2021/7/5
  Time: 22:25
  To change this template use File | Settings | File Templates.
--%>
<%@ page contentType="text/html;charset=UTF-8" language="java" %>
<html>
<head>
    <title>Title</title>
</head>
<body>
${hello}<br/>
${helloNew}
</body>
</html>
⑤验证版本区分查询结果页面,是两个不同的实现类实现的方法结果。
 (3)控制层controller中注入接口类的时候,命名一定要与dubbo-zk-consumer.xml中<dubbo:reference id="xx"/>定义的id一致,否则启动项目时,会报从spring容器中找不到类。版本的区分也是根据此id来实现调用不同的方法实现类的。
例:dubbo-zk-consumer.xml中没有id="someService1"的接口类,但是在controller控制层中注入someService1时,启动tomcat时,控制台会报错。


错误信息:spring容器中找不到此someService1

7.监控中心dubbo-admin
dubbo的使用,其实只需要有注册中心、提供者、消费者就可以,但是并不能看到有哪些消费者、提供者,为了更好的调试、发现问题,解决问题,因此引入了dubbo-admin。通过dubbo-admin可以对消费者和提供者进行管理,可以在dubbo部署做动态的调整,服务的管理。
dubbo-admin:图形化的服务管理页面,安装是需要注明注册中心的地址,即可从注册中心中获取到所有的提供者和消费者进行配置管理。
(1)dubbo-admin下载安装
官网地址:https://github.com/apache/incubator-dubbo/tree/2.5.x
下载导入idea中

(2)对dubbo-admin项目进行打包,先执行clean,再执行install
 在dubbo-admin的target目录下生成war包文件

(3)把war包拷贝到tomcat的webapp目录下

(4)打开war包,web-inf/dubbo.properties修改dubbo连接信息,配置下注册中心的地址和端口号,启动tomcat服务
#注册中心zookeeper地址
dubbo.registry.address=zookeeper://127.0.0.1:2181
#dubbo.admin用户root的密码是root
dubbo.admin.root.password=root
#dubbo.admin用户guest的密码是guest
dubbo.admin.guest.password=guest
(5)访问bubbo-admin服务

(6)启动消费者、提供者服务,在管理界面查看服务情况


8.集成springboot方法
(1)接口工程
还是使用之前的接口工程DubboInterface01

(2)提供者工程
①创建maven项目

②pom.xml中导入需要的jar包
<?xml version="1.0" encoding="UTF-8"?>

<project xmlns="http://maven.apache.org/POM/4.0.0" xmlns:xsi="http://www.w3.org/2001/XMLSchema-instance"
  xsi:schemaLocation="http://maven.apache.org/POM/4.0.0 http://maven.apache.org/xsd/maven-4.0.0.xsd">
  <modelVersion>4.0.0</modelVersion>

  <groupId>com.qingyun</groupId>
  <artifactId>SpringbootDubboZkProvider</artifactId>
  <version>1.0-SNAPSHOT</version>
  <parent>
    <groupId>org.springframework.boot</groupId>
    <artifactId>spring-boot-starter-parent</artifactId>
    <version>2.3.3.RELEASE</version>
    <relativePath/>
  </parent>

  <properties>
    <project.build.sourceEncoding>UTF-8</project.build.sourceEncoding>
    <maven.compiler.source>1.8</maven.compiler.source>
    <maven.compiler.target>1.8</maven.compiler.target>
    <dubbo.version>2.7.3</dubbo.version>
  </properties>


  <dependencies>
    <dependency>
      <groupId>junit</groupId>
      <artifactId>junit</artifactId>
      <version>4.11</version>
      <scope>test</scope>
    </dependency>

    <!--引入接口提供项目-->
    <dependency>
      <groupId>com.qingyun</groupId>
      <artifactId>DubboInterface01</artifactId>
      <version>1.0-SNAPSHOT</version>
    </dependency>

    <!--spring boot依赖的包-->
    <dependency>
      <groupId>org.springframework.boot</groupId>
      <artifactId>spring-boot-starter-web</artifactId>
    </dependency>

    <!--dubbo 相关-->
    <dependency>
      <groupId>org.apache.dubbo</groupId>
      <artifactId>dubbo-spring-boot-starter</artifactId>
      <version>${dubbo.version}</version>
    </dependency>

    <dependency>
      <groupId>org.apache.dubbo</groupId>
      <artifactId>dubbo</artifactId>
      <version>${dubbo.version}</version>
    </dependency>

    <dependency>
      <groupId>org.apache.dubbo</groupId>
      <artifactId>dubbo-dependencies-zookeeper</artifactId>
      <version>${dubbo.version}</version>
      <type>pom</type>
    </dependency>
    <!-- dubbo 相关依赖 end-->


  </dependencies>

</project>
③springboot项目启动类文件
/**
 * 程序启动类
 */
@SpringBootApplication
public class ProviderApplication {
    public static void main(String[] args) {
        SpringApplication.run(ProviderApplication.class,args);
    }
}
④接口实现类
通过dubbo的主键@Service的version标识不同的接口实现类,两个类实现同一个接口
接口实现类1:
/**
 * 使用dubbo的@Service注解的version标识不同的接口实现类
 */
@Service(version = "1.0")
public class SomeServiceImpl implements SomeService {

    @Override
    public String sayHello(String msg) {
        return "hello "+msg;
    }

    @Override
    public User getUserById(Integer id) {
        User user = new User();
        user.setId(id);
        user.setName("张三"+id);
        return user;
    }
}
接口实现类2:
/**
 * 使用dubbo的@Service注解的version标识不同的接口实现类
 */
@Service(version = "2.0")
public class NewSomeServiceImpl implements SomeService {

    @Override
    public String sayHello(String msg) {
        return "hello "+msg;
    }

    @Override
    public User getUserById(Integer id) {
        User user = new User();
        user.setId(id);
        user.setName("new张三"+id);
        return user;
    }
}
⑤springboot配置文件application.properties
#服务启动端口号
server.port=8002
#运用名称,dubbo中保证唯一
dubbo.application.name=SpringbootDubboZkProvider
#注册中心zookeeper地址
dubbo.registry.address=zookeeper://127.0.0.1:2181
#超时时间,2000毫秒
dubbo.registry.timeout=2000
#通信协议方式
dubbo.protocol.name=dubbo
#通信端口
dubbo.protocol.port=20880
#扫描包的位置,配置为接口工程中的接口类包位置
dubbo.scan.base-packages=com.qingyun.service
⑥启动springboot项目
(3)消费者
①创建maven项目

②pom.xml添加依赖的文件
<?xml version="1.0" encoding="UTF-8"?>

<project xmlns="http://maven.apache.org/POM/4.0.0" xmlns:xsi="http://www.w3.org/2001/XMLSchema-instance"
  xsi:schemaLocation="http://maven.apache.org/POM/4.0.0 http://maven.apache.org/xsd/maven-4.0.0.xsd">
  <modelVersion>4.0.0</modelVersion>

  <groupId>com.qingyun</groupId>
  <artifactId>SpringbootDubboZkConsumer</artifactId>
  <version>1.0-SNAPSHOT</version>


  <parent>
    <groupId>org.springframework.boot</groupId>
    <artifactId>spring-boot-starter-parent</artifactId>
    <version>2.3.3.RELEASE</version>
    <relativePath/>
  </parent>

  <properties>
    <project.build.sourceEncoding>UTF-8</project.build.sourceEncoding>
    <maven.compiler.source>1.8</maven.compiler.source>
    <maven.compiler.target>1.8</maven.compiler.target>
    <dubbo.version>2.7.3</dubbo.version>
  </properties>


  <dependencies>
    <dependency>
      <groupId>junit</groupId>
      <artifactId>junit</artifactId>
      <version>4.11</version>
      <scope>test</scope>
    </dependency>

    <!--引入接口提供项目-->
    <dependency>
      <groupId>com.qingyun</groupId>
      <artifactId>DubboInterface01</artifactId>
      <version>1.0-SNAPSHOT</version>
    </dependency>

    <!--spring boot依赖的包-->
    <dependency>
      <groupId>org.springframework.boot</groupId>
      <artifactId>spring-boot-starter-web</artifactId>
    </dependency>

    <!--dubbo 相关-->
    <dependency>
      <groupId>org.apache.dubbo</groupId>
      <artifactId>dubbo-spring-boot-starter</artifactId>
      <version>${dubbo.version}</version>
    </dependency>

    <dependency>
      <groupId>org.apache.dubbo</groupId>
      <artifactId>dubbo</artifactId>
      <version>${dubbo.version}</version>
    </dependency>

    <dependency>
      <groupId>org.apache.dubbo</groupId>
      <artifactId>dubbo-dependencies-zookeeper</artifactId>
      <version>${dubbo.version}</version>
      <type>pom</type>
    </dependency>
    <!-- dubbo 相关依赖 end-->


  </dependencies>

</project>
③springboot启动类
@SpringBootApplication
public class ConsumerApplication {
    public static void main(String[] args) {
        SpringApplication.run(ConsumerApplication.class,args);
    }
}
④消费者业务调用类
spring boot启动时执行任务CommandLineRunner接口中的run方法,用于启动测试数据。有多个任务的情况下,根据@Order注解标识执行顺序。使用dubbo的@Reference注解根据版本号注入,调用对应版本号的接口实现类方法
/**
 * spring boot启动时执行任务CommandLineRunner接口中的run方法,用于启动测试数据。
 * 有多个任务的情况下,根据@Order注解标识执行顺序
 */
@Component
public class SomeController implements CommandLineRunner {

    /**
     * 使用dubbo的@Reference注解,通过version版本确定调用哪个提供者实现类
     * 与提供者@Service(version = "1.0")对应
     */
    @Reference(version = "1.0")
    SomeService someService;

    @Reference(version = "2.0")
    SomeService newSomeService;

    @Override
    public void run(String... args) throws Exception {
        User user = someService.getUserById(1);
        System.out.println(user.getId()+" "+ user.getName());

        User userNew = newSomeService.getUserById(1);
        System.out.println(userNew.getId()+" "+ userNew.getName());
    }
}
⑤springboot配置文件application.properties
#项目启动端口
server.port=8083
#dubbo服务名称,保证唯一
dubbo.application.name=SpringbootDubboZkConsumer
#注册中心zookeeper地址
dubbo.registry.address=zookeeper://127.0.0.1:2181
⑥启动springboot项目,控制台打印出不同接口实现类返回的信息

9.dubbo2.7以后引入元数据中心
元数据中心用于存储一些服务提供者、消费者的信息,比如dubbo版本、服务接口的信息(包括方法名、形参表、返回值类型)等等。元数据中心主要的功能是测试服务接口,配置元数据中心以后,可以在dubbo admin中测试服务接口。
分别在消费者、提供者pom.xml中加入元数据中心的依赖:
    <dependency>
      <groupId>org.apache.dubbo</groupId>
      <artifactId>dubbo-metadata-report-zookeeper</artifactId>
      <version>${dubbo.version}</version>
      <scope>test</scope>
    </dependency>
springboot的配置文件application.properties中添加配置
#元数据配置中心地址
dubbo.metadata-report.address=zookeeper://127.0.0.1:2181
10.dubbo配置中心
使用配置中心后,提供者、消费者在springboot配置文件中不用写dubbo的其它配置,只写配置中心的配置即可:
#配置中心地址
dubbo.config-center.address=zookeeper://192.168.1.9:2181
#连接到配置中心的超时时间,ms
dubbo.config-center.timeout=10000
应用启动时,会自动连接到配置中心,从配置中心获取dubbo的配置
11.zookeeper集群方式
(1)zookeeper搭建集群
①拷贝三分zookeeper文件到用一目录下,重新新命名

②在目录下创建data目录,创建没有后缀的myid文件,myid文件分别设置值为1、2、3、

③三个服务都到conf目录下复制一份zoo_sample.cfg重命名为zoo.cfg

④修改zoo.cfg文件,设置下每个服务不同的端口,集群的通讯地址
zk1的配置:
# The number of milliseconds of each tick
# 心跳检查时间,2000毫秒
tickTime=2000
# The number of ticks that the initial
# synchronization phase can take
#初始化连接大小
initLimit=10
# The number of ticks that can pass between
# sending a request and getting an acknowledgement
syncLimit=5
# the directory where the snapshot is stored.
# do not use /tmp for storage, /tmp here is just
# example sakes.
# 临时数据存放的文件夹
dataDir=D:/software/zookeeper-cluster/apache-zookeeper-3.7.0-1/data
# 日志文件存放位置
logDir=D:/software/zookeeper-cluster/apache-zookeeper-3.7.0-1/logs
# the port at which the clients will connect
# zookeeper服务默认端口号,消费者或者提供者连接zookeeper的端口号,消费者调用提供者使用20880端口
clientPort=2181
# zookeeper启动默认会占用8080端口,在这里可以配置成其它端口号
admin.serverPort=8090
audit.enable=true
# the maximum number of client connections.
# increase this if you need to handle more clients
#maxClientCnxns=60
#
# Be sure to read the maintenance section of the
# administrator guide before turning on autopurge.
#
# http://zookeeper.apache.org/doc/current/zookeeperAdmin.html#sc_maintenance
#
# The number of snapshots to retain in dataDir
#autopurge.snapRetainCount=3
# Purge task interval in hours
# Set to "0" to disable auto purge feature
#autopurge.purgeInterval=1

## Metrics Providers
#
# https://prometheus.io Metrics Exporter
#metricsProvider.className=org.apache.zookeeper.metrics.prometheus.PrometheusMetricsProvider
#metricsProvider.httpPort=7000
#metricsProvider.exportJvmInfo=true
server.1=127.0.0.1:2888:3888
server.2=127.0.0.1:2889:3889
server.3=127.0.0.1:2890:3890
zk2和zk3分别修改下clientPort=2182、clientPort=2183,admin.serverPort=8091、admin.serverPort=8092,再修改下data和logs的存放位置即可。
⑤双击bin/zkServer.cmd依次启动三个zookeeper,从控制台查看启动情况

(2)dubbo中配置集群链接
application.properties中添加zookeeper集群的配置信息

#项目启动端口
server.port=8083
#dubbo服务名称,保证唯一
dubbo.application.name=SpringbootDubboZkConsumer
#注册中心zookeeper地址
dubbo.registry.address=zookeeper://127.0.0.1:2181?backup=127.0.0.1:2182,127.0.0.1:2183
#元数据配置中心地址
dubbo.metadata-report.address=zookeeper://127.0.0.1:2181?backup=127.0.0.1:2182,127.0.0.1:2183
12.dubbo配置负载均衡
Dubbo实现负载均衡,一般是对服务的提供者来实现我们的集群管理,也就是负载均衡,然后服务的消费者在请求消费的时候,通过一定的算法进行寻址(权重)。
(1)Dubbo提供了四种负载均衡策略:
1)随机 Random LoadBalance 按照权重设置的大小,随机
2)轮询 RoundRobin LoadBalance 例如:a b c a执行完b执行然后c,然后在到a...
3)最少活跃调用数(权重)LeastActive LoadBalance
活跃数指调用前后计数差,优先调用高的,相同活跃数的随机。使慢的提供者收到更少请求,因为越慢的提供者的调用前后计数差会越大。
4)一致性Hash ConsistentHash LoadBalance
相同参数总是发送到同一个提供者,如果这个提供者挂掉了,它会根据它的虚拟节点,平摊到其它服务者,不会引起巨大的变动
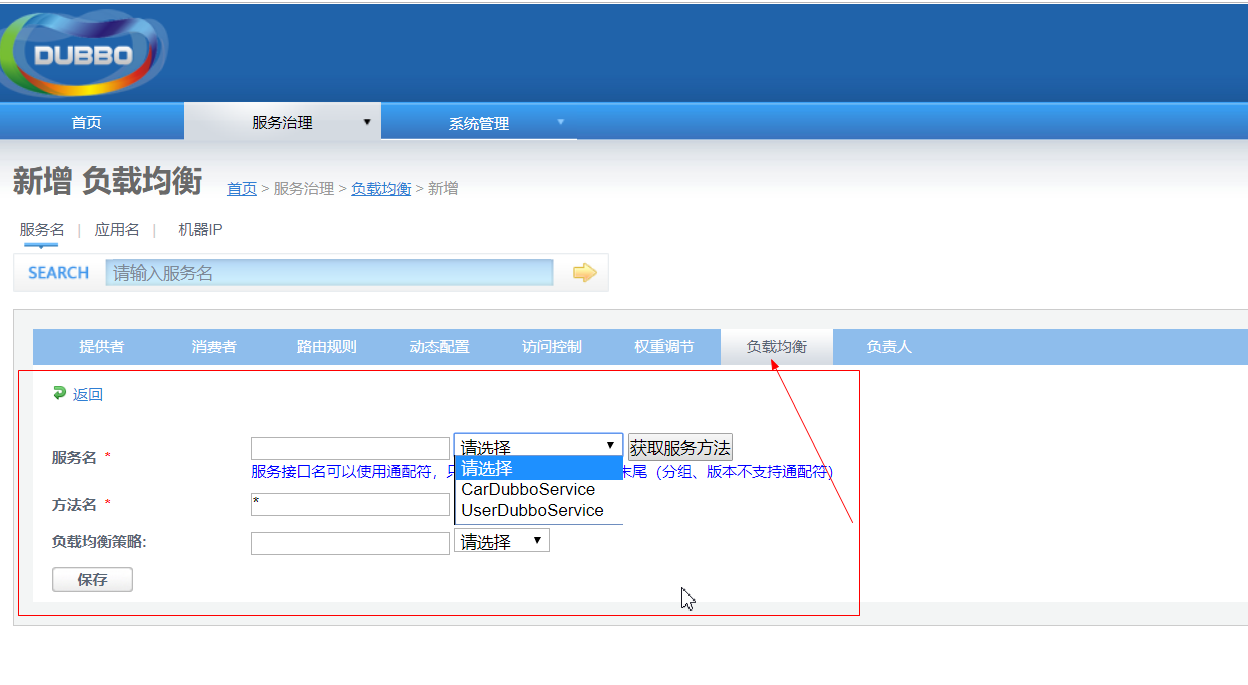
(2)配置负载均衡级别的方法
服务端服务级别配置:
<dubbo:service interface="接口名" loadbalance="roundrobin"/>客户端服务级别配置:
<dubbo:reference interface="" loadbalance="roundrobin" />我们也可以通过可视化界面管理平台来操作:
13.dubbo集群
具体的做法是对服务提供者的配置文件进行修改 ,配置文件里面的application name相同,dubbo则会认为是同一集群。
部署多个集群只需要两个步骤:
1)application name相同,同一集群环境中应用名必须一致
<dubbo:application name="服务名"/>
2)协议端口需要修改不同,端口必须不同
<dubbo:protocol name="dubbo" port="端口需要修改,不能重复"/>需求:配置一个集群环境,两个服务提供者
provider01:
#服务启动端口号
server.port=8002
#运用名称,dubbo中保证唯一
dubbo.application.name=SpringbootDubboZkProvider
#注册中心zookeeper地址
dubbo.registry.address=zookeeper://127.0.0.1:2181?backup=127.0.0.1:2182,127.0.0.1:2183
#元数据配置中心地址
dubbo.metadata-report.address=zookeeper://127.0.0.1:2181?backup=127.0.0.1:2182,127.0.0.1:2183
#超时时间,2000毫秒
dubbo.registry.timeout=2000
#通信协议方式
dubbo.protocol.name=dubbo
#通信端口
dubbo.protocol.port=20880
#扫描包的位置,配置为接口工程中的接口类包位置
dubbo.scan.base-packages=com.qingyun.service
provider02:
#服务启动端口号
server.port=8002
#运用名称,dubbo中保证唯一
dubbo.application.name=SpringbootDubboZkProvider
#注册中心zookeeper地址
dubbo.registry.address=zookeeper://127.0.0.1:2181?backup=127.0.0.1:2182,127.0.0.1:2183
#元数据配置中心地址
dubbo.metadata-report.address=zookeeper://127.0.0.1:2181?backup=127.0.0.1:2182,127.0.0.1:2183
#超时时间,2000毫秒
dubbo.registry.timeout=2000
#通信协议方式
dubbo.protocol.name=dubbo
#通信端口
dubbo.protocol.port=20881
#扫描包的位置,配置为接口工程中的接口类包位置
dubbo.scan.base-packages=com.qingyun.service
14.Dubbo框架的服务提供方与服务消费方的参数传递,隐式参数和上下文信息
上下文中存放的是当前调用过程中所需的环境信息。所有配置信息都将转换为URL得参数,RpcContext是一个ThreadLocal的临时状态记录器,当接收到RPC请求,或发起RPC请求时,RpcContext的状态都会变化。比如:A 调 B,B 再调 C,则 B 机器上,在 B 调 C 之前,RpcContext 记录的是 A 调 B 的信息,在 B 调 C 之后,RpcContext 记录的是 B 调 C 的信息。
URL 格式:protocol://username:password@host:port/path?key=value&key=value
服务提供方
public class XxxServiceImpl implements XxxService {

    public void xxx() {
        // 本端是否为提供端,这里会返回true
        boolean isProviderSide = RpcContext.getContext().isProviderSide();
        // 获取调用方IP地址
        String clientIP = RpcContext.getContext().getRemoteHost();
        // 获取当前服务配置信息,所有配置信息都将转换为URL的参数
        String application = RpcContext.getContext().getUrl().getParameter("application");
        // 注意:每发起RPC调用,上下文状态会变化
        yyyService.yyy();
        // 此时本端变成消费端,这里会返回false
        boolean isProviderSide = RpcContext.getContext().isProviderSide();
    }
}

服务消费方
// 远程调用
xxxService.xxx();
// 本端是否为消费端,这里会返回true
boolean isConsumerSide = RpcContext.getContext().isConsumerSide();
// 获取最后一次调用的提供方IP地址
String serverIP = RpcContext.getContext().getRemoteHost();
// 获取当前服务配置信息,所有配置信息都将转换为URL的参数
String application = RpcContext.getContext().getUrl().getParameter("application");
// 注意:每发起RPC调用,上下文状态会变化
yyyService.yyy();
隐式参数
可以通过RpcContext上的setAttachment和getAttachement在服务消费方和提供方之间进行参数的隐式传递。
在服务消费方设置隐式参数
setAttachment 设置的 KV 对,在完成下面一次远程调用会被清空,即多次远程调用要多次设置。

RpcContext.getContext().setAttachment("index", "1"); // 隐式传参,后面的远程调用都会隐式将这些参数发送到服务器端,类似cookie,用于框架集成,不建议常规业务使用
xxxService.xxx(); // 远程调用

在服务提供方获取隐式参数
public class XxxServiceImpl implements XxxService {

    public void xxx() {
        // 获取客户端隐式传入的参数,用于框架集成,不建议常规业务使用
        String index = RpcContext.getContext().getAttachment("index");
    }
}
注意,path,group,version,dubbo,token,timeout是关键字。
15.dubbo原理
第一步start,就是将服务装载容器中,然后准备注册服务。和Spring中启动过程类似,spring启动时,将bean装载进容器中的时候,首先要解析bean。所以dubbo也是先读配置文件解析服务。
所有的dubbo标签,都统一用DubboBeanDefinitionParser进行解析,基于一对一属性映射,将XML标签解析为Bean对象。
在ServiceConfig.export 或者ReferenceConfig.get 初始化时,将Bean对象转会为url格式,将所有Bean属性转成url的参数。
然后将URL传给Protocol扩展点,基于扩展点的Adaptive机制,根据URL的协议头,进行不同协议的服务暴露和引用。
a、 只暴露服务端口
在没有使用注册中心的情况,这种情况一般适用在开发环境下,服务的调用这和提供在同一个IP上,只需要打开服务的端口即可。
即,当配置 or
ServiceConfig解析出的URL的格式为:
Dubbo://service-host/com.xxx.TxxService?version=1.0.0
基于扩展点的Adaptiver机制,通过URL的“dubbo://”协议头识别,直接调用DubboProtocol的export()方法,打开服务端口。
b、向注册中心暴露服务:
和上一种的区别:需要将服务的IP和端口一同暴露给注册中心。
ServiceConfig解析出的url格式为:
registry://registry-host/com.alibaba.dubbo.registry.RegistryService?export=URL.encode(“dubbo://service-host/com.xxx.TxxService?version=1.0.0”)
基于扩展点的Adaptive机制,通过URL的“registry://”协议头识别,调用RegistryProtocol的export方法,将export参数中的提供者URL先注册到注册中心,再重新传给Protocol扩展点进行暴露: Dubbo://service-host/com.xxx.TxxService?version=1.0.0
(1)服务提供者暴露一个服务的详细过程
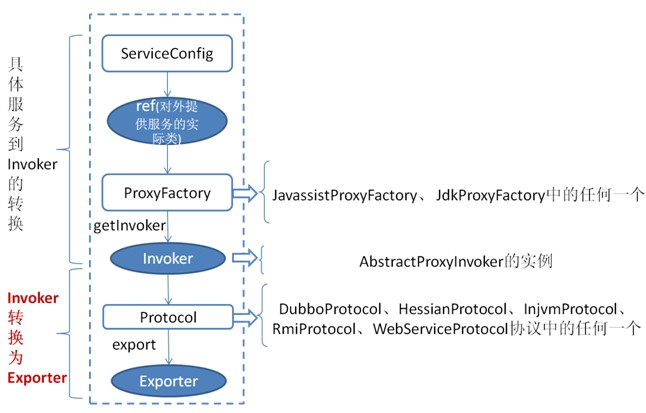
首先ServiceConfig类拿到对外提供服务的实际类ref(如:HelloWorldImpl),然后通过ProxyFactory类的getInvoker方法使用ref生成一个AbstractProxyInvoker实例,
到这一步就完成具体服务到Invoker的转化。接下来就是Invoker转换到Exporter的过程。
Dubbo处理服务暴露的关键就在Invoker转换到Exporter的过程(如上图中的红色部分);Dubbo协议的Invoker转为Exporter发生在DubboProtocol类的export方法,它主要是打开socket侦听服务,并接收客户端发来的各种请求,通讯细节由Dubbo自己实现。
(2)服务消费者消费一个服务的详细过程
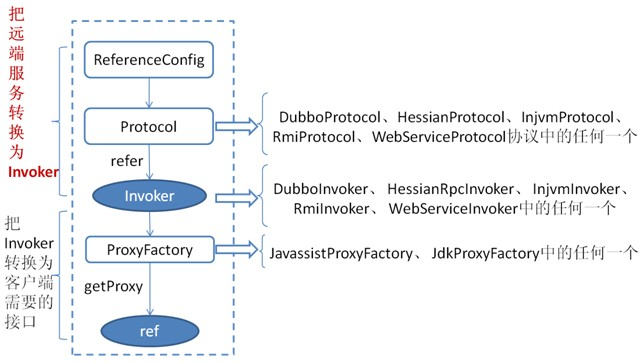
首先ReferenceConfig类的init方法调用Protocol的refer方法生成Invoker实例(如上图中的红色部分),这是服务消费的关键。
接下来把Invoker转换为客户端需要的接口(如:HelloWorld)。


 1026
1026


 被折叠的 条评论
为什么被折叠?
被折叠的 条评论
为什么被折叠?
 到【灌水乐园】发言


