


文章目录
背景
在开发过程中,我们可能会遇到以下需求
- 执行完某个业务后,发短信通知客户
- 完成某操作后,通知其他系统
- 某任务执行时间太长,希望能够把这个任务放在其他线程执行,稍后再来查询任务执行状态
- 等等…
上面的几种需求,开发者都希望无论这些通知的操作成功与否,都不影响到当前的操作,这个时候,就需要异步。
异步注解@Async介绍
Spring提供了优雅的异步处理方案,在Spring3中,Spring中引入了一个新的注解@Async,这个注解让我们在使用Spring完成异步操作变得非常方便。
这个注解是由SpringFramework提供的,因此就算不使用SpringBoot,也能使用。
Spring中用@Async注解标记的方法,称为异步方法,它会在调用方的当前线程之外的独立的线程中执行,其实就相当于我们自己new Thread(()-> System.out.println("hello world !"))这样在另一个线程中去执行相应的业务逻辑。
基本使用
新建一个接口
    @ApiOperation(tags = "异步任务测试", value = "测试Spring使用@Async提高系统的吞吐量")
    @PostMapping(value = "/testUsingDefaultAsyncTask")
    public JsonResult<String> testUsingDefaultAsyncTask() {
        return JsonResult.success(testService.testUsingDefaultAsyncTask());
    }
testUsingDefaultAsyncTask 的service方法中调用另外一个异步方法,同时打印当前的线程名
public String testUsingDefaultAsyncTask() {
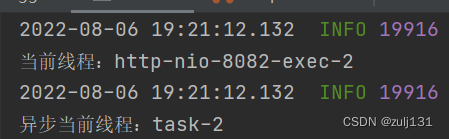
System.out.println("当前线程:" + Thread.currentThread().getName());
runningDefaultTask();
return "service hello";
}
@Async
public void runningDefaultTask() {
System.out.println("异步当前线程:" + Thread.currentThread().getName());
}
在主启动类中增加@EnableAsync注解,表示开启异步任务的功能
@SpringBootApplication
@EnableAsync
public class NacosServiceProviderApplication {

    public static void main(String[] args) {
        SpringApplication.run(NacosServiceProviderApplication.class, args);
    }

}
调用结果

等等-_-||,这里的输出结果出现了一个问题,就是异步方法和主方法依然是在同一个线程里面,@Async注解失效了,根本没有异步…,
此时需要对service方法进行一点小修改:
调用异步方法时,使用ApplicationContextHolder工具类,ApplicationContextHolder工具类里面持有ApplicationContext的引用,调用ApplicationContext.getBean方法获取到当前Service的Bean实例,再调用。
public String testUsingDefaultAsyncTask() {
    System.out.println("当前线程:" + Thread.currentThread().getName());
    ApplicationContextHolder.getBean(TestService.class).runningDefaultTask();
    return "service hello";
}

@Async
public void runningDefaultTask() {
    System.out.println("异步当前线程:" + Thread.currentThread().getName());
}
ApplicationContextHolder实现如下:
@Component
public class ApplicationContextHolder implements ApplicationContextAware {
    private static ApplicationContext applicationContext;

    @Override
    public void setApplicationContext(ApplicationContext applicationContext) throws BeansException {
        ApplicationContextHolder.applicationContext = applicationContext;
    }

    /**
     * 通过name获取bean
     *
     * @param name beanName
     * @return 获取到的bean
     */
    public static Object getBean(String name) {
        return applicationContext.getBean(name);
    }

    /**
     * 通过class获取bean
     *
     * @param clazz bean的Class对象
     * @return 获取到的bean
     */
    public static <T> T getBean(Class<T> clazz) {
        return applicationContext.getBean(clazz);
    }

    /**
     * 通过name+class获取bean
     *
     * @param name  beanName
     * @param clazz bean的Class对象
     * @return 获取到的bean
     */
    public static <T> T getBean(String name, Class<T> clazz) {
        return applicationContext.getBean(name, clazz);
    }
}
调用结果:
这个问题应该是代理的问题,我调试的时候,如果是同类调用的话是不经过代理对象,以后我会做一篇文章专门解析这个问题
分析源码
@EnableAsync注解 做了什么?
@EnableAsync基本属性
这个注解位于它位于的包名为org.springframework.scheduling.annotation,jar名为:spring-context
@Target(ElementType.TYPE)
@Retention(RetentionPolicy.RUNTIME)
@Documented
@Import(AsyncConfigurationSelector.class)
public @interface EnableAsync {
	/**
	* 默认情况下,要开启异步操作,要在相应的方法或者类上加上@Async注解
	* 这个属性是可以支持我们用自定义的注解去开启异步操作
	* 当使用了这个属性之后,原本的@Async注解就会失效
	* 不过通常我们用Spring提供的注解就足够了,没必要自己定义
	*/
	Class<? extends Annotation> annotation() default Annotation.class;

	// true表示启用CGLIB代理
	boolean proxyTargetClass() default false;

	/**
	* 修改代理方式:默认是AdviceMode.PROXY,采用Spring的动态代理(含JDK动态代理
	* 和CGLIB)
	* 若改为:AdviceMode.ASPECTJ表示使用AspectJ静态代理方式。
	* AdviceMode.ASPECTJ方式它能够解决同类内方法调用不走代理对象的问题,
	* 但是一般情况下都不建议这么去做,不要修改这个参数值
	*
	*/
	AdviceMode mode() default AdviceMode.PROXY;

	// 直接定义:它的执行顺序(因为可能有多个@EnableXXX)
	int order() default Ordered.LOWEST_PRECEDENCE;

}
注:
mode属性我试着设置成了AdviceMode.ASPECTJ,但是启动时项目要求有spring-aspects这个jar包,引入了之后,其实同类调用还是在同一个线程当中,并不能解决这个问题。因为生产环境上一般不设置这个属性,所以我没有深究
引入后置处理器AsyncAnnotationBeanPostProcessor
AsyncConfigurationSelector基本了解
mark:@EnableAsync -> AsyncConfigurationSelector
介绍完基本的属性,最重要的,是看这个注解上面的@Import注解导入的类:AsyncConfigurationSelector
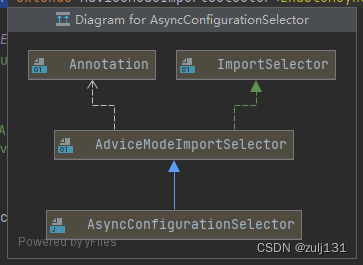
简单看一下上面的关系图,它也是一个ImportSelector,所以,起码明白一点的是,它会返回一个类名数组,这个数组中的类都会注册到Spring容器当中。这个类是ProxyAsyncConfiguration
public class AsyncConfigurationSelector extends AdviceModeImportSelector<EnableAsync> {

	private static final String ASYNC_EXECUTION_ASPECT_CONFIGURATION_CLASS_NAME =
			"org.springframework.scheduling.aspectj.AspectJAsyncConfiguration";

	@Override
	@Nullable
	public String[] selectImports(AdviceMode adviceMode) {
		switch (adviceMode) {
			case PROXY:
				//大部分情况下都是走PROXY的部分,所以这里只研究ProxyAsyncConfiguration
				return new String[] {ProxyAsyncConfiguration.class.getName()};
			case ASPECTJ:
				return new String[] {ASYNC_EXECUTION_ASPECT_CONFIGURATION_CLASS_NAME};
			default:
				return null;
		}
	}

}
由此可议看出,@EnableAsync最终是向容器内注入了ProxyAsyncConfiguration这个Bean。由@Configuration可以看出,它是一个配置类类。
AsyncConfigurationSelector注入ProxyAsyncConfiguration 类
mark:@EnableAsync -> AsyncConfigurationSelector->ProxyAsyncConfiguration
上面我们提到的AsyncConfigurationSelector 组件,往容器中注册了ProxyAsyncConfiguration 这个配置类,所以就看一下有没有@Bean标记的方法,它注册了什么Bean。
下面的asyncAdvisor方法就是被@Bean标记的 方法,它的作用就是往Spring容器注入了一个AsyncAnnotationBeanPostProcessor 类
@Configuration
@Role(BeanDefinition.ROLE_INFRASTRUCTURE)
public class ProxyAsyncConfiguration extends AbstractAsyncConfiguration {

	// 它的作用就是往Spring容器注入了一个AsyncAnnotationBeanPostProcessor,
	//它是个BeanPostProcessor,因此我们可以关注它的postProcessBeforeInitialization()
	//和postProcessAfterInitialization()方法
	@Bean(name = TaskManagementConfigUtils.ASYNC_ANNOTATION_PROCESSOR_BEAN_NAME)
	@Role(BeanDefinition.ROLE_INFRASTRUCTURE)
	public AsyncAnnotationBeanPostProcessor asyncAdvisor() {
		Assert.notNull(this.enableAsync, "@EnableAsync annotation metadata was not injected");
		AsyncAnnotationBeanPostProcessor bpp = new AsyncAnnotationBeanPostProcessor();
		bpp.configure(this.executor, this.exceptionHandler);
		Class<? extends Annotation> customAsyncAnnotation = this.enableAsync.getClass("annotation");
		if (customAsyncAnnotation != AnnotationUtils.getDefaultValue(EnableAsync.class, "annotation")) {
			bpp.setAsyncAnnotationType(customAsyncAnnotation);
		}
		bpp.setProxyTargetClass(this.enableAsync.getBoolean("proxyTargetClass"));
		bpp.setOrder(this.enableAsync.<Integer>getNumber("order"));
		return bpp;
	}

}
AsyncAnnotationBeanPostProcessor 生成代理对象
mark:@EnableAsync -> 注册AsyncConfigurationSelector -> 注册ProxyAsyncConfiguration配置类->AsyncAnnotationBeanPostProcessor
AsyncAnnotationBeanPostProcessor里面有很大的逻辑,所以这里先贴一下它的关系图,等等还要看回来(在IDEA,先用Ctrl+Alt+U 打印出它的继承关系图),采用从上到下的方式去分析功能。

上面提到的AsyncAnnotationBeanPostProcessor 是一个BeanPostProcessor,因此我们关注它的postProcessBeforeInitialization()和postProcessAfterInitialization()是做了什么,这两个方法是在每个Bean实例化前后调用的
先从BeanPostProcessor接口的第一个实现- AbstractAdvisingBeanPostProcessor去分析:
AbstractAdvisingBeanPostProcessor
// 它继承自,ProxyProcessorSupport,说明它也拥有AOP的通用配置
public abstract class AbstractAdvisingBeanPostProcessor extends ProxyProcessorSupport implements BeanPostProcessor {

	/**
	 * 增强器,代表横切的逻辑,由子类赋值
	 */
	@Nullable
	protected Advisor advisor;
	/**
	 * 是否优先于其他增强器执行
	 */
	protected boolean beforeExistingAdvisors = false;
	// 缓存合格的Bean们,是否合格由isEligible方法判断
	private final Map<Class<?>, Boolean> eligibleBeans = new ConcurrentHashMap<>(256);


	// 当遇到一个pre-object的时候,是否把该processor所持有得advisor放在现有的增强器们之前执行
	// 默认是false,会放在最后一个位置上的
	public void setBeforeExistingAdvisors(boolean beforeExistingAdvisors) {
		this.beforeExistingAdvisors = beforeExistingAdvisors;
	}

	/**
	 * BeanPostProcessor的前置处理方法,这里没有任何内容
	 */
	@Override
	public Object postProcessBeforeInitialization(Object bean, String beanName) {
		return bean;
	}

	// BeanPostProcessor的后置处理方法,在Bean已经实例化、初始化完成之后执行。
	@Override
	public Object postProcessAfterInitialization(Object bean, String beanName) {
		//这里的this.advisor 应该是一个增强器,这个在上面了解到是在AsyncAnnotationBeanPostProcessor中的setBeanFactory方法赋值的
		// 这里如果bean是AopInfrastructureBean或者增强器是null,那么则忽略处理
		if (this.advisor == null || bean instanceof AopInfrastructureBean) {
			return bean;
		}

		//如果一个bean是Advised类型,那么表示它已经是一个代理对象了,无需再重新创建代理对象
		//可以直接向里面添加增强器 this.advisor
		if (bean instanceof Advised) {
			Advised advised = (Advised) bean;
			//advised 不能是已冻结的额,而且要通过isEligible校验合法
			if (!advised.isFrozen() && isEligible(AopUtils.getTargetClass(bean))) {
				// 根据beforeExistingAdvisors的值来判断是放在Add our local Advisor to the existing proxy's Advisor chain...
				if (this.beforeExistingAdvisors) {
					advised.addAdvisor(0, this.advisor);
				}
				else {
					advised.addAdvisor(this.advisor);
				}
				return bean;
			}
		}

		//这里bean还没被代理,那么就要为这个bean创建一个代理对象
		//先通过isEligible校验合法
		if (isEligible(bean, beanName)) {
			//以当前的bean的配置,创建一个代理工厂
			ProxyFactory proxyFactory = prepareProxyFactory(bean, beanName);
			/**
			 * 如果不是使用CGLIB常见代理,那就去分析出它所实现的接口们  然后放进ProxyFactory 里去
			 * 这里 isProxyTargetClass 默认是false,所以是会分析它的接口,如果没有,
			 * 则isProxyTargetClass 设置true
			 */
			if (!proxyFactory.isProxyTargetClass()) {
				evaluateProxyInterfaces(bean.getClass(), proxyFactory);
			}
			//把当前的增强器放到代理工厂中
			proxyFactory.addAdvisor(this.advisor);
			// 留给子类,对代理工厂进行额外的自定义
			customizeProxyFactory(proxyFactory);
			//创建代理对象,注册到Spring容器中
			//所以如果根据此bean的类型来从spring容器获取bean的话,会拿到代理对象
			return proxyFactory.getProxy(getProxyClassLoader());
		}

		// 没有命中切面,则返回原始bean
		return bean;
	}

	/**
	 * 作用: 检查这个Bean是否是合格的,是否合格指的是
	 * 1. 当前的后置处理器类是否有配置增强器
	 * 2. 增强器是否能够应用到当前处理的Bean对象,也就是是否能够命中切面
	 * 以上两个条件都达成的话,才是合格的
	 */
	protected boolean isEligible(Object bean, String beanName) {
		return isEligible(bean.getClass());
	}
	protected boolean isEligible(Class<?> targetClass) {
		// 如果已经被缓存着了,那肯定靠谱啊
		Boolean eligible = this.eligibleBeans.get(targetClass);
		if (eligible != null) {
			return eligible;
		}
		// 如果没有切面(就相当于没有给配置增强器,那铁定是不合格的)
		if (this.advisor == null) {
			return false;
		}

		// 这个重要了:看看这个advisor是否能够切入进targetClass这个类,能够切入进去的也是合格的
		eligible = AopUtils.canApply(this.advisor, targetClass);
		this.eligibleBeans.put(targetClass, eligible);
		return eligible;
	}

	// 子类可以复写。比如`AbstractBeanFactoryAwareAdvisingPostProcessor`就复写了这个方法~~~
	protected ProxyFactory prepareProxyFactory(Object bean, String beanName) {
		//父类的方法几乎没有做什么东西,只是把target设置成当前处理的bean
		ProxyFactory proxyFactory = new ProxyFactory();
		proxyFactory.copyFrom(this);
		proxyFactory.setTarget(bean);
		return proxyFactory;
	}

	/**
	 * 交给子类,对代理工厂进行额外设置
	 */
	protected void customizeProxyFactory(ProxyFactory proxyFactory) {
	}

}
通过分析这个类,我了解到了 AbstractAdvisingBeanPostProcessor 作用就是在bean实例化以及初始化之后,将当前后置处理器的增强器切入到当前bean中并生成代理对象。
AbstractBeanFactoryAwareAdvisingPostProcessor
接下来,为了补充AbstractAdvisingBeanPostProcessor 中的未知(例如this.advisor怎么赋值,prepareProxyFactory方法在子类是否有重写等等),继续分析下一级子类AbstractBeanFactoryAwareAdvisingPostProcessor
public abstract class AbstractBeanFactoryAwareAdvisingPostProcessor extends AbstractAdvisingBeanPostProcessor
		implements BeanFactoryAware {

	@Nullable
	private ConfigurableListableBeanFactory beanFactory;

	/**
	* 这个方法是实现BeanFactoryAware  的方法,用于获取BeanFactory
	* 如果没有什么特殊配置,一般都能获取到DefaultListableBeanFactory
	* DefaultListableBeanFactory`是ConfigurableListableBeanFactory 的子类
	*/
	@Override
	public void setBeanFactory(BeanFactory beanFactory) {
		this.beanFactory = (beanFactory instanceof ConfigurableListableBeanFactory ?
				(ConfigurableListableBeanFactory) beanFactory : null);
	}


	/**
	 * 我们在上面的AbstractAdvisingBeanPostProcessor就分析过这个方法
	 * 现在在这里被重写了
	 */
	@Override
	protected ProxyFactory prepareProxyFactory(Object bean, String beanName) {
		if (this.beanFactory != null) {
			//如果Bean工厂是正常的,那就把这个Bean  expose一个特殊的Bean,记录下它的类型
			AutoProxyUtils.exposeTargetClass(this.beanFactory, beanName, bean.getClass());
		}

		//调用父类的方法,其实就是设置一个target
		ProxyFactory proxyFactory = super.prepareProxyFactory(bean, beanName);
		/**
		 * 这里创建代理也是和`AbstractAutoProxyCreator`差不多的逻辑。
		 * 如果没有显示的设置为CGLIB,并且toProxyUtils.shouldProxyTargetClass还被暴露过时一个特殊的Bean
		 * 那就强制使用CGLIB代理吧    这里一般和Scope无关的话,都返回false了
		 */
		if (!proxyFactory.isProxyTargetClass() && this.beanFactory != null &&
				AutoProxyUtils.shouldProxyTargetClass(this.beanFactory, beanName)) {
			proxyFactory.setProxyTargetClass(true);
		}
		return proxyFactory;
	}


	/**
	* 这里也重写了isEligible方法
	 * 在父类的isEligible方法的基础上增加了一个判断
	 * AutoProxyUtils.isOriginalInstance(beanName, bean.getClass())返回false
	 * 这个方法只是校验beanName一定不是beanClass.getName()+“.ORIGINAL”
	 */
	@Override
	protected boolean isEligible(Object bean, String beanName) {
		return (!AutoProxyUtils.isOriginalInstance(beanName, bean.getClass()) &&
				super.isEligible(bean, beanName));
	}

}
通过以上分析,可以知道AbstractBeanFactoryAwareAdvisingPostProcessor 做了三件事情,就是
- 进行beanFacotry的赋值
- 扩展isEligible 的校验
- prepareProxyFactory重写方法
AsyncAnnotationBeanPostProcessor
接下来继续分析子类:AsyncAnnotationBeanPostProcessor,这个也是和@Async最相关的一个类
public class AsyncAnnotationBeanPostProcessor extends AbstractBeanFactoryAwareAdvisingPostProcessor {

	/**
	 * 默认异步任务执行器(线程池)的bean名称,默认是"taskExecutor"
	 * 这个是可以支持更换的
	 */
	public static final String DEFAULT_TASK_EXECUTOR_BEAN_NAME =
			AnnotationAsyncExecutionInterceptor.DEFAULT_TASK_EXECUTOR_BEAN_NAME;


	protected final Log logger = LogFactory.getLog(getClass());

	// 异步的执行器
	@Nullable
	private Supplier<Executor> executor;

   // 异步异常处理器
	@Nullable
	private Supplier<AsyncUncaughtExceptionHandler> exceptionHandler;

    // 注解类型
	@Nullable
	private Class<? extends Annotation> asyncAnnotationType;


	// 此处特别注意:这里设置为true,也就是说@Async的Advisor(增强器)会放在首位
	public AsyncAnnotationBeanPostProcessor() {
		setBeforeExistingAdvisors(true);
	}

	/**
	 * 如果没有指定。那就将执行全局得默认查找。在上下文中查找唯一的`TaskExecutor`类型的Bean,或者一个名称为`
	 * taskExecutor`的Executor
	 * 当然,如果上面途径都没找到。那就会采用一个默认的任务池
	 */
	public void setExecutor(Executor executor) {
		this.executor = SingletonSupplier.of(executor);
	}

	/**
	 * Set the {@link AsyncUncaughtExceptionHandler} to use to handle uncaught
	 * exceptions thrown by asynchronous method executions.
	 * @since 4.1
	 */
	public void setExceptionHandler(AsyncUncaughtExceptionHandler exceptionHandler) {
		this.exceptionHandler = SingletonSupplier.of(exceptionHandler);
	}


	/**
	 * 可以设定需要扫描哪些注解类型,默认只有@Async和EJB 3.1 中的Asynchronous注解会被扫描
	 * 这个属性支持开发者使用他们自己定义的注解去异步执行某个方法
	 * 关联@EnalbeAsync中的设置属性?
	 */
	public void setAsyncAnnotationType(Class<? extends Annotation> asyncAnnotationType) {
		Assert.notNull(asyncAnnotationType, "'asyncAnnotationType' must not be null");
		this.asyncAnnotationType = asyncAnnotationType;
	}


	/**
	 * 这是一个比较重要的方法:重写了父类的setBeanFactory方法(因为有BeanFactoryAware接口,所以肯定某个父类实现了此方法)
	 * 在父类方法的基础上,增加了对于this.advisor 的赋值
	 * new了一个AsyncAnnotationAdvisor类,上面的属性都设置到了AsyncAnnotationAdvisor中
	 */
	@Override
	public void setBeanFactory(BeanFactory beanFactory) {
		super.setBeanFactory(beanFactory);

		AsyncAnnotationAdvisor advisor = new AsyncAnnotationAdvisor(this.executor, this.exceptionHandler);
		if (this.asyncAnnotationType != null) {
			advisor.setAsyncAnnotationType(this.asyncAnnotationType);
		}
		advisor.setBeanFactory(beanFactory);
		this.advisor = advisor;
	}

}
通过分析上面的代码,可以知道:
- 之前在父类AbstractAdvisingBeanPostProcessor 对于this.advisor,在这个子类进行了赋值,为AsyncAnnotationAdvisor ,并且是通过扩展setBeanFactory进行赋值。
- 之前在父类AbstractAdvisingBeanPostProcessor 分析到,beforeExistingAdvisors=true时,会把当前的增强器放到所有的增强器之前,在子类的构造方法中,设置了beforeExistingAdvisors=true
代理对象中的增强逻辑:AsyncAnnotationAdvisor
AsyncAnnotationAdvisor讲解
在AsyncAnnotationBeanPostProcessor 和它的父类AbstractAdvisingBeanPostProcessor 都遇到了this.advisor,所以this.advisor相对来说是比较重要的。
public class AsyncAnnotationAdvisor extends AbstractPointcutAdvisor implements BeanFactoryAware {
	// 通知拦截器(包含具体横切逻辑)
	private Advice advice;
	// 对于用过AOP的人来说,比较熟悉,因为这就是AOP中的切点
	private Pointcut pointcut;

	 // 两个都为null,那就是都会采用默认的方案
	 // 第一个参数是线程池的Supplier接口实现,第二个参数是异步任务错误处理器的Supplier接口实现
	public AsyncAnnotationAdvisor() {
		this((Supplier<Executor>) null, (Supplier<AsyncUncaughtExceptionHandler>) null);
	}


	// 创建一个AsyncAnnotationAdvisor实例,可以自己指定Executor线程池
	//和 AsyncUncaughtExceptionHandler错误处理器
	@SuppressWarnings("unchecked")
	public AsyncAnnotationAdvisor(
			@Nullable Supplier<Executor> executor, @Nullable Supplier<AsyncUncaughtExceptionHandler> exceptionHandler) {
		// 这里List长度选择2,应为绝大部分情况下只会扫描这两种@Async和@Asynchronous注解
		Set<Class<? extends Annotation>> asyncAnnotationTypes = new LinkedHashSet<>(2);
		asyncAnnotationTypes.add(Async.class);
		try {
			asyncAnnotationTypes.add((Class<? extends Annotation>)
					ClassUtils.forName("javax.ejb.Asynchronous", AsyncAnnotationAdvisor.class.getClassLoader()));
		}
		catch (ClassNotFoundException ex) {
			// If EJB 3.1 API not present, simply ignore.
		}
		//??:这里在我看的版本里面少了一步,这里原本是设置exceptionHandler,我看的版本没有了
		this.advice = buildAdvice(executor, exceptionHandler);
		this.pointcut = buildPointcut(asyncAnnotationTypes);
	}


	/**
	 * 设置异步注解
	 * // 这里注意:如果你自己指定了注解类型。
	 * 那么将不再扫描其余两个默认的注解,因此pointcut也就需要重新构建了
	 *
	 */
	public void setAsyncAnnotationType(Class<? extends Annotation> asyncAnnotationType) {
		Assert.notNull(asyncAnnotationType, "'asyncAnnotationType' must not be null");
		Set<Class<? extends Annotation>> asyncAnnotationTypes = new HashSet<>();
		asyncAnnotationTypes.add(asyncAnnotationType);
		this.pointcut = buildPointcut(asyncAnnotationTypes);
	}

	// 如果这个advice也实现了BeanFactoryAware,那就也把BeanFactory放进去
	@Override
	public void setBeanFactory(BeanFactory beanFactory) {
		if (this.advice instanceof BeanFactoryAware) {
			((BeanFactoryAware) this.advice).setBeanFactory(beanFactory);
		}
	}


	@Override
	public Advice getAdvice() {
		return this.advice;
	}

	@Override
	public Pointcut getPointcut() {
		return this.pointcut;
	}

	/**
	 * 这个通知拦截器最终是使用AnnotationAsyncExecutionInterceptor的实现类
	 * 调用它的configure 方法配置executor和exceptionHandler,最后返回
	 */
	protected Advice buildAdvice(
			@Nullable Supplier<Executor> executor, @Nullable Supplier<AsyncUncaughtExceptionHandler> exceptionHandler) {

		AnnotationAsyncExecutionInterceptor interceptor = new AnnotationAsyncExecutionInterceptor(null);
		interceptor.configure(executor, exceptionHandler);
		return interceptor;
	}

	protected Pointcut buildPointcut(Set<Class<? extends Annotation>> asyncAnnotationTypes) {
	     /**
	      * Composable是组合的意思,所以这里我认为ComposablePointcut 就是包含了多个切入点的一个类(因为需要支持多个注解)
	      * 第一个new AnnotationMatchingPointcut :
	      * 类匹配(只需要类上面有这个注解,所有的方法都匹配)this.methodMatcher = MethodMatcher.TRUE;
	      * 第二个new AnnotationMatchingPointcut:
	      * 方法匹配。只有方法上有这个注解才会匹配上
	      */
		ComposablePointcut result = null;
		for (Class<? extends Annotation> asyncAnnotationType : asyncAnnotationTypes) {
			Pointcut cpc = new AnnotationMatchingPointcut(asyncAnnotationType, true);
			Pointcut mpc = new AnnotationMatchingPointcut(null, asyncAnnotationType, true);
			if (result == null) {
				result = new ComposablePointcut(cpc);
			}
			else {
				result.union(cpc);
			}
			// 最终的结果都是取值为并集的
			result = result.union(mpc);
		}
		//这里代表着如果没有指定任何的异步注解,那么将会匹配所有类的所有方法,一般都会默认有@Async的
		return (result != null ? result : Pointcut.TRUE);
	}

}
通知拦截器:AnnotationAsyncExecutionInterceptor
从上的源码可以看出,最终的通知拦截行为,委托给了AnnotationAsyncExecutionInterceptor
这个类的结构比较复杂,我先贴一下它的继承结构

由上面的继承结构,可以看出,它是一个MethodInterceptor,我从网上资料查看,MethodInterceptor是一种简单实现AOP的方式,AOP底层也是用它,并且继承自AsyncExecutionAspectSupport,而MethodInterceptor的顶层结构就是一个Advice
用自上而下的方式讲解
AsyncExecutionAspectSupport
public abstract class AsyncExecutionAspectSupport implements BeanFactoryAware {


	 // 这是备选的。如果找到多个类型为TaskExecutor的Bean,才会备选的再用这个名称去找的
	public static final String DEFAULT_TASK_EXECUTOR_BEAN_NAME = "taskExecutor";


	protected final Log logger = LogFactory.getLog(getClass());


	// 缓存~~~AsyncTaskExecutor是TaskExecutor的子接口
	// 从这可以看出:不同的方法,对应的异步执行器不一样
	private final Map<Method, AsyncTaskExecutor> executors = new ConcurrentHashMap<>(16);

	// 默认的线程执行器
	private SingletonSupplier<Executor> defaultExecutor;

	// 异步异常处理器,SingletonSupplier里面缓存了一个单例对象,可以通过get方法请求
	private SingletonSupplier<AsyncUncaughtExceptionHandler> exceptionHandler;

	// Bean工厂
	@Nullable
	private BeanFactory beanFactory;


	/**
	 * 构造方法:
	 * 如果defaultExecutor 为null,则使用getDefaultExecutor(this.beanFactory)获取一个defaultExecutor
	 * this.exceptionHandler赋值为SimpleAsyncUncaughtExceptionHandler实例
	 */
	public AsyncExecutionAspectSupport(@Nullable Executor defaultExecutor) {
		this.defaultExecutor = new SingletonSupplier<>(defaultExecutor, () -> getDefaultExecutor(this.beanFactory));
		this.exceptionHandler = SingletonSupplier.of(SimpleAsyncUncaughtExceptionHandler::new);
	}

	/**
	 * 构造方法:
	 * 如果defaultExecutor 为null,则使用getDefaultExecutor(this.beanFactory)获取一个defaultExecutor
	 * exceptionHandler赋值到this.exceptionHandler ,但是这里没有提供默认对象的方法
	 */
	public AsyncExecutionAspectSupport(@Nullable Executor defaultExecutor, AsyncUncaughtExceptionHandler exceptionHandler) {
		this.defaultExecutor = new SingletonSupplier<>(defaultExecutor, () -> getDefaultExecutor(this.beanFactory));
		this.exceptionHandler = SingletonSupplier.of(exceptionHandler);
	}


	/**
	 * 同上面的构造方法基本一致,AsyncAnnotationAdvisor就是使用此方法进行初始化defaultExecutor
	 * 和exceptionHandler
	 * 但是这里exceptionHandler 使用了SingletonSupplier优化,如果exceptionHandler为null,则使用
     * SimpleAsyncUncaughtExceptionHandler实例
	 */
	public void configure(@Nullable Supplier<Executor> defaultExecutor,
			@Nullable Supplier<AsyncUncaughtExceptionHandler> exceptionHandler) {

		this.defaultExecutor = new SingletonSupplier<>(defaultExecutor, () -> getDefaultExecutor(this.beanFactory));
		this.exceptionHandler = new SingletonSupplier<>(exceptionHandler, SimpleAsyncUncaughtExceptionHandler::new);
	}

	public void setExecutor(Executor defaultExecutor) {
		this.defaultExecutor = SingletonSupplier.of(defaultExecutor);
	}

	public void setExceptionHandler(AsyncUncaughtExceptionHandler exceptionHandler) {
		this.exceptionHandler = SingletonSupplier.of(exceptionHandler);
	}


	@Override
	public void setBeanFactory(BeanFactory beanFactory) {
		this.beanFactory = beanFactory;
	}


	 /**
	  * 指定一个任务执行器执行方法。
	  */
	@Nullable
	protected AsyncTaskExecutor determineAsyncExecutor(Method method) {
	    // 如果缓存中能够找到该方法对应的执行器,就立马返回了
		AsyncTaskExecutor executor = this.executors.get(method);
		if (executor == null) {
			Executor targetExecutor;
			// 抽象方法:下面讲到的`AnnotationAsyncExecutionInterceptor`有实现。就是获取@Async注解的value值
			String qualifier = getExecutorQualifier(method);
			//下面就会根据这个指定的名称,从容器当中获取到beanName = 名称的任务执行器
			//当然有可能为null。注意此处是支持@Qualified注解标注在类上来区分Bean的
			 注意:此处targetExecutor仍然可能为null
			if (StringUtils.hasLength(qualifier)) {
				targetExecutor = findQualifiedExecutor(this.beanFactory, qualifier);
			}
			else {
			    // 注解没有指定value值,那就去找默认的执行器
				targetExecutor = this.defaultExecutor.get();
			}
			// 若还未null,那就返回null吧
			if (targetExecutor == null) {
				return null;
			}
			// 把targetExecutor 包装成一个AsyncTaskExecutor返回,并且缓存起来。
			// TaskExecutorAdapter就是AsyncListenableTaskExecutor的一个实现类
			executor = (targetExecutor instanceof AsyncListenableTaskExecutor ?
					(AsyncListenableTaskExecutor) targetExecutor : new TaskExecutorAdapter(targetExecutor));
			this.executors.put(method, executor);
		}
		return executor;
	}

	// 子类去复写此方法。也就是拿到对应的key,从而方便找bean吧(执行器)
	@Nullable
	protected abstract String getExecutorQualifier(Method method);


	 /**
	  * 根据指定名称获取对应的执行器,这个执行器是Executor类
	  */
	@Nullable
	protected Executor findQualifiedExecutor(@Nullable BeanFactory beanFactory, String qualifier) {
		if (beanFactory == null) {
			throw new IllegalStateException("BeanFactory must be set on " + getClass().getSimpleName() +
					" to access qualified executor '" + qualifier + "'");
		}
		return BeanFactoryAnnotationUtils.qualifiedBeanOfType(beanFactory, Executor.class, qualifier);
	}


	/**
	 * 获取一个默认的执行器
	 * TaskExecutor
	 */
	@Nullable
	protected Executor getDefaultExecutor(@Nullable BeanFactory beanFactory) {
		if (beanFactory != null) {
			try {
				// 如果容器内存在唯一的TaskExecutor(子类),就直接返回了
				return beanFactory.getBean(TaskExecutor.class);
			}
			catch (NoUniqueBeanDefinitionException ex) {
				// 这是出现了多个TaskExecutor类型的话,那就按照名字去拿  `taskExecutor`且是Executor类型
				logger.debug("Could not find unique TaskExecutor bean", ex);
				try {
					return beanFactory.getBean(DEFAULT_TASK_EXECUTOR_BEAN_NAME, Executor.class);
				}
				// 这里输出一个info信息
				catch (NoSuchBeanDefinitionException ex2) {
					//.....
				}
			}
			// 这里是没有找到一个TaskExecutor的执行器类型的bean
			catch (NoSuchBeanDefinitionException ex) {

			}
			//在下面讲解的AsyncExecutionInterceptor 这一个子类实现中,重写了getDefaultExecutor方法
			//如果父类方法返回null,就会new一个SimpleAsyncTaskExecutor
			//所以SimpleAsyncTaskExecutor就是默认的Async异步任务执行器
			//这里返回null
		}
		return null;
	}


	/**
	 * 提交一个任务到指定的执行器当中,在invoice方法中使用
	 */
	@Nullable
	protected Object doSubmit(Callable<Object> task, AsyncTaskExecutor executor, Class<?> returnType) {
		// 根据不同的返回值类型,来采用不同的方案去异步执行,但是执行器都是executor
		if (CompletableFuture.class.isAssignableFrom(returnType)) {
			return CompletableFuture.supplyAsync(() -> {
				try {
					return task.call();
				}
				catch (Throwable ex) {
					throw new CompletionException(ex);
				}
			}, executor);
		}
		// ListenableFuture接口继承自Future  是Spring自己扩展的一个接口。
		// 同样的AsyncListenableTaskExecutor也是Spring扩展自AsyncTaskExecutor的
		else if (ListenableFuture.class.isAssignableFrom(returnType)) {
			return ((AsyncListenableTaskExecutor) executor).submitListenable(task);
		}
		// 普通的submit,返回Future
		else if (Future.class.isAssignableFrom(returnType)) {
			return executor.submit(task);
		}
		// 没有返回值的情况下  也用sumitt提交,按时返回null
		else {
			executor.submit(task);
			return null;
		}
	}

	//处理错误
	protected void handleError(Throwable ex, Method method, Object... params) throws Exception {
		// 如果方法的返回值类型是Future,就rethrowException,表示直接throw出去
		if (Future.class.isAssignableFrom(method.getReturnType())) {
			ReflectionUtils.rethrowException(ex);
		}
		//否则调用异常处理器处理
		else {
			// Could not transmit the exception to the caller with default executor
			try {
				this.exceptionHandler.obtain().handleUncaughtException(ex, method, params);
			}
			catch (Throwable ex2) {
				logger.warn("Exception handler for async method '" + method.toGenericString() +
						"' threw unexpected exception itself", ex2);
			}
		}
	}

}
这个类其实做了3个方面的事情:
- 在Spring容器中查找执行器
- 提交执行方法
- 错误处理
继续看下子类
AsyncExecutionInterceptor
终于,从此处开始。可议看出它是一个MethodInterceptor,是一个通知拦截器了。但是从命名中也可以看出,它已经能够处理异步的执行了(比如基于XML方式的),但是还和注解无关
// 他继承自AsyncExecutionAspectSupport 来处理异步方法的处理,同时是个MethodInterceptor,来增强复合条件的方法
public class AsyncExecutionInterceptor extends AsyncExecutionAspectSupport implements MethodInterceptor, Ordered {

	/**
	 * 构造方法,复用父类的构造方法
	 */
	public AsyncExecutionInterceptor(@Nullable Executor defaultExecutor) {
		super(defaultExecutor);
	}

	/**
	 * 构造方法,复用父类的构造方法
	 */
	public AsyncExecutionInterceptor(@Nullable Executor defaultExecutor, AsyncUncaughtExceptionHandler exceptionHandler) {
		super(defaultExecutor, exceptionHandler);
	}


	 /**
	  * 最重要的当然是这个invoke方法,在上面AsyncExecutionAspectSupport 定义了doSumbit方法
	  * 但是没有找到调用这个方法地方
	  * 现在由子类去调用
	  *
      * 由doSubmit方法可以知道,入参有一个Callable,所以在这里,会把执行的方法包装成一个callable,然后再调用
	  */
	@Override
	@Nullable
	public Object invoke(final MethodInvocation invocation) throws Throwable {
		Class<?> targetClass = (invocation.getThis() != null ? AopUtils.getTargetClass(invocation.getThis()) : null);
		// 注意:此处是getMostSpecificMethod  拿到最终要执行的那个方法
		Method specificMethod = ClassUtils.getMostSpecificMethod(invocation.getMethod(), targetClass);
		final Method userDeclaredMethod = BridgeMethodResolver.findBridgedMethod(specificMethod);
		// determine一个用于执行此方法的异步执行器
		AsyncTaskExecutor executor = determineAsyncExecutor(userDeclaredMethod);
		if (executor == null) {
			throw new IllegalStateException(
					"No executor specified and no default executor set on AsyncExecutionInterceptor either");
		}
		// 构造一个任务,Callable(此处不采用Runable,因为需要返回值)
		Callable<Object> task = () -> {
			try {
				Object result = invocation.proceed();
				if (result instanceof Future) {
					return ((Future<?>) result).get();
				}
			}
			// 处理执行时可能产生的异常~~~~~~
			catch (ExecutionException ex) {
				handleError(ex.getCause(), userDeclaredMethod, invocation.getArguments());
			}
			catch (Throwable ex) {
				handleError(ex, userDeclaredMethod, invocation.getArguments());
			}
			return null;
		};

		return doSubmit(task, executor, invocation.getMethod().getReturnType());
	}

	// 显然这个方法它直接返回null,因为XML配置,这里还没支持注解配置
	@Override
	@Nullable
	protected String getExecutorQualifier(Method method) {
		return null;
	}

	// 如果父类返回的defaultExecutor 为null,那就new一个SimpleAsyncTaskExecutor作为默认的执行器
	@Override
	@Nullable
	protected Executor getDefaultExecutor(@Nullable BeanFactory beanFactory) {
		Executor defaultExecutor = super.getDefaultExecutor(beanFactory);
		return (defaultExecutor != null ? defaultExecutor : new SimpleAsyncTaskExecutor());
	}

	// 最高优先级  希望的是最优先执行(XML配置就是这种优先级)
	@Override
	public int getOrder() {
		return Ordered.HIGHEST_PRECEDENCE;
	}

}
AsyncExecutionInterceptor 做了以下事情:
- 在方法拦截invoke方法时,将执行方法组装为callable,调用父类的doSubmit提交到执行器中
- 重写了getDefaultExecutor,如果容器中没有bean,那么初始化一个new SimpleAsyncTaskExecutor()
注解的支持:AnnotationAsyncExecutionInterceptor
很显然,他是在AsyncExecutionInterceptor的基础上,提供了对@Async注解的支持。所以它是继承它的。
// 它继承自AsyncExecutionInterceptor ,只复写了一个方法
public class AnnotationAsyncExecutionInterceptor extends AsyncExecutionInterceptor {
	...
	// 由此可以见它就是去拿到@Async的value值。以方法的为准,其次是类上面的
	// 备注:发现这里是不支持EJB的@Asynchronous注解的,它是不能指定执行器的
	@Override
	@Nullable
	protected String getExecutorQualifier(Method method) {
		// Maintainer's note: changes made here should also be made in
		// AnnotationAsyncExecutionAspect#getExecutorQualifier
		Async async = AnnotatedElementUtils.findMergedAnnotation(method, Async.class);
		if (async == null) {
			async = AnnotatedElementUtils.findMergedAnnotation(method.getDeclaringClass(), Async.class);
		}
		return (async != null ? async.value() : null);
	}
}
推荐自定义异步线程池
首先得讲一下为什么不建议使用默认的线程?
从上面了解到,AsyncAnnotationAdvisor 默认使用一个叫SimpleAsyncTaskExecutor的线程池,但是这个SimpleAsyncTaskExecutor又不是真正意义上的线程池。
异步执行用户任务的SimpleAsyncTaskExecutor。每次执行客户提交给它的任务时,它会启动新的线程,并允许开发者控制并发线程的上限(concurrencyLimit),从而起到一定的资源节流作用。默认时,concurrencyLimit取值为-1,即不启用资源节流
所以它不是真的线程池,这个类不重用线程,每次调用都会创建一个新的线程(因此建议我们在使用@Aysnc的时候,自己配置一个线程池,节约资源)
protected void doExecute(Runnable task) {
		//这里每次都会新建一个线程
		Thread thread = (this.threadFactory != null ? this.threadFactory.newThread(task) : createThread(task));
		thread.start();
	}
自定义线程池的方法:
@Configuration
public class AsyncConfig implements AsyncConfigurer {

    @Override
    public Executor getAsyncExecutor() {
        ThreadPoolTaskExecutor executor = new ThreadPoolTaskExecutor();
        executor.setCorePoolSize(10); //核心线程数
        executor.setMaxPoolSize(20);  //最大线程数
        executor.setQueueCapacity(1000); //队列大小
        executor.setKeepAliveSeconds(300); //线程最大空闲时间
        executor.setThreadNamePrefix("fsx-Executor-"); 指定用于新创建的线程名称的前缀。
        executor.setRejectedExecutionHandler(new ThreadPoolExecutor.CallerRunsPolicy()); // 拒绝策略(一共四种,此处省略)

	    // 这一步千万不能忘了,否则报错: java.lang.IllegalStateException: ThreadPoolTaskExecutor not initialized
        executor.initialize();
        return executor;
    }

    // 异常处理器:当然你也可以自定义的,这里我就这么简单写了~~~
    @Override
    public AsyncUncaughtExceptionHandler getAsyncUncaughtExceptionHandler() {
        return new SimpleAsyncUncaughtExceptionHandler();
    }
}
然后在@Async中指定线程池的名称即可。
使用Spring的异步,我个人十分建议配置上自己自定义的配置器(如上配置仅供参考),这样能够更好的掌握(比如异常处理AsyncUncaughtExceptionHandler~~~)
配置线程池的要点:
核心线程最好不要超过应用所在机器的CPU的核心数:
比如说4核CPU,说明这台机器只能同一个时间并行执行4个线程,如果设置核心线程数为20个,那么必定会发生很频繁的线程切换,从而拉高机器的负载。
@Async注解使用的细节
- 同一个类调用的时候会失效,可以使用我Demo里面的方法解决(因为需要是通过代理对象发起调用)
- 需要注解
@EnableAsync来开启异步注解的支持,千万别漏了 - 可以使用Future来接收异步方法的返回值
总结
到了这里,我大致基本对@Async的实现有了基本了解,@EnableAsync引入了一个后置处理器,这个后置处理器在每个bean实例化以及初始化后,创建一个代理对象,代理对象使用AsyncAnnotationAdvisor 增强。AsyncAnnotationAdvisor 里面使用AOP的功能,拦截@Async的方法,将方法组装成一个Callable对象提交到线程池执行。
其实通读整篇文章之后,我只能简单了解了@Async的大致原理,更多的细节,还需要分析AOP原理才能清楚
参考
【小家Spring】Spring异步处理@Async的使用以及原理、源码分析(@EnableAsync):
https://blog.csdn.net/f641385712/article/details/89430276


 402
402


 被折叠的 条评论
为什么被折叠?
被折叠的 条评论
为什么被折叠?
 到【灌水乐园】发言


