


AOP的核心:代理模式
代理模式的分类
1.静态代理
2.动态代理
代理模式的优点以及代理模式的使用实例
使用代理模式的一个很大的优点。最直白的就是在Spring中的面向切面编程(AOP),我们能在一个切点之前执行一些操作,在一个切点之后执行一些操作,这个切点就是一个个方法。这些方法所在类肯定就是被代理了,在代理过程中切入了一些其他操作。
静态代理
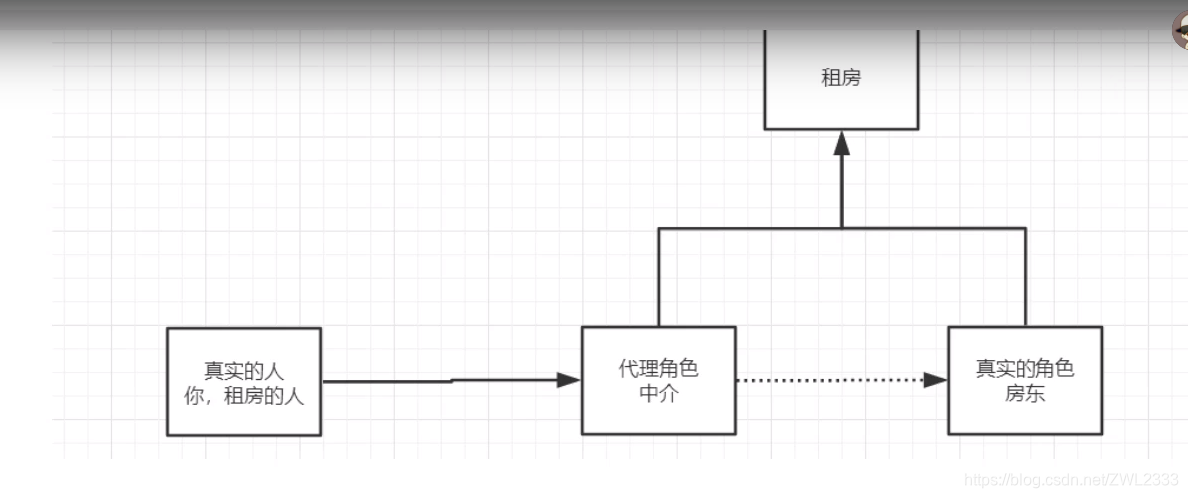
静态代理中的角色
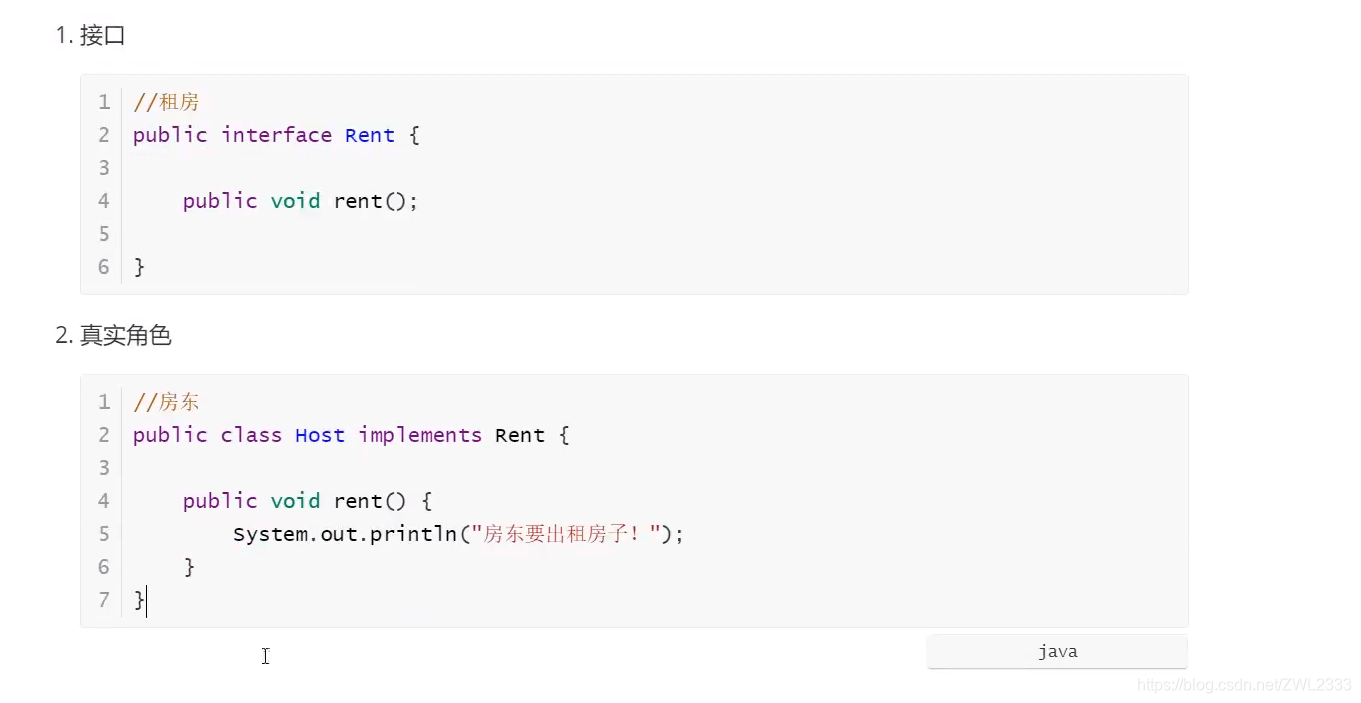
- 抽象角色,一般会使用接口或者抽象类来解决(租房)
- 真实角色:被代理的角色(房东)
- 代理角色:代理真实角色(中介)
- 客户:访问代理对象的人(租房的人)
3.代理角色
**![]()
**
public class StaticProxyTest {
    public static void main(String[] args) {
        //被代理的学生张三,他的班费上交有代理对象monitor(班长)完成
        Person zhangsan = new Student("张三");

        //生成代理对象,并将张三传给代理对象
        Person monitor = new StudentsProxy(zhangsan);

        //班长代理上交班费
        monitor.giveMoney();
    }
}
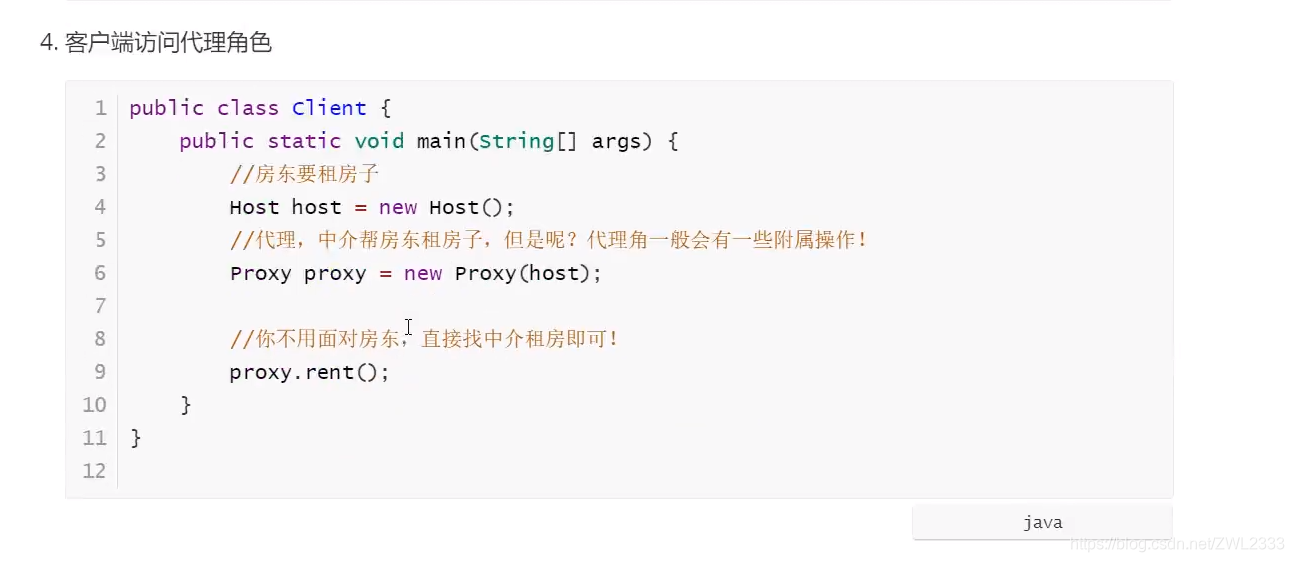
先创建一个被代理对象,然后将被代理对象作为属性传入代理对象,最后代理对象执行方法
代理模式的好处:
1.可以使真实角色的操作更加纯粹,不用去关注一些公共的业务
2.公共业务都交给代理来完成,实现了业务的分工
3.公共业务需要拓展的时候方便集中管理
缺点:
一个真实角色就会产生一个代理角色,代码量会增加,开发效率变低
动态代理
静态代理每次代理一个角色就要增加很多代码量,利用反射可以动态得加载一些类,动态代理得底层就是反射
动态代理得代理类是动态生成的,不是我们直接写好的
动态代理也可以分为两大类
1.基于接口的动态代理
2.基于类的动态代理。
动态代理,代理类并不是在Java代码中定义的,而是在运行时根据我们在Java代码中的“指示”动态生成的。相比于静态代理, 动态代理的优势在于可以很方便的对代理类的函数进行统一的处理,而不用修改每个代理类中的方法。代理类就是Proxy
动态代理与静态代理的区别。
(1)Proxy类的代码被固定下来,不会因为业务的逐渐庞大而庞大;
(2)可以实现AOP编程,这是静态代理无法实现的;
(3)解耦,如果用在web业务下,可以实现数据层和业务层的分离。
(4)动态代理的优势就是实现无侵入式的代码扩展。
静态代理这个模式本身有个大问题,如果类方法数量越来越多的时候,代理类的代码量是十分庞大的。所以引入动态代理来解决此类问题
动态代理实例
interface Human{
	String getBelied();
	void eat(String food) ;
}
class SuperMan implements Human{//被代理类
	@Override
	public String getBelied() {
		return "I believe T can fly!";
	}
	@Override
	public void eat(String food) {
		System.out.println("like eat :"+food);
	}
}
/*
 * 要实现动态代理需要解决的问题:
 * 1.怎么根据加载到内存中的被代理类 ,动态的创建一个代理类以及代理类对象
 * 2.当通过代理类的对象时 如何动态的去调用被代理类中的同名方法
 */
class ProxyFactory{
	public static Object getProxyInstance(Object obj) {//obj:被代理类对象
		MyInvocationHandler handler=new MyInvocationHandler();
		handler.bind(obj);//这里就创建被被代理类对象
		//返回一个代理类对象  Object是一个代理类的对象
		return Proxy.newProxyInstance(obj.getClass().getClassLoader(), obj.getClass().getInterfaces(),handler );
	}
}
class MyInvocationHandler implements InvocationHandler{
	private Object obj;//被代理类对象  赋值时使用被代理类对象复制
	public void bind(Object obj) {
		this.obj=obj;
	}
	//通过代理类对象,调用方法时,会自动的调用invoke()
	@Override
	public Object invoke(Object proxy, Method method, Object[] args) throws Throwable {//proxy :代理类对象    method:代理类对象调用的方法
		//当通过代理类的对象时 如何动态的去调用被代理类中的同名方法
		//将被代理类要执行的方法声明在这里 invoke()
			//加入事务,权限,日志代码
		Object result= method.invoke(obj, args);//method:即为代理类对象,此方法就作为被代理独享要调用的方法
		//加入事务,权限,日志代码

        return result;
	}
}
public class ProxyTest {
	public static void main(String[] args) {
		SuperMan superMan=new SuperMan();//被代理类对象
		Human proxyInstance=(Human)ProxyFactory.getProxyInstance(superMan);
		//当通过调用代理类对象调用方法时 会自动调用被代理类中 同名的方法
		String belief=proxyInstance.getBelied();
		System.out.println(belief);
		proxyInstance.eat("川菜");
	}
}
AOP的一些概念
想象下面的场景,开发中在多个模块间有某段重复的代码,我们通常是怎么处理的?显然,没有人会靠“复制粘贴”吧。在传统的面向过程编程中,我们也会将这段代码,抽象成一个方法,然后在需要的地方分别调用这个方法,这样当这段代码需要修改时,我们只需要改变这个方法就可以了。然而需求总是变化的,有一天,新增了一个需求,需要再多出做修改,我们需要再抽象出一个方法,然后再在需要的地方分别调用这个方法,又或者我们不需要这个方法了,我们还是得删除掉每一处调用该方法的地方。实际上涉及到多个地方具有相同的修改的问题我们都可以通过 AOP 来解决。
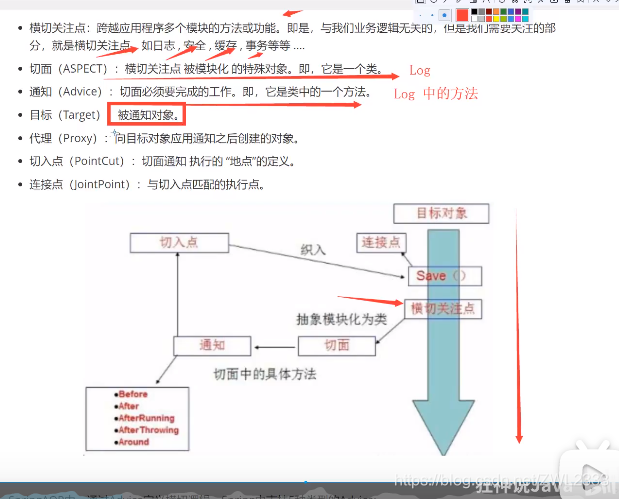
Target是一个接口或者方法
代理就是我们生成的代理类
AOP切面
1.首先创建一个接口 IBuy.java
package com.sharpcj.aopdemo.test1;

public interface IBuy {
    String buy();
}
实现了这个接口
package com.sharpcj.aopdemo.test1;

import org.springframework.stereotype.Component;

@Component
public class Boy implements IBuy {
    @Override
    public String buy() {
        System.out.println("男孩买了一个游戏机");
        return "游戏机";
    }
}
我们需要在男孩和女孩的 buy 方法之前,需要打印出“男孩女孩都买了自己喜欢的东西”
2、 定义一个切面类,BuyAspectJ.java
下面展示一些 内联代码片。
package com.sharpcj.aopdemo.test1;

import org.aspectj.lang.annotation.Aspect;
import org.aspectj.lang.annotation.Before;
import org.springframework.stereotype.Component;

@Aspect
@Component
public class BuyAspectJ {
    @Before("execution(* com.sharpcj.aopdemo.test1.IBuy.buy(..))")
    public void haha(){
        System.out.println("男孩女孩都买自己喜欢的东西");
    }
}
这个类,我们使用了注解 @Component 表明它将作为一个Spring Bean 被装配,使用注解 @Aspect 表示它是一个切面。
类中只有一个方法 haha 我们使用 @Before 这个注解,表示他将在方法执行之前执行。关于这个注解后文再作解释。
参数(“execution(* com.sharpcj.aopdemo.test1.IBuy.buy(…))”) 声明了切点,表明在该切面的切点是com.sharpcj.aopdemo.test1.Ibuy这个接口中的buy方法。至于为什么这么写,下文再解释。
3、 在配置文件中启用AOP切面功能
package com.sharpcj.aopdemo;

import org.springframework.context.annotation.ComponentScan;
import org.springframework.context.annotation.Configuration;
import org.springframework.context.annotation.EnableAspectJAutoProxy;

@Configuration
@ComponentScan(basePackageClasses = {com.sharpcj.aopdemo.test1.IBuy.class})
@EnableAspectJAutoProxy(proxyTargetClass = true)
public class AppConfig {
}
我们在配置文件类增加了@EnableAspectJAutoProxy注解,启用了 AOP 功能,参数proxyTargetClass的值设为了 true 。默认值是 false,两者的区别下文再解释。
Spring AOP 所支持的 AspectJ 切点指示器
execution指示器是我们在编写切点定义时最主要使用的指示器,在此基础上,我们使用其他指示器来限制所匹配的切点。
下图的切点表达式表示当Instrument的play方法执行时会触发通知。
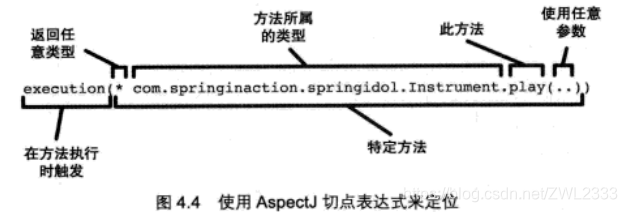
我们使用execution指示器选择Instrument的play方法,方法表达式以 * 号开始,标识我们不关心方法的返回值类型。然后我们指定了全限定类名和方法名。对于方法参数列表,我们使用 … 标识切点选择任意的play方法,无论该方法的入参是什么。
多个匹配之间我们可以使用链接符 &&、||、!来表示 “且”、“或”、“非”的关系。但是在使用 XML 文件配置时,这些符号有特殊的含义,所以我们使用 “and”、“or”、“not”来表示。
举例:
限定该切点仅匹配的包是 com.sharpcj.aopdemo.test1,可以使用
execution(* com.sharpcj.aopdemo.test1.IBuy.buy(…)) && within(com.sharpcj.aopdemo.test1.)
在切点中选择 bean,可以使用
execution( com.sharpcj.aopdemo.test1.IBuy.buy(…)) && bean(girl)
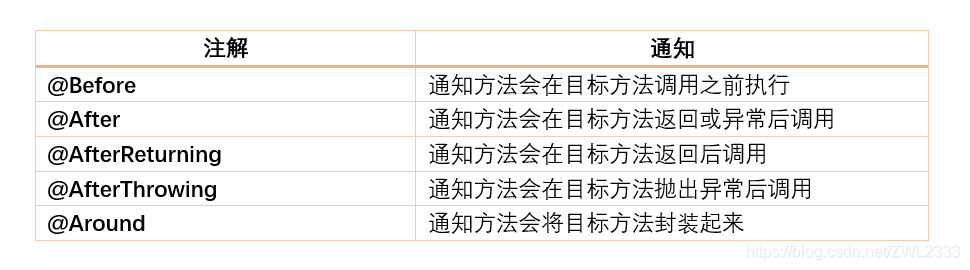
五种通知类型
package com.sharpcj.aopdemo.test1;
import org.aspectj.lang.ProceedingJoinPoint;
import org.aspectj.lang.annotation.*;
import org.springframework.stereotype.Component;
@Aspect
@Component
public class BuyAspectJ {
@Before("execution(* com.sharpcj.aopdemo.test1.IBuy.buy(..))")
public void hehe() {
System.out.println("before ...");
}
@After("execution(* com.sharpcj.aopdemo.test1.IBuy.buy(..))")
public void haha() {
System.out.println("After ...");
}
@AfterReturning("execution(* com.sharpcj.aopdemo.test1.IBuy.buy(..))")
public void xixi() {
System.out.println("AfterReturning ...");
}
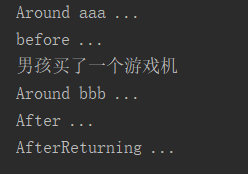
@Around("execution(* com.sharpcj.aopdemo.test1.IBuy.buy(..))")
public void xxx(ProceedingJoinPoint pj) {
try {
System.out.println("Around aaa ...");
pj.proceed();
System.out.println("Around bbb ...");
} catch (Throwable throwable) {
throwable.printStackTrace();
}
}
}
为了方便看效果,我们测试类中,只要 Boy 类:
package com.sharpcj.aopdemo;

import com.sharpcj.aopdemo.test1.Boy;
import com.sharpcj.aopdemo.test1.Girl;
import org.springframework.context.annotation.AnnotationConfigApplicationContext;

public class AppTest {
    public static void main(String[] args) {
        AnnotationConfigApplicationContext context = new AnnotationConfigApplicationContext(AppConfig.class);
        Boy boy = context.getBean("boy",Boy.class);
        Girl girl = (Girl) context.getBean("girl");
        boy.buy();
        // girl.buy();
    }
}
4.3 通过注解声明切点表达式
如你看到的,上面我们写的多个通知使用了相同的切点表达式,对于像这样频繁出现的相同的表达式,我们可以使用 @Pointcut注解声明切点表达式,然后使用表达式,修改代码如下:
BuyAspectJ.java
package com.sharpcj.aopdemo.test1;

import org.aspectj.lang.ProceedingJoinPoint;
import org.aspectj.lang.annotation.*;
import org.springframework.stereotype.Component;

@Aspect
@Component
public class BuyAspectJ {

    @Pointcut("execution(* com.sharpcj.aopdemo.test1.IBuy.buy(..))")
    public void point(){}

    @Before("point()")
    public void hehe() {
        System.out.println("before ...");
    }

    @After("point()")
    public void haha() {
        System.out.println("After ...");
    }

    @AfterReturning("point()")
    public void xixi() {
        System.out.println("AfterReturning ...");
    }

    @Around("point()")
    public void xxx(ProceedingJoinPoint pj) {
        try {
            System.out.println("Around aaa ...");
            pj.proceed();
            System.out.println("Around bbb ...");
        } catch (Throwable throwable) {
            throwable.printStackTrace();
        }
    }
}


 3万+
3万+


 被折叠的 条评论
为什么被折叠?
被折叠的 条评论
为什么被折叠?
 到【灌水乐园】发言


