


目录
一、项目介绍
本次项目实现效果和具体要求如下:
(1)绘制电子时钟
(2)实现电子时钟的使用,每秒钟可以动态更新
(3)显示当前时间
二、项目准备
下载“微信开发者工具”并注册
三、项目实践
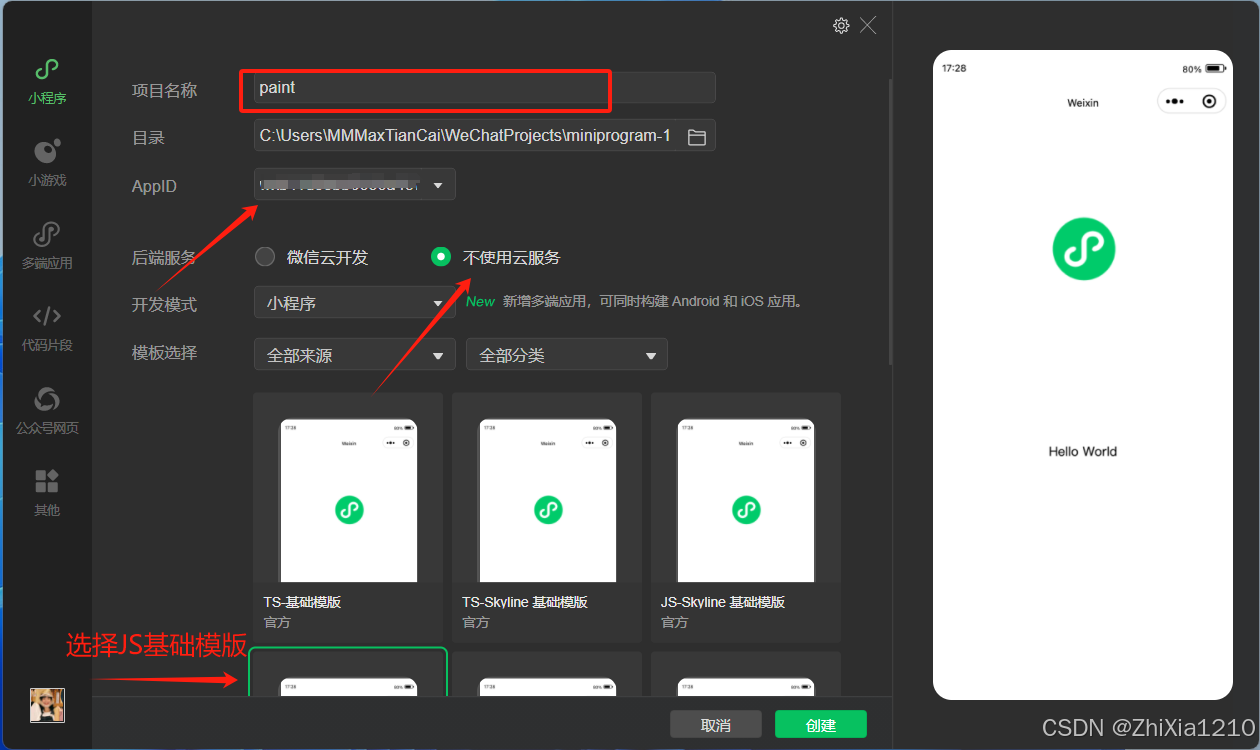
1、新创建一个项目
命名为“paint”,选择不使用云服务——JS基础模版,点击创建
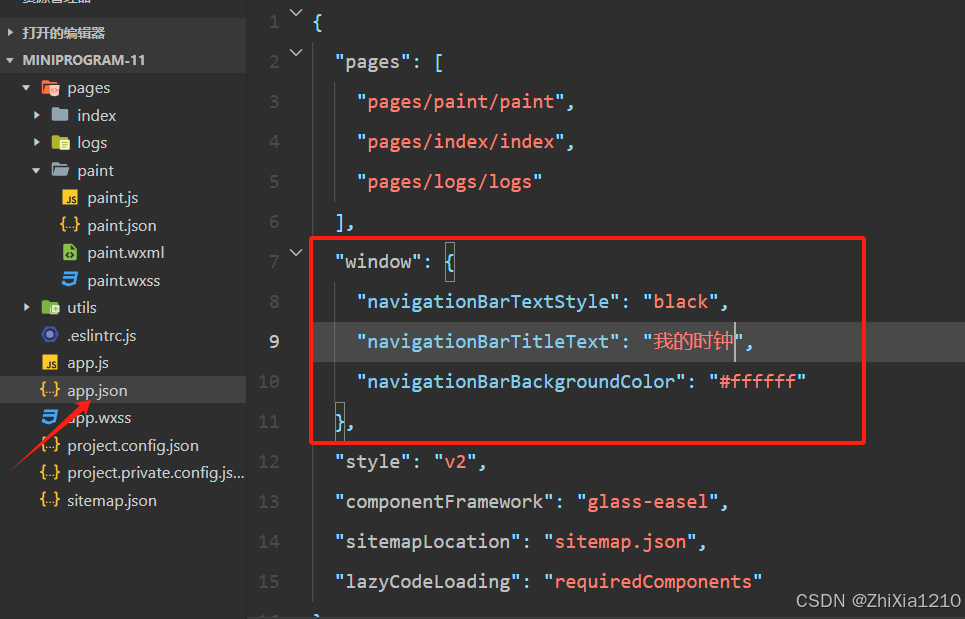
2、导航栏设置
在app.json中对所有页面的导航栏进行设置,设置标题文本为“我的时钟”
3、布局设计
根据题目要求,将页面分为三个模块,分别是标题(文本)、手绘时钟(画布) 、数字电子时钟(文本)三个部分,设计的WXML和WXSS代码如下,这里我们先对画布进行设计,对数字时钟的时间先采用text文本“12:00:00”的形式占个位置,后面再根据时间改变。
<!--pages/paint/paint.wxml-->
<view class="root">
  <view class="topic">
    <text>My Clock</text>
  </view>
  <canvas type="2d" id="clock" class="paint"></canvas>
  <view class="topic">
    <text> 12:00:00</text>
  </view>
</view>
/* pages/paint/paint.wxss */
.root{
display: flex;
flex-direction: column;
align-items: center;
justify-content: space-around; /*调整内容间隙*/
}
.topic{
font-size: 40pt;
font-weight: bold;
}
.paint{
width: 300px;
height: 300px;
margin-top: 10px;
margin-bottom: 10px;
border: solid 1px black;
}
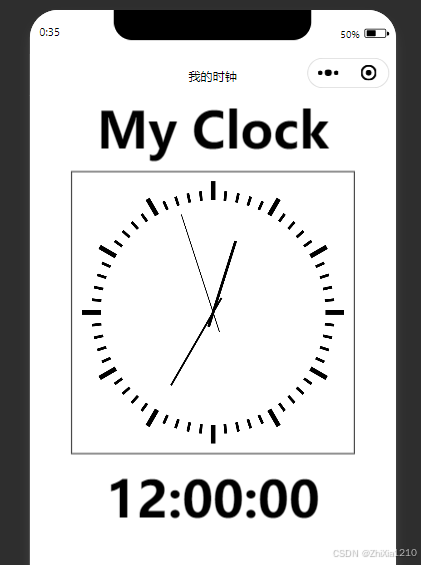
实现效果如下图所示

4、创建画布上下文(画布初始化)
首先需要根据画布组件的id属性在JS文件中的生命周期函数onLoad中创建画布上下文,然后才可以进行绘制工作。画布在paint.js中的初始化代码及解释如下。
因为我们前面WXSS中设置的画布大小为300*300,所以这里初始化设置圆心为(150,150),如果不设置圆心,默认圆心是(0,0)。
onLoad(options) {
wx.createSelectorQuery().select("#clock")
.fields({node:true,size:true})
.exec((res)=>{
console.log(res)
var myConvas=res[0].node //从查询结果中获取 <canvas> 节点,并将其赋值给变量 myCanvas。
this.ctx=myConvas.getContext("2d") //获取 <canvas> 元素的 2D 绘图上下文,并赋值给 this.ctx,这样就可以使用 this.ctx 进行绘图操作。
const dpr=wx.getWindowInfo().pixelRatio
myConvas.width=res[0].width*dpr //设置 <canvas> 元素的实际绘图宽度,乘以 dpr 以确保绘图在不同设备上保持清晰。
myConvas.height=res[0].height*dpr //设置 <canvas> 元素的实际绘图高度
this.ctx.scale(dpr,dpr) //通过 scale 方法调整绘图上下文的缩放比例,确保绘图与设备像素比匹配。
this.ctx.translate(150,150) //设置圆心
})
},5、绘制时钟刻度
在JS中创建自定义函数drawFrame(lineWidth,lineLength,count) 用于进行电子时钟刻度的绘制,并在OnLoad函数中进行调用,该部分的函数代码如下:
drawFrame(lineWidth,lineLength,count){
this.ctx.lineWidth=lineWidth
this.ctx.beginPath(); // 开始一个新的路径
for (var i=0;i<count;i++){
this.ctx.moveTo(0,-120-lineLength) //将笔触移动到了新的位置
this.ctx.lineTo(0,-120) //定义了一条从当前笔触位置到新位置的线
this.ctx.rotate(2*Math.PI/count) //开始旋转
}
this.ctx.stroke() //描边,fill是填充轨迹
},在刚刚写的OnLoad()片尾中调用绘制时钟刻度函数,分别绘制小时刻度和分钟刻度。
this.drawFrame(5,20,12)
this.drawFrame(1,10,60)实现效果如下所示。

6、绘制时钟指针
绘制时针的函数及解释如下
drawLine( angle , lineWidth , lineLength ){
this.ctx.lineWidth=lineWidth //设定线的粗细
this.ctx.beginPath(); // 开始一个新的路径
this.ctx.rotate(angle) //旋转angle角度的画布
this.ctx.moveTo(0,0) //将画笔放在原点
this.ctx.lineTo(0,-lineLength) //画出原点到指针长度距离的线条,绘制到(150+0,150-lineLength)点处,也就是垂直向上的
this.ctx.lineTo(0,lineLength / 5) //绘制指针超出圆心的那部分
this.ctx.stroke() //根据前面的定义,绘制线条的轮廓。
this.ctx.rotate(-angle) //将绘图上下文旋转回原来的方向,即旋转 angle 的负值。这是为了确保后续的绘图操作不会受到这次旋转的影响
},在绘制时钟指针之前需要获取当前的时间,调用now.getHours()方法等获取当前的时刻。然后计算每个小时时针走过的角度就是=(hour%12)*2*π/12+minutes * Math.PI / 360。可以说是整数个角度加上零散的分钟时针走过的角度,然后时针、分针、秒针分别调用划线的函数。
drawHuorDegree(){
const now = new Date()
const hour = now.getHours()
const minutes=now.getMinutes()
const second=now.getSeconds()
const rotateArc = (hour % 12) * Math.PI / 6 + minutes * Math.PI / 360
const minuteRotateArc = minutes*Math.PI/30
const secondArc = second*Math.PI/30
this.drawLine( rotateArc , 3 , 80 )
this.drawLine( minuteRotateArc , 2 , 90 )
this.drawLine( secondArc , 1 , 110 )
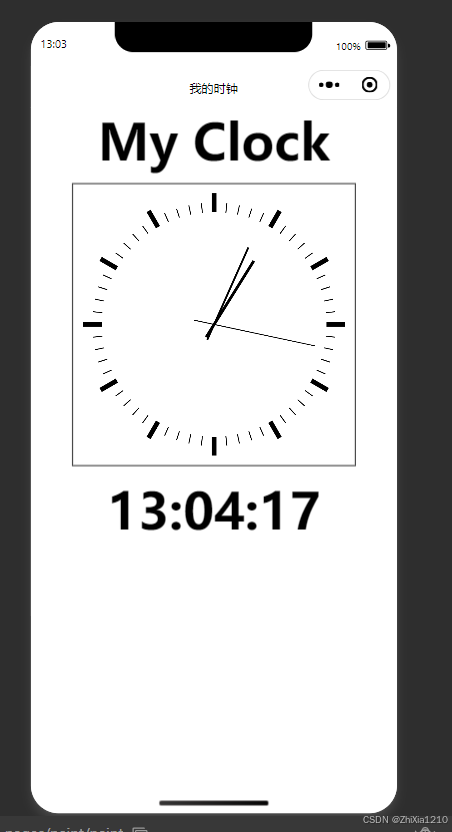
},在OnLoad中调用该函数this.drawHuorDegree() ,实现效果如下图所示。
6、显示数字电子时钟
在paint.js中的data里定义hour、minutes、second三个参数,然后在刚刚获取时间的函数drawHuorDegree中设置三个参数的值,如下所示。
this.setData({
hour:hour > 9 ? hour : '0' + hour,
minutes:minutes > 9 ? minutes : '0' + minutes,
second:second > 9 ? second : '0' + second
})
现在的三个参数都是代表当前系统的时间,下一步就是在paint.wxml里面进行单项数据绑定,实现代码如下。
<text> {{hour}}:{{minutes}}:{{second}}</text>实现效果:
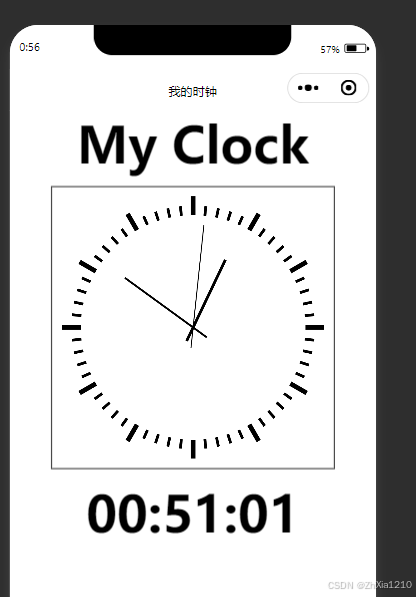
7、每秒更新
在 drawHuorDegree 方法中,首先使用 this.ctx.clearRect(-150, -150, 300, 300) 来清除整个画布;在 onLoad 生命周期函数中,设置定时器 this.interval,它每秒调用drawHuorDegree() 来更新时钟;在 onUnload 生命周期函数中,添加了 clearInterval(this.interval) 来清除定时器,避免在页面卸载后定时器仍然运行。代码如下所示。
drawHuorDegree(){
this.ctx.clearRect(-150, -150, 300, 300);
// 重新绘制时钟框架
this.drawFrame(5, 20, 12);
this.drawFrame(1, 10, 60);
const now = new Date()
const hour = now.getHours()
const minutes=now.getMinutes()
const second=now.getSeconds()
const rotateArc = (hour % 12) * Math.PI / 6 + minutes * Math.PI / 360
const minuteRotateArc = minutes*Math.PI/30
const secondArc = second*Math.PI/30
this.drawLine( rotateArc , 3 , 80 )
this.drawLine( minuteRotateArc , 2 , 90 )
this.drawLine( secondArc , 1 , 110 )
this.setData({
hour:hour > 9 ? hour : '0' + hour,
minutes:minutes > 9 ? minutes : '0' + minutes,
second:second > 9 ? second : '0' + second
})
},this.interval = setInterval(() => {
this.drawHuorDegree();
}, 1000);
})onUnload() {
clearInterval(this.interval); // 清除定时器
},现在就可以实现实时更新数字电子时钟了。
四、完整代码展示
pain.wxml
<!--pages/paint/paint.wxml-->
<view class="root">
<view class="topic">
<text>My Clock</text>
</view>
<canvas type="2d" id="clock" class="paint"></canvas>
<view class="topic">
<text> {{hour}}:{{minutes}}:{{second}}</text>
</view>
</view>pain.wxss
/* pages/paint/paint.wxss */
.root{
  display: flex;
  flex-direction: column;
  align-items: center;
  justify-content: space-around; /*调整内容间隙*/
}
.topic{
  font-size: 40pt;
  font-weight: bold;
}
.paint{
  width: 300px;
  height: 300px;
  margin-top: 10px;
  margin-bottom: 10px;
  border: solid 1px black;
}pain.js
// pages/paint/paint.js
Page({
/**
* 页面的初始数据
*/
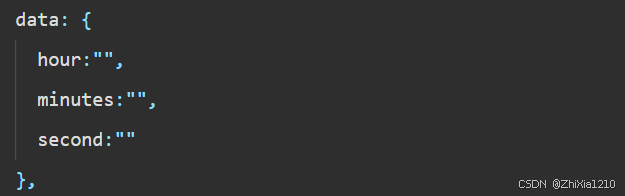
data: {
hour:"",
minutes:"",
second:""
},
drawFrame(lineWidth,lineLength,count){
this.ctx.beginPath(); // 开始一个新的路径
this.ctx.lineWidth=lineWidth
for (var i=0;i<count;i++){
this.ctx.moveTo(0,-120-lineLength)
this.ctx.lineTo(0,-120)
this.ctx.rotate(2*Math.PI/count) //开始旋转
}
this.ctx.stroke() 描边,fill是填充轨迹
},
drawLine( angle , lineWidth , lineLength ){
this.ctx.lineWidth=lineWidth //设定线的粗细
this.ctx.beginPath(); // 开始一个新的路径
this.ctx.rotate(angle) //旋转angle角度的画布
this.ctx.moveTo(0,0) //将画笔放在原点
this.ctx.lineTo(0,-lineLength) //画出原点到指针长度距离的线条,绘制到(150+0,150-lineLength)点处,也就是垂直向上的
this.ctx.lineTo(0,lineLength / 5) //绘制指针超出圆心的那部分
this.ctx.stroke() //根据前面的定义,绘制线条的轮廓。
this.ctx.rotate(-angle) //将绘图上下文旋转回原来的方向,即旋转 angle 的负值。这是为了确保后续的绘图操作不会受到这次旋转的影响
},
drawHuorDegree(){
this.ctx.clearRect(-150, -150, 300, 300);
// 重新绘制时钟框架
this.drawFrame(5, 20, 12);
this.drawFrame(1, 10, 60);
const now = new Date()
const hour = now.getHours()
const minutes=now.getMinutes()
const second=now.getSeconds()
const rotateArc = (hour % 12) * Math.PI / 6 + minutes * Math.PI / 360
const minuteRotateArc = minutes*Math.PI/30
const secondArc = second*Math.PI/30
this.drawLine( rotateArc , 3 , 80 )
this.drawLine( minuteRotateArc , 2 , 90 )
this.drawLine( secondArc , 1 , 110 )
this.setData({
hour:hour > 9 ? hour : '0' + hour,
minutes:minutes > 9 ? minutes : '0' + minutes,
second:second > 9 ? second : '0' + second
})
},
/**
* 生命周期函数--监听页面加载
*/
onLoad(options) {
wx.createSelectorQuery().select("#clock")
.fields({node:true,size:true})
.exec((res)=>{
console.log(res)
var myConvas=res[0].node //从查询结果中获取 <canvas> 节点,并将其赋值给变量 myCanvas。
this.ctx=myConvas.getContext("2d") //获取 <canvas> 元素的 2D 绘图上下文,并赋值给 this.ctx,这样就可以使用 this.ctx 进行绘图操作。
const dpr=wx.getWindowInfo().pixelRatio
myConvas.width=res[0].width*dpr //设置 <canvas> 元素的实际绘图宽度,乘以 dpr 以确保绘图在不同设备上保持清晰。
myConvas.height=res[0].height*dpr //设置 <canvas> 元素的实际绘图高度
this.ctx.scale(dpr,dpr) //通过 scale 方法调整绘图上下文的缩放比例,确保绘图与设备像素比匹配。
this.ctx.translate(150,150) //设置圆心
this.drawFrame(5,20,12)
this.drawFrame(1,10,60)
this.drawHuorDegree()
// 设置定时器,每秒更新时钟
this.interval = setInterval(() => {
        this.drawHuorDegree();
      }, 1000);
    })
},
/**
* 生命周期函数--监听页面初次渲染完成
*/
onReady() {
},
/**
* 生命周期函数--监听页面显示
*/
onShow() {
},
/**
* 生命周期函数--监听页面隐藏
*/
onHide() {
},
/**
* 生命周期函数--监听页面卸载
*/
onUnload() {
    clearInterval(this.interval); // 清除定时器
  },
/**
* 页面相关事件处理函数--监听用户下拉动作
*/
onPullDownRefresh() {
},
/**
* 页面上拉触底事件的处理函数
*/
onReachBottom() {
},
/**
* 用户点击右上角分享
*/
onShareAppMessage() {
}
})


 1753
1753

 被折叠的 条评论
为什么被折叠?
被折叠的 条评论
为什么被折叠?
 到【灌水乐园】发言


