


1、通过在Eclipse IDE中安装Spring Tool Suite(STS)插件可以很方便地创建Spring、SpringMVC及Spring Boot工程,在Eclipse IDE中安装Spring Tool Suite(STS)插件,
a、访问http://spring.io/tools/sts/all网页,下载和所用Eclipse版本对应Spring Tool Suite离线工具,由于这里使用Eclipse 4.7.2,所以这里下载springsource-tool-suite-3.9.2.RELEASE-e4.7.2-updatesite.zip
b、计算机断开网络连接;
c、打开Eclipse,点击“Help”菜单,出现下图:
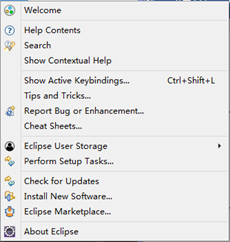
d、点击“Install New Software…”,出现下图:

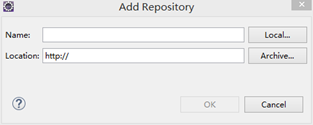
e、点击“Add…”按钮,出现下图:
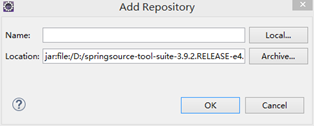
f、点击“Archive…”按钮,然后选择刚下载的Spring Tool Suite Eclipse 插件,出现下图:
g、点击“OK”按钮,出现下图:

h、选中上图四个“XXX/Spring IDE”选项,不要勾选上图蓝框复选框,点击“Next>”,出现下图:

i、点击“Next>”,出现下图:

j、点击“Next>”,出现下图:

k、选择“I accept the terms of the license agreement”,然后点击“Finish”,至此开始向Eclipse中安装“Spring Tool Suite
Eclipse”插件,过一会儿出现下图:
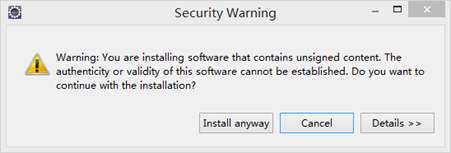
l、点击“Install anyway”按钮,过一会儿出现下图:
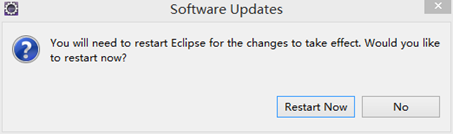
m、点击“Restart Now”按钮,重启Eclipse即可完成安装。
2、下载Spring相关jar包
a、logging jar包下载地址:https://commons.apache.org/proper/commons-logging/download_logging.cgi,这里下载1.2版。
b、Spring jar包下载地址:http://repo.springsource.org/libs-release-local/org/springframework/spring/,这里下载4.3.10版。
3、第一个Spring程序
a、创建一个普通Java的工程;
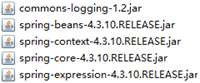
b、向工程中添加如下jar包;
①、创建lib文件夹,将如下jar包拷贝到该文件夹中
②、由于是Java工程,所以为了使这些jar包起作用需要先选择这些jar包——>鼠标右键点击Build Path——>Add to Build Path;如果是Java Web工程只需将这些jar包拷贝到WEB-INF中lib文件夹即可;
c、在com.lq.test中创建HelloWorld类:
public class HelloWorld {
	private String name;
	public void setName(String name) {
		this.name = name;
	}
	public void sayHello() {
		System.out.println(name +" say HelloWorld");
	}
}
d、创建Spring XML文件:
①、选中src目录——>鼠标右键,选中并点击“Other…”项——>找到并打开“Spring”节点,出现下图:

②、选择“Spring Bean Configuration File”子节点,点击“Next>”按钮,出现下图:

③、在“File name”文本框输入配置文件的文件名(这里为bean.xml),点击“Next>”按钮,出现下图:

说明:在创建Spring XML文件前需要先导入相应的jar包,否则上面红框区域不会出现那些Spring命名空间项。
e、在applicationContext.xml中配置HelloWorld类:
<?xml version="1.0" encoding="UTF-8"?>
<beans xmlns="http://www.springframework.org/schema/beans"
	xmlns:xsi="http://www.w3.org/2001/XMLSchema-instance"
	xsi:schemaLocation="http://www.springframework.org/schema/beans http://www.springframework.org/schema/beans/spring-beans.xsd">

<beans >
	<!-- 配置bean -->
	<!-- id属性:用于获取IOC容器中的Bean对象,具有唯一性 -->
	<!-- class属性:指定Bean对象由哪个类创建,为类的全类名 -->
	<bean id="helloworld" class="com.jd.bolg.HelloWorld">
		<!-- 为name属性赋值 -->
		<property name="name" value="Tom"></property>
	</bean>
</beans>
</beans>
f、从IOC容器中获取实例对象并调用sayHelloWorld方法:
import org.springframework.context.support.ClassPathXmlApplicationContext;

public class Test {

	public static void main(String[] args) {
		//首先创建Spring IOC容器对象
		ClassPathXmlApplicationContext applicationContext =new ClassPathXmlApplicationContext("application.xml");
		//从IOC容器中获取Bean对象
		HelloWorld helloWorld = (HelloWorld) applicationContext.getBean("helloWorld");
		//调用sayHello方法
		helloWorld.sayHello();
		//关闭IOC容器
		applicationContext.close();

	}
}
执行结果:


 1219
1219


 被折叠的 条评论
为什么被折叠?
被折叠的 条评论
为什么被折叠?
 到【灌水乐园】发言


