


引导加载自动配置类
继续对主程序来进行分析,之前已经说过,主程序前的@SpringBootApplication是@SpringBootConfiguration, @EnableAutoConfiguration, @ComponentScan三者的组合注解,那么我们继续一一来进行分析。
@SpringBootConfiguration和@ComponentScan
查看源码发现该注解继承自@Configuration,说明仅仅只是一个核心配置类,用来配置proxyBeanMethods。
@Target({ElementType.TYPE})
@Retention(RetentionPolicy.RUNTIME)
@Documented
@Configuration
public @interface SpringBootConfiguration {
    @AliasFor(
        annotation = Configuration.class
    )
    boolean proxyBeanMethods() default true;
}
@ComponentScan用来指定扫描哪些包,所以这两个注解无法实现自动配置。
⭐️@EnableAutoConfiguration
显然只有该注解是SpringBoot实现自动配置的核心,查看源码:
...
@AutoConfigurationPackage
@Import({AutoConfigurationImportSelector.class})
public @interface EnableAutoConfiguration {...}
发现该注解是@AutoConfigurationPackage, @Import两个注解的合成注解。**@Import注解的作用是导入一个组件**,那么继续深究@AutoConfigurationPackage注解。
@AutoConfigurationPackage
可以看到它实际上也是一个@import注解,实现了默认导入包的规则。
@Import({Registrar.class})
public @interface AutoConfigurationPackage {}
@AutoConfigurationPackage中导入了一个Registrar,其目的在于批量注册组件(@import一个一个注册太麻烦),能够将MainApplications所在包下的组件扫描导入进来。
⭐️@Import({AutoConfigurationImportSelector.class})
该注解利用Selector再来给容器中导入一些东西,该类中的selectImports方法规定了导入哪些东西:
public String[] selectImports(AnnotationMetadata annotationMetadata) {
    if (!this.isEnabled(annotationMetadata)) {
        return NO_IMPORTS;
    } else {
        AutoConfigurationMetadata autoConfigurationMetadata = AutoConfigurationMetadataLoader.loadMetadata(this.beanClassLoader);
        AutoConfigurationImportSelector.AutoConfigurationEntry autoConfigurationEntry = this.getAutoConfigurationEntry(autoConfigurationMetadata, annotationMetadata);
        return StringUtils.toStringArray(autoConfigurationEntry.getConfigurations());
    }
}
分析发现,通过getAutoConfigurationEntry方法获得了所有自动配置的集合并转为数组返回。
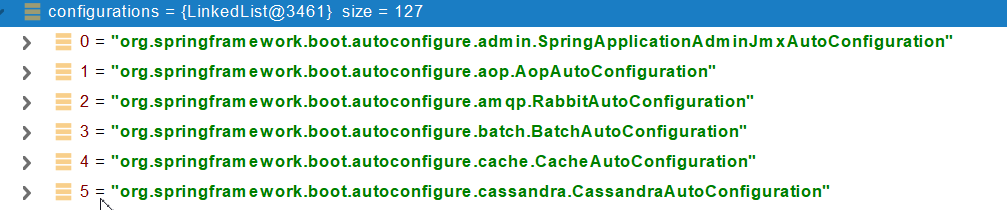
而getAutoConfigurationEntry中又通过getCandidateConfigurations获取了所有要导入到容器中的配置类(共127个)并封装。
再继续分析,getCandidateConfigurations中调用了SpringFactoriesLoader(Spring工厂加载器)来加载组件,再进一步,终于在SpringFactoriesLoader中发现了以下代码:
public static final String FACTORIES_RESOURCE_LOCATION = "META-INF/spring.factories";
我们在maven的包中找到spring-boot-autoconfigure-2.2.5.RELEASE.jar在对应位置下终于找到了一个名为spring.factories的配置文件:

所以说:SpringBoot的自动配置类是完全写死在配置文件中的,SpringBoot一启动就自动加载。
总结一下:
- 利用
getAutoConfigurationEntry(annotationMetadata);给容器中批量导入一些组件 - 调用
getCandidateConfigurations(annotationMetadata, attributes)获到所有需要导入到容器中的配置类 - 利用工厂加载
loadSpringFactories得到所有的组件 - 加载
spring-boot-autoconfigure-2.3.4.RELEASE.jar包中的META-INF/spring.factories文件。
按需开启自动配置项
虽然127个自动配置启动的时候默认全部加载,但最终运行时会按照条件装配(@Conditionalxxxx)规则配置,实现按需配置。
查看SpringBoot组件源码可以发现大量的@ConditionalOnMissingBean(容器没有指定Bean才…),这说明SpringBoot默认会在底层配好所有的组件,但是如果用户自己配置了以用户的优先。例如:
@Bean
@ConditionalOnMissingBean
public CharacterEncodingFilter characterEncodingFilter() {...}
如果不想用这个字符编码器,就自己重写一个,ConditionalOnMissingBean使得该编码器不会被调用。
总结
-
SpringBoot先加载所有的自动配置类(命名规则:xxxxxAutoConfiguration)
-
每个自动配置类按照条件进行生效,默认都会绑定配置文件指定的值。(配置类命名规则:xxxxProperties)然而最终xxxxProperties和配置文件进行了绑定。
-
生效的配置类就会给容器中装配很多组件,只要容器中这些组件存在,相应的功能自然存在。
定制化配置方法
-
- 直接使用
@Bean,默认先用用户的配置。
- 直接使用
-
- 修改组件对应的配置文件相关的值(在
application.properties中可以直接修改)。
- 修改组件对应的配置文件相关的值(在
⭐️SpringBoot最佳实践
通过对SpringBoot底层自动配置的分析,更加能够理解SpringBoot的最佳实践方案。
-
引入场景依赖。
-
查看自动配置了哪些[选做]。
-
- 自己分析,引入场景对应的自动配置一般都生效了。
- 在配置文件中添加
debug=true开启自动配置报告。Negative(不生效)/Positive(生效)。
- 在配置文件中添加
- 自己分析,引入场景对应的自动配置一般都生效了。
-
需要修改配置时:
-
- 参照文档修改配置项,或自己分析xxxProperties绑定了配置文件的哪些属性。
-
- 自定义加入或者替换组件(
@Bean, @Component)
- 自定义加入或者替换组件(
-
- 自定义器
xxxCustomizer
- 自定义器
❗️SpringBoot开发技巧
Lombok
lombok可以简化JavaBean开发和日志开发。
<dependency>
    <groupId>org.projectlombok</groupId>
    <artifactId>lombok</artifactId>
</dependency>
@NoArgsConstructor //无参构造器
@AllArgsConstructor//全参构造器
@EqualsAndHashCode //重写equeals和hascode方法
@ToString //编译时生成toString方法
@Data     //编译时生成getter、setter
@Component //只有在容器中的组件,才会拥有SpringBoot提供的强大功能
@ConfigurationProperties(prefix = "mycar") //开启组件配置:application.properties中调用时的前缀
public class Car {
    private String brand;
    private Integer price;
}
上面的5个注解全都是lombok提供的,lombok还可以在控制层中直接调用日志打印输出,不用再往控制台打印东西了。
@Slf4j
@RestController
public class HelloController {
    @RequestMapping("/hello")
    public String handle01(@RequestParam("name") String name){

        log.info("请求进来了....");

        return "Hello, Spring Boot 2!"+"你好:"+name;
    }
}
dev-tools
添加该插件后,在web开发中按快捷键代码的改变就可以实时生效。


 8500
8500

 被折叠的 条评论
为什么被折叠?
被折叠的 条评论
为什么被折叠?
 到【灌水乐园】发言


