


引入布局
如果你用过 iPhone 应该会知道, 几乎每一个 iPhone应用的界面顶部都会有一个标题栏,
标题栏上会有一到两个按钮可用于返回或其他操作(iPhone 没有实体返回键) 。现在很多的
Android程序也都喜欢模仿 iPhone的风格,在界面的顶部放置一个标题栏。虽然 Android系
统已经给每个活动提供了标题栏功能,但这里我们仍然决定不使用它,而是创建一个自定义
的标题栏。
经过前面两节的学习,我想创建一个标题栏布局对你来说已经不是什么困难的事情了,
只需要加入两个 Button 和一个 TextView,然后在布局中摆放好就可以了。可是这样做却存
在着一个问题,一般我们的程序中可能有很多个活动都需要这样的标题栏,如果在每个活动
的布局中都编写一遍同样的标题栏代码,明显就会导致代码的大量重复。这个时候我们就可
以使用引入布局的方式来解决这个问题,新建一个布局 title.xml,代码如下所示:
<LinearLayout xmlns:android="http://schemas.android.com/apk/res/android"
android:layout_width="match_parent"
android:layout_height="wrap_content"
android:background="@drawable/title_bg" >
<Button
android:id="@+id/title_back"
android:layout_width="wrap_content"
android:layout_height="wrap_content"
android:layout_gravity="center"
android:layout_margin="5dip"
android:background="@drawable/back_bg"
android:text="Back"
android:textColor="#fff" />
<TextView
android:id="@+id/title_text"
android:layout_width="0dip"
android:layout_height="wrap_content"
android:layout_gravity="center"
android:layout_weight="1"
android:gravity="center"
android:text="Title Text"
android:textColor="#fff"
android:textSize="24sp" />
<Button
android:id="@+id/title_edit"
android:layout_width="wrap_content"
android:layout_height="wrap_content"
android:layout_gravity="center"
android:layout_margin="5dip"
android:background="@drawable/edit_bg"
android:text="Edit"
android:textColor="#fff" />
</LinearLayout>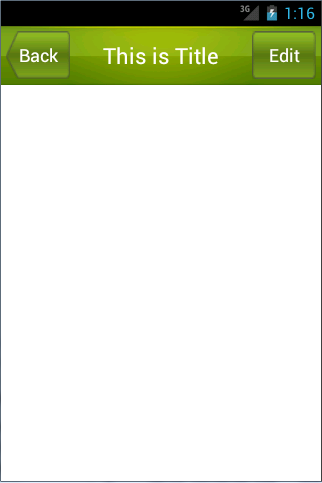
可以看到, 我们在LinearLayout中分别加入了两个Button和一个TextView, 左边的Button
可用于返回,右边的 Button 可用于编辑,中间的 TextView 则可以显示一段标题文本。上面
的代码中大多数的属性你都已经是见过的,下面我来说明一下几个之前没有讲过的属性。
android:background 用于为布局或控件指定一个背景,可以使用颜色或图片来进行填充,这
里我提前准备好了三张图片, title_bg.png、 back_bg.png和 edit_bg.png, 分别用于作为标题栏、
返回按钮和编辑按钮的背景。另外在两个 Button中我们都使用了 android:layout_margin这个属
性,它可以指定控件在上下左右方向上偏移的距离,当然也可以使用 android:layout_marginLeft
或 android:layout_marginTop 等属性来单独指定控件在某个方向上偏移的距离。
现在标题栏布局已经编写完成了,剩下的就是如何在程序中使用这个标题栏了,修改
activity_main.xml 中的代码,如下所示:
<LinearLayout xmlns:android="http://schemas.android.com/apk/res/android"
android:layout_width="match_parent"
android:layout_height="match_parent" >
<include layout="@layout/title" />
</LinearLayout>
�88�建自定义控件
引入布局的技巧确实解决了重复编写布局代码的问题, 但是如果布局中有一些控件要求
能够响应事件,我们还是需要在每个活动中为这些控件单独编写一次事件注册的代码。比如
说标题栏中的返回按钮,其实不管是在哪一个活动中,这个按钮的功能都是相同的,即销毁
掉当前活动。而如果在每一个活动中都需要重新注册一遍返回按钮的点击事件,无疑又是增
加了很多重复代码,这种情况最好是使用自定义控件的方式来解决。
新建 TitleLayout 继承自 LinearLayout,让它成为我们自定义的标题栏控件,代码如下
所示:
public class TitleLayout extends LinearLayout {
p
ublic TitleLayout(Context context, AttributeSet attrs) {
super(context, attrs);
LayoutInflater.from(context).inflate(R.layout.title, this);
}
}
首先我们重写了 LinearLayout 中的带有两个参数的构造函数,在布局中引入 TitleLayout
控件就会调用这个构造函数。然后在构造函数中需要对标题栏布局进行动态加载,这就要借
助 LayoutInflater 来实现了。通过 LayoutInflater 的 from()方法可以构建出一个 LayoutInflater
对象,然后调用 inflate()方法就可以动态加载一个布局文件,inflate()方法接收两个参数,第
一个参数是要加载的布局文件的 id,这里我们传入 R.layout.title,第二个参数是给加载好的
布局再添加一个父布局,这里我们想要指定为 TitleLayout,于是直接传入 this。
现在自定义控件已经创建好了,然后我们需要在布局文件中添加这个自定义控件,修改
activity_main.xml 中的代码,如下所示:
<LinearLayout xmlns:android="http://schemas.android.com/apk/res/android"
android:layout_width="match_parent"
android:layout_height="match_parent" >
<com.example.uicustomviews.TitleLayout
android:layout_width="match_parent"
android:layout_height="wrap_content"
></com.example.uicustomviews.TitleLayout>
</LinearLayout>
添加自定义控件和添加普通控件的方式基本是一样的, 只不过在添加自定义控件的时候
我们需要指明控件的完整类名,包名在这里是不可以省略的。
重新运行程序,你会发现此时效果和使用引入布局方式的效果是一样的。
然后我们来尝试为标题栏中的按钮注册点击事件,修改 TitleLayout中的代码,如下所示:
public class TitleLayout extends LinearLayout {
public TitleLayout(Context context, AttributeSet attrs) {
super(context, attrs);
LayoutInflater.from(context).inflate(R.layout.title, this);
Button titleBack = (Button) findViewById(R.id.title_back);
Button titleEdit = (Button) findViewById(R.id.title_edit);
titleBack.setOnClickListener(new OnClickListener() {
@Override
public void onClick(View v) {
((Activity) getContext()).finish();
}
});
titleEdit.setOnClickListener(new OnClickListener() {
@Override
public void onClick(View v) {
Toast.makeText(getContext(), "You clicked Edit button",
Toast.LENGTH_SHORT).show();
}
});
}
}
首先还是通过 findViewById()方法得到按钮的实例,然后分别调用 setOnClickListener()
方法给两个按钮注册了点击事件,当点击返回按钮时销毁掉当前的活动,当点击编辑按钮时
弹出一段文本。重新运行程序,点击一下编辑按钮,效果如图


 5887
5887

 被折叠的 条评论
为什么被折叠?
被折叠的 条评论
为什么被折叠?
 到【灌水乐园】发言


