


前言:
刚开始接触机器学习,遇到了很多的问题,也是在前人的博客的帮助下一步步学习起来的,所以写下本文,传递知识。
摘要:
本文主要实在ubuntu14.04下搭建caffe,并且运行py-faster-rcnn。用于目标检测。
一、caffe依赖的文件以及库。
caffe的安装方法具体步骤:https://gist.github.com/bearpaw/c38ef18ec45ba6548ec0(可能需要翻墙,所以在下文具体阐述)
1、安装需要的依赖包(缺什么补什么)
sudo apt-get install build-essential  # basic requirement
sudo apt-get install libprotobuf-dev libleveldb-dev libsnappy-dev libopencv-dev libboost-all-dev libhdf5-serial-dev libgflags-dev libgoogle-glog-dev liblmdb-dev protobuf-compiler #required by caffe
2、安装cuda7.5。
(安装之前确定自己的显卡支持的cuda版本)其中cuda 7.5的安装可以参
http://developer.download.nvidia.com/compute/cuda/7.5/Prod/docs/sidebar/CUDA_Installation_Guide_Linux.pdf
cuda7.5 下载地址:https://developer.nvidia.com/cuda-downloads
安装步骤:
$ sudo dpkg -i cuda-repo-<distro>_<version>_<architecture>.deb(.deb为你下载的版本)
$ sudo apt-get update
$ sudo apt-get install cuda
$ sudo reboot
3、安装cudnn
下载地址:https://pan.baidu.com/s/1ge8gjZl
安装:
$tar -zxvf cudnn-7.5-linux-x64-v5.0-ga.tgz
$cd cuda
$sudo cp lib/lib* /usr/local/cuda-7.5/lib64/
$sudo cp include/cudnn.h /usr/local/cuda-7.5/include/
接着执行
$cd /usr/local/cuda-7.5/lib64/
$sudo chmod +r libcudnn.so.5.0.5
$sudo ln -sf libcudnn.so.5.0.5 libcudnn.so.5
$sudo ln -sf libcudnn.so.5 libcudnn.so
$sudo ldconfig
4、环境变量设置(只有设置过环境变量配置才会起作用,需要的库才能找到)
4.1
$sudo gedit /etc/profile在打开的文件中添加:
PATH=/usr/local/cuda-7.5/bin:$PATH
LD_LIBRARY_PATH=/usr/local/cuda-7.5/lib64:$LD_LIBRARY_PATH
export PATH
export LD_LIBRARY_PATH
保存退出。
执行下列命令,使配置立刻生效
$ source /etc/profile
4.2 在 /etc/ld.so.conf.d/加入文件 cuda.conf, 内容如下
$ cd /etc/ld.so.conf.d/
$ gedit cuda.conf
在打开的文件中加入下列语句:
/usr/local/cuda-7.5/lib64
执行命令:
$ sudo ldconfig
faster-Rcnn 编译安装:
5、安装CUDA sample
5.1安装
进入/usr/local/cuda-7.5/samples, 执行下列命令来build samples
$ sudo make all -j4
(-j 多少取决于cpu几核)
等待结束。
5.2 测试
进入 /usr/local/cuda-7.5/samples/bin/x86_64/linux/release,执行:
$ ./deviceQuery
出现下列打印信息,则安装成功!
./deviceQuery Starting...

 CUDA Device Query (Runtime API) version (CUDART static linking)

Detected 1 CUDA Capable device(s)

Device 0: "GeForce GTX 745"
  CUDA Driver Version / Runtime Version          7.5 / 7.5
  CUDA Capability Major/Minor version number:    5.0
  Total amount of global memory:                 4093 MBytes (4291493888 bytes)
  ( 3) Multiprocessors, (128) CUDA Cores/MP:     384 CUDA Cores
  GPU Max Clock rate:                            1032 MHz (1.03 GHz)
  Memory Clock rate:                             900 Mhz
  Memory Bus Width:                              128-bit
  L2 Cache Size:                                 2097152 bytes
  Maximum Texture Dimension Size (x,y,z)         1D=(65536), 2D=(65536, 65536), 3D=(4096, 4096, 4096)
  Maximum Layered 1D Texture Size, (num) layers  1D=(16384), 2048 layers
  Maximum Layered 2D Texture Size, (num) layers  2D=(16384, 16384), 2048 layers
  Total amount of constant memory:               65536 bytes
  Total amount of shared memory per block:       49152 bytes
  Total number of registers available per block: 65536
  Warp size:                                     32
  Maximum number of threads per multiprocessor:  2048
  Maximum number of threads per block:           1024
  Max dimension size of a thread block (x,y,z): (1024, 1024, 64)
  Max dimension size of a grid size    (x,y,z): (2147483647, 65535, 65535)
  Maximum memory pitch:                          2147483647 bytes
  Texture alignment:                             512 bytes
  Concurrent copy and kernel execution:          Yes with 1 copy engine(s)
  Run time limit on kernels:                     Yes
  Integrated GPU sharing Host Memory:            No
  Support host page-locked memory mapping:       Yes
  Alignment requirement for Surfaces:            Yes
  Device has ECC support:                        Disabled
  Device supports Unified Addressing (UVA):      Yes
  Device PCI Domain ID / Bus ID / location ID:   0 / 1 / 0
  Compute Mode:
     < Default (multiple host threads can use ::cudaSetDevice() with device simultaneously) >

deviceQuery, CUDA Driver = CUDART, CUDA Driver Version = 7.5, CUDA Runtime Version = 7.5, NumDevs = 1, Device0 = GeForce GTX 745
Result = PASS
6、安装Atlas
`$ sudo apt-get install libatlas-base-dev `
7、安装opencv
我安装的是opencv3.1
安装方法详见:
UBUNTU14.04安装torch7 + opencv3.1
8、安装python依赖库
下载caffe,在caffe-master下执行:
$ for req in $(cat requirements.txt); do pip install $req; done
二、python-faster rcnn
1. Clone the Faster R-CNN repository
$ git clone --recursive https://github.com/rbgirshick/py-faster-rcnn.git
2. Build the Cython modules
 $ cd py-faster-rcnn/lib
 $ make
3. Build Caffe and pycaffe
$ cd py-faster-rcnn/caffe-fast-rcnn
 $ cp Makefile.config.example Makefile.config
修改 Makefile.config:如下
    ## Refer to http://caffe.berkeleyvision.org/installation.html
# Contributions simplifying and improving our build system are welcome!

# cuDNN acceleration switch (uncomment to build with cuDNN).
USE_CUDNN := 1 #使用cudnn

# CPU-only switch (uncomment to build without GPU support).
# CPU_ONLY := 1

# uncomment to disable IO dependencies and corresponding data layers
# USE_OPENCV := 0
# USE_LEVELDB := 0
# USE_LMDB := 0

# uncomment to allow MDB_NOLOCK when reading LMDB files (only if necessary)
#   You should not set this flag if you will be reading LMDBs with any
#   possibility of simultaneous read and write
# ALLOW_LMDB_NOLOCK := 1

# Uncomment if you're using OpenCV 3
OPENCV_VERSION := 3#安装的opencv版本

# To customize your choice of compiler, uncomment and set the following.
# N.B. the default for Linux is g++ and the default for OSX is clang++
# CUSTOM_CXX := g++

# CUDA directory contains bin/ and lib/ directories that we need.
CUDA_DIR := /usr/local/cuda-7.5 #安装的cuda的位置
# On Ubuntu 14.04, if cuda tools are installed via
# "sudo apt-get install nvidia-cuda-toolkit" then use this instead:
# CUDA_DIR := /usr

# CUDA architecture setting: going with all of them.
# For CUDA < 6.0, comment the *_50 lines for compatibility.
CUDA_ARCH := -gencode arch=compute_20,code=sm_20 \
        -gencode arch=compute_20,code=sm_21 \
        -gencode arch=compute_30,code=sm_30 \
        -gencode arch=compute_35,code=sm_35 \
        -gencode arch=compute_50,code=sm_50 \
        -gencode arch=compute_50,code=compute_50

# BLAS choice:
# atlas for ATLAS (default)
# mkl for MKL
# open for OpenBlas
BLAS := atlas
# Custom (MKL/ATLAS/OpenBLAS) include and lib directories.
# Leave commented to accept the defaults for your choice of BLAS
# (which should work)!
# BLAS_INCLUDE := /path/to/your/blas
# BLAS_LIB := /path/to/your/blas

# Homebrew puts openblas in a directory that is not on the standard search path
# BLAS_INCLUDE := $(shell brew --prefix openblas)/include
# BLAS_LIB := $(shell brew --prefix openblas)/lib

# This is required only if you will compile the matlab interface.
# MATLAB directory should contain the mex binary in /bin.
# MATLAB_DIR := /usr/local
# MATLAB_DIR := /Applications/MATLAB_R2012b.app

# NOTE: this is required only if you will compile the python interface.
# We need to be able to find Python.h and numpy/arrayobject.h.
 PYTHON_INCLUDE := /usr/include/python2.7 \
        /usr/lib/python2.7/dist-packages/numpy/core/include
# Anaconda Python distribution is quite popular. Include path:
# Verify anaconda location, sometimes it's in root.
# ANACONDA_HOME := $(HOME)/anaconda3
# PYTHON_INCLUDE := $(ANACONDA_HOME)/include \
         $(ANACONDA_HOME)/include/python3.5m \
         $(ANACONDA_HOME)/lib/python3.5/site-packages/numpy/core/include \

# Uncomment to use Python 3 (default is Python 2)
# PYTHON_LIBRARIES := boost_python3 python3.5m
# PYTHON_INCLUDE := /usr/include/python3.5m \
#                 /usr/lib/python3.5/dist-packages/numpy/core/include

# We need to be able to find libpythonX.X.so or .dylib.
 PYTHON_LIB := /usr/lib
# PYTHON_LIB := $(ANACONDA_HOME)/lib

# Homebrew installs numpy in a non standard path (keg only)
# PYTHON_INCLUDE += $(dir $(shell python -c 'import numpy.core; print(numpy.core.__file__)'))/include
# PYTHON_LIB += $(shell brew --prefix numpy)/lib

# Uncomment to support layers written in Python (will link against Python libs)
WITH_PYTHON_LAYER := 1 #需要python层

# Whatever else you find you need goes here.
INCLUDE_DIRS := $(PYTHON_INCLUDE) /usr/local/include
LIBRARY_DIRS := $(PYTHON_LIB) /usr/local/lib /usr/lib

# If Homebrew is installed at a non standard location (for example your home directory) and you use it for general dependencies
# INCLUDE_DIRS += $(shell brew --prefix)/include
# LIBRARY_DIRS += $(shell brew --prefix)/lib

# Uncomment to use `pkg-config` to specify OpenCV library paths.
# (Usually not necessary -- OpenCV libraries are normally installed in one of the above $LIBRARY_DIRS.)
# USE_PKG_CONFIG := 1

# N.B. both build and distribute dirs are cleared on `make clean`
BUILD_DIR := build
DISTRIBUTE_DIR := distribute

# Uncomment for debugging. Does not work on OSX due to https://github.com/BVLC/caffe/issues/171
# DEBUG := 1

# The ID of the GPU that 'make runtest' will use to run unit tests.
TEST_GPUID := 0

# enable pretty build (comment to see full commands)
Q ?= @
保存退出。
接着执行:
$ make all -j4
 $ make test
 $ make runtest
 $ make -j4 && make pycaffe
(-j 多少取决于cpu几核)
完成编译。
4 . Download pre-computed Faster R-CNN detectors
$ cd py-faster-rcnn
 $ ./data/scripts/fetch_faster_rcnn_models.sh
This will populate the $FRCN_ROOT/data folder with faster_rcnn_models. See data/README.md for details. These models were trained on VOC 2007 trainval.
5、Run demo
$ cd py-faster-rcnn
 $ ./tools/demo.py
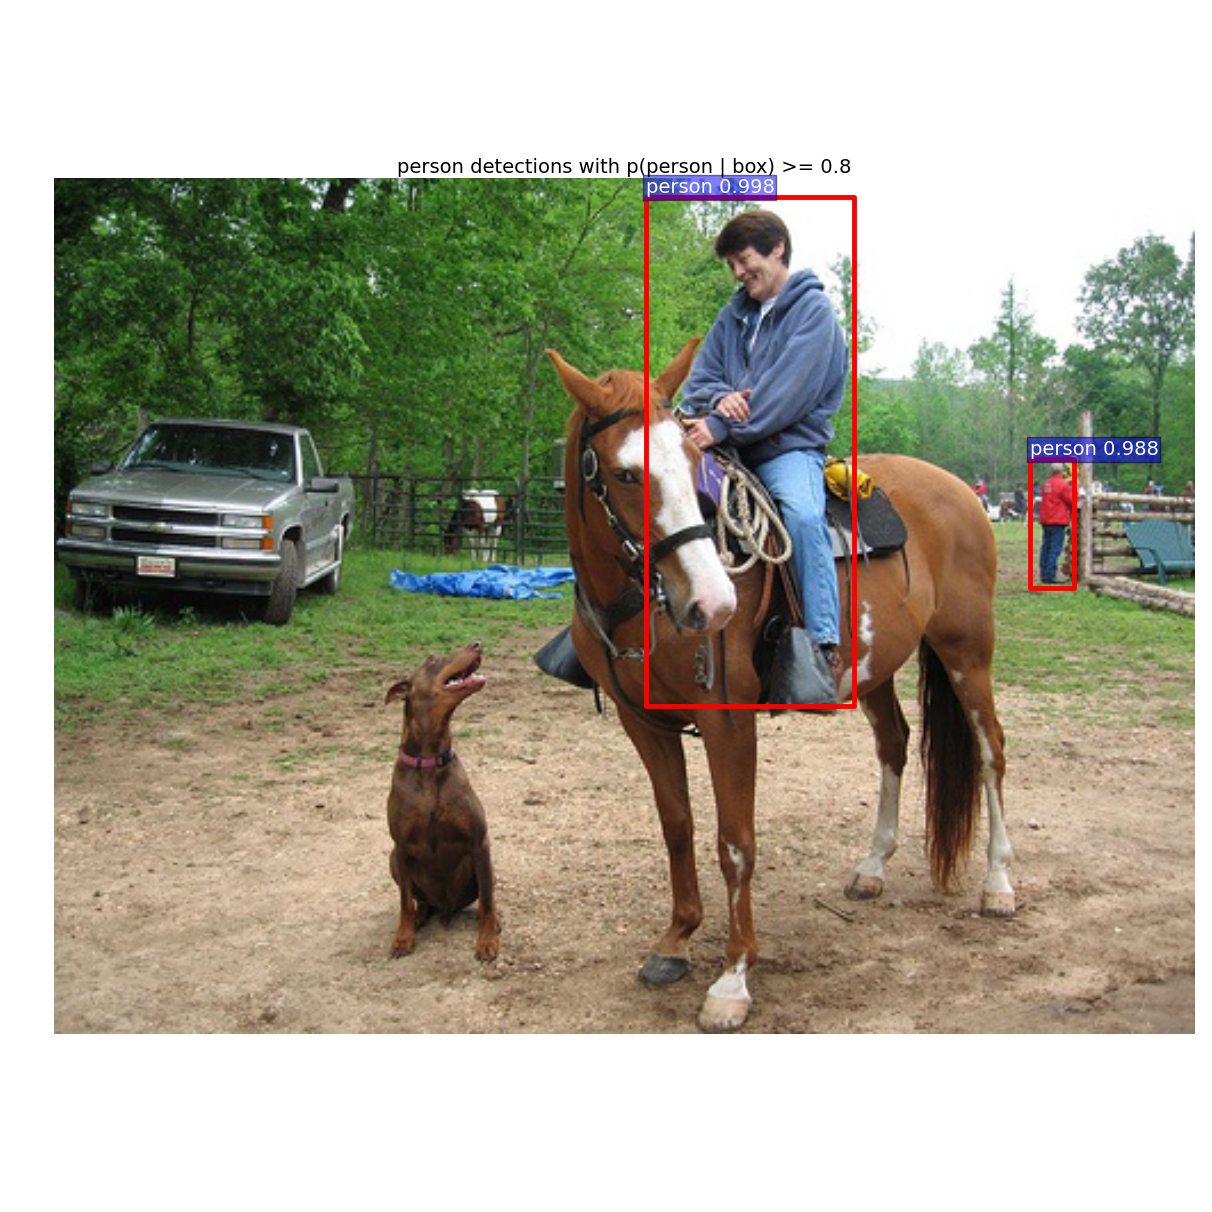
6、result:
三、可能遇到的问题。
错误1#:
这一步就按照上述的caffe安装步骤安装caffe,可能遇到错误 #1 cudnn error blabla。。。)
遇到CUDNN错误,可能是fasterrcnn不支持cudnn-V5的原因,解决办法:
$ cd caffe-fast-rcnn
 $ git remote add caffe https://github.com/BVLC/caffe.git
 $ git fetch caffe
 $ git merge caffe/master
merge 后删除 include/caffe/layers/python_layer.hpp 中的
self_.attr("phase") = static_cast<int>(this->phase_);
保存退出就可以继续编译了。
错误2#:
Can‘t make test !fatal errror :caffe/version_layers.hpp :NO such file or directory)
**# If you’re experienced with Caffe and have all of the requirements installed
# *and your Makefile.config in place, then simply do:***
解决办法:
修改src/caffe/test/test_smooth_L1_loss_layer.cpp,为test_smooth_L1_loss_layer.cpp.orig
安装caffe中可能遇到的问题:
错误3#:
2.make all 过程中可能遇到的问题:
a.boost_python3
[plain] view plain copy 在CODE上查看代码片派生到我的代码片
AR -o .build_release/lib/libcaffe.a
LD -o .build_release/lib/libcaffe.so.1.0.0-rc3
/usr/bin/ld: cannot find -lboost_python3
collect2: error: ld returned 1 exit status
Makefile:563: recipe for target ‘.build_release/lib/libcaffe.so.1.0.0-rc3’ failed
make: * [.build_release/lib/libcaffe.so.1.0.0-rc3] Error 1
解决办法:
$sudo ln -s /usr/lib/x86_64-linux-gnu/libboost_python-py34.so /usr/lib/x86_64-linux-gnu/libboost_python3.so
欢迎留言讨论!


 1376
1376

 被折叠的 条评论
为什么被折叠?
被折叠的 条评论
为什么被折叠?
 到【灌水乐园】发言


