


这篇文章主要介绍LBS检索功能及如何替换大头针图片及如何自定义弹出框,工程设置、定位功能请看
iOS百度开发笔记(一)
iOS百度开发笔记(二)
录入数据
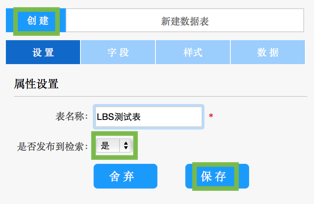
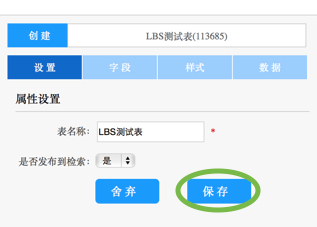
要使用LBS功能,首先要有自己的数据。进入LBS云管理后台,点击创建新建一张表,是否发布到检索选择是,保存。
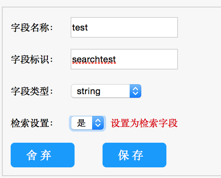
就进入到LBS测试表这张表中,选择字段,随意创建一个字段,这里把检索设置设置为“是”,保存。
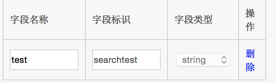
保存成功后在下面会显示出来。
样式就不设置了。
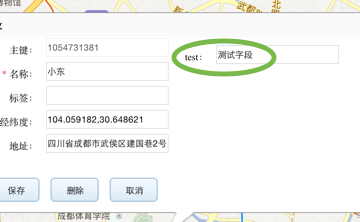
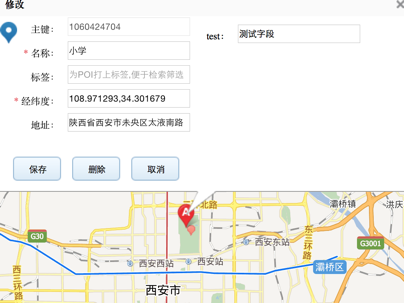
点数据,我找了接近半天,才发现这个数据要在右边的地图的右上角添加(……)

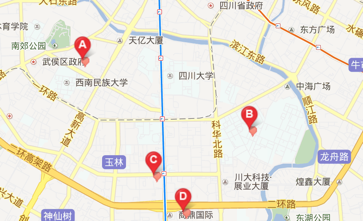
可以批量导入,这里我使用标注模式,把下面那个标记图点亮以后,在地图上标注。

添加标注,每一个标注的 test 字段都写上“测试字段”,这样后面用test字段搜索的时候,就可以把所有标注都搜出来。
在成都添加了四个,再到西安添加一个
添加后到设置里保存一下。
代码实现
来到工程里,在MapViewController.h中加入
#import <BaiduMapAPI/BMKCloudSearch.h>
#import <BaiduMapAPI/BMKPinAnnotationView.h>
#import <BaiduMapAPI/BMKPointAnnotation.h>
同时加上BMKCloudSearchDelegate。
在.mm里加上公有的
BMKCloudSearch* _search;在 viewdidload 中加上
//适配ios7
    if( ([[[UIDevice currentDevice] systemVersion] doubleValue]>=7.0))
    {
//        self.edgesForExtendedLayout=UIRectEdgeNone;
        self.navigationController.navigationBar.translucent = NO;
    }
和
//初始化云检索服务
    _search = [[BMKCloudSearch alloc]init];
    // 设置地图级别
    [_mapView setZoomLevel:13];
    _mapView.isSelectedAnnotationViewFront = YES;
再添加方法
//发起本地云检索
-(IBAction)onClickLocalSearch
{
    BMKCloudLocalSearchInfo *cloudLocalSearch = [[BMKCloudLocalSearchInfo alloc]init];
    cloudLocalSearch.ak = @“服务端 ak";
    cloudLocalSearch.geoTableId = 113685;
    cloudLocalSearch.pageIndex = 0;
    cloudLocalSearch.pageSize = 10;
    cloudLocalSearch.region = @"test";
    cloudLocalSearch.keyword = @"测试字段";
    BOOL flag = [_search localSearchWithSearchInfo:cloudLocalSearch];
    if(flag)
    {
        NSLog(@"本地云检索发送成功");
    }
    else
    {
        NSLog(@"本地云检索发送失败");
    }
}
注意这里的loudLocalSearch.ak与之前填写的iOS ak不是一个,记得我在iOS百度开发笔记(一)的开头申请的两个ak吗?这个就是当时申请的服务端 ak。
然后cloudLocalSearch.geoTableId指的是:
cloudLocalSearch.geoTableId
就在LBS管理后台,建立的表旁边。
cloudLocalSearch.region和cloudLocalSearch.keyword分别填入之前添加的字段(test)和录入数据时输入的字段的值(测试字段)。
在 viewdidload 中加上
[self onClickLocalSearch];
再添加方法:
#pragma mark -
#pragma mark implement BMKMapViewDelegate

/**
 *根据anntation生成对应的View
 *@param mapView 地图View
 *@param annotation 指定的标注
 *@return 生成的标注View
 */
- (BMKAnnotationView *)mapView:(BMKMapView *)view viewForAnnotation:(id <BMKAnnotation>)annotation
{
    // 生成重用标示identifier
    NSString *AnnotationViewID = @"xidanMark";

    // 检查是否有重用的缓存
    BMKAnnotationView* annotationView = [view dequeueReusableAnnotationViewWithIdentifier:AnnotationViewID];

    // 缓存没有命中,自己构造一个,一般首次添加annotation代码会运行到此处
    if (annotationView == nil) {
        annotationView = [[BMKPinAnnotationView alloc] initWithAnnotation:annotation reuseIdentifier:AnnotationViewID];
        ((BMKPinAnnotationView*)annotationView).pinColor = BMKPinAnnotationColorRed;
        // 设置重天上掉下的效果(annotation)
        ((BMKPinAnnotationView*)annotationView).animatesDrop = YES;
    }

    // 设置位置
    annotationView.centerOffset = CGPointMake(0, -(annotationView.frame.size.height * 0.5));
    annotationView.annotation = annotation;
    // 单击弹出泡泡,弹出泡泡前提annotation必须实现title属性
    annotationView.canShowCallout = YES;
    // 设置是否可以拖拽
    annotationView.draggable = NO;

    return annotationView;
}
- (void)mapView:(BMKMapView *)mapView didSelectAnnotationView:(BMKAnnotationView *)view
{
    [mapView bringSubviewToFront:view];
    [mapView setNeedsDisplay];
}
- (void)mapView:(BMKMapView *)mapView didAddAnnotationViews:(NSArray *)views
{
    NSLog(@"didAddAnnotationViews");
}

#pragma mark -
#pragma mark implement BMKSearchDelegate

- (void)onGetCloudPoiResult:(NSArray*)poiResultList searchType:(int)type errorCode:(int)error
{
    // 清楚屏幕中所有的annotation
    NSArray* array = [NSArray arrayWithArray:_mapView.annotations];
    [_mapView removeAnnotations:array];

    if (error == BMKErrorOk) {
        BMKCloudPOIList* result = [poiResultList objectAtIndex:0];
        for (int i = 0; i < result.POIs.count; i++) {
            BMKCloudPOIInfo* poi = [result.POIs objectAtIndex:i];
            //自定义字段
            if(poi.customDict!=nil&&poi.customDict.count>1)
            {
                NSString* customStringField = [poi.customDict objectForKey:@"custom"];
                NSLog(@"customFieldOutput=%@",customStringField);
                NSNumber* customDoubleField = [poi.customDict objectForKey:@"double"];
                NSLog(@"customDoubleFieldOutput=%f",customDoubleField.doubleValue);

            }

            BMKPointAnnotation* item = [[BMKPointAnnotation alloc]init];
            CLLocationCoordinate2D pt = (CLLocationCoordinate2D){ poi.longitude,poi.latitude};
            item.coordinate = pt;
            item.title = poi.title;
            [_mapView addAnnotation:item];
            if(i == 0)
            {
                //将第一个点的坐标移到屏幕中央
                _mapView.centerCoordinate = pt;
            }
        }
    } else {
        NSLog(@"error ==%d",error);
    }
}
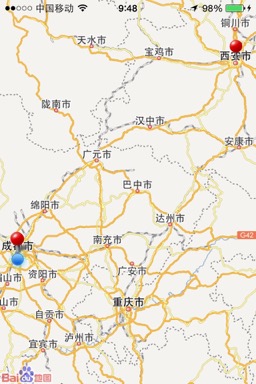
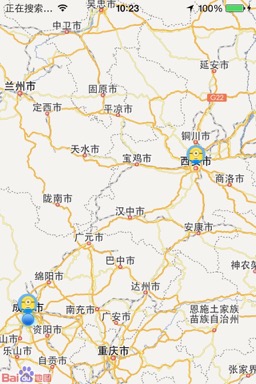
运行,结果:

可以看见四个点点,滑到西安,添加在这里的点点也在。
直到这一步的demo可以在这里下载。
使用时注意:
1.bundle id的填写要与申请key时填写的安全码一致。
2.要把自己的iOS ak填进AppDelegate.m中。
3.要把服务端 ak填进MapViewController.h中。
替换大头针图片
那么接下来就替换坐标点点的图片,并且为弹出框添加图片。
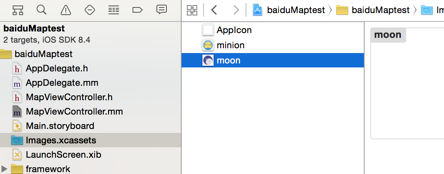
先到 images.xcassets里添加一张图片

找到
- (BMKAnnotationView *)mapView:(BMKMapView *)view viewForAnnotation:(id <BMKAnnotation>)annotation
{}
,在return annotationView;之前加入:
((BMKPinAnnotationView*)annotationView).pinColor = BMKPinAnnotationColorPurple;

// 设置该标注点动画显示
((BMKPinAnnotationView*)annotationView).animatesDrop = YES;

annotationView.annotation=annotation;
//替换图片
annotationView.image = [UIImage imageNamed:@"minion"];
运行结果:
有点儿吓人,到 images.xcassets里改变图片大小(24*24,48*48,72*72),运行:
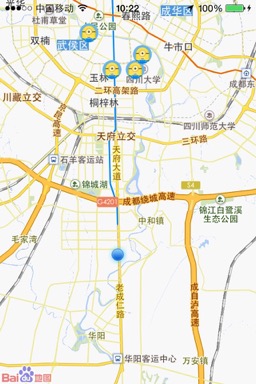
西安的小伙伴也在:
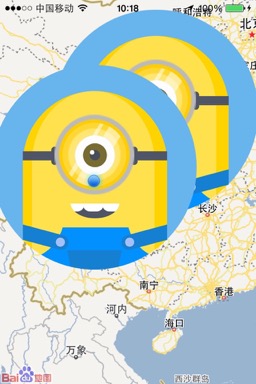
自定义弹出框样式
在 images.xcassets里再加入一张图片,作为弹出框里的图片(40*40,80*80,120*120)
找到
- (BMKAnnotationView *)mapView:(BMKMapView *)view viewForAnnotation:(id <BMKAnnotation>)annotation
{}
,在return annotationView;之前加入:
    UIView *popView = [[UIView alloc]initWithFrame:CGRectMake(0, 0, 100, 60)];
    //设置弹出气泡图片
    UIImageView *imageV = [[UIImageView alloc]initWithImage:[UIImage imageNamed:@"moon"]];
    imageV.frame = CGRectMake(0, 0, 60, 60);
    [popView addSubview:imageV];
    //自定义显示的内容
    UILabel *driverName = [[UILabel alloc]initWithFrame:CGRectMake(63, 3, 100, 20)];
    driverName.text = @"测试字段一";
    driverName.backgroundColor = [UIColor clearColor];
    driverName.font = [UIFont systemFontOfSize:14];
    driverName.textColor = [UIColor blackColor];
    driverName.textAlignment = NSTextAlignmentCenter;
    [popView addSubview:driverName];

    UILabel *carName = [[UILabel alloc]initWithFrame:CGRectMake(63, 30, 100, 20)];
    carName.text = @"测试字段二";
    carName.backgroundColor = [UIColor clearColor];
    carName.font = [UIFont systemFontOfSize:14];
    carName.textColor = [UIColor blackColor];
    carName.textAlignment = NSTextAlignmentCenter;

    [popView addSubview:carName];
    BMKActionPaopaoView *pView = [[BMKActionPaopaoView alloc]initWithCustomView:popView];
    pView.frame = CGRectMake(0, 0, 160, 60);
    pView.backgroundColor = [UIColor colorWithWhite:0.9 alpha:0.9];

    ((BMKPinAnnotationView*)annotationView).paopaoView = nil;
    ((BMKPinAnnotationView*)annotationView).paopaoView = pView;
运行结果:

demo在这里下载
使用时注意:
1.bundle id的填写要与申请key时填写的安全码一致。
2.要把自己的iOS ak填进AppDelegate.m中。
3.要把服务端 ak填进MapViewController.h中。


 1545
1545


 被折叠的 条评论
为什么被折叠?
被折叠的 条评论
为什么被折叠?
 到【灌水乐园】发言


