


首先我们看一下@Aspect的简单实例代码
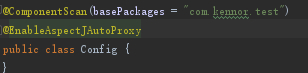
首先到Config类中添加@EnableAspectJAutoProxy注解打开AOP功能
@ComponentScan(basePackages = "com.kennor.test")
@EnableAspectJAutoProxy
public class Config {
}
自定义注解StudyTrainAnnotation用于标识连接点Joinpoint
@Retention(RetentionPolicy.RUNTIME)
@Target(ElementType.METHOD)
public @interface StudyTrainAnnotation {
}
自定义切面StudyTrainAspect类
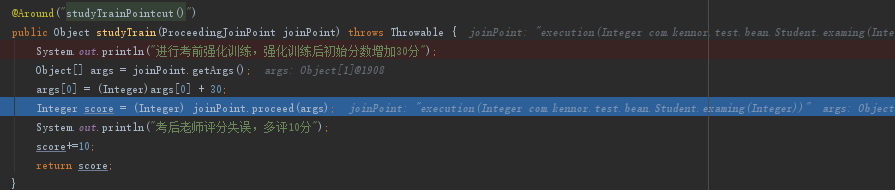
在切面方法studyTrain中对目标方法进行增强,具体业务逻辑是增加分数。
@Component
@Aspect
public class StudyTrainAspect {
   /**
    * 设置切点Pointcut
    */
   @Pointcut("@annotation(StudyTrainAnnotation)")
   public void studyTrainPointcut(){
   }
   /**
    * 设置增强方法Advice
    * @param joinPoint
    * @return
    */
   @Around("studyTrainPointcut()")
   public Object studyTrain(ProceedingJoinPoint joinPoint) throws Throwable {
      System.out.println("进行考前强化训练,强化训练后初始分数增加30分");
      Object[] args = joinPoint.getArgs();
      args[0] = (Integer)args[0] + 30;
      Integer score = (Integer) joinPoint.proceed(args);
      System.out.println("考后老师评分失误,多评10分");
      score+=10;
      return score;
   }
}
增加Student接口
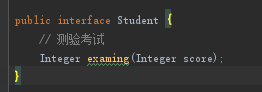
在StudentA和StudentB实现Student接口
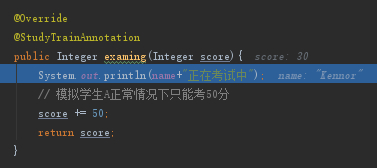
在StudentA的examing方法中增加@StudyTrainAnnotation注解,标识StudentA的examing是需要增强的目标对象Target。


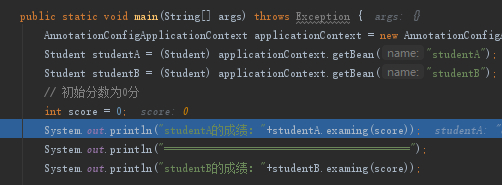
然后调用
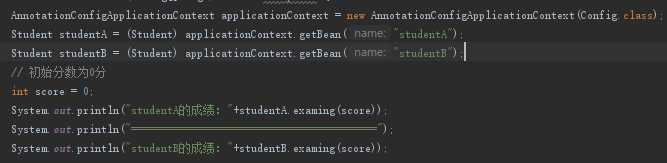
运行结果如下:
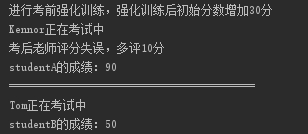
可以看到StudentA考试成绩增加到了90分,而StudentB没有使用AOP所以仍是50分。
为了做对比,看一下StudentB和StudentA的区别

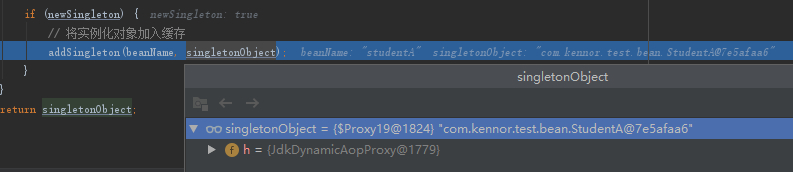
通过Debug可以看到,StudentA的引用实际上是代理对象,然后代理对象的targetSource属性保存着StudentA。接下来我们将分析一下整个流程到底是怎么样的。
接下来我们就着这个实例,分析一下源码,看看Spring底层源码是如何实现的。
首先我们看到Config类上的@EnableAspectJAutoProxy注解
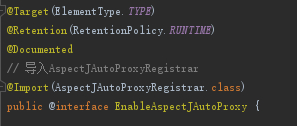
可以看到EnableAspectJAutoProxy使用了@Import标签导入了AspectJAutoProxyRegistrar类
而关于@Import标签的处理在AnnotationConfigApplicationContext的构造方法中创建的ConfigurationClassPostProcessor中进行的,跟处理@ComponentScan注解一样,具体看下面方法注释的第4点,会将AspectJAutoProxyRegistrar注册到Spring中,这里不再赘述。
@Nullable
protected final SourceClass doProcessConfigurationClass(ConfigurationClass configClass, SourceClass sourceClass)
      throws IOException {
   // 1.处理类上的@Component注解
   if (configClass.getMetadata().isAnnotated(Component.class.getName())) {
      // Recursively process any member (nested) classes first
      processMemberClasses(configClass, sourceClass);
   }
   // Process any @PropertySource annotations
   // 2.处理类上的@PropertySource注解
   for (AnnotationAttributes propertySource : AnnotationConfigUtils.attributesForRepeatable(
         sourceClass.getMetadata(), PropertySources.class,
         org.springframework.context.annotation.PropertySource.class)) {
      if (this.environment instanceof ConfigurableEnvironment) {
         processPropertySource(propertySource);
      }
      ... ...
   }
   // Process any @ComponentScan annotations
   // 3.处理类上的@ComponentScan注解
   Set<AnnotationAttributes> componentScans = AnnotationConfigUtils.attributesForRepeatable(
         sourceClass.getMetadata(), ComponentScans.class, ComponentScan.class);
   if (!componentScans.isEmpty() &&
         !this.conditionEvaluator.shouldSkip(sourceClass.getMetadata(), ConfigurationPhase.REGISTER_BEAN)) {
      ... ...
   }
   // Process any @Import annotations
   // 4.处理@Import注解
   processImports(configClass, sourceClass, getImports(sourceClass), true);
   // Process any @ImportResource annotations
   // 5.处理@ImportResource注解
   AnnotationAttributes importResource =
         AnnotationConfigUtils.attributesFor(sourceClass.getMetadata(), ImportResource.class);
   if (importResource != null) {
      ... ...
   }
   // Process individual @Bean methods
   // 6.处理@Bean注解
   Set<MethodMetadata> beanMethods = retrieveBeanMethodMetadata(sourceClass);
   for (MethodMetadata methodMetadata : beanMethods) {
      configClass.addBeanMethod(new BeanMethod(methodMetadata, configClass));
   }
   ... ...
   return null;
}
接着我们看一下AspectJAutoProxyRegistrar

可以看到AspectJAutoProxyRegistrar实现了ImportBeanDefinitionRegistrar接口,所以registerBeanDefinitions方法会在ApplicationContext的refresh方法中的invokeBeanFactoryPostProcessors里被调用。

在AspectJAutoProxyRegistrar的registerBeanDefinitions方法中主要是往Spring注册了AnnotationAwareAspectJAutoProxyCreator
// AOP的处理入口
// 注册AnnotationAwareAspectJAutoProxyCreator,主要用于处理@AspectJ注解
AopConfigUtils.registerAspectJAnnotationAutoProxyCreatorIfNecessary(registry);


可以看到最终AnnotationAwareAspectJAutoProxyCreator被封装到BeanDefinition注册到Spring中。
而在AnnotationAwareAspectJAutoProxyCreator所继承的父类AbstractAutoProxyCreator实现了SmartInstantiationAwareBeanPostProcessor接口

其中实现了一个很重要的方法:postProcessAfterInitialization,这里会创建返回Bean对应的代理对象。

通过方法的名称我们也可以知道postProcessAfterInitialization会在Bean初始化完成后调用,这是我们回到Bean的创建方法doCreateBean中,我们在之前的文章有提过此方法中的第5点注释处的方法就是处理生成代理对象的。
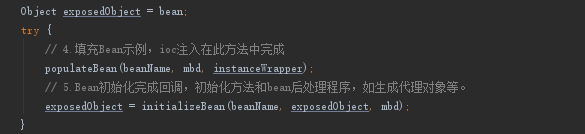
接着我们继续看一下initializeBean的具体源码
protected Object initializeBean(String beanName, Object bean, @Nullable RootBeanDefinition mbd) {
   ... ...

   Object wrappedBean = bean;
   if (mbd == null || !mbd.isSynthetic()) {
      // 1.调用BeanPostProcessor实现类的postProcessBeforeInitialization方法
      wrappedBean = applyBeanPostProcessorsBeforeInitialization(wrappedBean, beanName);
   }

   try {
      // 2.调用InitializingBean的afterPropertiesSet方法
      invokeInitMethods(beanName, wrappedBean, mbd);
   }
   ... ...
   if (mbd == null || !mbd.isSynthetic()) {
      // 3.调用BeanPostProcessor实现类的postProcessBeforeInitialization方法
      // 如果配置了代理,则AbstractAutoProxyCreator会在此处调用,生成代理对象
      wrappedBean = applyBeanPostProcessorsAfterInitialization(wrappedBean, beanName);
   }

   return wrappedBean;
}
我们可以看到注释第3点处的applyBeanPostProcessorsAfterInitialization方法

最终调用到我们一开始所介绍的AnnotationAwareAspectJAutoProxyCreator父类AbstractAutoProxyCreator的postProcessAfterInitialization方法中

可以看到核心流程在wrapIfNecessary里,具体源码如下:
protected Object wrapIfNecessary(Object bean, String beanName, Object cacheKey) {
   if (StringUtils.hasLength(beanName) && this.targetSourcedBeans.contains(beanName)) {
      return bean;
   }
   // 判断当前bean的切面标识
   if (Boolean.FALSE.equals(this.advisedBeans.get(cacheKey))) {
      return bean;
   }
   if (isInfrastructureClass(bean.getClass()) || shouldSkip(bean.getClass(), beanName)) {
      this.advisedBeans.put(cacheKey, Boolean.FALSE);
      return bean;
   }

   // Create proxy if we have advice.
   // 1.根据当前beanMame对应的bean去扫描匹配bean类中的方法是否有符合Pointcut规则(@Pointcut)的切面方法(@Around、@Before、@After...)
   Object[] specificInterceptors = getAdvicesAndAdvisorsForBean(bean.getClass(), beanName, null);
   if (specificInterceptors != DO_NOT_PROXY) {
      // 将当前Bean标识为有切面方法
      this.advisedBeans.put(cacheKey, Boolean.TRUE);
      // 2.创建代理对象
      Object proxy = createProxy(
            bean.getClass(), beanName, specificInterceptors, new SingletonTargetSource(bean));
      this.proxyTypes.put(cacheKey, proxy.getClass());
      return proxy;
   }

   // 将当前Bean标识为无切面方法
   this.advisedBeans.put(cacheKey, Boolean.FALSE);
   return bean;
}
首先我们看wrapIfNecessary方法中注释第1点处的getAdvicesAndAdvisorsForBean方法的具体代码


继续看findEligibleAdvisors的具体是如何获取Advisor

这里我们继续看一下aspectJAdvisorsBuilder的buildAspectJAdvisors方法
public List<Advisor> buildAspectJAdvisors() {
   List<String> aspectNames = this.aspectBeanNames;

   if (aspectNames == null) {
      synchronized (this) {
         aspectNames = this.aspectBeanNames;
         if (aspectNames == null) {
            List<Advisor> advisors = new ArrayList<>();
            aspectNames = new ArrayList<>();
            // 获取容器中所有的beanName
            String[] beanNames = BeanFactoryUtils.beanNamesForTypeIncludingAncestors(
                  this.beanFactory, Object.class, true, false);
            for (String beanName : beanNames) {
               if (!isEligibleBean(beanName)) {
                  continue;
               }
               // We must be careful not to instantiate beans eagerly as in this case they
               // would be cached by the Spring container but would not have been weaved.
               // 获取Class对象
               Class<?> beanType = this.beanFactory.getType(beanName);
               if (beanType == null) {
                  continue;
               }
               // 1.判断类上是否有@Aspect注解
               if (this.advisorFactory.isAspect(beanType)) {
                  aspectNames.add(beanName);
                  // 解析封装@Aspect注解信息
                   AspectMetadata amd = new AspectMetadata(beanType, beanName);
                  if (amd.getAjType().getPerClause().getKind() == PerClauseKind.SINGLETON) {
                     MetadataAwareAspectInstanceFactory factory =
                           new BeanFactoryAspectInstanceFactory(this.beanFactory, beanName);
                     // 2.获取所有切面方法封装类Advisor集合
                     List<Advisor> classAdvisors = this.advisorFactory.getAdvisors(factory);
                     if (this.beanFactory.isSingleton(beanName)) {
                        this.advisorsCache.put(beanName, classAdvisors);
                     }
                     else {
                        this.aspectFactoryCache.put(beanName, factory);
                     }
                     // 3.将Advisor添加到列表中
                     advisors.addAll(classAdvisors);
                  }
                  else {
                     // Per target or per this.
                     if (this.beanFactory.isSingleton(beanName)) {
                        throw new IllegalArgumentException("Bean with name '" + beanName +
                              "' is a singleton, but aspect instantiation model is not singleton");
                     }
                     MetadataAwareAspectInstanceFactory factory =
                           new PrototypeAspectInstanceFactory(this.beanFactory, beanName);
                     this.aspectFactoryCache.put(beanName, factory);
                     advisors.addAll(this.advisorFactory.getAdvisors(factory));
                  }
               }
            }
            this.aspectBeanNames = aspectNames;
            // 4.返回Advisor列表
            return advisors;
         }
      }
   }
   ... ...
   return advisors;
}
此时我们示例代码中的StudyTrainAspect会通过buildAspectJAdvisors()注释1处的判断,走到注释2处的方法里面。
@Override
public List<Advisor> getAdvisors(MetadataAwareAspectInstanceFactory aspectInstanceFactory) {
   Class<?> aspectClass = aspectInstanceFactory.getAspectMetadata().getAspectClass();
   String aspectName = aspectInstanceFactory.getAspectMetadata().getAspectName();
   validate(aspectClass);

   // We need to wrap the MetadataAwareAspectInstanceFactory with a decorator
   // so that it will only instantiate once.
   MetadataAwareAspectInstanceFactory lazySingletonAspectInstanceFactory =
         new LazySingletonAspectInstanceFactoryDecorator(aspectInstanceFactory);

   List<Advisor> advisors = new ArrayList<>();
   // 1. getAdvisorMethods返回没有@Pointcut注解的方法集合
   for (Method method : getAdvisorMethods(aspectClass)) {
      // 2. 创建Advisor
      Advisor advisor = getAdvisor(method, lazySingletonAspectInstanceFactory, advisors.size(), aspectName);
      if (advisor != null) {
         advisors.add(advisor);
      }
   }
   ... ...
   return advisors;
}
首先我们getAdvisors()注释1处getAdvisorMethods方法

getAdvisorMethods获取到没有@Pointcut的方法,所以method列表中会记录到示例代码StudyTrainAspect的studyTrain方法
接着我们返回getAdvisors()注释2处。

getPointcut方法会去解析studyTrain上的@Around注解的信息。


@Nullable
public static <A extends Annotation> A findAnnotation(Method method, @Nullable Class<A> annotationType) {
   Assert.notNull(method, "Method must not be null");
   if (annotationType == null) {
      return null;
   }
   AnnotationCacheKey cacheKey = new AnnotationCacheKey(method, annotationType);
   A result = (A) findAnnotationCache.get(cacheKey);

   if (result == null) {
      Method resolvedMethod = BridgeMethodResolver.findBridgedMethod(method);
      // 从当前方法上寻找annotationType类型的注解信息
      result = findAnnotation((AnnotatedElement) resolvedMethod, annotationType);
      if (result == null) {
         // 从当前类实现的接口中寻找annotationType类型的注解
         result = searchOnInterfaces(method, annotationType, method.getDeclaringClass().getInterfaces());
      }
      // 从父类中寻找annotationType类型的注解信息
      Class<?> clazz = method.getDeclaringClass();
      while (result == null) {
         ... ...
      }

      ... ...
   }

   return result;
}
最后可以看到注释2处将信息封装到AspectJAnnotation中返回到getPointcut方法中,此时getPointcut注释1处获取到的aspectJAnnotation对象如下:

最后再到注释2处创建AspectJExpressionPointcut返回出去。

可以看到AspectJExpressionPointcut保存着示例代码StudyTrainAspect的studyTrain方法@Around注解的pointcut表达式:studyTrainPointcut()。
接着我们看回到getAdvisor方法的注释2处

通过入参我们可以发现这里的InstantiationModelAwarePointcutAdvisorImpl装了示例代码pointcut表达式(studyTrainPointcut())和Advice增强方法(studyTrain())等信息。
接着我们看一下InstantiationModelAwarePointcutAdvisorImpl类


可以看到这个类最终实现了Advisor接口,而且类中有几个重要的属性,我们看一下在构造方法中instantiatedAdvice属性是如何赋值的。


getAdvice具体代码如下
@Override
@Nullable
public Advice getAdvice(Method candidateAdviceMethod, AspectJExpressionPointcut expressionPointcut,
      MetadataAwareAspectInstanceFactory aspectInstanceFactory, int declarationOrder, String aspectName) {

   Class<?> candidateAspectClass = aspectInstanceFactory.getAspectMetadata().getAspectClass();
   validate(candidateAspectClass);

   // 获取Method方法上的注解
   AspectJAnnotation<?> aspectJAnnotation =
         AbstractAspectJAdvisorFactory.findAspectJAnnotationOnMethod(candidateAdviceMethod);
   if (aspectJAnnotation == null) {
      return null;
   }
   ... ...
   AbstractAspectJAdvice springAdvice;

   switch (aspectJAnnotation.getAnnotationType()) {
      case AtPointcut:
          // 忽略@Pointcut注解
         return null;
      case AtAround:
         // 封装@Around注解
         // AspectJAroundAdvice实现了MethodInterceptor接口
         springAdvice = new AspectJAroundAdvice(
               candidateAdviceMethod, expressionPointcut, aspectInstanceFactory);
         break;
      case AtBefore:
         // 封装@Before注解
         // AspectJMethodBeforeAdvice实现了MethodBeforeAdvice接口
         springAdvice = new AspectJMethodBeforeAdvice(
               candidateAdviceMethod, expressionPointcut, aspectInstanceFactory);
         break;
      case AtAfter:
         // 封装@After注解
         // AspectJAfterAdvice实现了MethodInterceptor接口
         springAdvice = new AspectJAfterAdvice(
               candidateAdviceMethod, expressionPointcut, aspectInstanceFactory);
         break;
      case AtAfterReturning:
         // 封装@afterReturning注解
         // AspectJAfterReturningAdvice实现了AfterReturningAdvice接口
         springAdvice = new AspectJAfterReturningAdvice(
               candidateAdviceMethod, expressionPointcut, aspectInstanceFactory);
         AfterReturning afterReturningAnnotation = (AfterReturning) aspectJAnnotation.getAnnotation();
         if (StringUtils.hasText(afterReturningAnnotation.returning())) {
            springAdvice.setReturningName(afterReturningAnnotation.returning());
         }
         break;
      case AtAfterThrowing:
         // 封装@afterThrowing注解
         // AspectJAfterThrowingAdvice实现了MethodInterceptor接口
         springAdvice = new AspectJAfterThrowingAdvice(
               candidateAdviceMethod, expressionPointcut, aspectInstanceFactory);
         AfterThrowing afterThrowingAnnotation = (AfterThrowing) aspectJAnnotation.getAnnotation();
         if (StringUtils.hasText(afterThrowingAnnotation.throwing())) {
            springAdvice.setThrowingName(afterThrowingAnnotation.throwing());
         }
         break;
      default:
         throw new UnsupportedOperationException(
               "Unsupported advice type on method: " + candidateAdviceMethod);
   }

   // Now to configure the advice...
   springAdvice.setAspectName(aspectName);
   springAdvice.setDeclarationOrder(declarationOrder);
   String[] argNames = this.parameterNameDiscoverer.getParameterNames(candidateAdviceMethod);
   if (argNames != null) {
      springAdvice.setArgumentNamesFromStringArray(argNames);
   }
   springAdvice.calculateArgumentBindings();

   return springAdvice;
}
可以看到在getAdvice方法中根据注解封装成对应的Advice,其中封装Around注解和After注解的Advice实现了MethodInterceptor接口,而封装After注解的Before实现的是MethodBeforeAdvice接口。
所以在我们示例代码中StudyTrainAspect中的带有@Around注解的studyTrain方法会被封装成AspectJAroundAdvice对象

接着getAdvisor方法将Advisor返回到buildAspectJAdvisors中,buildAspectJAdvisors再将Advisor保存到列表里继续获取其他Advisor,最后将Advisor列表返回到findEligibleAdvisors。

接着我们继续看findEligibleAdvisors注释第2点处,看看Bean和Advisor是如何匹配,在我们示例代码就是StudentA的examing方法与StudyTrainAspect的studyTrain的匹配过程。

findEligibleAdvisors这块的匹配比较复杂,我们跟着断点大概看一下


上面这个方法中的FuzzyBoolean类会记录匹配结果


这里通过hasAnnotation判断examing方法是否包含StudyTraninAnnotation注解,由于examing是有添加@StudyTraninAnnotation注解的,所以会返回YES


然后将match封装到ShadowMatchImpl中返回出去


最后通过匹配,把Advisor添加到eligibleAdvisors中返回出去
接着回到findEligibleAdvisors方法中

此时就将StudentA匹配到的Advisor返回出去

接着就回到了一开始的wrapIfNecessary中

我们接下来将用注释1处获取到的Advisor用于注释2处创建StudentA的代理对象。

在createProxy方法中可以看到创建了代理工厂proxyFacotry,并且将Advisor添加到代理工厂中,然后通过proxyFacotry获取代理对象。
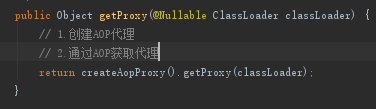
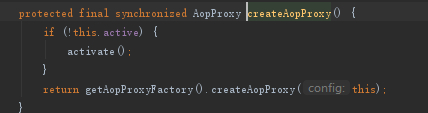
我们先看一下getProxy中的注释1处创建AOP代理

由于我们的StudentA实现了Student接口,所以采用JDK代理模式,因此会创建一个JDKDynamicAopProxy代理对象返回
而JDKDynamicAopProxy实现了动态代理的关键接口InvocationHandler,因此StudentA代理对象调用接口中的examing方法的时候会调用回此类的invoke方法中,这个我们在后面介绍。
接着我们先回到getProxy方法中的注释第2处,看看getProxy方法

选择JDKDynamicAopProxy对象

 可以看到需要代理的接口中就包含了Student接口,接着继续往下走到Proxy.newProxyInstance方法中,接下来就是我们熟悉的动态代理相关的代码了


最后生成动态代理类返回到一开始提到的wrapIfNecessary方法中。


最后返回到doCreateBean方法中,此时exposedObject持有着StudentA的代理对象。

最后doCreateBean将exposedObject返回出去

接着进入到getSingleton中,最终studentA缓存的对象是StudentA的代理对象。
这也就是为什么在示例代码中我们获取到的StudentA是个代理对象的原因。
接着我们在前面分析的时候已经提到,StudentA代理对象调用接口中的examing方法的时候会调用代理对象的invoke方法,也就是JDKDynamicAopProxy的invoke方法。
接着我们看一下在JDKDynamicAopProxy的invoke方法中是如何调用到StudentA的examing方法和StudyTrainAspect的studyTrain方法
@Override
@Nullable
public Object invoke(Object proxy, Method method, Object[] args) throws Throwable {
   Object oldProxy = null;
   boolean setProxyContext = false;
       // 从advised中获取targetSource
   // 代理实例就保存在targetSource的target属性中
   TargetSource targetSource = this.advised.targetSource;
   Object target = null;
   try {
      ... ...
      // Get as late as possible to minimize the time we "own" the target,
      // in case it comes from a pool.
      // 获取代理示例
      target = targetSource.getTarget();
      Class<?> targetClass = (target != null ? target.getClass() : null);

      // Get the interception chain for this method.
      // 获取符合当前代理示例方法的切面执行链
      List<Object> chain = this.advised.getInterceptorsAndDynamicInterceptionAdvice(method, targetClass);

      if (chain.isEmpty()) {
         Object[] argsToUse = AopProxyUtils.adaptArgumentsIfNecessary(method, args);
         retVal = AopUtils.invokeJoinpointUsingReflection(target, method, argsToUse);
      }
      else {
         // We need to create a method invocation...
         // 创建MethodInvocation
         MethodInvocation invocation =
               new ReflectiveMethodInvocation(proxy, target, method, args, targetClass, chain);
         // Proceed to the joinpoint through the interceptor chain.
         // 1.调用切面执行链方法
         retVal = invocation.proceed();
      }
      ... ...
      return retVal;
   }
   ... ...
}
看到注释1处继续调用proceed方法

调用到我们的@Around注解的方法studyTrain的封装类AspectJAroundAdvice的invoke方法,继续进入到AspectJAroundAdvice的invoke方法中


这时就调用到StudyTrainAspect的studyTrain方法中了

然后我们修改参数后调用了joinPoint的proceed方法

再次来到proceed方法中

此时链条已经执行完毕,进入到invokeJoinponit方法中,最后会反射调用到StudentA的examing方法

然后返回到proceed方法中

然后继续返回到StudyTrainAspect的studyTrain方法中的joinPoint.proceed处
然后执行往studyTrain继续往上返回出去

最后执行完毕。


 710
710


 被折叠的 条评论
为什么被折叠?
被折叠的 条评论
为什么被折叠?
 到【灌水乐园】发言


