


Activity的setContentView
首先查看Activity的setContentView的方法:
>Activity.java
    public void setContentView(@LayoutRes int layoutResID) {
        //getWindow()获取activity内部对象mWindow(PhoneWindow类型)并调用它的setContentView方法
        getWindow().setContentView(layoutResID);
        initWindowDecorActionBar();
    }
可以看到Activity的setContentView方法实际还是调用mWindow的setContentView方法,接下看我们试看看mWindow的相关代码
mWindow对象
查看Activity源码,在attach方法中对mWindow做了赋值。
>Activity.java
final void attach(Context context, ActivityThread aThread,
            Instrumentation instr, IBinder token, int ident,
            Application application, Intent intent, ActivityInfo info,
            CharSequence title, Activity parent, String id,
            NonConfigurationInstances lastNonConfigurationInstances,
            Configuration config, String referrer, IVoiceInteractor voiceInteractor,
            Window window, ActivityConfigCallback activityConfigCallback) {
        attachBaseContext(context);

        mFragments.attachHost(null /*parent*/);

        mWindow = new PhoneWindow(this, window, activityConfigCallback);
        mWindow.setWindowControllerCallback(this);
        mWindow.setCallback(this);
         /…部分代码省略…/
        mWindow.setWindowManager(
                (WindowManager)context.getSystemService(Context.WINDOW_SERVICE),
                mToken, mComponent.flattenToString(),
                (info.flags & ActivityInfo.FLAG_HARDWARE_ACCELERATED) != 0);
        if (mParent != null) {
            mWindow.setContainer(mParent.getWindow());
        }
        mWindowManager = mWindow.getWindowManager();
}
那么Activity的attach方法是Activity生命周期的第一个方法,它是通过ActivityThread#performLaunchActivity方法调用的,这是通过AMS(ActivityManagerService)的startActivity调用ActivityTrack的startActivityMayWait来调用的。
attach字面意思就是“使依附;贴上;系上”,也就是点击activity进行启动的时候之执行的。
>ActivityThread.java
    private Activity performLaunchActivity(ActivityClientRecord r, Intent customIntent) {
        /*******部分代码省略********/
        Activity activity = null;
        try {
            java.lang.ClassLoader cl = appContext.getClassLoader();
            activity = mInstrumentation.newActivity(
                    cl, component.getClassName(), r.intent);
            StrictMode.incrementExpectedActivityCount(activity.getClass());
            r.intent.setExtrasClassLoader(cl);
            r.intent.prepareToEnterProcess();
            if (r.state != null) {
                r.state.setClassLoader(cl);
            }
        } catch (Exception e) {
            if (!mInstrumentation.onException(activity, e)) {
                throw new RuntimeException(
                    "Unable to instantiate activity " + component
                    + ": " + e.toString(), e);
            }
        }

        try {
            Application app = r.packageInfo.makeApplication(false, mInstrumentation);

            /*******部分代码省略********/

            if (activity != null) {
                CharSequence title = r.activityInfo.loadLabel(appContext.getPackageManager());
                Configuration config = new Configuration(mCompatConfiguration);
                if (r.overrideConfig != null) {
                    config.updateFrom(r.overrideConfig);
                }
                if (DEBUG_CONFIGURATION) Slog.v(TAG, "Launching activity "
                        + r.activityInfo.name + " with config " + config);
                Window window = null;
                if (r.mPendingRemoveWindow != null && r.mPreserveWindow) {
                    window = r.mPendingRemoveWindow;
                    r.mPendingRemoveWindow = null;
                    r.mPendingRemoveWindowManager = null;
                }
                appContext.setOuterContext(activity);
                //调用activity#attach方法
                activity.attach(appContext, this, getInstrumentation(), r.token,
                        r.ident, app, r.intent, r.activityInfo, title, r.parent,
                        r.embeddedID, r.lastNonConfigurationInstances, config,
                        r.referrer, r.voiceInteractor, window, r.configCallback);
                /*******部分代码省略********/
    }
如上源代码当中就是在启动Activity的时候执行其attach:
- ApplicationThread#scheduleLaunchActivity
- ActivityThread#handleLaunchActivity
- ActivityThread#performLaunchActivity
- Activity#attach
PhoneWindow.setContentView
//PhoneWindow.java
@Override
public void setContentView(int layoutResID) {
// Note: FEATURE_CONTENT_TRANSITIONS may be set in the process of installing the window
// decor, when theme attributes and the like are crystalized. Do not check the feature
// before this happens.
if (mContentParent == null) {
//构造DecorView对象并赋值给mDecor,并进行mContentParent的初始化
installDecor();
} else if (!hasFeature(FEATURE_CONTENT_TRANSITIONS)) {
mContentParent.removeAllViews();
}
if (hasFeature(FEATURE_CONTENT_TRANSITIONS)) {
final Scene newScene = Scene.getSceneForLayout(mContentParent, layoutResID,
getContext());
transitionTo(newScene);
} else {
//将Resource对应的id等于layoutResID的xml布局文件,add到mContentParent中
mLayoutInflater.inflate(layoutResID, mContentParent);
}
mContentParent.requestApplyInsets();
final Callback cb = getCallback();
if (cb != null && !isDestroyed()) {
cb.onContentChanged();
}
mContentParentExplicitlySet = true;
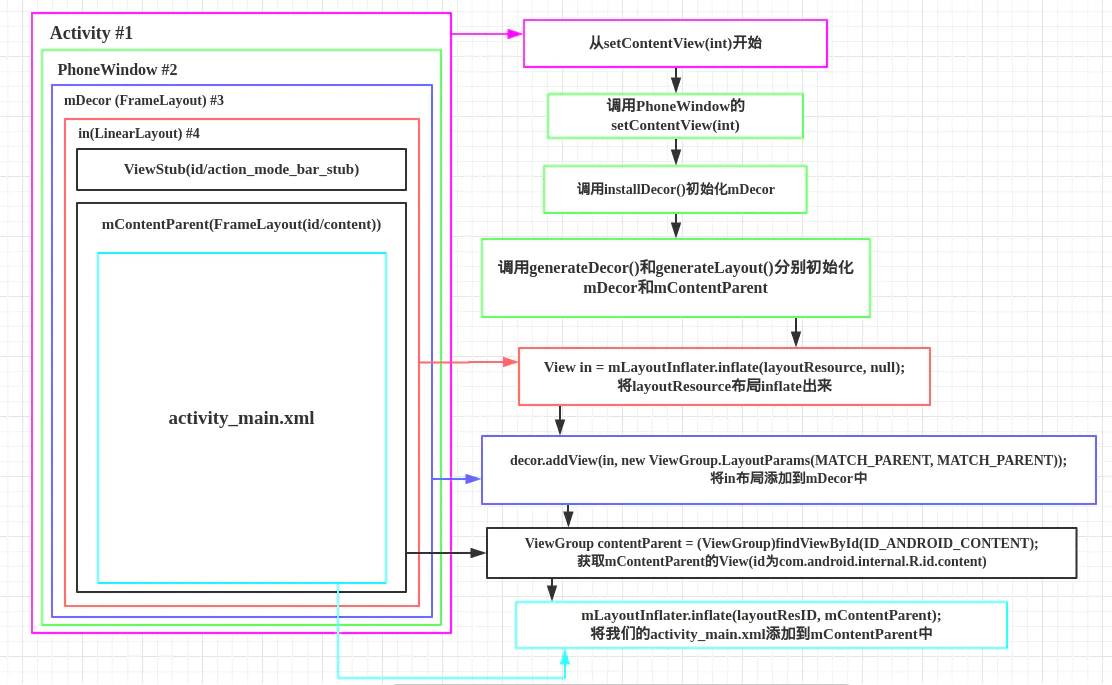
}setContentView主要做了两件事:
- 初始化整个界面(即:DecorView)
- 将setContentView的参数对应的View,add到mContentParent中
//PhoneWindow.java
    private void installDecor() {
        mForceDecorInstall = false;
        if (mDecor == null) {
            //构造DecorView类型对象mDecor
            mDecor = generateDecor(-1);
            mDecor.setDescendantFocusability(ViewGroup.FOCUS_AFTER_DESCENDANTS);
            mDecor.setIsRootNamespace(true);
            if (!mInvalidatePanelMenuPosted && mInvalidatePanelMenuFeatures != 0) {
                mDecor.postOnAnimation(mInvalidatePanelMenuRunnable);
            }
        } else {
            mDecor.setWindow(this);
        }
        if (mContentParent == null) {
            //构造mContentParent
            mContentParent = generateLayout(mDecor);

            // Set up decor part of UI to ignore fitsSystemWindows if appropriate.
            mDecor.makeOptionalFitsSystemWindows();

            final DecorContentParent decorContentParent = (DecorContentParent) mDecor.findViewById(
                    R.id.decor_content_parent);

            if (decorContentParent != null) {
                //mDecorContentParent赋值R.id.decor_content_parent
                mDecorContentParent = decorContentParent;
                mDecorContentParent.setWindowCallback(getCallback());
                if (mDecorContentParent.getTitle() == null) {
                    mDecorContentParent.setWindowTitle(mTitle);
                }
            /*******部分代码省略********/
    }
installDecor方法里先执行generateDecor方法构造mDecor,然后通过执行generateLayout()方法初始化mContentParent。
//PhoneWindow.java
    protected DecorView generateDecor(int featureId) {
        // System process doesn't have application context and in that case we need to directly use
        // the context we have. Otherwise we want the application context, so we don't cling to the
        // activity.
        ...
        return new DecorView(context, featureId, this, getAttributes());
    }
>PhoneWindow.java
protected ViewGroup generateLayout(DecorView decor) {
/*******部分代码省略********/
mDecor.startChanging();
//加载对应主题theme的布局资源
mDecor.onResourcesLoaded(mLayoutInflater, layoutResource);
mContentRoot = (ViewGroup) in;
ViewGroup contentParent = (ViewGroup)findViewById(ID_ANDROID_CONTENT);
if (contentParent == null) {
throw new RuntimeException("Window couldn't find content container view");
}
/*******部分代码省略********/
return contentParent;
}
void onResourcesLoaded(LayoutInflater inflater, int layoutResource) {
if (mBackdropFrameRenderer != null) {
loadBackgroundDrawablesIfNeeded();
mBackdropFrameRenderer.onResourcesLoaded(
this, mResizingBackgroundDrawable, mCaptionBackgroundDrawable,
mUserCaptionBackgroundDrawable, getCurrentColor(mStatusColorViewState),
getCurrentColor(mNavigationColorViewState));
}
mDecorCaptionView = createDecorCaptionView(inflater);
//生成 对应主题theme的布局资源view
final View root = inflater.inflate(layoutResource, null);
if (mDecorCaptionView != null) {
if (mDecorCaptionView.getParent() == null) {
addView(mDecorCaptionView,
new ViewGroup.LayoutParams(MATCH_PARENT, MATCH_PARENT));
}
mDecorCaptionView.addView(root,
new ViewGroup.MarginLayoutParams(MATCH_PARENT, MATCH_PARENT));
} else {
// Put it below the color views.
addView(root, 0, new ViewGroup.LayoutParams(MATCH_PARENT, MATCH_PARENT));
}
//赋值给mContentRoot
mContentRoot = (ViewGroup) root;
initializeElevation();
}mContentRoot为对应主题theme的布局资源,经测试(mContentRoot == mDecorContentParent)为true。
generateLayout(DecorView decor)方法构造出来的mContentParent为id=ID_ANDROID_CONTENT,即com.android.internal.R.id.content的FrameLayout
此时的布局结构: decorView mDecor ->theme lyoutResource布局资源 mContentRoot -> id=content的FrameLayout mContentParent -> setContentView方法设置的layoutId布局 layoutResID
最终我们要展示在Activity中的View已经构造好了,那么在Activity的onResume 方法之后,在 ActivityThread#handleResumeActivity 方法中会将该View通过WindowManager添加在Activity所挂在的Window上进行展现。
    public void handleResumeActivity(IBinder token, boolean finalStateRequest, boolean isForward,
            String reason) {

        /*******部分代码省略********/
        // TODO Push resumeArgs into the activity for consideration
        final ActivityClientRecord r = performResumeActivity(token, finalStateRequest, reason);
        if (r == null) {
            // We didn't actually resume the activity, so skipping any follow-up actions.
            return;
        }

        final Activity a = r.activity;

        if (r.window == null && !a.mFinished && willBeVisible) {
            r.window = r.activity.getWindow();
            View decor = r.window.getDecorView();
            decor.setVisibility(View.INVISIBLE);
            ViewManager wm = a.getWindowManager();
            WindowManager.LayoutParams l = r.window.getAttributes();
            a.mDecor = decor;
            l.type = WindowManager.LayoutParams.TYPE_BASE_APPLICATION;
            l.softInputMode |= forwardBit;
            if (r.mPreserveWindow) {
                a.mWindowAdded = true;
                r.mPreserveWindow = false;
                // Normally the ViewRoot sets up callbacks with the Activity
                // in addView->ViewRootImpl#setView. If we are instead reusing
                // the decor view we have to notify the view root that the
                // callbacks may have changed.
                ViewRootImpl impl = decor.getViewRootImpl();
                if (impl != null) {
                    impl.notifyChildRebuilt();
                }
            }
            if (a.mVisibleFromClient) {
                if (!a.mWindowAdded) {
                    a.mWindowAdded = true;
                    //将decor添加到Activity的Window上进行展现,注意:wm为WindowManagerImpl类型对象
                    wm.addView(decor, l);
                } else {
                    // The activity will get a callback for this {@link LayoutParams} change
                    // earlier. However, at that time the decor will not be set (this is set
                    // in this method), so no action will be taken. This call ensures the
                    // callback occurs with the decor set.
                    a.onWindowAttributesChanged(l);
                }
            }

            // If the window has already been added, but during resume
            // we started another activity, then don't yet make the
            // window visible.
        } else if (!willBeVisible) {
            if (localLOGV) Slog.v(TAG, "Launch " + r + " mStartedActivity set");
            r.hideForNow = true;
        }

       /*******部分代码省略********/
    }
这里的vm是WindowManagerImpl类,参数mParentWindow!=null,带有mAppToken
//WindowManagerImpl
public void addView(@NonNull View view, @NonNull ViewGroup.LayoutParams params) {
        applyDefaultToken(params);
        //调用WindowManagerGlobal的addView方法
        mGlobal.addView(view, params, mContext.getDisplay(), mParentWindow);
    }

//WindowManagerGlobal
    public void addView(View view, ViewGroup.LayoutParams params,
            Display display, Window parentWindow) {
        /*******部分代码省略********/

        ViewRootImpl root;
        View panelParentView = null;

        synchronized (mLock) {

            /*******部分代码省略********/

            //创建ViewRootImpl
            root = new ViewRootImpl(view.getContext(), display);

            view.setLayoutParams(wparams);

            mViews.add(view);
            mRoots.add(root);
            mParams.add(wparams);

            // do this last because it fires off messages to start doing things
            try {
                //将view添加到ViewRootImpl中
                root.setView(view, wparams, panelParentView);
            } catch (RuntimeException e) {
                // BadTokenException or InvalidDisplayException, clean up.
                if (index >= 0) {
                    removeViewLocked(index, true);
                }
                throw e;
            }
        }
    }
关于ViewRootImpl与View和WindowManager,详情可以看 https://blog.csdn.net/a2923790861/article/details/108830797
PopupWindow的setContentView
首先查看PopupWindow的setContentView的方法:
    public void setContentView(View contentView) {
        if (isShowing()) {
            return;
        }

        mContentView = contentView;

        if (mContext == null && mContentView != null) {
            mContext = mContentView.getContext();
        }
        //获取Activity的WindowManager
        if (mWindowManager == null && mContentView != null) {
            mWindowManager = (WindowManager) mContext.getSystemService(Context.WINDOW_SERVICE);
        }
        /*******部分代码省略********/
    }
popupWindow可以通过showAtLocation或者showAsDropDown方法显示,这里我们就看showAtLocation好了
    public void showAtLocation(IBinder token, int gravity, int x, int y) {
        if (isShowing() || mContentView == null) {
            return;
        }

        TransitionManager.endTransitions(mDecorView);

        detachFromAnchor();

        mIsShowing = true;
        mIsDropdown = false;
        mGravity = gravity;
        //创建窗口的布局参数。
        final WindowManager.LayoutParams p = createPopupLayoutParams(token);
        //弹出前的准备操作
        preparePopup(p);

        p.x = x;
        p.y = y;
        //执行弹出
        invokePopup(p);
    }


    protected final WindowManager.LayoutParams createPopupLayoutParams(IBinder token) {
        final WindowManager.LayoutParams p = new WindowManager.LayoutParams();

        // These gravity settings put the view at the top left corner of the
        // screen. The view is then positioned to the appropriate location by
        // setting the x and y offsets to match the anchor's bottom-left
        // corner.
        p.gravity = computeGravity();
        p.flags = computeFlags(p.flags);
        //WindowManager.LayoutParams.TYPE_APPLICATION_PANEL  1000
        p.type = mWindowLayoutType;
        p.token = token;
        p.softInputMode = mSoftInputMode;
        p.windowAnimations = computeAnimationResource();

        if (mBackground != null) {
            p.format = mBackground.getOpacity();
        } else {
            p.format = PixelFormat.TRANSLUCENT;
        }
        //设置宽高
        if (mHeightMode < 0) {
            p.height = mLastHeight = mHeightMode;
        } else {
            p.height = mLastHeight = mHeight;
        }

        if (mWidthMode < 0) {
            p.width = mLastWidth = mWidthMode;
        } else {
            p.width = mLastWidth = mWidth;
        }

        p.privateFlags = PRIVATE_FLAG_WILL_NOT_REPLACE_ON_RELAUNCH
                | PRIVATE_FLAG_LAYOUT_CHILD_WINDOW_IN_PARENT_FRAME;

        // Used for debugging.
        p.setTitle("PopupWindow:" + Integer.toHexString(hashCode()));

        return p;
    }
在showAtLocation方法中,先创建窗口的布局参数,然后进行了弹出的准备工作preparePopup,接着执行弹出操作invokePopup
    private void preparePopup(WindowManager.LayoutParams p) {
        if (mContentView == null || mContext == null || mWindowManager == null) {
            throw new IllegalStateException("You must specify a valid content view by "
                    + "calling setContentView() before attempting to show the popup.");
        }

        if (p.accessibilityTitle == null) {
            p.accessibilityTitle = mContext.getString(R.string.popup_window_default_title);
        }

        // The old decor view may be transitioning out. Make sure it finishes
        // and cleans up before we try to create another one.
        if (mDecorView != null) {
            mDecorView.cancelTransitions();
        }

        // When a background is available, we embed the content view within
        // another view that owns the background drawable.
        //如果设置了背景颜色,则创建BackgroundView,并 addView(mContentView)
        if (mBackground != null) {
            mBackgroundView = createBackgroundView(mContentView);
            mBackgroundView.setBackground(mBackground);
        } else {
            //直接赋值为mContentView
            mBackgroundView = mContentView;
        }
        //创建顶级视图DecorView,并且addView(mBackgroundView)
        mDecorView = createDecorView(mBackgroundView);
        mDecorView.setIsRootNamespace(true);

        // The background owner should be elevated so that it casts a shadow.
        mBackgroundView.setElevation(mElevation);

        // We may wrap that in another view, so we'll need to manually specify
        // the surface insets.
        p.setSurfaceInsets(mBackgroundView, true /*manual*/, true /*preservePrevious*/);

        mPopupViewInitialLayoutDirectionInherited =
                (mContentView.getRawLayoutDirection() == View.LAYOUT_DIRECTION_INHERIT);
    }
//通过向窗口管理器添加内容视图来调用弹出窗口
private void invokePopup(WindowManager.LayoutParams p) {
if (mContext != null) {
p.packageName = mContext.getPackageName();
}
final PopupDecorView decorView = mDecorView;
decorView.setFitsSystemWindows(mLayoutInsetDecor);
setLayoutDirectionFromAnchor();
//使用WindowManager添加布局到Window上进行展现
mWindowManager.addView(decorView, p);
if (mEnterTransition != null) {
decorView.requestEnterTransition(mEnterTransition);
}
}至此PopupWindow的视图就展示出来了
Dialog的视图展示
一个简单的dialog创建、显示、隐藏的代码在DialogFragment中:
//DialogFragment.class
    public LayoutInflater onGetLayoutInflater(@Nullable Bundle savedInstanceState) {
        if (!this.mShowsDialog) {
            return super.onGetLayoutInflater(savedInstanceState);
        } else {
            //创建dialog
            this.mDialog = this.onCreateDialog(savedInstanceState);
            if (this.mDialog != null) {
                this.setupDialog(this.mDialog, this.mStyle);
                return (LayoutInflater)this.mDialog.getContext().getSystemService("layout_inflater");
            } else {
                return (LayoutInflater)this.mHost.getContext().getSystemService("layout_inflater");
            }
        }
    }


    public Dialog onCreateDialog(@Nullable Bundle savedInstanceState) {
        //创建dialog,使用activity的content,以及dialogFragmnet的theme主题
        return new Dialog(this.getActivity(), this.getTheme());
    }

    public void onActivityCreated(@Nullable Bundle savedInstanceState) {
        super.onActivityCreated(savedInstanceState);
        if (this.mShowsDialog) {
            View view = this.getView();
            if (view != null) {
                if (view.getParent() != null) {
                    throw new IllegalStateException("DialogFragment can not be attached to a container view");
                }
                //设置dialog的layout布局,内部调用PhoneWindow.setContentView(view);
                //最终添加到DecorView下的theme view下的 id=R.id.content的容器中
                this.mDialog.setContentView(view);
            }

            Activity activity = this.getActivity();
            if (activity != null) {
                this.mDialog.setOwnerActivity(activity);
            }

            this.mDialog.setCancelable(this.mCancelable);
            this.mDialog.setOnCancelListener(this);
            this.mDialog.setOnDismissListener(this);
            if (savedInstanceState != null) {
                Bundle dialogState = savedInstanceState.getBundle("android:savedDialogState");
                if (dialogState != null) {
                    this.mDialog.onRestoreInstanceState(dialogState);
                }
            }

        }
    }
让我们看下dialog的构造函数:
public Dialog(@NonNull Context context) {
        this(context, 0, true);
    }

public Dialog(@NonNull Context context, @StyleRes int themeResId) {
        this(context, themeResId, true);
    }

    Dialog(@NonNull Context context, @StyleRes int themeResId, boolean createContextThemeWrapper) {
        if (createContextThemeWrapper) {
            if (themeResId == ResourceId.ID_NULL) {
                final TypedValue outValue = new TypedValue();
                context.getTheme().resolveAttribute(R.attr.dialogTheme, outValue, true);
                themeResId = outValue.resourceId;
            }
            mContext = new ContextThemeWrapper(context, themeResId);
        } else {
            mContext = context;
        }
        //获取activity对应的phoneWindow对应的WindowManager
        mWindowManager = (WindowManager) context.getSystemService(Context.WINDOW_SERVICE);
        //创建一个PhoneWindow
        final Window w = new PhoneWindow(mContext);
        mWindow = w;
        w.setCallback(this);
        w.setOnWindowDismissedCallback(this);
        w.setOnWindowSwipeDismissedCallback(() -> {
            if (mCancelable) {
                cancel();
            }
        });
        //设置mWindowManager为dialog PhoneWindow 的窗口管理器
        w.setWindowManager(mWindowManager, null, null);
        w.setGravity(Gravity.CENTER);

        mListenersHandler = new ListenersHandler(this);
    }
然后就是dialog的show方法了
    public void show() {
        if (mShowing) {
            if (mDecor != null) {
                if (mWindow.hasFeature(Window.FEATURE_ACTION_BAR)) {
                    mWindow.invalidatePanelMenu(Window.FEATURE_ACTION_BAR);
                }
                mDecor.setVisibility(View.VISIBLE);
            }
            return;
        }

        mCanceled = false;

        if (!mCreated) {
            dispatchOnCreate(null);
        } else {
            // Fill the DecorView in on any configuration changes that
            // may have occured while it was removed from the WindowManager.
            final Configuration config = mContext.getResources().getConfiguration();
            mWindow.getDecorView().dispatchConfigurationChanged(config);
        }

        onStart();
        //获取window的顶级布局给mDecor
        mDecor = mWindow.getDecorView();

        if (mActionBar == null && mWindow.hasFeature(Window.FEATURE_ACTION_BAR)) {
            final ApplicationInfo info = mContext.getApplicationInfo();
            mWindow.setDefaultIcon(info.icon);
            mWindow.setDefaultLogo(info.logo);
            mActionBar = new WindowDecorActionBar(this);
        }
        //获取window的布局参数
        WindowManager.LayoutParams l = mWindow.getAttributes();
        boolean restoreSoftInputMode = false;
        if ((l.softInputMode
                & WindowManager.LayoutParams.SOFT_INPUT_IS_FORWARD_NAVIGATION) == 0) {
            l.softInputMode |=
                    WindowManager.LayoutParams.SOFT_INPUT_IS_FORWARD_NAVIGATION;
            restoreSoftInputMode = true;
        }
        //使用WindowManager添加布局到Window上进行展现
        mWindowManager.addView(mDecor, l);
        if (restoreSoftInputMode) {
            l.softInputMode &=
                    ~WindowManager.LayoutParams.SOFT_INPUT_IS_FORWARD_NAVIGATION;
        }

        mShowing = true;

        sendShowMessage();
    }
接着是dismiss方法
    public void dismiss() {
        if (Looper.myLooper() == mHandler.getLooper()) {
            dismissDialog();
        } else {
            mHandler.post(mDismissAction);
        }
    }

    void dismissDialog() {
        if (mDecor == null || !mShowing) {
            return;
        }

        if (mWindow.isDestroyed()) {
            Log.e(TAG, "Tried to dismissDialog() but the Dialog's window was already destroyed!");
            return;
        }

        try {
            //通过mWindowManager从window上移除mDecor
            mWindowManager.removeViewImmediate(mDecor);
        } finally {
            if (mActionMode != null) {
                mActionMode.finish();
            }
            //重置为null
            mDecor = null;
            mWindow.closeAllPanels();
            onStop();
            mShowing = false;

            sendDismissMessage();
        }
    }
总结的一些点:
1.activity、基于activity创建的PopupWindow、activity下的dialogFragemnt、activity下的dialogFragment下的dialogFragment,他们所使用的WindowManager都是activity在attach生命周期时创建的PhoneWindow对应的WindowManager。即一个activity对应一个WindowManager
2.dialog、popupWindow都无法使用Application Context创建显示(具体可看 https://blog.csdn.net/sunluyao_/article/details/108373573)


 620
620


 被折叠的 条评论
为什么被折叠?
被折叠的 条评论
为什么被折叠?
 到【灌水乐园】发言


