


 本文详细介绍了如何在Unity编辑器中自定义编辑器脚本、创建自定义编辑器窗口、扩展Inspector面板等功能,帮助开发者快速扩展编辑器功能。
在阅读本教程之前,你需要对Unity的操作流程有一些基础的认识,并且最好了解内置的GUI系统如何使用。
如何让编辑器运行你的代码
Unity3D可以通过事件触发来执行你的编辑器代码,但是我们需要一些编译器参数来告知编译器何时需要触发该段代码。
[MenuItem(XXX)]声明在一个函数上方,告知编译器给Unity3D编辑器添加一个菜单项,并且当点击该菜单项的时候调用该函数。触发函数里可以编写任何合法的代码,可以是一个资源批处理程序,也可以弹出一个编辑器窗口。代码里可以访问到当前选中的内容(通过Selection类),并据此来确定显示视图。与此类似,[ContextMenu("XXX")]可以向你的上下文菜单中添加一个菜单项。
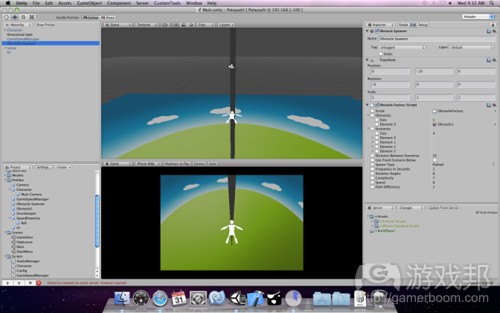
当你编写了一些Component脚本,当它被附属到某个GameObject时,想在编辑视图即可在Scene视图观察到效果,那么你可以把[ExecuteInEditMode]写在类上方来通知编译器,该类的OnGUI和Update等函数在编辑模式也也会被调用。我们还可以使用[AddComponentMenu("XXX/XXX")]来把该脚本关联到Component菜单中,点击相应菜单项即可为GameObject添加该Component脚本。
开始编写编辑器
为了避免不必要的包含,Unity3D的运行时和编辑器类分辨存储在不同的Assemblies里(UnityEngine和UnityEditor)。当你准备开始编写编辑器之前,你需要using UnityEditor来导入编辑器的名称空间。
有些代码可能是运行时和编辑器都需要执行的,如果你想在其中加以区分,那么可以使用#if UNITY_EDITOR ... #endif宏来对编辑器代码做特殊处理。
在你开始真正编写代码之前,我认为你还需要知道所有放在命名为Editor目录下的脚本会在其它脚本之后进行编译,这方便了你去使用那些运行时的内容。而那些目录下的脚本是不能访问到Editor目录下的内容的。所以,你最好把你的编辑器脚本写在Editor目录下。
如何创建自定义编辑器窗口
创建你的窗口
如果你想自定义一个可编辑的面板,那么你需要编写一个继承自EditorWIndow的类。通常情况下,你还需要写一个[MenuItem]来告知编译器何时打开这个面板。这个事件的回调应该是一个静态方法,并且返回一个窗口的实例。
现在,当你点击对应的菜单项时,会弹出一个空白的窗口。并且你可以像Unity3D编辑器预制的窗口一样随意拖动和停靠。下面来看看我们如何来在窗口内实现我们想要的功能吧。
扩展你的窗口
和运行时的GUI一样,如果你需要在窗口中添加交互控件,那么必须重写OnGUI方法。具体的重写方式和运行时的GUI一样,你甚至可以使用任何扩展自原生GUI系统的插件(例如iGUI和GUIX)来简化你的插件开发流程(仅经过初步测试,更深层次的可用性尚待验证)。同时UnityEditor名称空间下的EditorGUILayout在原生GUI之上提供了一些更方便的接口和控件,让你可以轻松的使用一些编辑器特有的UI控件。
除了OnGUI外,你可能还会需要如下一些回调来触发某些具体的逻辑(完整的列表请参考官方文档):
l OnSelectionChange,但你点选物品时触发
l OnFocus /OnLostFocus,获得和失去焦点时触发
进一步扩展你的窗口
自定义控件
和运行时GUI的使用方式一样,如果你打算自定义自己的控件,那么最简单的方式就是实现一个静态方法(也可以不是静态的),并提供一些可选参数,在方法内部根据这些参数来完成对控件的布局(就像你在OnGUI中做的一样)。
如果你打算把自定义控件实现在窗口类内部,你可以使用Partial类来更好的管理你的代码。
绘制2D内容
绘制图片
可以使用GUI.DrawTexture来完成对图片资源的绘制。
绘制基础图元
GUI本身并没有提供绘制基础图元的方法,但是可以通过一些方式来封装出这些方法。
l 绘制线段:通过一个像素的贴图资源配合GUI.DrawTexture和矩阵旋转来完成线段的绘制。
l 绘制矩形框:通过GUI.Box和样式设置来封装出对矩形框和矩形填充框。
资源选择器
EditorLayout.ObjectField控件提供一个资源选择逻辑,生成时需要指定某种资源类型。然后你可以拖动该种资源到该控件或点击控件旁边的小圆圈进行列表进行选择。
如何存储编辑内容
你可能需要创建一个继承自SerializedObject的类来保存编辑的数据。继承自SerializedObject的对象能用于存储数据而不参与渲染,并可以最终打包到AssetBundle。
针对当前的编辑选项等内容的存储,可能需要另外一个SerializedObject类(和具体的系统设计相关)。
向导式的编辑窗口
在很多情况下可能你都会需要一个有很多参数的编辑面板,然后在编辑结束后有一个按钮加以确认。这你不用自己来实现,UnityEditor提供了ScriptableWizard来帮助你快捷的进行开发。
他是继承自EditorWindow的,所以他们的使用是很类似的。不过注意,当你点击确认按钮时,OnWizardCreate()会被调用。另外,ScriptableWizard.DisplayWizard可以帮助你生成并显示出该窗口。
如何扩展Inspector面板
当你在Unity3D中点选一个对象时,Inspector面板会随即显示出此对象的属性。我们可以针对某个类型的对象扩展该面板,这在为Unity3D开发插件时是非常有用的。
定义INSPECTOR何时被触发
自定义的Inspector面板需要继承Editor类。由于功能相对具体,所以你无需定义代码何时被触发,对应代码会在你点击它所对应的物体时自动执行。
那么如何定义它所对应的类型呢?只需要在你的类定义之前通过编译器的命令[CustomEditor(typeof(XXX))]就可以完成这项工作了。
访问被编辑的对象
在Inspector视图中,我们经常需要访问正在被编辑的对象。Editor类的成员变量target正是提供了这一关联。
尽管如此,需要注意target是一个Object类型的对象,具体使用时可能需要类型转换(可以使用C#的泛型来避免重复的类型转换)。
实现你自己的Inspector界面
扩展Editor与扩展EditorWindow唯一的不同在于你需要重写的是OnInspectorGUI而不是OnGUI。另外,如果你想绘制默认的可编辑项,只需调用DrawDefaultInspector即可。
在Scene界面定义编辑句柄
当选中一个物体的时候,可能我们希望在Scene视图里也能定义一些编辑或展现。这一工作可以通过OnSceneGUI和Handle类来完成。OnSceneGUI用来处理来自Scene视图的事件,而Handle类用来在Scene视图实现一些3D的GUI控件(例如控制对象位置的Position控制器)。
具体的使用方式可以参考官方的参考文档。
一些常用的功能说明
l AssetDatabase.CreateAsset可以帮住你从资源目录中创建一个资源实例。
l Selection.activeObject返回当前选中的对象。
l EditorGUIUtility.PingObject用来实现在Project窗口中点击某一项的操作。
l Editor.Repaint用来重绘界面所有的控件。
l XXXImporter用来设置某种资源的具体导入设置(例如在某些情况下你需要设置导入的贴图为可读的)。
l EditorUtility.UnloadUnusedAssets用于释放没有使用的资源,避免你的插件产生内存泄漏。
l Event.Use用来标记事件已经被处理结束了。
l EditorUtility.SetDirty用来通知编辑器数据已被修改,这样在下次保存时新的数据将被存储。
Unity3D的方便之处在于,它很容易地扩展编辑器套件。每款游戏都对加工有着不同的需求,可以快速地以完全集成的方法来构建这些内容并极大地提升开发速度。
目前有大量复杂的软件包提供以基本Unity功能套件为基础的复杂工具,从视觉脚本编辑器到编辑器内导航网格生成。但是,有关如何自行构建此类事物的程序说明却很少。我将在下文列举某些在自己的工作中总结的编辑器定制相关信息。
如何构建编辑器脚本
因为你不想在游戏中包含所有的编辑器定制,而且你也不想游戏对某些Unity编辑器内的东西有所依赖,所以Unity将运行时间和编辑器代码放置在单独的编译中。
在编辑命令中,运行时间代码在编辑器代码之前执行,这样编辑器类型就可以可靠地联系至运行时间组件(游戏邦注:否则就会变得难以编辑),但是你的运行时间组件并不涉及任何编辑器代码。
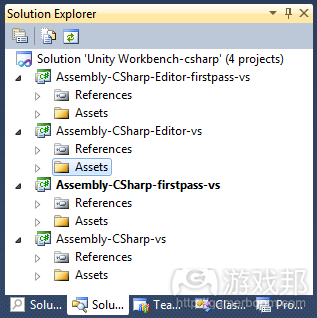
你必须维持严格的层次。Unity 3.4版本中这个方面做得更加具体,现在其产生的项目文件与其提供的4个编辑阶段相对应,这样就不会混淆文件的构建时间。
在某个点上的程序说明有些不太清楚。当我首次开始使用时,我认为需要在我的项目上创建单个“Editor”文件夹,然后把所有的编辑器类型放入其中。事实上,系统的灵活性要更高些,你可以在项目中创建任意数量的“Editor”文件夹,将其埋藏在“资产”文件夹的任何地方,所有这些都可以存放编辑器代码。
所以,现在通常情况下我会以功能(游戏邦注:比如命名为“AI”)为单位来创建文件夹,然后纳入所有功能相关组件,然后在旁边放上Editor文件夹(游戏邦注:比如命名为“AI/Editor”),装上所有运行这些组件的编辑器扩展。
只要Unity的内在类型能够发挥作用,运行时间类型都会存在于UnityEngine命名空间中,而所有的编辑器类型都会存在于UnityEditor命名空间里。
UnityEditor.Editor类
到目前为止,我设立的最普遍的定制是一个自定义检查器。Unity的Inspector面板提供看到组件状态的窗口,但是这种基本设置只能理解有限的类型,而且只能展示公共区域。
自定义检查器让你可以完全控制用户查看和编辑你的组件的方式。比如,它们可以让你呈现只读资产、强迫性价值限制或只改变选项呈现的方式。
Unity中的Inspector都是Editor类的子类别,所以你应该从这里开始。但是,我对编辑器类处理样式的方法不是很喜欢。里面有个“Target”用来提及检查器正在编辑的物体,但是只是基本的“Object”样式,所以你要不断将其转变成更有用的样式。为避开这个问题,我使用了一个非常简单的类别,具体如下:
public class InspectorBase : Editor where T : UnityEngine.Object
{
protected T Target { get { return (T) target; } }
}
现在,如果我想要为MyCustomComponent创造检查器,我就可以从InspectorBase得到检查器,然后使用“Target”,这样我就不用时常更改了。
应当注意的是,你还需要将CustomEditor属性附到检查器类中,Unity才能够真正使用它们。
编辑器GUI
一旦你创造自定义检查器后,你通常想要执行的方法就是OnInspectorGUI()。OnInspectorGUI()可用来指定在检查器中展示的所有东西,使用的是Unity的GUI系统。
因为这是编辑器代码,我们可以使用UnityEditor命名空间中的类型,这包括EditorGUILayout。EditorGUILayout使得了大量的简单控制,可以在编辑器中使用,比Unity普通运行时间GUI系统提供的更好。比如,假如我想向用户展示进入3D位置的领域,我可以使用EditorGUILayout.Vector3Field():Target.somePosition = EditorGUILayout.Vector3Field(“Some position”, Target.somePosition)。
在检查器中产生的效果如下图所示:

正因为GUI系统能够发挥作用,所以如果我改变UI中的值,Vector3Field就会传回新的值,Target.somePosition就会得到更新。在将其指派给目标之前,你可以自由改变值(游戏邦注:比如将值定义在某个范围内),你也可以完全忽略传回的值。
值并不一定来自于域,你可以曝光检查器中的资产,可以采用调用一个功能来获得当前值并使用另一个功能来保存。
当然,Unity会默认处理这个事情。如果你只是想要在Unity已经展示的为基础来构建,你就不必要重新执行所有那些域。Editor有个DrawDefaultInspector()方法,告诉Unity调用所有通常调用的控制,但是在这个过程完成之后,你仍然有机会添加额外域和按键。
说到按键,EditorGUILayout的用途确实很广泛,但是你或许已经注意到存在漏洞。比如,如果我想要在导航网格组件上添加“重新计算”按键,这又会怎么样呢?技巧在于EditorGUILayout仍然构建于常规运行时间GUILayout之上,所以你还是可以使用GUILayout中的所有东西。
你对检查器中的域做出改变并且为目标物体的域指派新值时,Unity会察觉到你正在改变物体,所以下次保存屏幕或项目时就会将其写入磁盘。这种察觉是有限的,它只能识别公共资产的直接指派。如果你通过资产或调用方法来修改目标物体,你可能就需要自行调用EditorUtility.SetDirty了。
扩展组件背景菜单
在测试时,有时手动引发某些行为还是很有用的。你可以通过在自定义检查器上安放按键来触发行为:if(GUILayout.Button(“Explode now!”)) Target.ExplodeNow()。
但是还有个更加简单的方法,这个方法完全不需要自定义检查器。你可以使用的是UnityEngine.ContextMenu属性:
/* In the target class… */
[ContextMenu("Explode now!")]
public void ExplodeNow() { … }
右键点击组件的检查器(游戏邦注:无论是否自定义化),你会看到背景菜单,其中有额外的功能。可以快速地进行测试。
扩展主菜单
到这里为止,我所说的所有东西都是围绕某个特别组件为中心的定制。其他种类的扩展又会如何呢?
在我的游戏中,动画系统将其资产存放在文件夹架构中,这样每个文件夹都对应enum的一个入口。当我改变enum时,如果可以同步文件夹结构会起到很大作用,添加任何丢失的文件夹并删除
任何多余的文件夹。所以我采用了以下较为简单的方法:
public class AnimationSystem{
public static void SyncFolderStructure() { … }
}
但是我要何时以及如何调用呢?我采用的做法是将其连同到Assets菜单中的菜单项目中,使用MenuItem属性:
[MenuItem("Assets/Sync folder structure")]
public static void SyncFolderStructure() { … }
点击菜单项目就可以调用功能。应当注意的是,功能需要是静态的,但是其中的类可以是多种类型的。
Wizards
Editor GUI元素并不一定要在Inspector中。它还可以创造主观编辑器窗口,可以像任何Unity内置窗口那样一动,而且可以像在检查器中那样使用GUI命令。最简单的方法就是使用ScriptableWizard,这很像一个对话盒。你在呈现后设定某些值,然后点击按键让其施展“魔法”。
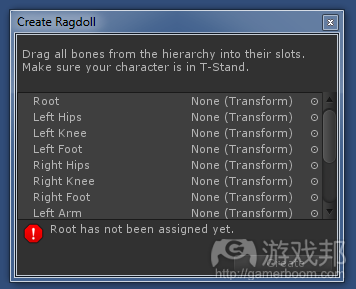
在默认情况下,ScriptableWizard的作用很像检查器:类中的任何公共域都会自动呈现在wizard窗口中。你的wizard会像一大串公共域那样简单,而且还有个OnWizardCreate()方法,当用户点击“Create”按键时Unity就会调用这个方法。而且,你可以改变按键上的文字,“Apply”或“OK”之类的会显得更加直观。
wizard的另一个层面是决定用户如何开启,常用方法是使用有静态功能的菜单选项,如上图所示:
[MenuItem("GameObject/Create Other/Explosion")]
public static void CreateExplosion()
{
ScriptableWizard.DisplayWizard(“Create explosion”);
}
(本文为游戏邦/gamerboom.com编译,如需转载请联系:游戏邦)
Opinion: Extending The Unity3D Editor
Richard Fine
One of the handy things about Unity3D is that it’s very easy to extend the editor suite. Every game has unique requirements for tooling, and being able to build those up quickly and in a fully integrated manner can make a world of difference to your development speed.
A number of pretty sophisticated packages exist that offer complex tools on top of the base Unity featureset, from visual script editors to in-editor navigation mesh generation. The documentation for how you might build such a thing yourself, however, is a bit thin. Here’s a whirlwind tour of some of the most useful bits of info about editor customization that I’ve found in the course of my work.
How Editor Scripts Are Built
Because you don’t want all your editor customization to be included in the game that you ship, and because you don’t want your shipping game to have any dependencies on things in the Unity editor, Unity keeps runtime and editor code in separate assemblies.
The compilation order is such that runtime code is compiled before editor code, so that your editor classes can safely refer to runtime components (otherwise it’d be difficult to edit them) – but it does mean that your runtime components can’t reference any of your editor code.
You have to maintain a strict layering. Unity’s gotten a bit more explicit about this in 3.4 – now the project files it generates (for VS/MonoDevelop) clearly correspond to the four compilation stages it provides, so there’s no confusion about which files will get build at which times.
The documentation is a little unclear on one particular point. When I first started, I thought that I had to have a single ‘Editor’ folder at the top of my project, and that all editor classes had to go inside it. The system’s actually a bit more flexible than that; you can have as many ‘Editor’ folders as you want in your project, buried wherever you like inside your Assets folder, and all of them can contain editor code.
So now it’s very common that I’ll have a folder for one particular feature (e.g. ‘AI’) that contains all the components for that feature, with an Editor folder alongside (e.g. ‘AI/Editor’) that contains the editor extensions for working with those components.
As far as Unity’s built-in types go, runtime types all live in the UnityEngine namespace (in the UnityEngine assembly), while editor types all live in the UnityEditor namespace (in the UnityEditor assembly).
The UnityEditor.Editor Class
By far the most common kind of customization I set up is a custom inspector. Unity’s Inspector panel provides your window into a component’s state, but in its base form it only understands a limited set of types, and will only expose public fields (no properties).
Custom inspectors give you the opportunity to completely control how users view and edit your components; for example, they let you display read-only properties, enforce value constraints, or just change the way an option is presented – for example, replacing a [0..1] float field with a percentage slider.
Inspectors in Unity are all subclasses of the Editor class, so that’s where you start. One thing I don’t like about the editor class, though, is the way it handles types: it has a ‘target’ member that refers to the object the inspector is editing, but it’s of the base ‘Object’ type, so you keep on having to cast it to a more useful type. To get around this I use a very simple generic class:
public class InspectorBase : Editor where T : UnityEngine.Object
{
protected T Target { get { return (T) target; } }
}
Now, if I want to create an inspector for MyCustomComponent, I can derive the inspector from InspectorBase, and use the ‘Target’ member instead of the untyped ‘target’ member, and I don’t have to keep casting everywhere.
Note that you also need to attach the [CustomEditor] attribute to your inspector classes for Unity to actually pick them up and use them.
Editor GUI
Once you’ve created your custom inspector, the method you usually want to implement is OnInspectorGUI(). OnInspectorGUI() is responsible for specifying everything shown in the inspector, using Unity’s immediate-mode GUI system.
Because this is editor code, we can use the types in the UnityEditor namespace, which includes EditorGUILayout. EditorGUILayout provides a bunch of really simple controls for use in the editor, over and above what Unity’s regular runtime GUI system offers. For example, say I want to show the user a field for entering a 3D position. I could use EditorGUILayout.Vector3Field():
Target.somePosition = EditorGUILayout.Vector3Field(“Some position”, Target.somePosition);
This results in a line in your inspector that looks like this:
The immediate-mode GUI system works such that if I change the values in the UI, Vector3Field will return the new values, and Target.somePosition gets updated. You’re free to manipulate the value – for example, clamping it to a range – before assigning it to the target; and you’re free to ignore the return value completely (which would effectively make the field read-only).
The values don’t have to be coming to/from fields, either – you can expose properties in the inspector by adding lines for them in this way, or call a function to get the current value and another function to save it, whatever you like.
Of course, Unity does this stuff by default for any public members. If you just want to build on top of what Unity’s already showing, you don’t have to reimplement all those fields – Editor has a DrawDefaultInspector() method that tells Unity to draw all the controls it would usually draw, but when it’s finished, you’ve still got the opportunity to add a few extra fields and buttons yourself.
Speaking of buttons… EditorGUILayout is pretty comprehensive, but you might notice that there are some things missing – what if I want to put a “recalculate” button on my navigation mesh component, for example? The trick is that EditorGUILayout is still built on top of the regular runtime GUILayout, so everything in GUILayout is available to you as well.
As you make changes to the fields in the inspector, and assign new values to the fields of your target object, Unity detects that you’re changing the object and flags it as ‘dirty’ so that it will be written out to disk the next time you save the scene or project. This detection is limited: it only picks up direct assignment to public properties. If you’re changing the target object through properties or through calling methods on it, you may need to call EditorUtility.SetDirty yourself.
Extending The Component Context Menu
It’s often useful to be able to manually trigger certain behavior when testing things out. You could do this by putting a button on the custom inspector that triggers the behavior:
if(GUILayout.Button(“Explode now!”)) Target.ExplodeNow();
but there’s an even easier way – one that doesn’t require a custom inspector at all. What you can do instead is use the UnityEngine.ContextMenu attribute:
/* In the target class… */
[ContextMenu("Explode now!")]
public void ExplodeNow() { … }
Right-clicking in the component’s inspector – whether you’ve customized it or not – will then show you a context menu, with the extra item in there. Very handy for quickly rigging things up for testing.
Extending the main menus
Everything I’ve talked about so far has been about customization centered around a particular component. What about other kinds of extension, like general utilities?
The animation system in my game stores its assets in a folder structure, such that each folder corresponds to one entry in an enum. When I change the enum, it’s useful to be able to synchronize that folder structure, adding any missing folders and deleting any obsolete ones. So I’ve got this class, with a simple method:
public class AnimationSystem{
public static void SyncFolderStructure() { … }
}
But how and when do I call it? What I’ve done is to wire it up to a menu item in the Assets menu, using the MenuItem attribute:
[MenuItem("Assets/Sync folder structure")]
public static void SyncFolderStructure() { … }
Clicking the menu item calls the function. Note that the function needs to be static – but the class it’s in can be anything, and can derive from anything (including nothing).
Wizards
Editor GUI elements don’t only have to live inside the Inspector. It’s also possible to create arbitrary editor windows, that can be moved and docked like any of
Unity’s built-in windows, and that are populated using GUI commands just like in an inspector. One of the simplest ways of doing this is to use a ScriptableWizard, which is like a dialogue box – you display it, set some values in it, then hit a button to make it work its magic.
ScriptableWizard, by default, works almost like an inspector: any public fields in your derived class will be automatically shown in the wizard window. Your wizard might be as simple as a bunch of public fields, plus an OnWizardCreate() method, which Unity will call when the user hits the ‘Create’ button. Worth noting that you can change the text on that button, too, if ‘Apply’ or ‘OK’ or similar would be more intuitive.
The only other aspect of the wizard is deciding how the user will launch it; the usual approach is to use a menu item bound to a static function, as shown above:
[MenuItem("GameObject/Create Other/Explosion")]
public static void CreateExplosion()
{
ScriptableWizard.DisplayWizard(“Create explosion”);
}
Conclusion
There’s loads more – I’ve not even touched on custom asset types yet, or asset import postprocessors, or scene view customization. They’ll wait for another day…


 被折叠的 条评论
为什么被折叠?
被折叠的 条评论
为什么被折叠?
 到【灌水乐园】发言


