


接上一篇 《Linux 安装Nginx (Nginx-1.25.4)》
本文描述如何配置Nginx多域名及SSL证书。
假设Nginx安装在/usr/local/nginx目录下。Nginx的配置文件为:/usr/local/nginx/conf/nginx.conf,要实现配置域名和SSL证书,都是修改此配置文件。
1.配置域名
通过server_name配置节点进行配置,如下所示:
server
    {
	    listen	80;
         server_name	hellocode.net;           #绑定域名
         index index.htm index.html index.php;   #默认文件
         location / {
            root   html;
            index  index.html index.htm;
        }
    }
如果有多个域名,只需多配置几个server节点即可。
    server
    {
	    listen	80;
         server_name	hellocode.net;         #绑定域名
         index index.htm index.html index.php;   #默认文件
         location / {
            root   html;
            index  index.html index.htm;
        }
    }
    server
    {
	    listen	80;
         server_name	cnsites.com;         #绑定域名
         index index.htm index.html index.php;   #默认文件
         location / {
            root   html;
            index  index.html index.htm;
        }
    }
2.绑定SSL证书
这里以阿里云免费SSL证书为例。
1.申请并下载证书。
先去阿里云申请免费SSL证书,并下载适用于Nginx的证书。

2.上传证书到服务器
在服务器上创建目录/usr/local/nginx/ssl,并将证书解压后,上传到此目录。

3.配置Nginx证书
修改配置文件:/usr/local/nginx/conf/nginx.conf
以下是完整的nginx.conf文件,仅供参考。
#user nobody;
worker_processes 1;
#error_log logs/error.log;
#error_log logs/error.log notice;
#error_log logs/error.log info;
#pid logs/nginx.pid;
events {
worker_connections 1024;
}
http {
include mime.types;
default_type application/octet-stream;
#log_format main '$remote_addr - $remote_user [$time_local] "$request" '
# '$status $body_bytes_sent "$http_referer" '
# '"$http_user_agent" "$http_x_forwarded_for"';
#access_log logs/access.log main;
sendfile on;
#tcp_nopush on;
#keepalive_timeout 0;
keepalive_timeout 65;
#gzip on;
server
{
listen 80;
server_name hellocode.net; #绑定域名
index index.htm index.html index.php; #默认文件
location / {
root html;
index index.html index.htm;
}
}
server
{
listen 80;
server_name cnsites.com; #绑定域名
index index.htm index.html index.php; #默认文件
location / {
root html;
index index.html index.htm;
}
}
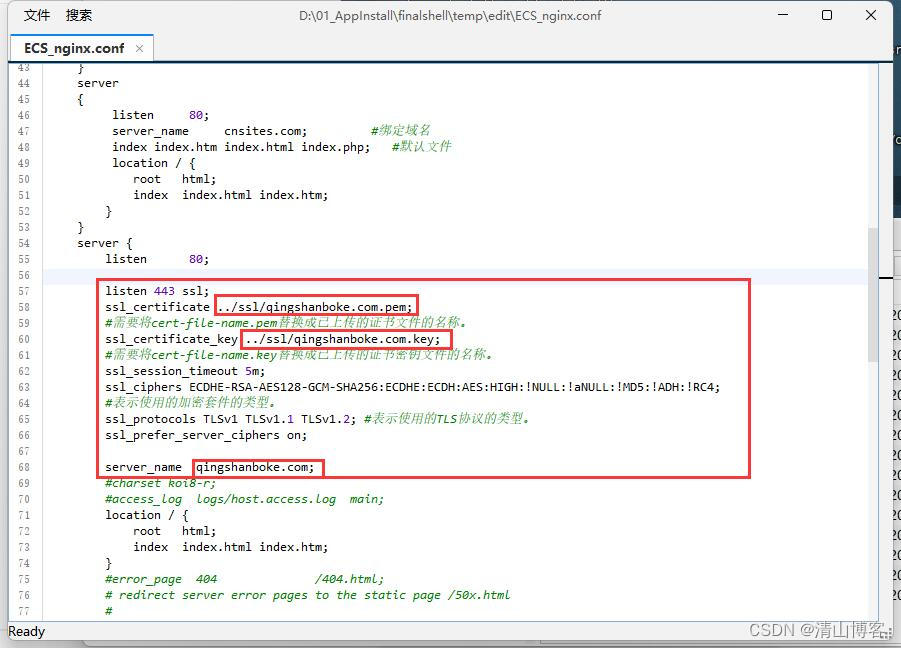
server {
listen 80;
listen 443 ssl;
ssl_certificate ../ssl/qingshanboke.com.pem;
#需要将cert-file-name.pem替换成已上传的证书文件的名称。
ssl_certificate_key ../ssl/qingshanboke.com.key;
#需要将cert-file-name.key替换成已上传的证书密钥文件的名称。
ssl_session_timeout 5m;
ssl_ciphers ECDHE-RSA-AES128-GCM-SHA256:ECDHE:ECDH:AES:HIGH:!NULL:!aNULL:!MD5:!ADH:!RC4;
#表示使用的加密套件的类型。
ssl_protocols TLSv1 TLSv1.1 TLSv1.2; #表示使用的TLS协议的类型。
ssl_prefer_server_ciphers on;
server_name qingshanboke.com;
#charset koi8-r;
#access_log logs/host.access.log main;
location / {
root html;
index index.html index.htm;
}
#error_page 404 /404.html;
# redirect server error pages to the static page /50x.html
#
error_page 500 502 503 504 /50x.html;
location = /50x.html {
root html;
}
# proxy the PHP scripts to Apache listening on 127.0.0.1:80
#
#location ~ \.php$ {
# proxy_pass http://127.0.0.1;
#}
# pass the PHP scripts to FastCGI server listening on 127.0.0.1:9000
#
#location ~ \.php$ {
# root html;
# fastcgi_pass 127.0.0.1:9000;
# fastcgi_index index.php;
# fastcgi_param SCRIPT_FILENAME /scripts$fastcgi_script_name;
# include fastcgi_params;
#}
# deny access to .htaccess files, if Apache's document root
# concurs with nginx's one
#
#location ~ /\.ht {
# deny all;
#}
}
# another virtual host using mix of IP-, name-, and port-based configuration
#
#server {
# listen 8000;
# listen somename:8080;
# server_name somename alias another.alias;
# location / {
# root html;
# index index.html index.htm;
# }
#}
# HTTPS server
#
#server {
# listen 443 ssl;
# server_name localhost;
# ssl_certificate cert.pem;
# ssl_certificate_key cert.key;
# ssl_session_cache shared:SSL:1m;
# ssl_session_timeout 5m;
# ssl_ciphers HIGH:!aNULL:!MD5;
# ssl_prefer_server_ciphers on;
# location / {
# root html;
# index index.html index.htm;
# }
#}
}
注意:修改配置后,都需重载Nginx,配置才会生效。
命令:/usr/local/nginx/sbin/nginx -s reload
3.其他配置
1.让WEB取得原始请求页面地址、IP地址
在web程序中,通过 HttpServletRequest request的 request.getRequestURL().toString(); 方法取用户请求地址时,Nginx配置的是localhost,取到的路径会是http://localhsot/***,此时需要在/usr/local/nginx/conf/nginx.conf文件进行配置。增加:
proxy_set_header Host $host; #让WEB取得原始请求地址
proxy_set_header X-Real-IP $remote_addr; #让WEB取得原始请求IP
像下面这样:
location / {
    proxy_pass http://localhost:88;
	proxy_set_header Host $host;  #让WEB取得原始请求地址
	proxy_set_header X-Real-IP $remote_addr;  #让WEB取得原始请求IP
    proxy_set_header X-Forwarded-For $proxy_add_x_forwarded_for;

    root   html;
    index  index.html index.htm;
}


 853
853


 被折叠的 条评论
为什么被折叠?
被折叠的 条评论
为什么被折叠?
 到【灌水乐园】发言


