


Image Processing in OpenCV
Geometric Transformations of Images
图像几何变换
学习目标
- 学习对图像应用不同的几何变换,如平移、旋转、仿射变换等。
- cv.getPerspectiveTransform函数
Transformations转换
OpenCV提供了两个变换函数,cv.warpAffine和cv.warpPerspective,用它们可以执行各种变换。cv.warpAffine采用2*3变换矩阵,而cv.warpPerspective采用3*3变换矩阵作为输入。
Scaling(缩放)
缩放就是图像的resize,OpenCV为此提供了一个函数cv.resize(),该函数可以手动指定图像的大小,也可以指定缩放因子。resize使用不同的插值方法。首选插值方法是用于缩小的cv.INTER_AREA(即缩小图片使用该方法效果最好)和用于缩放的cv.INTER_CUBIC(效果好但慢)和cv.INTER_LINEAR(中庸)。默认情况下,插值方法cv.INTER_LINEAR用于所有调整大小的目的。你可以使用以下任意方法调整输入图像的大小。
cv.resize(
InputArray src,
OutputArray dst,(一般省略,直接用变量来接cv.resize返回的图片)
Size dsize,
double fx=0,
double fy=0,
int interpolation = INTER_LINEAR
)
参数说明:
src:输入,原图像,即待改变大小的图像;
dst:输出,改变大小之后的图像,这个图像和原图像具有相同的内容,只是大小和原图像不一样而已;
dsize:输出图像的大小。如果这个参数不为0,那么就代表将原图像缩放到这个Size(width,height)指定的大小;如果这个参数为0,那么原图像缩放之后的大小就要通过下面的公式来计算:
dsize = Size(round(fx*src.cols), round(fy*src.rows))其中,fx和fy就是下面要说的两个参数,是图像width方向和height方向的缩放比例。
fx:width方向的缩放比例,如果它是0,那么它就会按照(double)dsize.width/src.cols来计算;
fy:height方向的缩放比例,如果它是0,那么它就会按照(double)dsize.height/src.rows来计算;注:dsize和fx,fy按我的理解是互斥的,如果用了dsize就不用指定fx,fy了,反之亦然。
interpolation:这个是指定插值的方式,图像缩放之后,肯定像素要进行重新计算的,就靠这个参数来指定重新计算像素的方式,有以下几种:
INTER_NEAREST - 最邻近插值
INTER_LINEAR - 双线性插值,如果最后一个参数你不指定,默认使用这种方法
INTER_AREA -区域插值 resampling using pixel area relation. It may be a preferred method for image decimation, as it gives moire’-free results. But when the image is zoomed, it is similar to the INTER_NEAREST method.
INTER_CUBIC - 4x4像素邻域内的双立方插值
INTER_LANCZOS4 - 8x8像素邻域内的Lanczos插值--------此处参数说明转自
OpenCV图像缩放resize各种插值方式的比较_opencv图像缩放resize各种插值方式的比较实现-CSDN博客
import numpy as np
import cv2 as cv

img = cv.imread('messi5.jpg',1)
assert img is not None,'file could not be load,please check with os.path.exists()'

#缩小到原来的1/2
res1 = cv.resize(img,None,fx=0.5,fy=0.5,interpolation = cv.INTER_AREA)

#放大到原来的2倍
height,width= img.shape[:2]
res2 = cv.resize(img,(2*width,2*height),interpolation = cv.INTER_CUBIC)

#使用cv.INFER_LINEAR来进行插值
res3 = cv.resize(img,None,fx=0.5,fy=0.5,interpolation = cv.INTER_LINEAR)
res4 = cv.resize(img,None,fx=2,fy=2,interpolation=cv.INTER_LINEAR)

cv.imshow('res1',res1)
cv.imshow('res2',res2)
cv.imshow('res3',res3)
cv.imshow('res4',res4)

cv.waitKey(0)
cv.destroyAllWindows()
Translation(平移)
平移就是物体位置的移动。
import numpy as np
import cv2 as cv
img = cv.imread('messi5.jpg', cv.IMREAD_GRAYSCALE)
assert img is not None, "file could not be read, check with os.path.exists()"
rows,cols = img.shape
M = np.float32([[1,0,100],[0,1,50]])
dst = cv.warpAffine(img,M,(cols,rows))
cv.imshow('img',dst)
cv.waitKey(0)
cv.destroyAllWindows()
M矩阵第一个元素[1,0,tx]表示x方向上的变换。其中1表示不改变X坐标的比例,0表示Y坐标的变换不影响X坐标,tx是X方向的平移量。
第二个元素[0,1,ty]表示y方向上的变换。其中0表示x坐标变换不影响y坐标,1表示不改变y坐标的比例,ty是y方向的平移量。

Rotation(旋转)
图像旋转一个角度是通过变换矩阵实现的,变换矩阵形式为
但是,OpenCV 提供了可调整旋转中心的缩放旋转功能,因此您可以在您喜欢的任何位置进行旋转。修改后的变换矩阵如下
img = cv.imread('messi5.jpg', cv.IMREAD_GRAYSCALE)
assert img is not None, "file could not be read, check with os.path.exists()"
rows,cols = img.shape
# cols-1 and rows-1 are the coordinate limits.
M = cv.getRotationMatrix2D(((cols-1)/2.0,(rows-1)/2.0),90,1)
dst = cv.warpAffine(img,M,(cols,rows))
Affine Transformation(仿射变换)
在仿射变换中,原始图像中的所有平行线在输出图像中仍然是平行的。要找到变换矩阵,我们需要输入图像中的三个点及其在输出图像中的对应位置。然后,cv.getAffineTransform 将创建一个 2x3 矩阵,并将其传递给 cv.warpAffine。
img = cv.imread('drawing.png')
assert img is not None, "file could not be read, check with os.path.exists()"
rows,cols,ch = img.shape
pts1 = np.float32([[50,50],[200,50],[50,200]])
pts2 = np.float32([[10,100],[200,50],[100,250]])
M = cv.getAffineTransform(pts1,pts2)
dst = cv.warpAffine(img,M,(cols,rows))
plt.subplot(121),plt.imshow(img),plt.title('Input')
plt.subplot(122),plt.imshow(dst),plt.title('Output')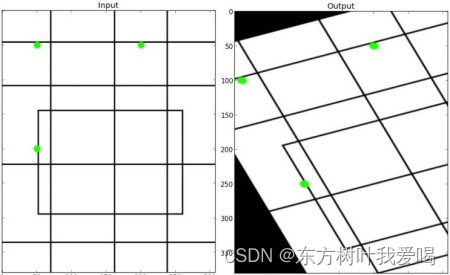
Perspective Transformation(视角变换)
透视变换需要一个 3x3 变换矩阵。即使在变换后,直线仍然是直线。要找到这个变换矩阵,需要输入图像上的 4 个点和输出图像上的相应点。在这 4 个点中,有 3 个点不应相交。然后就可以通过函数 cv.getPerspectiveTransform 找到变换矩阵。然后利用这个 3x3 变换矩阵应用 cv.warpPerspective。
img = cv.imread('sudoku.png')
assert img is not None, "file could not be read, check with os.path.exists()"
rows,cols,ch = img.shape
pts1 = np.float32([[56,65],[368,52],[28,387],[389,390]])
pts2 = np.float32([[0,0],[300,0],[0,300],[300,300]])
M = cv.getPerspectiveTransform(pts1,pts2)
dst = cv.warpPerspective(img,M,(300,300))
plt.subplot(121),plt.imshow(img),plt.title('Input')
plt.subplot(122),plt.imshow(dst),plt.title('Output')
plt.show()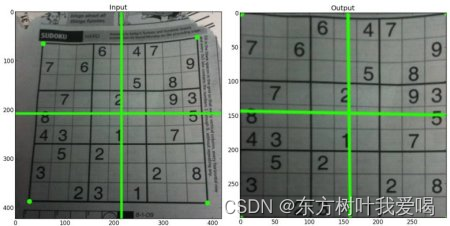
总结:
本章节中学习了图像的几何变换相关操作


 1018
1018

 被折叠的 条评论
为什么被折叠?
被折叠的 条评论
为什么被折叠?
 到【灌水乐园】发言


