


Android ActionBarCompat-Styled Sample
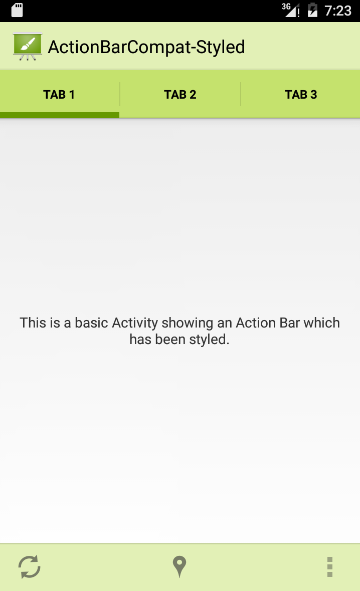
This sample shows you how to use ActionBarCompat with a customized theme. It utilizes a split action bar when running on a device with a narrow display, and shows three tabs.
此示例演示了如何使用 ActionBarCompat 与自定义主题,拆分操作栏,在狭窄的显示设备上运行时,显示三个选项卡。
此示例演示了如何使用 ActionBarCompat 与自定义主题,拆分操作栏,在狭窄的显示设备上运行时,显示三个选项卡。
public class MainActivity extends ActionBarActivity implements ActionBar.TabListener {

    @Override
    protected void onCreate(Bundle savedInstanceState) {
        super.onCreate(savedInstanceState);
        setContentView(R.layout.sample_main);

        // Set the Action Bar to use tabs for navigation
        ActionBar ab = getSupportActionBar();
        ab.setNavigationMode(ActionBar.NAVIGATION_MODE_TABS);

        // Add three tabs to the Action Bar for display
        ab.addTab(ab.newTab().setText("Tab 1").setTabListener(this));
        ab.addTab(ab.newTab().setText("Tab 2").setTabListener(this));
        ab.addTab(ab.newTab().setText("Tab 3").setTabListener(this));
    }

    @Override
    public boolean onCreateOptionsMenu(Menu menu) {
        // Inflate menu from menu resource (res/menu/main)
        getMenuInflater().inflate(R.menu.main, menu);

        return super.onCreateOptionsMenu(menu);
    }

    // Implemented from ActionBar.TabListener
    @Override
    public void onTabSelected(ActionBar.Tab tab, FragmentTransaction fragmentTransaction) {
        // This is called when a tab is selected.
    }

    // Implemented from ActionBar.TabListener
    @Override
    public void onTabUnselected(ActionBar.Tab tab, FragmentTransaction fragmentTransaction) {
        // This is called when a previously selected tab is unselected.
    }

    // Implemented from ActionBar.TabListener
    @Override
    public void onTabReselected(ActionBar.Tab tab, FragmentTransaction fragmentTransaction) {
        // This is called when a previously selected tab is selected again.
    }
}
截图:
但是我觉得重点不在这个地方,而在AndroidManifest.xml上面,因为,ActionBar一直都是在窗口上面的,但是这一次在了窗口下面,这个是有原因的,我很少用过Action Bar,所以我还奇怪了半天,明明代码和资源都是一样的,为什么会在下面了,具体我们来看看AndroidManifest.xml:
  <activity android:name=".MainActivity">

            <!-- Launcher Intent filter -->
            <intent-filter>
                <action android:name="android.intent.action.MAIN" />
                <category android:name="android.intent.category.LAUNCHER" />
            </intent-filter>

            <!--
                In this example set the Activity to have a split action bar when the device's
                display is narrow. In ActionBarCompat this is done by setting the
                'android.support.UI_OPTIONS' metadata field to 'splitActionBarWhenNarrow'.
            -->
            <meta-data
                android:name="android.support.UI_OPTIONS"
                android:value="splitActionBarWhenNarrow" />

        </activity>
当您的应用程序上运行Android 4.0系统(API 14级)或更高级别时,有一个额外的模式可称action bar为“split action bar”。当在一个狭窄的屏幕运行启用split action bar时,会在屏幕的底部出现一个action bar显示所有action item。分裂action bar用来分开action item,确保分配合理数量的空间来在一个狭窄的屏幕上显示所有的action item,而空间留给顶端的导航和标题元素。 使用 split action bar,只需添加uiOptions=“splitActionBarWhenNarrow”,到你的<activity>或<application>清单元素。
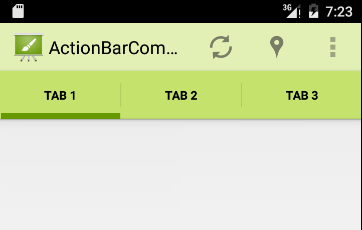
没想到meta-data可以这样用,一直以为只是用代码来获取数据的而已,又学到了一招,……o((≧▽≦o) ,我们把这个去掉之后,程序效果如下:


 3483
3483


 被折叠的 条评论
为什么被折叠?
被折叠的 条评论
为什么被折叠?
 到【灌水乐园】发言


