


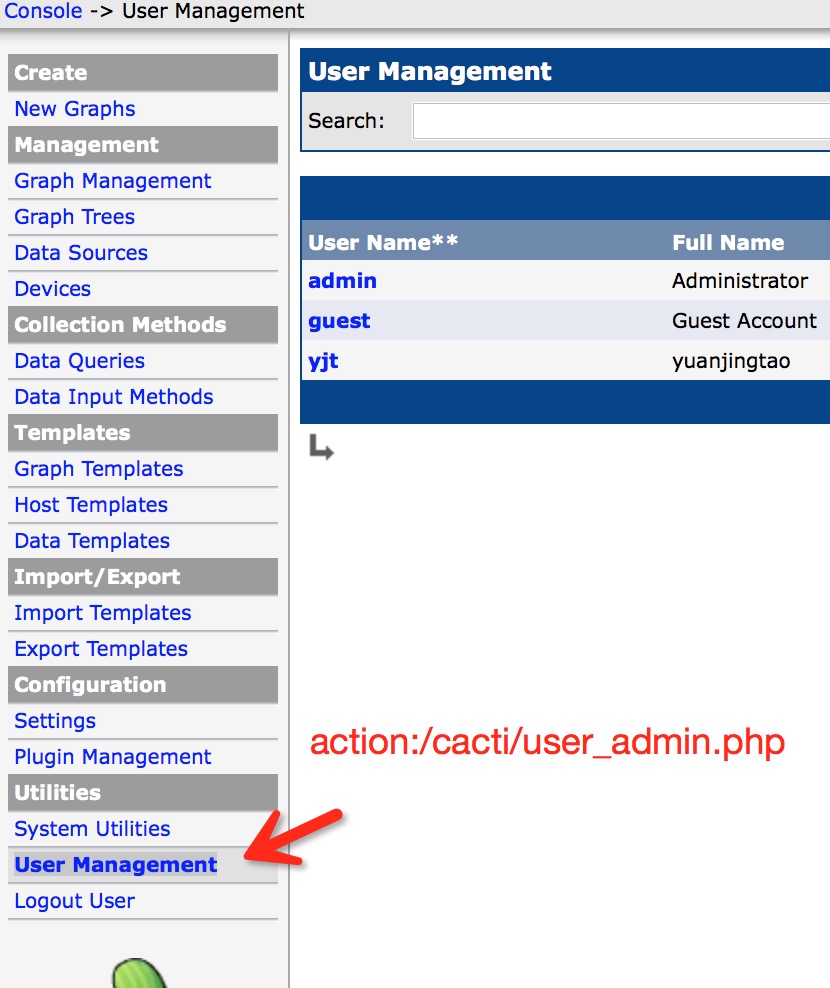
UserManagement
绘制
因为用户是我们登陆时候的核心,所以先从用户也就是UserManagement看起
经过之前的分析我们知道index页面的过程如下:
1. include(“./include/auth.php”);
2. include(“./include/top_header.php”);
3. api_plugin_hook(‘console_before’);
4. 登陆默认首页的绘制。
5. api_plugin_hook(‘console_after’);
6. include(“./include/bottom_footer.php”);
那么打开UserManagement对应的user_admin.php,
可以看到大致过程如下
1. include(“./include/auth.php”);
2. 定义了一个常量
define(“MAX_DISPLAY_PAGES”, 21);
$user_actions = array(
1 => “Delete”,
2 => “Copy”,
3 => “Enable”,
4 => “Disable”,
5 => “Batch Copy”
);
3. load_current_session_value(“tab”, “sess_user_admin_tab”, “user_realms_edit”);用来记住我们come from where
4. action跳转以及表单的构建

1.说一下第4步,代码如下
switch (get_request_var_request("action")) {
    case 'actions':
        form_actions();
        break;

    case 'save':
        form_save();
        break;

    case 'perm_remove':
        perm_remove();
        break;

    case 'user_edit':
        include_once("include/top_header.php");
        user_edit();
        include_once("include/bottom_footer.php");
        break;

    default:
        if (!api_plugin_hook_function('user_admin_action', get_request_var_request("action"))) {
            include_once("include/top_header.php");
            user();
            include_once("include/bottom_footer.php");
        }
        break;
}

如图1所示,当你点击User Management的时候所走的还是user_admin.php这个action。这时候上述switch代码走的case分支就是下面。
default:
    include_once("include/top_header.php");
    user();
    include_once("include/bottom_footer.php");
    break;
也就是会加上top_header.php与bottom_footer.php。并在中间调用一个user()方法。user方法的看起来复杂,其实完成的功能就是绘制user_management页面的main_content页面

这样此时user_admin.php的逻辑结构就变成了

1. include(“./include/auth.php”);
2. include(“./include/top_header.php”);
3. api_plugin_hook(‘console_before’);
4. user_management页面的绘制。
5. api_plugin_hook(‘console_after’);
6. include(“./include/bottom_footer.php”);
这个和我们之前讲的index.php页面是一致的,这个就是cacti大多数功能页面的结构思路。

下面来着重讲一下user()方法。还是使用user_admin.php这个action来讲解。
    1. 首先它定义了三个全局变量
    global $colors, $auth_realms, $user_actions;
    2. 校验分页action中的page变量 input validation,
        关于input_validate_input_number方法,可以传入空值或者是num,
        如果非空并且不是num类型就会die_html_input_error();
        就是在页面上打印Validation error;
    3. 清理所有的session vars,这里的清理是指取出可能带来注入风险的特殊字符。
        1. clean up search string,sort_column and sort_direction string
        例如$_REQUEST["filter"]不为空,就会执行下述代码
        $_REQUEST["filter"] = sanitize_search_string(get_request_var("filter"));

        这个sanitize_search_string();这个function中的部分代码是come from phpBB project,function的用处就是过滤特殊字符。
        2. if the user pushed the 'clear' button,    $_REQUEST["clear_x"]是否有值来判断用户是否点击clear button。
        如果是的话kill_session_var()  and unset($_REQUEST[""]);
        就是清楚session的值以及request中的值。
        3. 调用多个load_current_session_value()来初始化session vars
        这个的目的是帮助我们设置session的值,防止我们忘记设置。
        如果request中有该值,则设置session的值为request中的值,
        如果request没有设置值,而session中有,则设置request中的值为该值。
        如果都没有的话那就设置为load_current_session_value方法中的第三个参数当作默认值
    4. 表单绘制
    html_start_box();
    form表单的绘制;
    $save_html;
    html_end_box();
    draw_actions_dropdown($user_actions);绘制下拉框
    5. 尾部页面的绘制(主要是用于page分页的绘制)
    include_once("./include/bottom_footer.php");
    通过api_plugin_hook('page_bottom');function来实现
点击go,clear,search
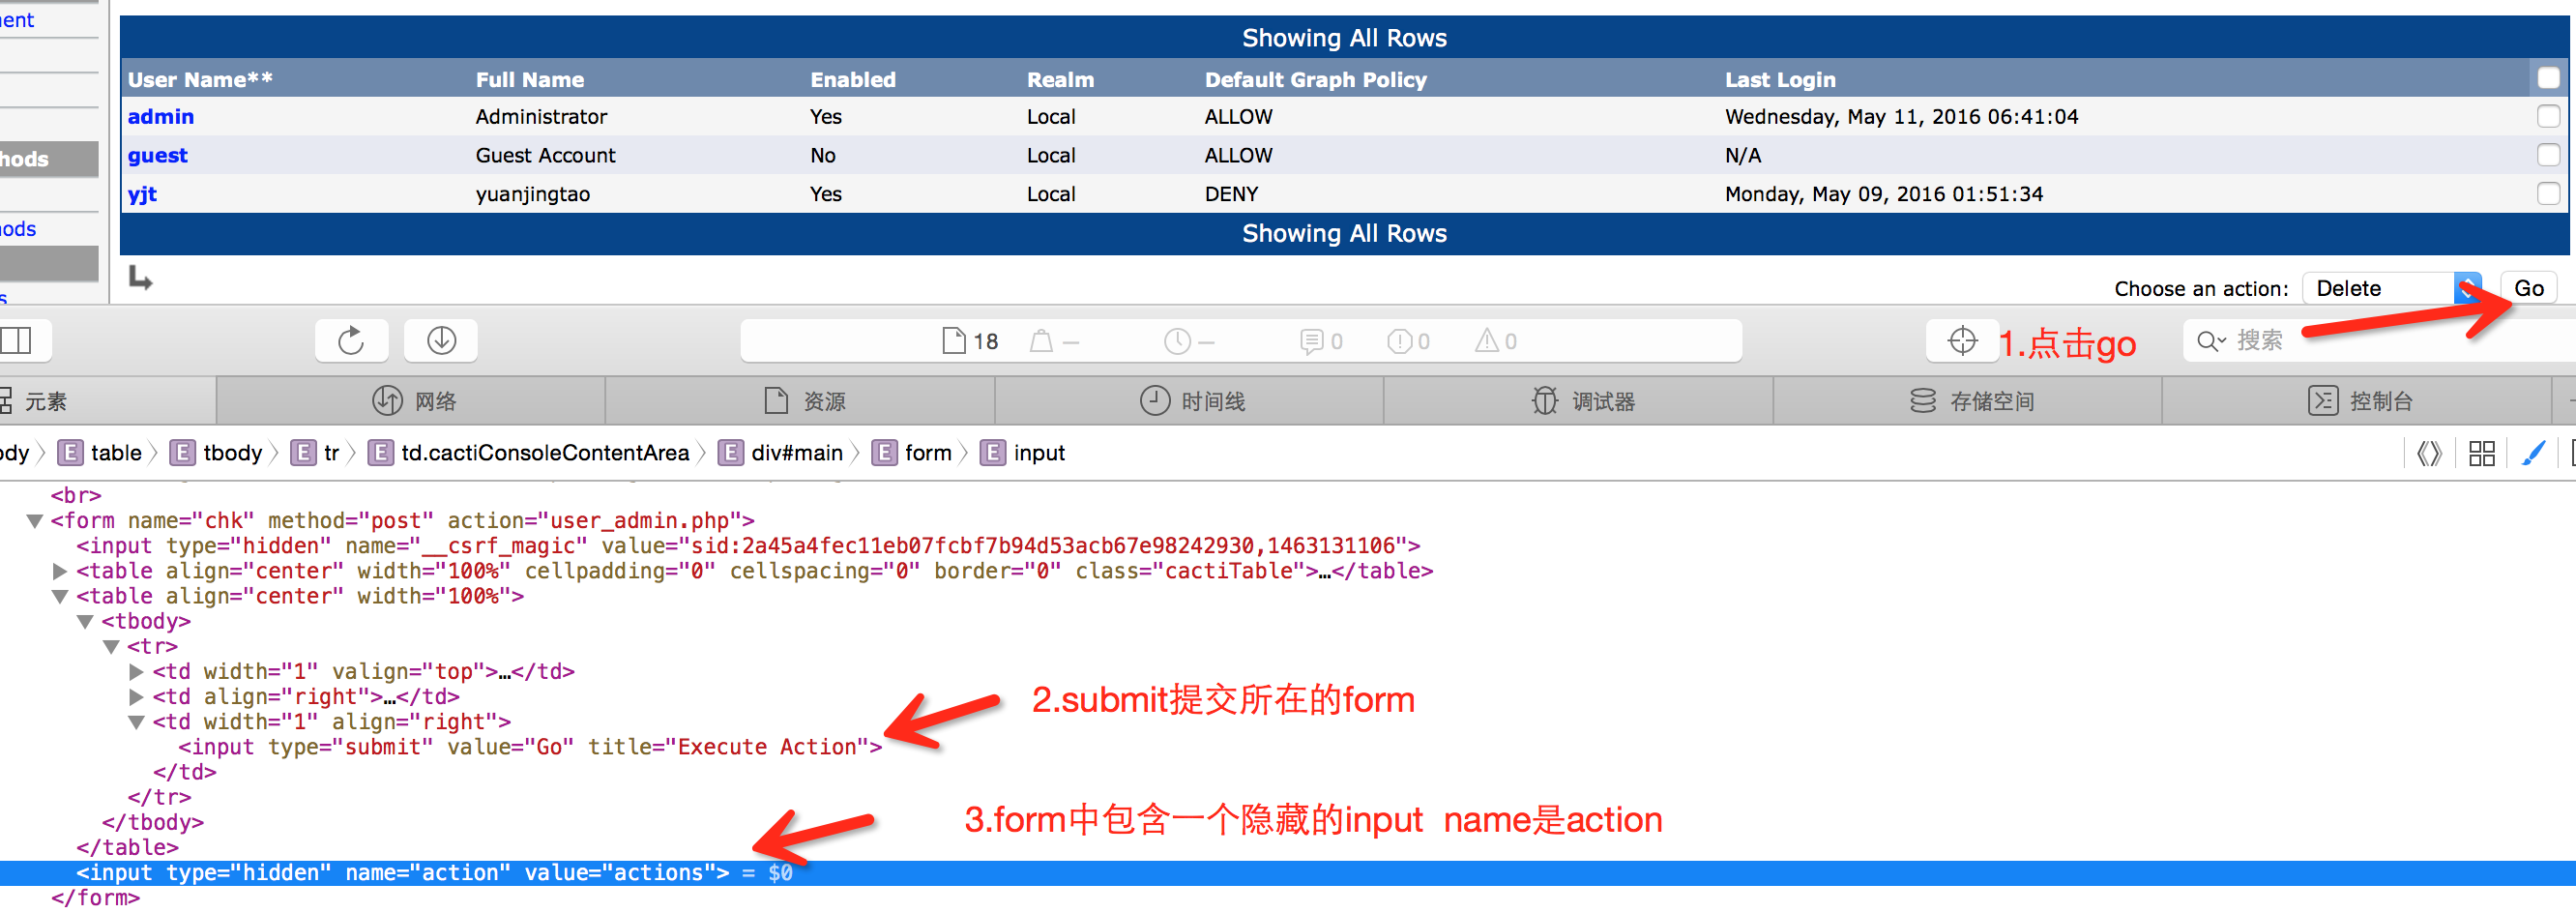
如上图所示:
当我们点击go的时候,go本身是一个submit控件,它会提交所在的form表单,同时这个form中包含一个name为action的input,value为actions,所以当再次提交的时候,请求如下:
action为user_admin.php
request中包含了action这个变量,值为actions。
所以再次来到user_admin.php.
这时候所经判断
switch (get_request_var_request("action")) {
    case 'actions':
        form_actions();
        break;
}
所以我们所执行的function为form_actions();

再来看看form_actions()的功能,
在我们一条数据也不选的过程
    1. 检查$_POST["selected_items"])
    2. include_once("./include/top_header.php");
    3. html_start_box();
    4. form表单的绘制  这个表单只包含一个span提示错误信息"未选择数据",并给了一个值为return,onclick函数为window.history.back()的input
    5. html_end_box();
    6. include_once("./include/bottom_footer.php");
如果我们选择了一条及以上的数据
    1. 检查$_POST["selected_items"])
    2. 根据get_request_var_post("drp_action")执行相应的增删改操作。
    3. header("Location: user_admin.php");
clear,search与go的工作原理相同,这里不再赘述。
点击ADD

当我们点击add的时候路径为user/_admin.php?action=user_edit
所以执行为
switch (get_request_var_request("action")) {
case 'user_edit':
include_once("include/top_header.php");
user_edit();
include_once("include/bottom_footer.php");
break;
}
看到它调用了user_edit()方法。
1. $_GET["id"]是否为空,决定标题为edit还是new
2. api_plugin_hook_function('user_admin_edit')
3. html_start_box();
4. draw_edit_form();
5. html_end_box();
6. form_save_button();
这里着重看一下draw_edit_form(),因为后面还会多次用到此方法。
如本例中。
draw_edit_form(array(
"config" => array("form_name" => "chk"),
"fields" => inject_form_variables($fields_user_user_edit_host, (isset($user) ? $user : array()))
));
传入了两个变量
1. 首先提取出fields和config这两个变量,
2. 对fields进行处理,$fields_user_user_edit_host是定义在global_form.php中的array数组。前面讲过使用,以及这样使用的好处。可以统一定制,方便修改增加字段等。
3. 传入的config主要功能是提供fields等应该同意的样式,例如颜色等。
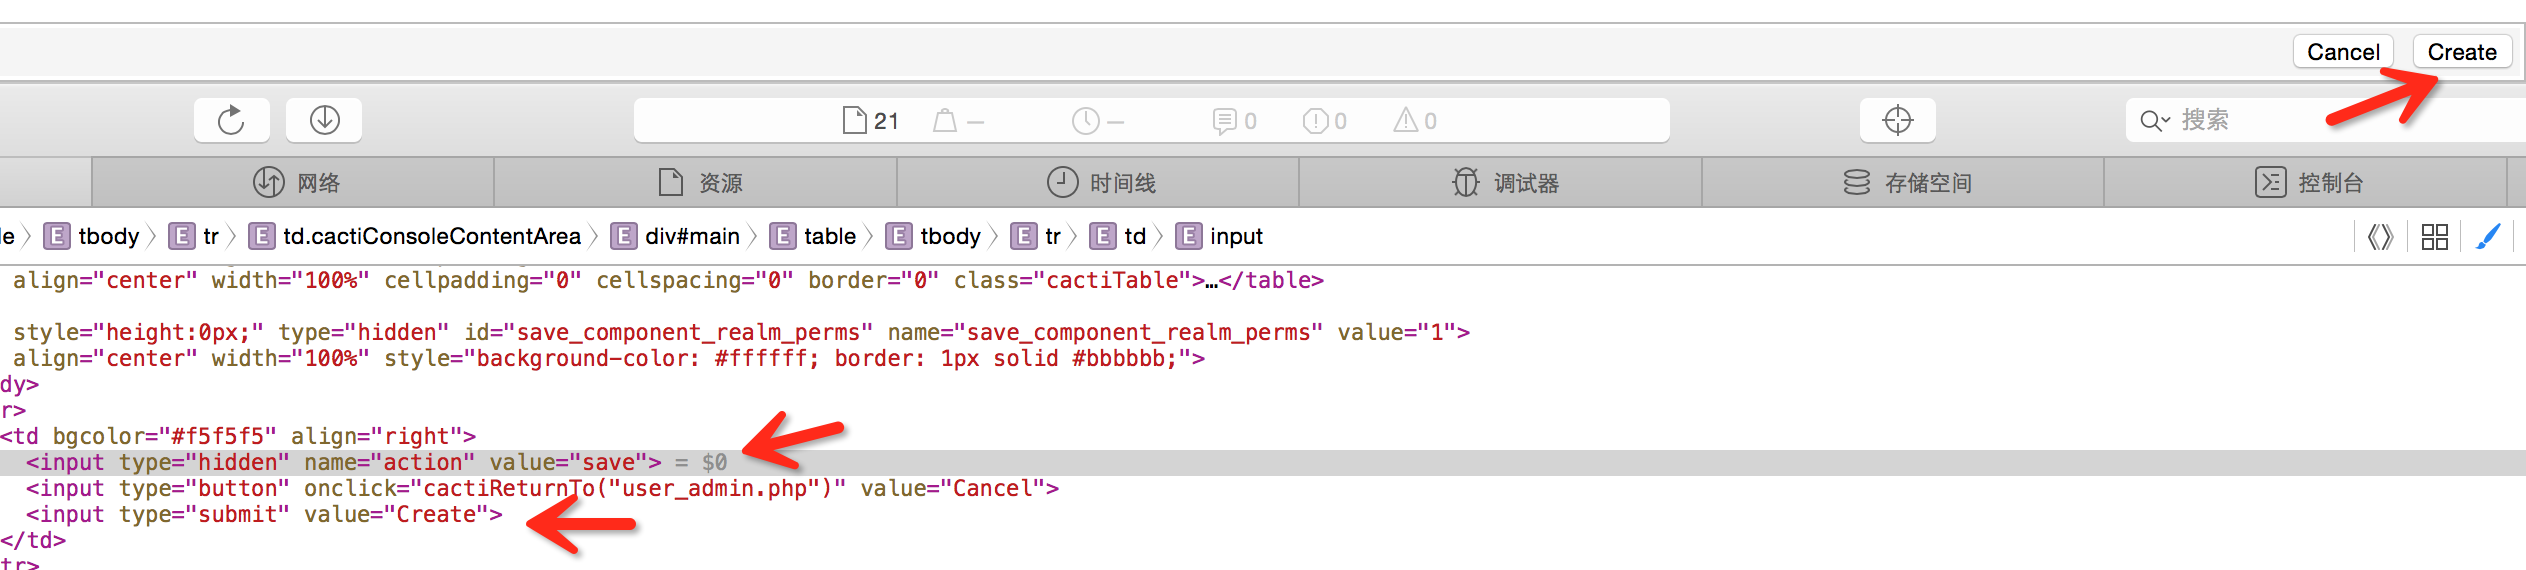
如图1所示之前介绍了这种方式,通过submit以及name为action的input,来达到提交一个action为user_admin.php并且$_POST["action"]=save的表单。
需要注意的是这个表单还会提交图2所示的很多realms信息。从这里我们可以看出,默认的权限都是为2没有的。
现在跳转回user_admin.php页面,action为save,则
switch (get_request_var_request("action")) {
case 'save':
form_save();
break;
}
这时发现调用的是form_save()的function
具体逻辑和之前一样。这里不再讲过程,我们只讲插入用户所需要插入的数据
1. sql_save($save, "user_auth")
这其中user_auth包含如下:
$save["username"]
$save["full_name"]
$save["password"]
$save["must_change_password"]
$save["show_tree"]
$save["show_list"]
$save["show_preview"]
$save["graph_settings"]
$save["login_opts"]
$save["policy_graphs"]
$save["policy_trees"]
$save["policy_hosts"]
$save["policy_graph_templates"]
$save["realm"]
$save["enabled"]
这个正是我们表的所有字段,所有字段所对应的含义,请查看数据库中的该表的字段注释。
2. $_POST["save_component_realm_perms"])
代表Realm Permissions。Realm permissions control which sections of Cacti this user will have access to.
对应处理的表为user_auth_realm。
首先delete所有相关user_id的数据,然后replace into到user_auth_realm表中。
note:它使用的插入是replace into
使用replace into的好处是首先尝试插入数据到表中,如果发现表中已经有此行数据(根据主键或者唯一索引判断)则先删除此行数据,然后插入新的数据。否则,直接插入新数据。
至此,整个保存流程走完。点击Edit
edit与上述模块相似,
这里只简单介绍权限分类
Realm permissions
Realm permissions control which sections of Cacti this user will have access to.
Graph permissions
Graph policies will be evaluated in the order shown until a match is found.
其中分为四类,这个之前说过,分别是:
By Graph
By Device
By Graph Template
By Tree
Graph settings
Graph settings control how graphs are displayed for this user.


 286
286

 被折叠的 条评论
为什么被折叠?
被折叠的 条评论
为什么被折叠?
 到【灌水乐园】发言


