使用ObjectAnimator实现ArcMenu动画效果
ObjectAnimator是Google3.0+系统提供的另一套动画框架,相比于原始的Animation动画框架,ObjectAnimator(属性动画)更灵活、方便且效率更高。
使用普通的Animation框架,如果我们需要实现一个ImageView的移动效果,可以使用TranslateAnimation很轻松的”实现”,这里所说的实现是指界面层次的,但是这种仅停留在界面层次的”实现”会出现很多的问题,例如我们用TranslateAnimation把ImageView从A点移动到了B点,但其实移动后的ImageView的响应事件如点击时间等,依然停留在移动前的A点。换句话说,使用Animation框架实现的效果停留在”界面”层次而非”交互层次”。
对于ObjectAnimator的详细介绍,大家可以参考其他的博文了解,在此不在详细说明。
我们要实现的效果大致是这样的:
PS:不会用录屏软件做gif,只能拿一张效果图充数,见谅===
布局文件中很简单,一个FrameLayout包含6个ImageView,代码如下:
<?xml version="1.0" encoding="utf-8"?>
<FrameLayout xmlns:android="http://schemas.android.com/apk/res/android"
             android:orientation="vertical"
             android:background="#ffffff"
             android:padding="20dp"
             android:layout_width="match_parent"
             android:layout_height="match_parent">
    <ImageView android:layout_width="wrap_content"
               android:layout_height="wrap_content"
               android:src="@drawable/composer_camera"
               android:id="@+id/iv_camera"/>

    <ImageView android:layout_width="wrap_content"
               android:layout_height="wrap_content"
               android:src="@drawable/composer_music"
               android:id="@+id/iv_music"/>

    <ImageView android:layout_width="wrap_content"
               android:layout_height="wrap_content"
               android:src="@drawable/composer_place"
               android:id="@+id/iv_place"/>

    <ImageView android:layout_width="wrap_content"
               android:layout_height="wrap_content"
               android:src="@drawable/composer_sleep"
               android:id="@+id/iv_sleep"/>

    <ImageView android:layout_width="wrap_content"
               android:layout_height="wrap_content"
               android:src="@drawable/composer_thought"
               android:id="@+id/iv_thought"/>

    <ImageView android:layout_width="wrap_content"
               android:layout_height="wrap_content"
               android:src="@drawable/composer_with"
               android:id="@+id/iv_with"/>
</FrameLayout>
这篇博客的主要目的是用ObjectAnimator实现动画效果,所以并没有吧ArcMenu抽成自定义View。
ArcMenuActivity中的代码如下:
package com.example.myview;

import android.animation.AnimatorSet;
import android.animation.ObjectAnimator;
import android.app.Activity;
import android.os.Bundle;
import android.view.View;
import android.view.animation.BounceInterpolator;
import android.widget.ImageView;
import android.widget.Toast;

import java.util.LinkedList;
import java.util.List;

/**
 * Created by WangChunLei on 15/10/31.
 */
public class ArcMenuActivity extends Activity implements View.OnClickListener {

    int[] resId = {R.id.iv_camera, R.id.iv_music, R.id.iv_place, R.id.iv_sleep, R.id.iv_thought, R.id.iv_with};
    List<ImageView> list = new LinkedList<ImageView>();
    boolean isShowing = false;

    @Override
    protected void onCreate(Bundle savedInstanceState) {
        super.onCreate(savedInstanceState);
        setContentView(R.layout.layout_arc_menu);

        for (int i = 0; i < resId.length; i++) {
            ImageView iv = (ImageView) findViewById(resId[i]);
            list.add(iv);
            iv.setOnClickListener(this);
        }
    }

    @Override
    public void onClick(View v) {
        switch (v.getId()) {
            case R.id.iv_with:
                if (isShowing) {//收回
                    closeArcMenu();
                } else {//弹出
                    showArcMenu();
                }
                isShowing = !isShowing;
                break;
            case R.id.iv_thought:
            case R.id.iv_camera:
            case R.id.iv_sleep:
            case R.id.iv_music:
            case R.id.iv_place:
                Toast.makeText(this, "当前点击的图片ID为:" + v.getId(), Toast.LENGTH_LONG).show();
                break;
            default:
                break;
        }
    }

    private void showArcMenu() {
        int radius = (list.size() - 2) * 120;//半径
        float perAngle = (float) ((90 / (list.size() - 2)) * Math.PI / 180);

        for (int i = 0; i < list.size() - 1; i++) {
            float x = (float) (radius * Math.cos(i * perAngle));
            float y = (float) (radius * Math.sin(i * perAngle));
            ObjectAnimator animator1 = ObjectAnimator.ofFloat(list.get(i),
                    "translationY", 0f, x);
            ObjectAnimator animator2 = ObjectAnimator.ofFloat(list.get(i),
                    "translationX", 0f, y);

            AnimatorSet set = new AnimatorSet();
            set.playTogether(animator1, animator2);
            set.setDuration(300);
            set.setInterpolator(new BounceInterpolator());
            set.setStartDelay(i * 100);
            set.start();
        }
    }

    private void closeArcMenu() {
        int radius = (list.size() - 2) * 120;//半径
        float perAngle = (float) ((90 / (list.size() - 2)) * Math.PI / 180);

        for (int i = 0; i < list.size() - 1; i--) {
            float x = (float) (radius * Math.cos(i * perAngle));
            float y = (float) (radius * Math.sin(i * perAngle));

            ObjectAnimator animator1 = ObjectAnimator.ofFloat(list.get(i), "translationY", x, 0f);
            ObjectAnimator animator2 = ObjectAnimator.ofFloat(list.get(i), "translationX", y, 0f);

            AnimatorSet set = new AnimatorSet();
            set.playTogether(animator1, animator2);
            set.setDuration(300);
            set.setInterpolator(new BounceInterpolator());
            set.setStartDelay(i * 100);
            set.start();
        }
    }
}
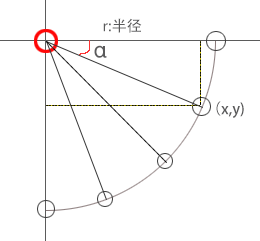
每个ImageView移动的位置是需要一些数学计算的,以下图做解释:

通过上图的原理,再作一些简单的计算,就能够得到每个图片移动后的位置
x=radius*Math.cos(α);
y=radius*Math.sin(α);
代码中,showArcMenu表示菜单展开的方法,closeArcMenu表示菜单收回的方法,这两个动作的动画恰好是相反的,只是起始x,y和终止x,y调换了一下位置而已。
写博文不容易,用Photoshop画示意图更是蛋疼,希望该博文会有所帮助。


 3486
3486

 被折叠的 条评论
为什么被折叠?


