三十七、openlayers官网示例Earthquakes Heatmap解析——在地图上加载热力图

官网demo地址:

Earthquakes Heatmap 

这篇主要介绍了热力图HeatmapLayer

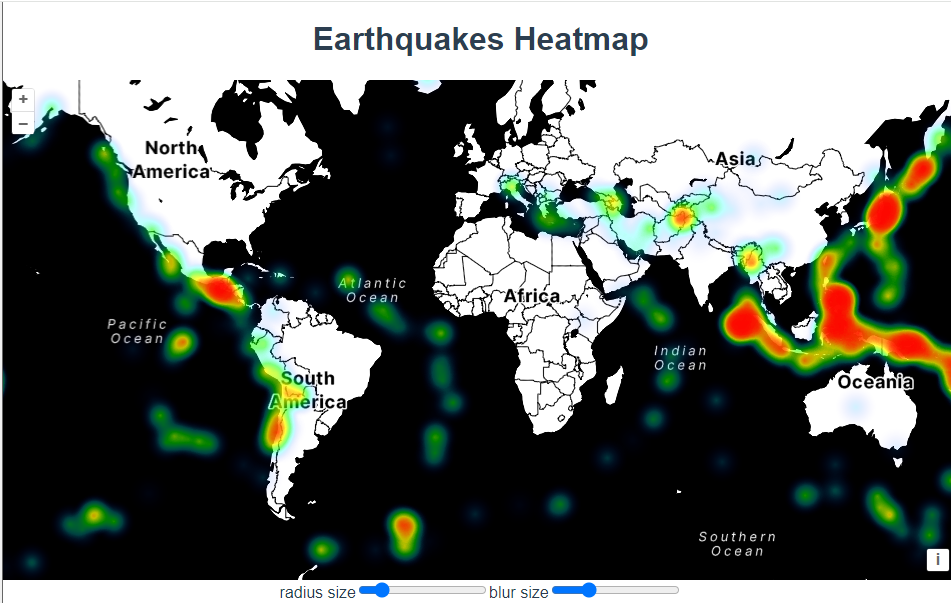
HeatmapLayer 是一个用于在地图上显示热力图的图层类型,通常用于表示地理数据中的密度或强度。例如,它可以用来显示地震、人口密度或其他空间数据的热点区域。在这个示例中,HeatmapLayer 被用来显示从 KML 文件中提取的地震数据。 

 const vector = new HeatmapLayer({
      source: new VectorSource({
        url: "https://openlayers.org/en/latest/examples/data/kml/2012_Earthquakes_Mag5.kml",
        format: new KML({
          extractStyles: false,
        }),
      }),
      //热力图的模糊半径,以像素为单位。
      blur: parseInt(blur.value, 10),
      //每个点的影响半径,以像素为单位。
      radius: parseInt(radius.value, 10),
      //用于根据特征属性计算热力图中每个点的权重 权重值 应介于 0 到 1 之间
      weight: function (feature) {
        const name = feature.get("name");
        const magnitude = parseFloat(name.substr(2));
        console.log("magnitude", magnitude);
        return magnitude - 5;
      },
    });

通过滑块的改变控制图层的半径和模糊度 

 blur.addEventListener("input", function () {
      vector.setBlur(parseInt(blur.value, 10));
    });

    radius.addEventListener("input", function () {
      vector.setRadius(parseInt(radius.value, 10));
    });

 完整代码:

<template>
  <div class="box">
    <h1>Earthquakes Heatmap</h1>
    <div id="map"></div>
    <form>
      <label for="radius">radius size</label>
      <input id="radius" type="range" min="1" max="50" step="1" value="5" />
      <label for="blur">blur size</label>
      <input id="blur" type="range" min="1" max="50" step="1" value="15" />
    </form>
  </div>
</template>

<script>
import KML from "ol/format/KML.js";
import Map from "ol/Map.js";
import StadiaMaps from "ol/source/StadiaMaps.js";
import VectorSource from "ol/source/Vector.js";
import View from "ol/View.js";
import { Heatmap as HeatmapLayer, Tile as TileLayer } from "ol/layer.js";
export default {
  name: "",
  components: {},
  data() {
    return {
      map: null,
    };
  },
  computed: {},
  created() {},
  mounted() {
    const blur = document.getElementById("blur");
    const radius = document.getElementById("radius");

    const vector = new HeatmapLayer({
      source: new VectorSource({
        url: "https://openlayers.org/en/latest/examples/data/kml/2012_Earthquakes_Mag5.kml",
        format: new KML({
          extractStyles: false,
        }),
      }),
      //热力图的模糊半径,以像素为单位。
      blur: parseInt(blur.value, 10),
      //每个点的影响半径,以像素为单位。
      radius: parseInt(radius.value, 10),
      //用于根据特征属性计算热力图中每个点的权重 权重值 应介于 0 到 1 之间
      weight: function (feature) {
        const name = feature.get("name");
        const magnitude = parseFloat(name.substr(2));
        console.log("magnitude", magnitude);
        return magnitude-5;
      },
    });

    const raster = new TileLayer({
      source: new StadiaMaps({
        layer: "stamen_toner",
      }),
    });

    new Map({
      layers: [raster, vector],
      target: "map",
      view: new View({
        center: [0, 0],
        zoom: 2,
      }),
    });

    blur.addEventListener("input", function () {
      vector.setBlur(parseInt(blur.value, 10));
    });

    radius.addEventListener("input", function () {
      vector.setRadius(parseInt(radius.value, 10));
    });
  },
  methods: {},
};
</script>

<style lang="scss" scoped>
#map {
  width: 100%;
  height: 500px;
}
.box {
  height: 100%;
}
</style>

  • 2
    点赞
  • 0
    收藏
    觉得还不错? 一键收藏
  • 0
    评论
可以使用 echarts 和 openlayers 分别实现热力图,下面分别介绍一下具体的方法: 1. echarts 实现热力图 使用 echarts 实现热力图需要使用 echarts 的插件 echarts-gl,通过 echarts-gl 可以使用 WebGL 技术绘制更加复杂的图表,包括热力图。 具体步骤如下: (1)安装 echarts-gl 插件: ``` npm install echarts-gl --save ``` (2)引入 echarts 和 echarts-gl: ```html <script src="https://cdn.jsdelivr.net/npm/echarts/dist/echarts.min.js"></script> <script src="https://cdn.jsdelivr.net/npm/echarts-gl/dist/echarts-gl.min.js"></script> ``` (3)创建一个包含地图的 div 容器和一个 echarts 实例: ```html <div id="map" style="width: 100%; height: 600px;"></div> <script type="text/javascript"> var myChart = echarts.init(document.getElementById('map')); </script> ``` (4)配置 echarts 实例,包括地图类型、地图数据和热力图数据: ```javascript option = { tooltip: {}, visualMap: { min: 0, max: 500, calculable: true, inRange: { color: ['#50a3ba', '#eac736', '#d94e5d'] } }, geo: { map: 'world', roam: true }, series: [{ type: 'heatmap', coordinateSystem: 'geo', data: [ {name: 'Afghanistan', value: 283.54}, {name: 'Albania', value: 198.28}, {name: 'Algeria', value: 200.20}, // ... 省略部分数据 ] }] }; myChart.setOption(option); ``` 2. openlayers 实现热力图 使用 openlayers 实现热力图需要使用第三方库 ol-heatmap,ol-heatmap 是一个基于 openlayers热力图插件。 具体步骤如下: (1)安装 ol-heatmap: ``` npm install ol-heatmap --save ``` (2)引入 openlayers 和 ol-heatmap: ```html <link rel="stylesheet" href="https://cdn.jsdelivr.net/npm/ol/dist/ol.css" type="text/css"> <script src="https://cdn.jsdelivr.net/npm/ol/dist/ol.js"></script> <script src="https://cdn.jsdelivr.net/npm/ol-heatmap/ol-heatmap.js"></script> ``` (3)创建一个包含地图的 div 容器和一个 openlayers 实例: ```html <div id="map" style="width: 100%; height: 600px;"></div> <script type="text/javascript"> var map = new ol.Map({ target: 'map', layers: [ new ol.layer.Tile({ source: new ol.source.OSM() }) ], view: new ol.View({ center: [0, 0], zoom: 2 }) }); </script> ``` (4)创建一个热力图层并添加到 openlayers 实例中: ```javascript var heatmapLayer = new ol.layer.Heatmap({ source: new ol.source.Vector({ url: 'data.json', format: new ol.format.GeoJSON() }), blur: 15, radius: 5, opacity: 0.8 }); map.addLayer(heatmapLayer); ``` 其中,data.json 是包含热力图数据的 GeoJSON 格式文件。
评论
添加红包

请填写红包祝福语或标题

红包个数最小为10个

红包金额最低5元

当前余额3.43前往充值 >
需支付:10.00
成就一亿技术人!
领取后你会自动成为博主和红包主的粉丝 规则
hope_wisdom
发出的红包
实付
使用余额支付
点击重新获取
扫码支付
钱包余额 0

抵扣说明:

1.余额是钱包充值的虚拟货币,按照1:1的比例进行支付金额的抵扣。
2.余额无法直接购买下载,可以购买VIP、付费专栏及课程。

余额充值