


前言
上一篇文章我们具体分析了Android12原生状态栏类StatusBar构建状态栏视图以及将状态栏添加到Window的过程,也分析了状态栏视图的整个布局结构;早期的状态栏和导航栏对于手机设备来说那是相当重要的,但是随着手机不断的推陈出新,状态栏和导航栏对于手机的重要性在逐渐降低,特别是在快捷手势出现之后,导航栏几乎变得可有可无。但是对于当前如火如荼的商用车载系统来说,状态栏和导航栏却几乎是必备的,谷歌自然也意识到了这点,特意在Android12的原生代码中提供了一个包含有状态栏、导航栏、消息中心等SystemUI组件的项目CarSystemUI,而它正是本篇文章我们所要分析的。
一、车载SystemUI和原生SystemUI的关系
1)两者的位置不同
原生SystemUI项目位于/frameworks/base/package/SystemUI目录,车载SystemUI项目位于/packages/apps/Car/SystemUI目录
2)原生SystemUI是车载SystemUI的基础
原生SystemUI可以独立编译成SystemUI.apk文件,车载SystemUI无法独立编译,必须在原生SystemUI的基础上才能编译出CarSystemUI.apk文件;通过阅读CarSystemUI的Android.bp文件可以发现,CarSystemUI在编译的时候,会将原生的SystemUI以静态库的方式引入。
packages/apps/Car/SystemUI/Android.bp
android_library {
    name: "CarSystemUI-core",

    srcs: [
        "src/**/*.java",
        "src/**/I*.aidl",
    ],

    resource_dirs: [
        "res-keyguard",
        "res",
    ],

    static_libs: [
        "SystemUI-core",
        "CarNotificationLib",
        "SystemUIPluginLib",
        "SystemUISharedLib",
        "SettingsLib",
        "car-admin-ui-lib",
        "car-ui-lib",
        "android.car.userlib",
        "car-qc-lib",
        "androidx.legacy_legacy-support-v4",
        "androidx.recyclerview_recyclerview",
        "androidx.preference_preference",
        "androidx.appcompat_appcompat",
        "androidx.mediarouter_mediarouter",
        "androidx.palette_palette",
        "androidx.legacy_legacy-preference-v14",
        "androidx.leanback_leanback",
        "androidx.slice_slice-core",
        "androidx.slice_slice-view",
        "androidx.slice_slice-builders",
        "androidx.arch.core_core-runtime",
        "androidx.lifecycle_lifecycle-extensions",
        "SystemUI-tags",
        "SystemUI-proto",
        "dagger2",
        "//external/kotlinc:kotlin-annotations",
    ],

    libs: [
        "android.car",
    ],

    manifest: "AndroidManifest.xml",

    plugins: ["dagger2-compiler"],

}

android_app {
    name: "CarSystemUI",

    static_libs: [
        "CarSystemUI-core",
    ],

    export_package_resources: true,

    libs: [
        "android.car",
    ],

    resource_dirs: [],

     overrides: [
        "SystemUI",
    ],

    platform_apis: true,
    system_ext_specific: true,
    certificate: "platform",
    privileged: true,

    optimize: {
        proguard_flags_files: [
            "proguard.flags",
        ],
    },
    dxflags: ["--multi-dex"],

    aaptflags: [
        "--extra-packages",
        "com.android.keyguard",
    ],

    kotlincflags: ["-Xjvm-default=enable"],

    plugins: ["dagger2-compiler"],

    required: ["privapp_whitelist_com.android.systemui", "allowed_privapp_com.android.carsystemui"],
}
3)两者包含的组件不同
车载SystemUI去掉了原生SystemUI中的一部分组件,又新增了一部分自定义组件。
二、CarSystemUIFactory创建CarSystemUI模块所需的各种SystemUI组件
1、在Android 12系统源码_SystemUI(一)SystemUI的启动流程这篇文章中我们有讲过,SystemUIApplication的onCreate方法会回调对象SystemUIAppComponentFactory为自己设置的回调方法。
frameworks/base/packages/SystemUI/src/com/android/systemui/SystemUIAppComponentFactory.java
public class SystemUIAppComponentFactory extends AppComponentFactory {

    @NonNull
    @Override
    public Application instantiateApplicationCompat(
            @NonNull ClassLoader cl, @NonNull String className)
            throws InstantiationException, IllegalAccessException, ClassNotFoundException {
        Application app = super.instantiateApplicationCompat(cl, className);
        if (app instanceof ContextInitializer) {
        	//为Application设置回调方法
            ((ContextInitializer) app).setContextAvailableCallback(
                    context -> {
                        SystemUIFactory.createFromConfig(context);
                        SystemUIFactory.getInstance().getSysUIComponent().inject(SystemUIAppComponentFactory.this);
                    }
            );
        }

        return app;
    }

}
2、该回调方法会调用SystemUIFactory的createFromConfig方法。
framework/base/packages/SystemUI/src/com/android/systemui/SystemUIFactory.java
public class SystemUIFactory {

    static SystemUIFactory mFactory;

    public static <T extends SystemUIFactory> T getInstance() {
        return (T) mFactory;
    }
    public static void createFromConfig(Context context) {
        createFromConfig(context, false);
    }

    @VisibleForTesting
    public static void createFromConfig(Context context, boolean fromTest) {
        if (mFactory != null) {
            return;
        }
        //获取config_systemUIFactoryComponent所对应的字符串
        final String clsName = context.getString(R.string.config_systemUIFactoryComponent);
        if (clsName == null || clsName.length() == 0) {
            throw new RuntimeException("No SystemUIFactory component configured");
        }
        try {
            Class<?> cls = null;
            cls = context.getClassLoader().loadClass(clsName);
            //通过反射创建SystemUIFactory实例并赋值给静态属性mFactory
            mFactory = (SystemUIFactory) cls.newInstance();
            //执行init方法
            mFactory.init(context, fromTest);
        } catch (Throwable t) {
            Log.w(TAG, "Error creating SystemUIFactory component: " + clsName, t);
            throw new RuntimeException(t);
        }
    }
}
frameworks/base/packages/SystemUI/res/values/config.xml
<string name="config_systemUIFactoryComponent" translatable="false">com.android.systemui.SystemUIFactory</string>
SystemUIFactory的createFromConfig最终是获取R.string.config_systemUIFactoryComponent所对应的字符串,在原生SystemUI项目中这个字符串就是SystemUIFactory自己的类名,这样通过反射创建的对象自然就是SystemUIFactory本身,后续调用SystemUIFactory的getInstance方法所获取的对象自然也是SystemUIFactory对象实例。
3、然而车载SystemUI项目修改了这个字段,让该字段变成了CarSystemUIFactory的类名。
packages/apps/Car/SystemUI/res/values/config.xml
    <string name="config_systemUIFactoryComponent" translatable="false">
        com.android.systemui.CarSystemUIFactory
    </string>
这样SystemUIFactory后续调用SystemUIFactory的getInstance方法所获取的对象就变成了CarSystemUIFactory。
4、SystemUI组件最初都是在SystemUIApplication的startServicesIfNeeded方法中被创建并初始化的。
    public void startServicesIfNeeded() {
        String[] names = SystemUIFactory.getInstance().getSystemUIServiceComponents(getResources());
        startServicesIfNeeded(/* metricsPrefix= */ "StartServices", names);
    }
SystemUIApplication的startServicesIfNeeded方法调用SystemUIFactory.getInstance()方法最终得到了CarSystemUIFactory对象,接着会调用CarSystemUIFactory的getSystemUIServiceComponents方法获取需要创建和初始化的SystemUI组件对象。
5、CarSystemUIFactory的getSystemUIServiceComponents方法如下所示。
public class CarSystemUIFactory extends SystemUIFactory {
    @Override
    public String[] getSystemUIServiceComponents(Resources resources) {
        Set<String> names = new HashSet<>();
		//获取SystemUI项目配置的所有SystemUI组件
        for (String s : super.getSystemUIServiceComponents(resources)) {
            names.add(s);
        }
		//CarSystemUI模块需要移除的SystemUI组件
        for (String s : resources.getStringArray(R.array.config_systemUIServiceComponentsExclude)) {
            names.remove(s);
        }
		//CarSystemUI模块需要新增的SystemUI组件
        for (String s : resources.getStringArray(R.array.config_systemUIServiceComponentsInclude)) {
            names.add(s);
        }
        //在经过移除、新增两步后,会将新的组件数组返回
        String[] finalNames = new String[names.size()];
        names.toArray(finalNames);
        return finalNames;
    }
 }
1)获取SystemUI项目配置的所有SystemUI组件。
    <string-array name="config_systemUIServiceComponents" translatable="false">
        <item>com.android.systemui.util.NotificationChannels</item><!--通知-->
        <item>com.android.systemui.keyguard.KeyguardViewMediator</item><!--键盘锁状态-->
        <item>com.android.systemui.recents.Recents</item><!--任务列表-->
        <item>com.android.systemui.volume.VolumeUI</item><!--监听音量,并决定是否显示音量的对话框-->
        <item>com.android.systemui.statusbar.phone.StatusBar</item><!--状态栏-->
        <item>com.android.systemui.usb.StorageNotification</item><!--监听 USB 连接状态并发送通知进行提示-->
        <item>com.android.systemui.power.PowerUI</item><!--监听电量状态并在低电量时发送通知-->
        <item>com.android.systemui.media.RingtonePlayer</item><!--用于播放铃声-->
        <item>com.android.systemui.keyboard.KeyboardUI</item><!--键盘锁 UI-->
        <item>com.android.systemui.shortcut.ShortcutKeyDispatcher</item><!--快捷分发器-->
        <item>@string/config_systemUIVendorServiceComponent</item><!--这里可以定义厂商定制的组件-->
        <item>com.android.systemui.util.leak.GarbageMonitor$Service</item><!--用于监控内存泄漏的服务-->
        <item>com.android.systemui.LatencyTester</item><!--仅在 debug 环境执行,用于监听系统测试延迟的模拟动作-->
        <item>com.android.systemui.globalactions.GlobalActionsComponent</item><!--用于显示全局对话框(例如长按电源按键)-->
        <item>com.android.systemui.ScreenDecorations</item><!--处理页面中的显示的形状(如圆角)-->
        <item>com.android.systemui.biometrics.AuthController</item><!--身份验证-->
        <item>com.android.systemui.SliceBroadcastRelayHandler</item><!--允许打开设置App-->
        <item>com.android.systemui.statusbar.notification.InstantAppNotifier</item><!--时应用程序通知-->
        <item>com.android.systemui.theme.ThemeOverlayController</item><!--主题-->
        <item>com.android.systemui.accessibility.WindowMagnification</item><!--放大器-->
        <item>com.android.systemui.accessibility.SystemActions</item>
        <item>com.android.systemui.toast.ToastUI</item>
        <item>com.android.systemui.wmshell.WMShell</item>
    </string-array>
2)CarSystemUI模块需要移除的SystemUI组件。
    <string-array name="config_systemUIServiceComponentsExclude" translatable="false">
        <item>com.android.systemui.recents.Recents</item>
        <item>com.android.systemui.volume.VolumeUI</item>
        <item>com.android.systemui.statusbar.phone.StatusBar</item><!--原生状态栏在这里被移除-->
        <item>com.android.systemui.keyboard.KeyboardUI</item>
        <item>com.android.systemui.shortcut.ShortcutKeyDispatcher</item>
        <item>com.android.systemui.LatencyTester</item>
        <item>com.android.systemui.globalactions.GlobalActionsComponent</item>
        <item>com.android.systemui.SliceBroadcastRelayHandler</item>
        <item>com.android.systemui.statusbar.notification.InstantAppNotifier</item>
        <item>com.android.systemui.accessibility.WindowMagnification</item>
        <item>com.android.systemui.accessibility.SystemActions</item>
        <item>com.android.systemui.toast.ToastUI</item>
    </string-array>
3)CarSystemUI模块需要新增的SystemUI组件。
    <string-array name="config_systemUIServiceComponentsInclude" translatable="false">
        <item>com.android.systemui.car.systembar.CarSystemBar</item><!--车载导航栏在这里被添加-->
        <item>com.android.systemui.car.voicerecognition.ConnectedDeviceVoiceRecognitionNotifier</item>
        <item>com.android.systemui.car.window.SystemUIOverlayWindowManager</item>
        <item>com.android.systemui.car.toast.CarToastUI</item>
        <item>com.android.systemui.car.volume.VolumeUI</item>
        <item>com.android.systemui.car.cluster.ClusterDisplayController</item>
    </string-array>
到这里我们终于看到了车载导航栏CarSystemBar组件,前面的文章我们有介绍,SystemUIApplication的startServicesIfNeeded会创建所有的SystemUI组件对象并调用它们的start方法。
三、从CarSystemBar的start方法到调用buildNavBarWindows方法构建NavigationBarFrame视图:
1、CarSystemBar的构造方法如下所示:
package/app/Car/SystemUI/src/com/android/systemui/car/systembar/CarSystemBar.java
public class CarSystemBar extends SystemUI implements CommandQueue.Callbacks {
    ...代码省略...
    @Inject
    public CarSystemBar(Context context,
            CarSystemBarController carSystemBarController,
            // TODO(b/156052638): Should not need to inject LightBarController
            LightBarController lightBarController,
            DarkIconDispatcher darkIconDispatcher,
            WindowManager windowManager,
            CarDeviceProvisionedController deviceProvisionedController,
            CommandQueue commandQueue,
            AutoHideController autoHideController,
            ButtonSelectionStateListener buttonSelectionStateListener,
            @Main DelayableExecutor mainExecutor,
            @UiBackground Executor uiBgExecutor,
            IStatusBarService barService,
            Lazy<KeyguardStateController> keyguardStateControllerLazy,
            Lazy<PhoneStatusBarPolicy> iconPolicyLazy,
            StatusBarSignalPolicy signalPolicy,
            HvacController hvacController,
            SystemBarConfigs systemBarConfigs
    ) {
        super(context);
        mCarSystemBarController = carSystemBarController;
        mStatusBarIconController = (SysuiDarkIconDispatcher) darkIconDispatcher;
        mWindowManager = windowManager;
        mCarDeviceProvisionedController = deviceProvisionedController;
        mCommandQueue = commandQueue;
        mAutoHideController = autoHideController;
        mButtonSelectionStateListener = buttonSelectionStateListener;
        mExecutor = mainExecutor;
        mUiBgExecutor = uiBgExecutor;
        mBarService = barService;
        mKeyguardStateControllerLazy = keyguardStateControllerLazy;
        mIconPolicyLazy = iconPolicyLazy;
        mHvacController = hvacController;
        mSystemBarConfigs = systemBarConfigs;
        mSignalPolicy = signalPolicy;
        mDisplayId = context.getDisplayId();
    }
    ...代码省略...
}
dagger2框架会通过CarSystemBar的构造方法上的注解@Inject创建CarSystemBar实例对象,并会为CarSystemBar构造方法中的所有参数赋值,紧接着CarSystemBar的start方法会被调用。
2、start方法会调用一个关键方法createSystemBar,该方法会构建状态栏视图和导航栏视图。
public class CarSystemBar extends SystemUI implements CommandQueue.Callbacks {
    ...代码省略...
    public void start() {
        ...代码省略...
        createSystemBar(result);
        ...代码省略...
    }
    ...代码省略...
}
3、createSystemBar方法如下所示。
public class CarSystemBar extends SystemUI implements CommandQueue.Callbacks {
    ...代码省略...
    private void createSystemBar(RegisterStatusBarResult result) {
        buildNavBarWindows();//构建视图对象容器
        buildNavBarContent();
        attachNavBarWindows();
        ...代码省略...
    }
    ...代码省略...
}
createSystemBar首先调用buildNavBarWindows构建顶部栏、底部栏、左侧栏、右侧栏这四种导航栏视图对象,然后再调用buildNavBarContent构建每种导航栏所对应的具体视图内容,最后会调用attachNavBarWindows将状态栏和导航栏视图添加到Window中。
4、先来看下buildNavBarWindows方法:
public class CarSystemBar extends SystemUI implements CommandQueue.Callbacks {
    private final CarSystemBarController mCarSystemBarController;//车载系统栏控制器
    ...代码省略...
    //视图
    private ViewGroup mTopSystemBarWindow;//顶部栏视图容器
    private ViewGroup mBottomSystemBarWindow;//底部栏视图容器
    private ViewGroup mLeftSystemBarWindow;//左侧栏视图容器
    private ViewGroup mRightSystemBarWindow;//右侧栏视图容器
     ...代码省略...
    private void buildNavBarWindows() {
        mTopSystemBarWindow = mCarSystemBarController.getTopWindow();//获取顶部栏视图容器
        mBottomSystemBarWindow = mCarSystemBarController.getBottomWindow();//获取底部栏视图容器
        mLeftSystemBarWindow = mCarSystemBarController.getLeftWindow();//获取左侧栏视图容器
        mRightSystemBarWindow = mCarSystemBarController.getRightWindow();//获取右侧栏视图容器
    }
}
buildNavBarWindows方法会调用CarSystemBarController的get_Window方法对CarSystemBar中存在的对四个视图对象视图容器mTopSystemBarWindow、mBottomSystemBarWindow、mLeftSystemBarWindow、mRightSystemBarWindow进行赋值。
5、CarSystemBarController关于get_Window的方法如下:
package/app/Car/SystemUI/src/com/android/systemui/car/systembar/CarSystemBarController.java
public class CarSystemBarController {
      ...代码省略...
    private final CarSystemBarViewFactory mCarSystemBarViewFactory;
     ...代码省略...
    @Nullable
    public ViewGroup getTopWindow() {
        return mShowTop ? mCarSystemBarViewFactory.getTopWindow() : null;
    }

    @Nullable
    public ViewGroup getBottomWindow() {
        return mShowBottom ? mCarSystemBarViewFactory.getBottomWindow() : null;
    }

    @Nullable
    public ViewGroup getLeftWindow() {
        return mShowLeft ? mCarSystemBarViewFactory.getLeftWindow() : null;
    }

    @Nullable
    public ViewGroup getRightWindow() {
        return mShowRight ? mCarSystemBarViewFactory.getRightWindow() : null;
    }
     ...代码省略...
}
可见CarSystemBarController的get_Window方法会进一步调用CarSystemBarViewFactory的get_Window方法。
6、CarSystemBarViewFactory关于get_Window的关键代码如下所示:
package/app/Car/SystemUI/src/com/android/systemui/car/systembar/CarSystemBarViewFactory.java
    @SysUISingleton
public class CarSystemBarViewFactory {
     ...代码省略...
    private final ArrayMap<Type, ViewGroup> mCachedContainerMap = new ArrayMap<>();
     ...代码省略...
    public CarSystemBarView getTopBar(boolean isSetUp) {
        return getBar(isSetUp, Type.TOP, Type.TOP_UNPROVISIONED);
    }

    public CarSystemBarView getBottomBar(boolean isSetUp) {
        return getBar(isSetUp, Type.BOTTOM, Type.BOTTOM_UNPROVISIONED);
    }

    public CarSystemBarView getLeftBar(boolean isSetUp) {
        return getBar(isSetUp, Type.LEFT, Type.LEFT_UNPROVISIONED);
    }

    public CarSystemBarView getRightBar(boolean isSetUp) {
        return getBar(isSetUp, Type.RIGHT, Type.RIGHT_UNPROVISIONED);
    }

    private ViewGroup getWindowCached(Type type) {
        if (mCachedContainerMap.containsKey(type)) {
            return mCachedContainerMap.get(type);
        }

        ViewGroup window = (ViewGroup) View.inflate(mContext,
                R.layout.navigation_bar_window, /* root= */ null);
        mCachedContainerMap.put(type, window);
        return mCachedContainerMap.get(type);
    }
     ...代码省略...
CarSystemBarViewFactory的get_Bar方法会进一步调用getWindowCached方法,而getWindowCached会先判断类型为ArrayMap<Type, ViewGroup>的缓存mCachedContainerMap中是否存在对应的CarSystemBarView视图,如果存在直接返回;否则会调用View的inflate方法将R.layout.navigation_bar_window布局文件构建成相应的视图对象,然后存储到mCachedContainerMap中,并返回该视图对象。
7、来看下navigation_bar_window.xml这个布局文件。
framework/base/package/SystemUI/res/layout/navigation_bar_window.xml
<com.android.systemui.navigationbar.NavigationBarFrame
    xmlns:android="http://schemas.android.com/apk/res/android"
    xmlns:systemui="http://schemas.android.com/apk/res-auto"
    android:id="@+id/navigation_bar_frame"
    android:theme="@style/Theme.SystemUI"
    android:layout_height="match_parent"
    android:layout_width="match_parent">

</com.android.systemui.navigationbar.NavigationBarFrame>
就是一个很普通的布局文件,只有一个自定义控件NavigationBarFrame。
framework/base/package/SystemUI/src/com/android/systemui/navigationbar/NavigationBarFrame.java
public class NavigationBarFrame extends FrameLayout {

    private DeadZone mDeadZone = null;

    public NavigationBarFrame(@NonNull Context context) {
        super(context);
    }

    public NavigationBarFrame(Context context, AttributeSet attrs) {
        super(context, attrs);
    }

    public NavigationBarFrame(@NonNull Context context, @Nullable AttributeSet attrs,
            @AttrRes int defStyleAttr) {
        super(context, attrs, defStyleAttr);
    }

    public void setDeadZone(@NonNull DeadZone deadZone) {
        mDeadZone = deadZone;
    }

    @Override
    public boolean dispatchTouchEvent(MotionEvent event) {
        if (event.getAction() == ACTION_OUTSIDE) {
            if (mDeadZone != null) {
                return mDeadZone.onTouchEvent(event);
            }
        }
        return super.dispatchTouchEvent(event);
    }
}
NavigationBarFrame就是一个继承自FrameLayout的自定义控件,单词Frame有边框的意思,这也进一步说明NavigationBarFrame这个控件就是NavigationBar的边框的意思,在前面第4步提到的CarSystemBar调用buildNavBarWindows方法所构建的四个视图容器对象mTopSystemBarWindow、mBottomSystemBarWindow、mLeftSystemBarWindow、mRightSystemBarWindow其实就对应了NavigationBarFrame这个这个对象。
四、构建类型为NavigationBarFrame的顶部栏视图容器、底部栏视图容器、左侧栏视图容器、右侧栏视图容器所需要填充的视图内容。
1、CarSystemBar的createSystemBar方法在调用buildNavBarWindows方法构建NavigationBarFrame视图容器之后,会继续调用buildNavBarContent方法来为视图容器构建具体的视图内容。
public class CarSystemBar extends SystemUI implements CommandQueue.Callbacks {
    ...代码省略...
    private void createSystemBar(RegisterStatusBarResult result) {
        buildNavBarWindows();//构建视图对象容器
        buildNavBarContent();//构建视图对象内容
        attachNavBarWindows();
        ...代码省略...
    }
    ...代码省略...
}
2、buildNavBarContent方法如下所示:
public class CarSystemBar extends SystemUI implements
    ...代码省略...
    private boolean mDeviceIsSetUpForUser = true;
    private boolean mIsUserSetupInProgress = false;
    ...代码省略...
    private void buildNavBarContent() {
        mTopSystemBarView = mCarSystemBarController.getTopBar(isDeviceSetupForUser());
        if (mTopSystemBarView != null) {
            mSystemBarConfigs.insetSystemBar(SystemBarConfigs.TOP, mTopSystemBarView);
            mHvacController.registerHvacViews(mTopSystemBarView);
            mTopSystemBarWindow.addView(mTopSystemBarView);
        }
        mBottomSystemBarView = mCarSystemBarController.getBottomBar(isDeviceSetupForUser());
        if (mBottomSystemBarView != null) {

            mSystemBarConfigs.insetSystemBar(SystemBarConfigs.BOTTOM, mBottomSystemBarView);
            mHvacController.registerHvacViews(mBottomSystemBarView);
            mBottomSystemBarWindow.addView(mBottomSystemBarView);
        }
        mLeftSystemBarView = mCarSystemBarController.getLeftBar(isDeviceSetupForUser());
        if (mLeftSystemBarView != null) {
            mSystemBarConfigs.insetSystemBar(SystemBarConfigs.LEFT, mLeftSystemBarView);
            mHvacController.registerHvacViews(mLeftSystemBarView);
            mLeftSystemBarWindow.addView(mLeftSystemBarView);
        }

        mRightSystemBarView = mCarSystemBarController.getRightBar(isDeviceSetupForUser());
        if (mRightSystemBarView != null) {
            mSystemBarConfigs.insetSystemBar(SystemBarConfigs.RIGHT, mRightSystemBarView);
            mHvacController.registerHvacViews(mRightSystemBarView);
            mRightSystemBarWindow.addView(mRightSystemBarView);
        }
  }
    private boolean isDeviceSetupForUser() {
        return mDeviceIsSetUpForUser && !mIsUserSetupInProgress;
    }
    ...代码省略...
}
和之前buildNavBarWindows调用CarSystemBarController的get_Window方法一样,buildNavBarContent方法会继续调用CarSystemBarController的另外一个方法get_Bar,来获取具体的视图内容。
3、CarSystemBarController和get_Bar方法关联的关键代码如下所示:
@SysUISingleton
public class CarSystemBarController {
    ...代码省略...
    @Nullable
    public CarSystemBarView getTopBar(boolean isSetUp) {
        if (!mShowTop) {
            return null;
        }
        mTopView = mCarSystemBarViewFactory.getTopBar(isSetUp);
        //让mTopView视图内容对象和状态栏触摸监听对象、通知栏控制器、空调面板控制器产生关联
        setupBar(mTopView, mTopBarTouchListener, mNotificationsShadeController,
                mHvacPanelController, mHvacPanelOverlayViewController);

        if (isSetUp) {
            //对麦克风进行设置,系统不希望在unProvisioned模式下麦克风和配置文件选择器被点击
            setupMicQcPanel();
            //配置用户信息面板
            setupProfilePanel();
        }
        return mTopView;
    }
    @Nullable
    public CarSystemBarView getBottomBar(boolean isSetUp) {
        if (!mShowBottom) {
            return null;
        }
        mBottomView = mCarSystemBarViewFactory.getBottomBar(isSetUp);//获取底部栏具体视图内容
        setupBar(mBottomView, mBottomBarTouchListener, mNotificationsShadeController,
                mHvacPanelController, mHvacPanelOverlayViewController);
        return mBottomView;
    }

    @Nullable
    public CarSystemBarView getLeftBar(boolean isSetUp) {
        if (!mShowLeft) {
            return null;
        }
        mLeftView = mCarSystemBarViewFactory.getLeftBar(isSetUp);//获取左侧栏具体视图内容
        setupBar(mLeftView, mLeftBarTouchListener, mNotificationsShadeController,
                mHvacPanelController, mHvacPanelOverlayViewController);
        return mLeftView;
    }
    @Nullable
    public CarSystemBarView getRightBar(boolean isSetUp) {
        if (!mShowRight) {
            return null;
        }
        mRightView = mCarSystemBarViewFactory.getRightBar(isSetUp);//获取右侧栏具体视图内容
        setupBar(mRightView, mRightBarTouchListener, mNotificationsShadeController,
                mHvacPanelController, mHvacPanelOverlayViewController);
        return mRightView;
    }

    //让CarSystemBarView视图内容对象和状态栏触摸监听对象、通知栏控制器、空调面板控制器产生关联
    private void setupBar(CarSystemBarView view, View.OnTouchListener statusBarTouchListener,
            NotificationsShadeController notifShadeController,
            HvacPanelController hvacPanelController,
            HvacPanelOverlayViewController hvacPanelOverlayViewController) {
        view.setStatusBarWindowTouchListener(statusBarTouchListener);
        view.setNotificationsPanelController(notifShadeController);
        view.setHvacPanelController(hvacPanelController);
        view.registerHvacPanelOverlayViewController(hvacPanelOverlayViewController);
        mButtonSelectionStateController.addAllButtonsWithSelectionState(view);
        mButtonRoleHolderController.addAllButtonsWithRoleName(view);
        mUserNameViewControllerLazy.get().addUserNameView(view);
        mPrivacyChipViewControllerLazy.get().addPrivacyChipView(view);
    }

    private void setupMicQcPanel() {
        //状态栏图标控制器
        if (mMicPanelController == null) {
            mMicPanelController = new StatusIconPanelController(mContext, mCarServiceProvider,
                    mBroadcastDispatcher, mConfigurationController);
        }

        mMicPanelController.setOnQcViewsFoundListener(qcViews -> qcViews.forEach(qcView -> {
            if (qcView.getLocalQCProvider() instanceof MicQcPanel) {
                MicQcPanel micQcPanel = (MicQcPanel) qcView.getLocalQCProvider();
                micQcPanel.setControllers(mPrivacyChipViewControllerLazy.get(),
                        mMicPrivacyElementsProviderLazy.get());
            }
        }));

        mMicPanelController.attachPanel(mTopView.requireViewById(R.id.privacy_chip),
                R.layout.qc_mic_panel, R.dimen.car_mic_qc_panel_width, mPrivacyChipXOffset,
                mMicPanelController.getDefaultYOffset(), Gravity.TOP | Gravity.END);
    }

    //配置用户信息面板
    private void setupProfilePanel() {
        View profilePickerView = mTopView.findViewById(R.id.user_name);
        if (mProfilePanelController == null && profilePickerView != null) {
            boolean profilePanelDisabledWhileDriving = mContext.getResources().getBoolean(
                    R.bool.config_profile_panel_disabled_while_driving);
            mProfilePanelController = new StatusIconPanelController(mContext, mCarServiceProvider,
                    mBroadcastDispatcher, mConfigurationController,
                    profilePanelDisabledWhileDriving);
            mProfilePanelController.attachPanel(profilePickerView, R.layout.qc_profile_switcher,
                    R.dimen.car_profile_quick_controls_panel_width, Gravity.TOP | Gravity.END);
        }
    }
    ...代码省略...
}
四个视图对象获取视图内容的方式是非常相似的,get_Bar方法首先判断是否显示对应的栏,如果确定显示则会继续调用CarSystemBarViewFactory的get_Bar方法来获取具体的视图内容,随后调用setupBar方法让视图内容对象和状态栏触摸监听对象、通知栏控制器、空调面板控制器产生关联。其中getTopBar方法还会继续调用setupMicQcPanel方法和setupProfilePanel方法来进行一些额外的设置。
4、CarSystemBarViewFactory类关于get_Bar方法的关键代码方法如下所示:
@SysUISingleton
public class CarSystemBarViewFactory {
    ...代码省略...
    private final ArrayMap<Type, CarSystemBarView> mCachedViewMap = new ArrayMap<>(Type.values().length);
    private static final ArrayMap<Type, Integer> sLayoutMap = setupLayoutMapping();
    private static ArrayMap<Type, Integer> setupLayoutMapping() {
        ArrayMap<Type, Integer> map = new ArrayMap<>();
        map.put(Type.TOP, R.layout.car_top_system_bar);//顶部栏视图布局
        map.put(Type.TOP_UNPROVISIONED, R.layout.car_top_system_bar_unprovisioned);
        map.put(Type.BOTTOM, R.layout.car_bottom_system_bar);//底部栏视图布局
        map.put(Type.BOTTOM_UNPROVISIONED, R.layout.car_bottom_system_bar_unprovisioned);
        map.put(Type.LEFT, R.layout.car_left_system_bar);//左侧栏视图布局
        map.put(Type.LEFT_UNPROVISIONED, R.layout.car_left_system_bar_unprovisioned);
        map.put(Type.RIGHT, R.layout.car_right_system_bar);//右侧栏视图布局
        map.put(Type.RIGHT_UNPROVISIONED, R.layout.car_right_system_bar_unprovisioned);
        return map;
    }
...代码省略...
    //获取顶部栏视图内容
    public CarSystemBarView getTopBar(boolean isSetUp) {
        return getBar(isSetUp, Type.TOP, Type.TOP_UNPROVISIONED);
    }

    //获取底部栏视图内容
    public CarSystemBarView getBottomBar(boolean isSetUp) {
        return getBar(isSetUp, Type.BOTTOM, Type.BOTTOM_UNPROVISIONED);
    }

    //获取左侧栏视图内容
    public CarSystemBarView getLeftBar(boolean isSetUp) {
        return getBar(isSetUp, Type.LEFT, Type.LEFT_UNPROVISIONED);
    }

    //获取右侧栏视图内容
    public CarSystemBarView getRightBar(boolean isSetUp) {
        return getBar(isSetUp, Type.RIGHT, Type.RIGHT_UNPROVISIONED);
    }
    //getBar继续调用getBarCached方法
    private CarSystemBarView getBar(boolean isSetUp, Type provisioned, Type unprovisioned) {
        CarSystemBarView view = getBarCached(isSetUp, provisioned, unprovisioned);
        if (view == null) {
            String name = isSetUp ? provisioned.name() : unprovisioned.name();
            Log.e(TAG, "CarStatusBar failed inflate for " + name);
            throw new RuntimeException(
                    "Unable to build " + name + " nav bar due to missing layout");
        }
        return view;
    }

  //getBarCached方法最终是从sLayoutMap中获取具体的视图内容
    private CarSystemBarView getBarCached(boolean isSetUp, Type provisioned, Type unprovisioned) {
        Type type = isSetUp ? provisioned : unprovisioned;
        if (mCachedViewMap.containsKey(type)) {
            return mCachedViewMap.get(type);
        }
        //从sLayoutMap中获取对应的布局文件资源id
        @LayoutRes int barLayout = sLayoutMap.get(type);
        //将布局文件转化为CarSystemBarView类型的View对象。
        CarSystemBarView view = (CarSystemBarView) View.inflate(mContext, barLayout,
                /* root= */ null);

        //为空调按钮设置点击事件
        view.setupHvacButton();
        //为快捷图标容器设置控制器
        view.setupQuickControlsEntryPoints(mQuickControlsEntryPointsController, isSetUp);
        //为只读图标设置控制器
        view.setupReadOnlyIcons(mReadOnlyIconsController);
        view.addView(new FocusParkingView(mContext), 0);
        //将视图内容View添加到缓存中
        mCachedViewMap.put(type, view);
        //返回当前type对应的视图内容View
        return mCachedViewMap.get(type);
    }
}
CarSystemBarViewFactory这个类的get_Bar方法会继续调用getBarCached方法,getBarCached首先从类型为ArrayMap<Type, CarSystemBarView>的缓存mCachedViewMap中获取缓存对象,如果存在直接返回,如果不存在则继续从类型为ArrayMap<Type, Integer>的sLayoutMap中获取具体布局文件资源id,结合
   private static final ArrayMap<Type, Integer> sLayoutMap = setupLayoutMapping();
    private static ArrayMap<Type, Integer> setupLayoutMapping() {
        ArrayMap<Type, Integer> map = new ArrayMap<>();
        map.put(Type.TOP, R.layout.car_top_system_bar);//顶部栏视图布局
        map.put(Type.BOTTOM, R.layout.car_bottom_system_bar);//底部栏视图布局
        map.put(Type.LEFT, R.layout.car_left_system_bar);//左侧栏视图布局
        map.put(Type.RIGHT, R.layout.car_right_system_bar);//右侧栏视图布局
        return map;
    }
我们可以知道顶部栏对应R.layout.car_top_system_bar,底部栏对应R.layout.car_bottom_system_bar,左侧栏对应R.layout.car_left_system_bar,右侧栏对应R.layout.car_right_system_bar,这里在从sLayoutMap中获取到对应的布局文件资源id后,再通过View的inflate方法将布局文件转化为相对应的视图对象,并且会调用setupHvacButton为空调按钮设置点击事件,调用setupQuickControlsEntryPoints为快捷图标容器设置控制器,调用setupReadOnlyIcons为只读图标设置控制器,最后会将CarSystemBarView存储到mCachedViewMap缓存中,并返回CarSystemBarView视图对象。
五、将顶部栏、底部栏、左侧栏、右侧栏添加到Window中。
1、重新回到CarSystemBar的createSystemBar方法
public class CarSystemBar extends SystemUI implements CommandQueue.Callbacks {
    private void createSystemBar(RegisterStatusBarResult result) {
        buildNavBarWindows();//构建视图对象容器
        buildNavBarContent();//构建视图对象内容
        attachNavBarWindows();//将视图对象添加到Window中
        ...代码省略...
    }
}
前面我们已经分析了构建视图对象容器和构建视图对象内容,接下来我们继续分析attachNavBarWindows方法,是该方法将将视图对象添加到Window中。
2、attachNavBarWindows方法代码如下:
public class CarSystemBar extends SystemUI implements CommandQueue.Callbacks {
    private void attachNavBarWindows() {
mSystemBarConfigs.getSystemBarSidesByZOrder().forEach(this::attachNavBarBySide);
    }
}
attachNavBarWindows会调用SystemBarConfigs的getSystemBarSidesByZOrder方法获取到当前存在的所有SystemBar所对应的Side。
3、SystemBarConfigs类和getSystemBarSidesByZOrder方法相关的关键代码如下所示:
packages/apps/Car/SystemUI/src/com/android/systemui/car/systembar/SystemBarConfigs.java
@SysUISingleton
public class SystemBarConfigs {
    private static final int HUN_ZORDER = 10;
    public static final int TOP = 0;
    public static final int BOTTOM = 1;
    public static final int LEFT = 2;
    public static final int RIGHT = 3;

    private static final int[] BAR_TYPE_MAP = {
            InsetsState.ITYPE_STATUS_BAR,//状态栏对应的系统装饰窗口类型
            InsetsState.ITYPE_NAVIGATION_BAR,//导航栏对应的系统装饰窗口类型
            InsetsState.ITYPE_CLIMATE_BAR,//左侧栏对应的系统装饰窗口类型
            InsetsState.ITYPE_EXTRA_NAVIGATION_BAR右侧栏对应的系统装饰窗口类型
    };
    private final Map<@SystemBarSide Integer, SystemBarConfig> mSystemBarConfigMap =
            new ArrayMap<>();
    private final List<@SystemBarSide Integer> mSystemBarSidesByZOrder = new ArrayList<>();
    @Inject
    public SystemBarConfigs(@Main Resources resources) {
        ...代码省略...
        populateMaps();
        readConfigs();//读取SystemBar所对应的SystemBarConfig的配置信息
        ...代码省略...
        sortSystemBarSidesByZOrder();//使用SystemBarConfig的ZOrder属性对SystemBarConfig的Size进行排序
    }

    private static void populateMaps() {
        BAR_GRAVITY_MAP.put(TOP, Gravity.TOP);
        BAR_GRAVITY_MAP.put(BOTTOM, Gravity.BOTTOM);
        BAR_GRAVITY_MAP.put(LEFT, Gravity.LEFT);
        BAR_GRAVITY_MAP.put(RIGHT, Gravity.RIGHT);

        BAR_TITLE_MAP.put(TOP, "TopCarSystemBar");
        BAR_TITLE_MAP.put(BOTTOM, "BottomCarSystemBar");
        BAR_TITLE_MAP.put(LEFT, "LeftCarSystemBar");
        BAR_TITLE_MAP.put(RIGHT, "RightCarSystemBar");

        BAR_GESTURE_MAP.put(TOP, InsetsState.ITYPE_TOP_MANDATORY_GESTURES);
        BAR_GESTURE_MAP.put(BOTTOM, InsetsState.ITYPE_BOTTOM_MANDATORY_GESTURES);
        BAR_GESTURE_MAP.put(LEFT, InsetsState.ITYPE_LEFT_MANDATORY_GESTURES);
        BAR_GESTURE_MAP.put(RIGHT, InsetsState.ITYPE_RIGHT_MANDATORY_GESTURES);
    }

  private void readConfigs() {
//    <bool name="config_enableTopSystemBar">true</bool>
        mTopNavBarEnabled = mResources.getBoolean(R.bool.config_enableTopSystemBar);
//    <bool name="config_enableBottomSystemBar">true</bool>
        mBottomNavBarEnabled = mResources.getBoolean(R.bool.config_enableBottomSystemBar);
//    <bool name="config_enableLeftSystemBar">false</bool>
        mLeftNavBarEnabled = mResources.getBoolean(R.bool.config_enableLeftSystemBar);
//    <bool name="config_enableRightSystemBar">false</bool>
        mRightNavBarEnabled = mResources.getBoolean(R.bool.config_enableRightSystemBar);
        //顶部栏可用
        if (mTopNavBarEnabled) {
            SystemBarConfig topBarConfig =
                    new SystemBarConfigBuilder()
                            .setSide(TOP)
                            //顶部栏高度<dimen name="car_top_system_bar_height">@*android:dimen/status_bar_height</dimen>
                            .setGirth(mResources.getDimensionPixelSize(R.dimen.car_top_system_bar_height))
                            //系统栏类型<integer name="config_topSystemBarType">0</integer>
                            .setBarType(mResources.getInteger(R.integer.config_topSystemBarType))
                            //系统栏Z轴序列<integer name="config_topSystemBarZOrder">1</integer>
                            .setZOrder(mResources.getInteger(R.integer.config_topSystemBarZOrder))
                            //<bool name="config_hideTopSystemBarForKeyboard">false</bool>
                            .setHideForKeyboard(mResources.getBoolean(R.bool.config_hideTopSystemBarForKeyboard))
                            .build();
            mSystemBarConfigMap.put(TOP, topBarConfig);
        }
        //底部栏可用
        if (mBottomNavBarEnabled) {
            SystemBarConfig bottomBarConfig =
                    new SystemBarConfigBuilder()
                            .setSide(BOTTOM)
                            //底部栏高度<dimen name="car_bottom_system_bar_height">@*android:dimen/navigation_bar_height</dimen>
                            .setGirth(mResources.getDimensionPixelSize(R.dimen.car_bottom_system_bar_height))
                            //系统栏类型<<integer name="config_bottomSystemBarType">1</integer>
                            .setBarType(mResources.getInteger(R.integer.config_bottomSystemBarType))
                            //系统栏Z轴序列<integer name="config_bottomSystemBarZOrder">10</integer>
                            .setZOrder(mResources.getInteger(R.integer.config_bottomSystemBarZOrder))
                   //<boolname="config_hideBottomSystemBarForKeyboard">@*android:bool/config_automotiveHideNavBarForKeyboard</bool>
                            .setHideForKeyboard(mResources.getBoolean(R.bool.config_hideBottomSystemBarForKeyboard))//默认为true
                            .build();
            mSystemBarConfigMap.put(BOTTOM, bottomBarConfig);
        }
        //左侧栏不可用
        if (mLeftNavBarEnabled) {
            SystemBarConfig leftBarConfig =
                    new SystemBarConfigBuilder()
                            .setSide(LEFT)
                            //左侧栏高度<dimen name="car_left_system_bar_width">96dp</dimen>
                            .setGirth(mResources.getDimensionPixelSize(R.dimen.car_left_system_bar_width))
                            //系统栏类型<integer name="config_leftSystemBarType">2</integer>
                            .setBarType(mResources.getInteger(R.integer.config_leftSystemBarType))
                            //系统栏Z轴序列<integer name="config_leftSystemBarZOrder">0</integer>
                            .setZOrder(mResources.getInteger(R.integer.config_leftSystemBarZOrder))
                            //<bool name="config_hideLeftSystemBarForKeyboard">false</bool>
                            .setHideForKeyboard(mResources.getBoolean(R.bool.config_hideLeftSystemBarForKeyboard))
                            .build();
            mSystemBarConfigMap.put(LEFT, leftBarConfig);
        }
        //右侧栏不可用
        if (mRightNavBarEnabled) {
            SystemBarConfig rightBarConfig =
                    new SystemBarConfigBuilder()
                            .setSide(RIGHT)
                            //右侧栏高度<dimen name="car_right_system_bar_width">96dp</dimen>
                            .setGirth(mResources.getDimensionPixelSize(R.dimen.car_right_system_bar_width))
                            //系统栏类型<integer name="config_rightSystemBarType">3</integer>
                            .setBarType(mResources.getInteger(R.integer.config_rightSystemBarType))
                            //系统栏Z轴序列<integer name="config_rightSystemBarZOrder">0</integer>
                            .setZOrder(mResources.getInteger(R.integer.config_rightSystemBarZOrder))
                            //<bool name="config_hideRightSystemBarForKeyboard">false</bool>
                            .setHideForKeyboard(mResources.getBoolean(R.bool.config_hideRightSystemBarForKeyboard))
                            .build();
            mSystemBarConfigMap.put(RIGHT, rightBarConfig);
        }
    }

    //根据序号对SystemBar进行排序
    private void sortSystemBarSidesByZOrder() {
        //获取SystemBarConfig列表
        List<SystemBarConfig> systemBarsByZOrder = new ArrayList<>(mSystemBarConfigMap.values());

        systemBarsByZOrder.sort(new Comparator<SystemBarConfig>() {
            @Override
            public int compare(SystemBarConfig o1, SystemBarConfig o2) {
                //调用SystemBarConfig的getZOrder进行大小比较
                return o1.getZOrder() - o2.getZOrder();
            }
        });

        //在mSystemBarSidesByZOrder中存储当前按照ZOrder从小到大来进行排序的SystemBar的Side数值。
        systemBarsByZOrder.forEach(systemBarConfig -> {
            mSystemBarSidesByZOrder.add(systemBarConfig.getSide());
        });
    }

    protected List<Integer> getSystemBarSidesByZOrder() {
        return mSystemBarSidesByZOrder;
    }
SystemBarConfig对象本身
    private static final class SystemBarConfig {
        private final int mSide;
        private final int mBarType;
        private final int mGirth;
        private final int mZOrder;
        private final boolean mHideForKeyboard;
        private int[] mPaddings = new int[]{0, 0, 0, 0};

        private SystemBarConfig(@SystemBarSide int side, int barType, int girth, int zOrder,
                boolean hideForKeyboard) {
            mSide = side;
            mBarType = barType;
            mGirth = girth;
            mZOrder = zOrder;
            mHideForKeyboard = hideForKeyboard;
        }
        ...代码省略...
        private WindowManager.LayoutParams getLayoutParams() {
            WindowManager.LayoutParams lp = new WindowManager.LayoutParams(
                    isHorizontalBar(mSide) ? ViewGroup.LayoutParams.MATCH_PARENT : mGirth,
                    isHorizontalBar(mSide) ? mGirth : ViewGroup.LayoutParams.MATCH_PARENT,
                    mapZOrderToBarType(mZOrder),
                    WindowManager.LayoutParams.FLAG_NOT_FOCUSABLE
                            | WindowManager.LayoutParams.FLAG_NOT_TOUCH_MODAL
                            | WindowManager.LayoutParams.FLAG_WATCH_OUTSIDE_TOUCH
                            | WindowManager.LayoutParams.FLAG_SPLIT_TOUCH,
                    PixelFormat.TRANSLUCENT);//设置窗口半透明
 //                   PixelFormat.TRANSPARENT);//设置窗口全透明
            lp.setTitle(BAR_TITLE_MAP.get(mSide));
            //顶部栏为new int[]{InsetsState.ITYPE_STATUS_BAR, InsetsState.ITYPE_TOP_MANDATORY_GESTURES};
            //底部栏为new int[]{InsetsState.ITYPE_NAVIGATION_BAR, InsetsState.ITYPE_BOTTOM_MANDATORY_GESTURES};
            //providesInsetsTypes这个字段很重要,只有设置对这个字段,系统才会认定该窗口是对应的装饰窗口;
            lp.providesInsetsTypes = new int[]{BAR_TYPE_MAP[mBarType], BAR_GESTURE_MAP.get(mSide)};
            lp.setFitInsetsTypes(0);
            lp.windowAnimations = 0;
            lp.gravity = BAR_GRAVITY_MAP.get(mSide);
            return lp;
        }

        private int mapZOrderToBarType(int zOrder) {
            //<integer name="config_topSystemBarZOrder">1</integer>
            //<integer name="config_bottomSystemBarZOrder">10</integer>
            //zOrder = 10;
            //从这里可以知道顶部栏的窗口类型为TYPE_STATUS_BAR_ADDITIONAL
            //从这里可以知道底部栏的窗口类型为TYPE_NAVIGATION_BAR_PANEL
            return zOrder >= HUN_ZORDER ? WindowManager.LayoutParams.TYPE_NAVIGATION_BAR_PANEL
                    : WindowManager.LayoutParams.TYPE_STATUS_BAR_ADDITIONAL;
        }

        private void setPaddingBySide(@SystemBarSide int side, int padding) {
            mPaddings[side] = padding;
        }
    }
SystemBarConfig对象的建造者
    private static final class SystemBarConfigBuilder {
        private int mSide;
        private int mBarType;
        private int mGirth;
        private int mZOrder;
        private boolean mHideForKeyboard;

        private SystemBarConfigBuilder setSide(@SystemBarSide int side) {
            mSide = side;
            return this;
        }

        private SystemBarConfigBuilder setBarType(int type) {
            mBarType = type;
            return this;
        }

        private SystemBarConfigBuilder setGirth(int girth) {
            mGirth = girth;
            return this;
        }

        private SystemBarConfigBuilder setZOrder(int zOrder) {
            mZOrder = zOrder;
            return this;
        }

        private SystemBarConfigBuilder setHideForKeyboard(boolean hide) {
            mHideForKeyboard = hide;
            return this;
        }

        private SystemBarConfig build() {
            return new SystemBarConfig(mSide, mBarType, mGirth, mZOrder, mHideForKeyboard);
        }
    }
总结一下以上代码:
-
在SystemBarConfigs的构造方法中,调用readConfigs方法来读取SystemBar所对应的SystemBarConfig的配置信息,结合注释可以发现默认情况下,顶部栏和底部栏可用半透明,且顶部栏的窗口类型为TYPE_STATUS_BAR_ADDITIONAL,底部栏的窗口类型为TYPE_NAVIGATION_BAR_PANEL。且它们所对应的配置信息会存储在mSystemBarConfigMap中,左侧栏和右侧栏不可用且它们所对应的配置信息不会存储在mSystemBarConfigMap中。
-
SystemBarConfigs的构造方法继续调用sortSystemBarSidesByZOrder,该方法会根据已经存储在mSystemBarConfigMap中的SystemBarConfigs的ZOrder字段来进行排序,将mSystemBarConfigMap中SystemBarConfigs的Side字段存储在类型为int的mSystemBarSidesByZOrder集合中。
4、明白了SystemBarConfigs的主要功能,再重新看第2步的attachNavBarWindows方法。
public class CarSystemBar extends SystemUI implements CommandQueue.Callbacks {
    private void attachNavBarWindows() {
mSystemBarConfigs.getSystemBarSidesByZOrder().forEach(this::attachNavBarBySide);
    }
}
我们可以知道该方法最终会循环mSystemBarSidesByZOrder集合的内容,用该集合的子项作为参数,依次调用attachNavBarBySide方法。
5、attachNavBarBySide方法如下所示:
public class CarSystemBar extends SystemUI implements CommandQueue.Callbacks {
    private void attachNavBarBySide(int side) {
        switch (side) {
            case SystemBarConfigs.TOP:
                if (mTopSystemBarWindow != null) {
                    //如果顶部栏视图容器不为空,将顶部栏视图容器添加到Window中
                    mWindowManager.addView(mTopSystemBarWindow,
                            mSystemBarConfigs.getLayoutParamsBySide(SystemBarConfigs.TOP));
                }
                break;
            case SystemBarConfigs.BOTTOM:
                //如果底部栏视图容器不为空,将顶部栏视图容器添加到Window中
                if (mBottomSystemBarWindow != null && !mBottomNavBarVisible) {
                    mBottomNavBarVisible = true;
                    mWindowManager.addView(mBottomSystemBarWindow,
                            mSystemBarConfigs.getLayoutParamsBySide(SystemBarConfigs.BOTTOM));
                }
                break;
            case SystemBarConfigs.LEFT:
                if (mLeftSystemBarWindow != null) {
                    mWindowManager.addView(mLeftSystemBarWindow,
                            mSystemBarConfigs.getLayoutParamsBySide(SystemBarConfigs.LEFT));
                }
                break;
            case SystemBarConfigs.RIGHT:
                if (mRightSystemBarWindow != null) {
                    mWindowManager.addView(mRightSystemBarWindow,
                            mSystemBarConfigs.getLayoutParamsBySide(SystemBarConfigs.RIGHT));
                }
                break;
            default:
                return;
        }
    }
}
attachNavBarBySide做的方法并不多,就是根据对应的type判断当前视图容器的具体类型,到底是顶部栏、底部栏、左侧栏还是右侧栏,根据类型配合类型相对应的参数将该视图容器添加到WindowManager中。
六、总结
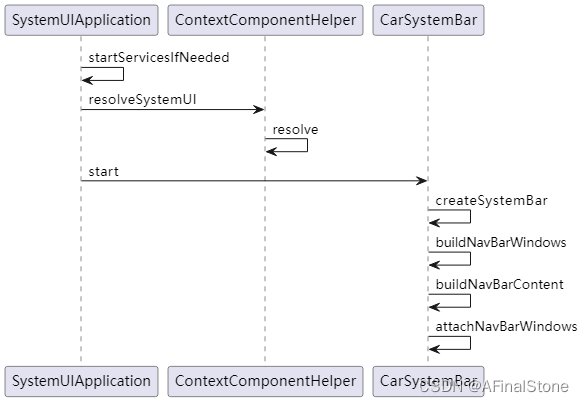
本篇文章我们具体分析了CarSystemBar从启动到构建视图,再到将视图添加到Window的流程;结合代码我们可以知道,默认情况下Android车载系统中只显示顶部栏和底部栏视图,最后用一张图对前面的代码流程做一个回顾。
💡 技术无价,赞赏随心
写文不易,如果本文帮你避开了“八小时踩坑”,或者让你直呼“学到了!”
欢迎扫码赞赏,让我知道这篇内容值得!
(1元点赞,5元加鸡腿,10元一杯咖啡,100…您就是我的榜一大哥!😂)


 被折叠的 条评论
为什么被折叠?
被折叠的 条评论
为什么被折叠?
 到【灌水乐园】发言


