


目录
使用Spring Initializr创建springboot项目
WebMvcAutoConfiguration自动配置类分析
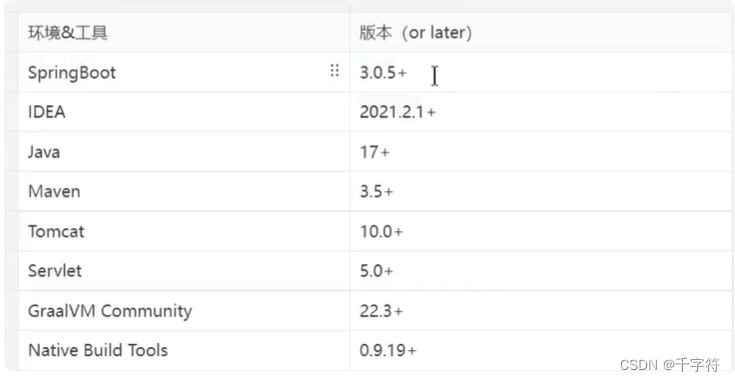
版本要求
SpringBoot介绍
SpringBoot 能够帮我们简单、快速地创建一个独立的、生产级别的Spring应用
特性:
- 快速创建独立Spring应用
- 直接嵌入tomcat、jetty或Undertow等Servlet容器,无需部署war包
- 提供可选的starter,简化应用整合
- 按需自动配置Spring以及第三方库
- 提供生产级别特性:如 监控指标、健康检查(k8s)、外部化配置等
- 无代码生成,无xml
创建一个最基础的springbooot项目
1.创建项目

2.将父工程设置为spring-boot-starter-parent,导入springboot web 开发的基础依赖:spring-boot-starter-web,设置springboot打包插件:spring-boot-maven-plugin
<?xml version="1.0" encoding="UTF-8"?>
<project xmlns="http://maven.apache.org/POM/4.0.0"
xmlns:xsi="http://www.w3.org/2001/XMLSchema-instance"
xsi:schemaLocation="http://maven.apache.org/POM/4.0.0 http://maven.apache.org/xsd/maven-4.0.0.xsd">
<modelVersion>4.0.0</modelVersion>
<groupId>com.qiu</groupId>
<artifactId>boot-1-project</artifactId>
<version>1.0-SNAPSHOT</version>
<!-- springboot项目必须继承 spring-boot-starter-parent-->
<parent>
<groupId>org.springframework.boot</groupId>
<artifactId>spring-boot-starter-parent</artifactId>
<version>3.0.5</version>
</parent>
<dependencies>
<!-- web开发的场景启动器-->
<dependency>
<groupId>org.springframework.boot</groupId>
<artifactId>spring-boot-starter-web</artifactId>
</dependency>
</dependencies>
<build>
<plugins>
<!-- springboot项目的打包插件-->
<plugin>
<groupId>org.springframework.boot</groupId>
<artifactId>spring-boot-maven-plugin</artifactId>
</plugin>
</plugins>
</build>
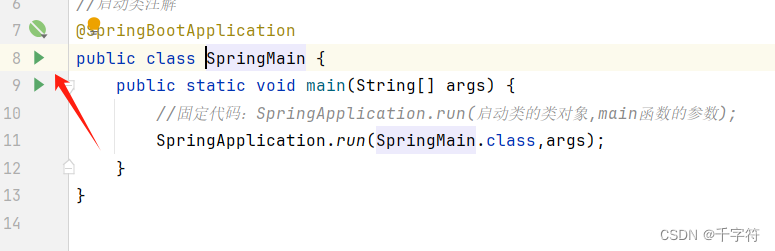
</project>3.编写启动类,springboot web项目可以直接运行该类来启动项目,不需要tomcat等服务器,因为springboot已经内置服务器。
//启动类注解
@SpringBootApplication
public class SpringMain {
    public static void main(String[] args) {
        //固定代码:SpringApplication.run(启动类的类对象,main函数的参数);
        SpringApplication.run(SpringMain.class,args);
    }
}
4.编写服务
@RestController
// ==  Controller(将该类放入ioc容器) + ResponseBody(以数据格式返回,不添加该注解会经过视图解析器)
public class HelloController {

    //请求映射:/hello的请求会调用该方法
    @RequestMapping("hello")
    public String hello(){
        //将数据返回
        return "hello spring boot3 !";
    }
}
5.启动服务

6.访问服务

7.将项目打包
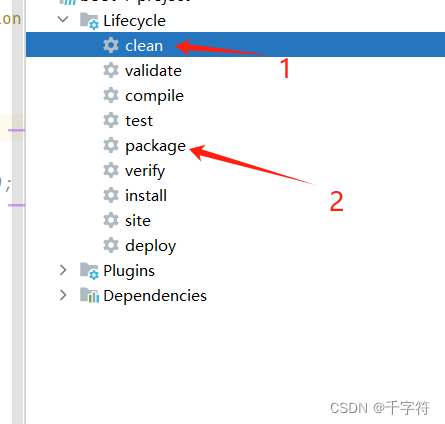

8.运行项目:把jar包放到有java环境的服务器上就可以直接启动(记得把项目停掉)


9.springboot可以不在源码修改配置文件,在jar包目录下创建一个 .properties 配置文件就可以覆盖配置,还可以创建config文件夹,把配置文件放进去,优先级更高


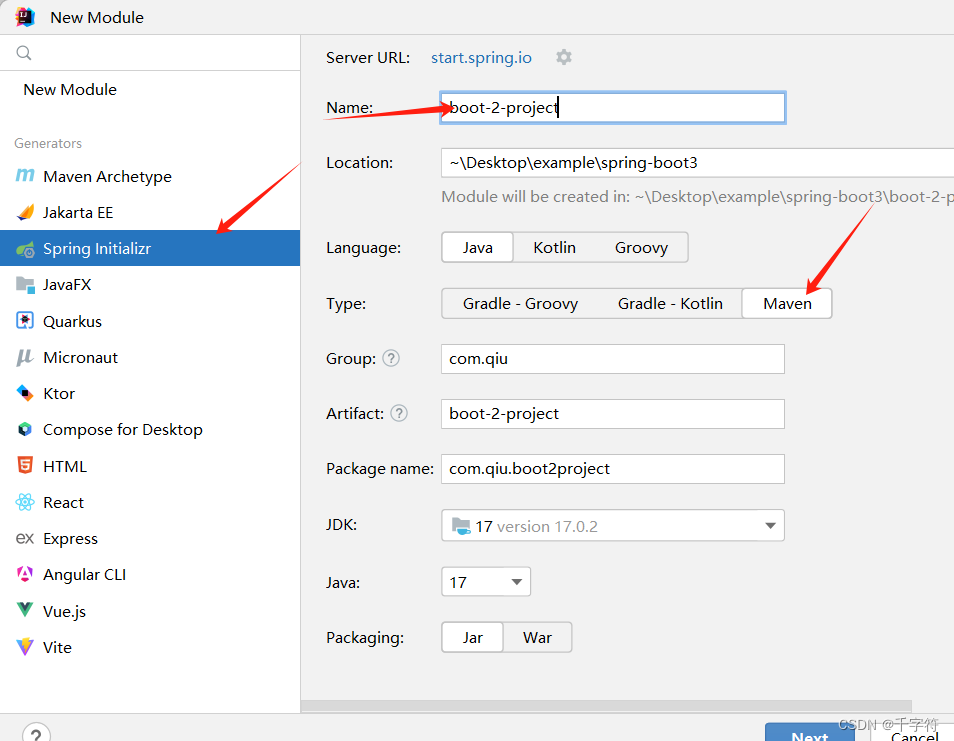
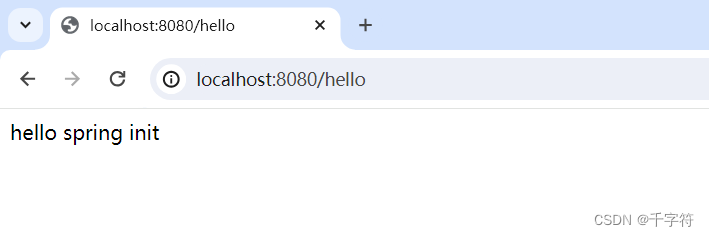
使用Spring Initializr创建springboot项目

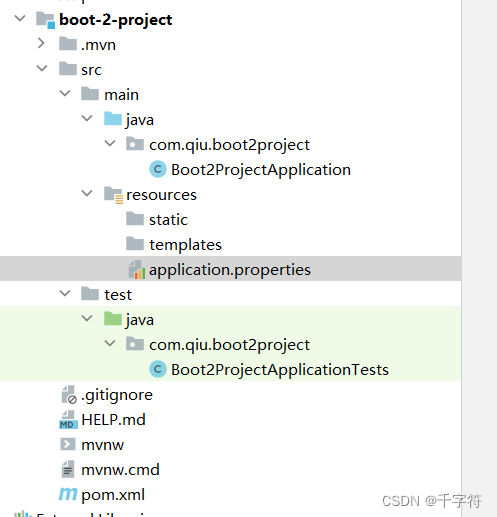
创建服务并启动项目:
@RestController
public class HelloController {

    @RequestMapping("hello")
    public String hello(){
        return "hello spring init";
    }

}


Spring Boot 自动配置机制
- 自动配置的Tomcat,SpringMVC等
- springboot自动配置DispatcherServlet、ViewResolver、CharacterEncodingFilter等组件
- 如果需要哪些组件,只需要把启动器导入,就自动配置到ioc容器
- 可以使用以下代码查看配置的组件
public static void main(String[] args) {
		//获取ioc容器
		ConfigurableApplicationContext run = SpringApplication.run(Boot2ProjectApplication.class, args);
		//查看所有组件
        //springboot自动配置好核心组件
		for (String name : run.getBeanDefinitionNames()) {
			System.out.println(name);
		}
}- 默认的包扫描规则
- 默认扫描启动类的目录及子目录
- 可以@SpringBootApplication(scanBasePackages="com.qiu")
- 也可以@ComponentScan("com.qiu")
- 配置默认值
- 配置文件中的所有配置项都是跟某个类的对象值一一对应的。
- 在application.properties中按住ctrl点击对应的配置项可以跳转到对应的类。
- 这样的类叫做配置属性类。
- 比如:ServerProperties包含所有Tomcat服务器相关的配置 , MultipartProperties包含所有文件上传相关的配置。
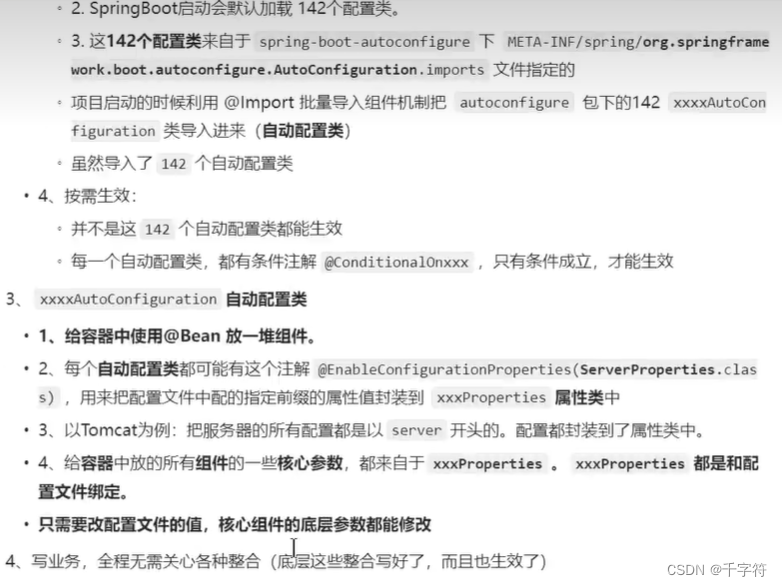
- 按需加载自动配置
- 当导入启动器,如:spring-boot-starter-web时,启动器除了会导入相关功能的依赖,还会导入一个spring-boot-starter
- spring-boot-starter是所有启动器的启动器,是基础核心starter
- spring-boot-starter导入了spring-boot-autoconfigure,这个包有所有启动器的AutoConfiguration(自动配置类)
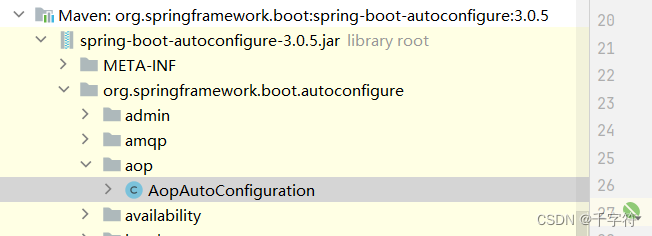
- 但不会全部开启,只有导入对应的启动器时才会开启相应的自动配置
SpringBoot常用注解
SpringBoot不再使用XML配置方式,使用全注解驱动
1.组件注册
@Configuration:在类上添加,表明是个配置类,替代配置文件。
@SpringBootConfiguration:与@Configuration功能相同,更见名知意。
@Bean:在配置类下的方法上添加,替代<Bean>标签。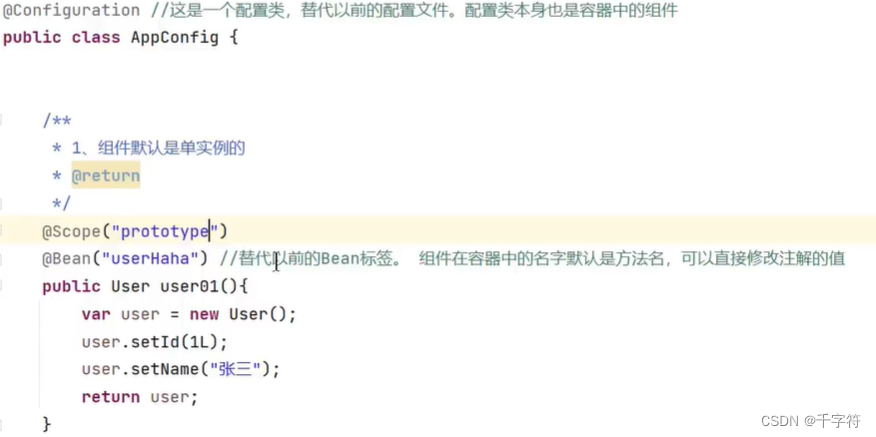
@Controller、@Service、@Repository、@Component:在类上使用,表明把这个类放到ioc容器。
@Import:可以导入任意类,当我们需要把第三方的组件放到ioc容器中,除了使用@Bean,还可以直接在配置类上使用@Import( … .class) 将组件放到ioc容器中。
@ComponentScan:在配置类上使用@ComponentScan("路径"),来扫描路径下的组件放到ioc容器中。
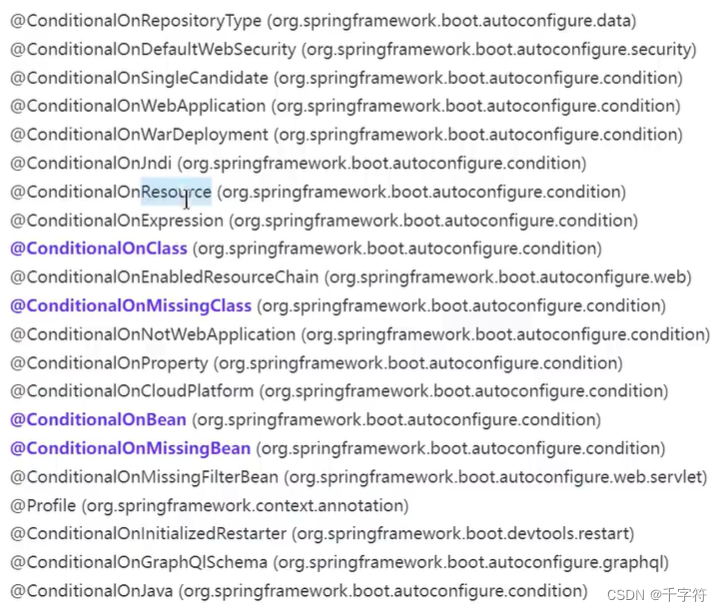
2.条件注解
@ConditionalOnXxx:
@ConditionOnClass:如果类路径中存在这个类,则触发指定行为
@ConditionOnMissingClass:如果类路径中不存在这个类,则触发指定行为
@ConditionOnBean:如果容器中存在这个Bean,则触发指定行为
@ConditionOnMissingBean:如果容器中不存在这个Bean,则触发指定行为
 解释:当ioc容器中有FastsqlException组件就把Cat类放到ioc容器,没有就把Dog类放到ioc容器中。
如果该注解放到配置类上,这个配置类才生效。
3.属性绑定
@ConfigurationProperties
@EnableConfigurationProperties
将容器的任意组件的属性值和配置文件的配置项的值进行绑定。
示例:编写application配置文件
student.id=1
student.name=qiu
student.age=22
创建pojo类并放到ioc容器
@Component
public class Student {
    @Override
    public String toString() {
        return "Student{" +
                "id=" + id +
                ", name='" + name + '\'' +
                ", age=" + age +
                '}';
    }

    public Integer getId() {
        return id;
    }

    public void setId(Integer id) {
        this.id = id;
    }

    public String getName() {
        return name;
    }

    public void setName(String name) {
        this.name = name;
    }

    public Integer getAge() {
        return age;
    }

    public void setAge(Integer age) {
        this.age = age;
    }

    Integer id;
    String name;
    Integer age;
}
只要类中属性与配置文件的配置项相同,就在类上添加注解(类属性要有set和get方法)
@ConfigurationProperties(prefix = "student")
@Component
public class Student {
    @Override
    public String toString() {
        return "Student{" +
                "id=" + id +
                ", name='" + name + '\'' +
                ", age=" + age +
                '}';
    }

    public Integer getId() {
        return id;
    }

    public void setId(Integer id) {
        this.id = id;
    }

    public String getName() {
        return name;
    }

    public void setName(String name) {
        this.name = name;
    }

    public Integer getAge() {
        return age;
    }

    public void setAge(Integer age) {
        this.age = age;
    }

    Integer id;
    String name;
    Integer age;
}
这样启动服务后,就会自动给组件赋值
EnableConfigurationProperties(Student.class)功能:(主要用在第三方)
1.开启Student组件的属性绑定
2.默认把该组件放到ioc容器中
SpringBoot自动配置流程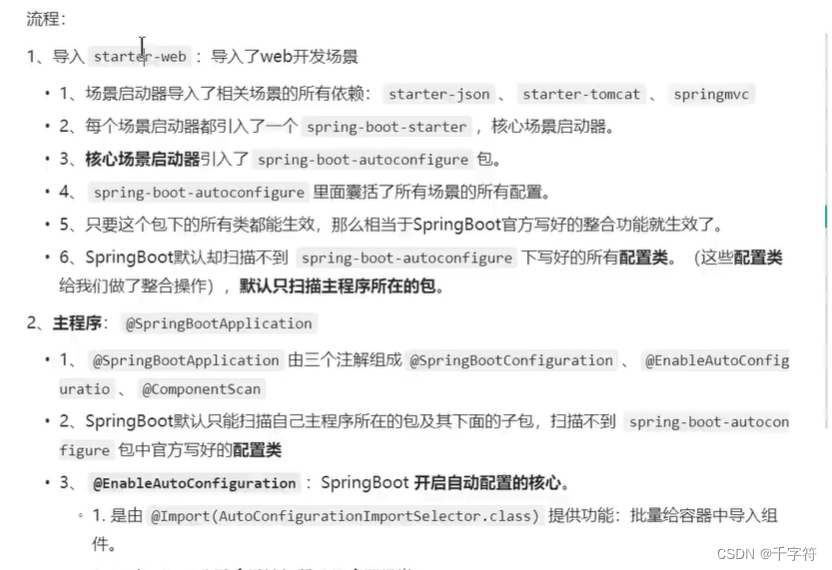
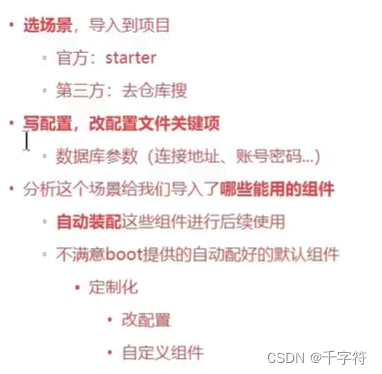
学习SpringBoot的方法
示例:
1、导入redis的启动器
        <dependency>
			<groupId>org.springframework.boot</groupId>
			<artifactId>spring-boot-starter-data-redis</artifactId>
		</dependency>
2、导入启动器后就会有相应的自动配置类:RedisAutoConfiguration
输入 ctrl + n 搜索可查看
3、在类上可以看到@EnableConfigurationProperties({RedisProperties.class}),这个注解开启了RedisProperties类的属性绑定,ctrl + 左键 查看
4、在类上看到@ConfigurationProperties( prefix = "spring.data.redis" ),就知道在配置文件对应配置项
5、在RedisAutoConfiguration中可以看到把哪些Bean放到ioc容器中,可以修改配置或覆盖
SpringBoot日志配置
| 日志接口 | 日志实现类 |
|---|---|
| JCL(Jakarta Commons Logging) SLF4j(Simpple Logging Facade for Java) jboss-logging | Log4j JUL(java.util.logging) Log4j2 Logback |
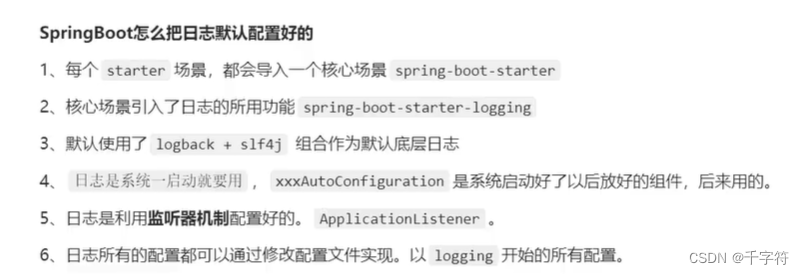
Spring5以后把commons-logging作为内部日志,但支持jul,log4j2,logback。默认使用logback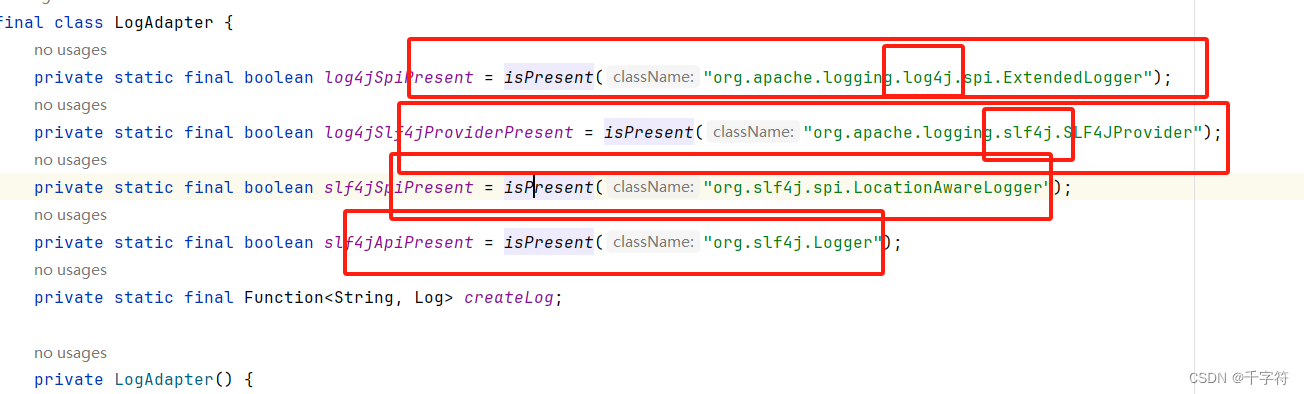
日志格式:
2024-03-23T01:01:09.925+08:00 INFO 27188 --- [boot-2-project] [ main] o.a.c.c.C.[Tomcat].[localhost].[/] : Initializing Spring embedded WebApplicationContext
- 默认格式:
- 时间和日期:毫秒级精度
- 日志级别:ERROR,WARN,INFO,DEBUG ,TRACE
- 进程ID
- ---:信息分割符
- 线程名:使用[]包含
- Logger名:通常是产生日志的类名
- 消息:日志记录的内容
自定义日志格式:
%d{HH:mm:ss.SSS} %contextName [%thread] %-5level %logger{36} - %msg%n
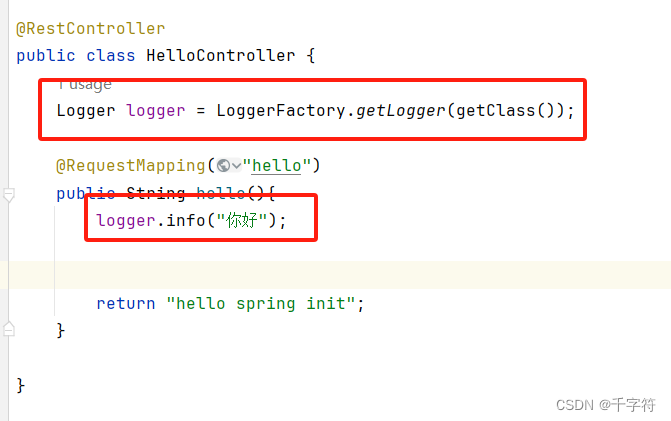
使用日志:
方法1:从日志工厂获得记录当前类的记录器(一个类可以有一个记录器),调用方法
方法2:在类使用@Slf4j注解(需要添加lombok依赖),它会在底层自动为这个类注入log属性,使用log打印日志。
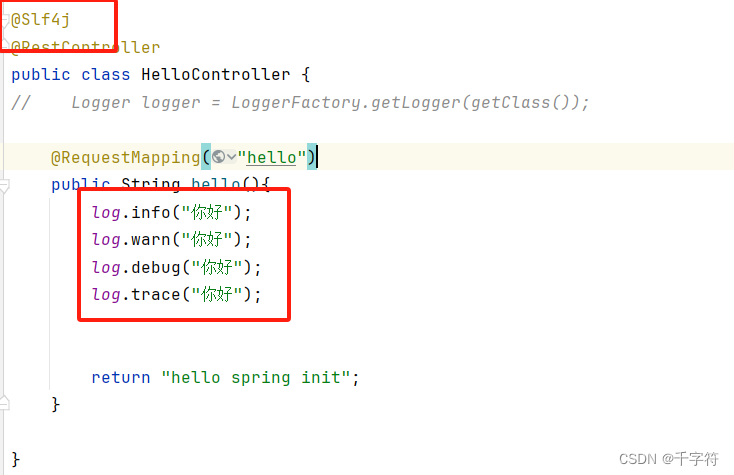
指定日志级别:
Springboot默认所有日志只要没有指定日志级别就使用root的默认级别(info)或设置的级别:
logging.level.root = debug
日志内容可以使用占位符:
log.info("a:{},b:{}",a,b);
指定某个类或包的日志级别:
logging.level.com.qiu.boot2project.controller = info
日志分组:

日志文件输出:
指定文件名:只写名字生成到当前位置
logging.file.name=D:\\logging\\file.log
指定文件路径:日志文件名默认为spring.log
logging.file.path=D:\\logging\\
同时指定文件名和文件路径只看文件名
日志归档和切割:(默认开启)
# 归档    切割
# LOG_FILE 就是 自己配置的文件名      yyyy-MM-dd 时间       i 当天的第几个文件
# max-file-size 只要文件超过了1MB 切割下一个文件
logging.logback.rollingpolicy.file-name-pattern=${LOG_FILE}.%d{yyyy-MM-dd}.%i.gz
logging.logback.rollingpolicy.max-file-size=1MB
只有logback才能直接配置,如果要使用其他日志系统,需要自行配置(log4j2需要添加log4j2.xml或log4j2-spring.xml)
自定义日志系统: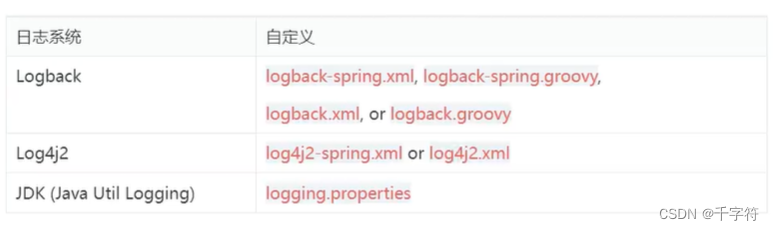
可以自行编写logback.xml或logback-spring.xml配置文件,这时springboot会读取这个配置文件,不使用默认的日志。
<?xml version="1.0" encoding="UTF-8"?>

<!-- 配置文件修改时重新加载,默认true -->
<configuration scan="true">

    <!--定义日志文件的存储地址 勿在 LogBack 的配置中使用相对路径-->
    <property name="CATALINA_BASE" value="logs"></property>

    <!-- 控制台输出 -->
    <appender name="CONSOLE" class="ch.qos.logback.core.ConsoleAppender">
        <encoder charset="UTF-8">
            <!-- 输出日志记录格式 -->
            <pattern>%d{yyyy-MM-dd HH:mm:ss.SSS} [%thread] %-5level %logger{36} - %msg%n</pattern>
        </encoder>
    </appender>

    <!-- 第一个文件输出,每天产生一个文件 -->
    <appender name="FILE1" class="ch.qos.logback.core.rolling.RollingFileAppender">
        <rollingPolicy class="ch.qos.logback.core.rolling.TimeBasedRollingPolicy">
            <!-- 输出文件路径+文件名 -->
            <fileNamePattern>${CATALINA_BASE}/aa.%d{yyyyMMdd}.log</fileNamePattern>
            <!-- 保存30天的日志 -->
            <maxHistory>30</maxHistory>
        </rollingPolicy>
        <encoder charset="UTF-8">
            <!-- 输出日志记录格式 -->
            <pattern>%d{yyyy-MM-dd HH:mm:ss.SSS} [%thread] %-5level %logger{36} - %msg%n</pattern>
        </encoder>
    </appender>

    <!-- 第二个文件输出,每天产生一个文件 -->
    <appender name="FILE2" class="ch.qos.logback.core.rolling.RollingFileAppender">
        <file>${CATALINA_BASE}/bb.log</file>
        <rollingPolicy class="ch.qos.logback.core.rolling.TimeBasedRollingPolicy">
            <fileNamePattern>${CATALINA_BASE}/bb.%d{yyyyMMdd}.log</fileNamePattern>
            <maxHistory>30</maxHistory>
        </rollingPolicy>
        <encoder charset="UTF-8">
            <pattern>%d{yyyy-MM-dd HH:mm:ss.SSS} [%thread] %-5level %logger{36} - %msg%n</pattern>
        </encoder>
    </appender>

    <appender name="CUSTOM" class="ch.qos.logback.core.rolling.RollingFileAppender">
        <file>${CATALINA_BASE}/custom.log</file>
        <rollingPolicy class="ch.qos.logback.core.rolling.TimeBasedRollingPolicy">
            <!-- daily rollover -->
            <fileNamePattern>${CATALINA_BASE}/custom.%d{yyyy-MM-dd}.log</fileNamePattern>
            <!-- keep 30 days' worth of history -->
            <maxHistory>30</maxHistory>
        </rollingPolicy>
        <encoder charset="UTF-8">
            <pattern>%d{yyyy-MM-dd HH:mm:ss.SSS} [%thread] %-5level %logger{36} - %msg%n</pattern>
        </encoder>
    </appender>

    <!-- 设置日志输出级别 -->
    <root level="ERROR">
        <appender-ref ref="CONSOLE" />
    </root>
    <logger name="file1" level="DEBUG">
        <appender-ref ref="FILE1" />
    </logger>
    <logger name="file1" level="INFO">
        <appender-ref ref="FILE2" />
    </logger>
    <!-- 自定义logger -->
    <logger name="custom" level="INFO">
        <appender-ref ref="CUSTOM" />
    </logger>
</configuration>
切换默认日志系统:
        <dependency>
			<groupId>org.springframework.boot</groupId>
			<artifactId>spring-boot-starter-web</artifactId>
			<exclusions>
				<exclusion>
					<groupId>org.springframework.boot</groupId>
					<artifactId>spring-boot-starter-logging</artifactId>
				</exclusion>
			</exclusions>
		</dependency>
        <dependency>
			<groupId>org.springframework.boot</groupId>
			<artifactId>spring-boot-starter-log4j</artifactId>
		</dependency>
SpringBoot Web开发
依赖:
		<dependency>
			<groupId>org.springframework.boot</groupId>
			<artifactId>spring-boot-starter-web</artifactId>
		</dependency>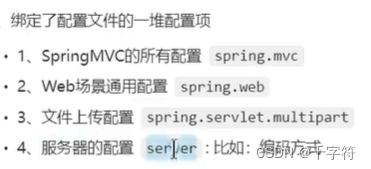
最佳实战:
静态资源
WebMvcAutoConfiguration自动配置类分析
1.生效条件:
@AutoConfiguration(
    after = {DispatcherServletAutoConfiguration.class, TaskExecutionAutoConfiguration.class, ValidationAutoConfiguration.class}
)//在这三个自动配置类后面开始自动配置
@ConditionalOnWebApplication(
    type = Type.SERVLET
)//如果是web应用,并且还得是servlet类型(还有Reactive 响应式web应用)才能生效
@ConditionalOnClass({Servlet.class, DispatcherServlet.class, WebMvcConfigurer.class})//当存在这些Bean才生效
@ConditionalOnMissingBean({WebMvcConfigurationSupport.class})//当没有这个Bean才生效
@AutoConfigureOrder(-2147483638)//优先级
@ImportRuntimeHints({WebResourcesRuntimeHints.class})
public class WebMvcAutoConfiguration {
2.效果:
1.放了两个Bean:FormContentFilter 和 HiddenHttpMethodFilter
- HiddenHttpMethodFilter:页面表单提交Rest请求(GET,POST,PUT,DELETE),不然表单只能发送GET和POST
- FormContentFilter:表单内容Filter,不然只有GET(URL后面)和POST(请求体)能携带数据,PUT和DELETE请求体数据会被忽略。
2.给容器放了WebMvcConfigurer组件:给SpringMvc添加各种定制功能
 @Configuration(
        proxyBeanMethods = false
    )
    @Import({EnableWebMvcConfiguration.class})
    @EnableConfigurationProperties({WebMvcProperties.class, WebProperties.class})
    @Order(0)
    public static class WebMvcAutoConfigurationAdapter implements WebMvcConfigurer, ServletContextAware {
3.WebMvcConfigurer
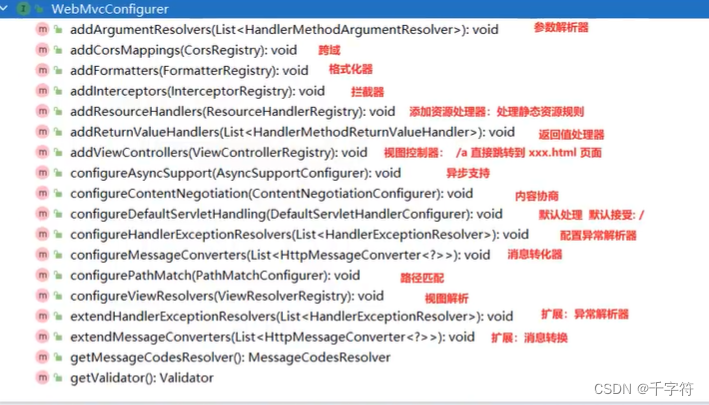
4.静态资源的规则源码addResourceHandlers
        public void addResourceHandlers(ResourceHandlerRegistry registry) {
            if (!this.resourceProperties.isAddMappings()) {
                logger.debug("Default resource handling disabled");
            } else {
                //规则1
                this.addResourceHandler(registry, this.mvcProperties.getWebjarsPathPattern(), "classpath:/META-INF/resources/webjars/");
                //规则2
                this.addResourceHandler(registry, this.mvcProperties.getStaticPathPattern(), (registration) -> {
                    registration.addResourceLocations(this.resourceProperties.getStaticLocations());
                    if (this.servletContext != null) {
                        ServletContextResource resource = new ServletContextResource(this.servletContext, "/");
                        registration.addResourceLocations(new Resource[]{resource});
                    }

                });
            }
        }
规则1:访问 /webjars/** 就到 classpath:/META-INF/resources/webjars/ 下找资源。
maven导入依赖,依赖jar包下的静态资源可以通过/webjars/访问

规则2:访问 /** 就到 "classpath:/META-INF/resources/", "classpath:/resources/", "classpath:/static/", "classpath:/public/" 这些下找资源。
规则3:静态资源默认都有缓存规则的设置
- 所有缓存的配置修改,在配置文件的 spring.web
- cachePeriod:缓存周期:多久不用找服务器要新的,默认没有,以秒为单位
- cacheControl:HTTP缓存控制
- useLastModified:是否使用最后一次修改,配合http cache规则
如果浏览器访问了一个静态资源,如果服务器这个资源没有发生变化,下次访问直接让浏览器用自己缓存中的东西,而不是给服务器发请求。
//addResourceHandler方法内部
registration.setCachePeriod(this.getSeconds(this.resourceProperties.getCache().getPeriod()));
registration.setCacheControl(this.resourceProperties.getCache().getCachecontrol().toHttpCacheControl());
registration.setUseLastModified(this.resourceProperties.getCache().isUseLastModified());
5.EnableWebMvcConfiguration源码
@Configuration(
        proxyBeanMethods = false
    )
    @EnableConfigurationProperties({WebProperties.class})
    public static class EnableWebMvcConfiguration extends DelegatingWebMvcConfiguration implements ResourceLoaderAware {
这个类继承了WebMvcConfigurationSupport,就是SpringBoot给容器中放了WebMvcConfigurationSupport组件。
如果我们自己放了这个组件,SpringBoot的WebMvcAutoConfiguration都不会生效;但他自己是在自动配置类生效后放的,不矛盾。
类下有方法WelcomePageHandlerMapping:只要静态资源路径内有index.html,项目启动就默认访问。
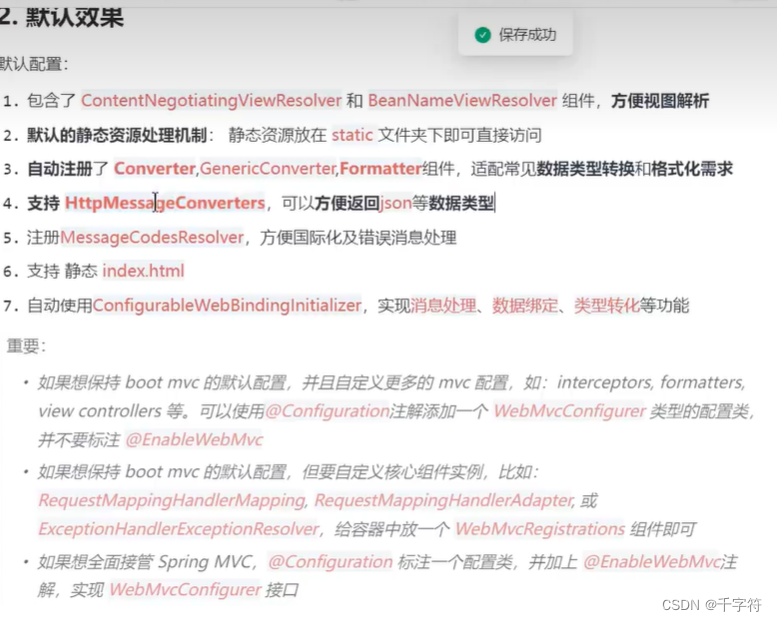
默认配置
静态资源映射
- 访问 /webjars/** 就到 classpath:/META-INF/resources/webjars/ 下找资源。
- maven导入依赖,依赖jar包下的静态资源可以通过/webjars/访问
- 访问 /** 就到 "classpath:/META-INF/resources/", "classpath:/resources/", "classpath:/static/", "classpath:/public/" 这些下找资源。
静态资源缓存
静态资源默认都有缓存规则的设置
- 所有缓存的配置修改,在配置文件的 spring.web
- cachePeriod:缓存周期:多久不用找服务器要新的,默认没有,以秒为单位
- cacheControl:HTTP缓存控制
- useLastModified:是否使用最后一次修改,配合http cache规则
欢迎页
只要静态资源路径内有index.html,项目启动就默认访问。
Favicon
每次浏览器请求网站时,都会请求 /favicon.ico,只要静态资源路径下有该图标就会返回。
缓存的一些配置

自定义静态资源规则
自定义静态资源路径,自定义缓存规则
1.配置方式
- spring.mvc:
- 静态资源访问前缀路径(你想要访问静态资源要在浏览器输入的路径的前缀)
- spring.web:
- 静态资源在服务器的位置前缀
- 静态资源缓存策略
# 自定义webjars路径前缀
spring.mvc.webjars-path-pattern=/wj/**
# 静态资源访问路径前缀
spring.mvc.static-path-pattern=/static/**
# 自定义静态资源在服务器的位置
spring.web.resources.static-locations=classpath:/a/,classpath:/b/,classpath:/static/
2.代码方式
创建一个配置类,实现WebMvcConfigurer接口,不要添加@EnableWebMvc,它会禁用boot的springMvc自动配置。
@Configuration
public class MyConfig implements WebMvcConfigurer {

    @Override
    public void addResourceHandlers(ResourceHandlerRegistry registry) {
        //保留默认配置
        WebMvcConfigurer.super.addResourceHandlers(registry);
        //自己写
        registry.addResourceHandler("/static/**")
                .addResourceLocations("classpath:/a/","classpath:/b/")
                .setCacheControl(CacheControl.maxAge(1180, TimeUnit.SECONDS));

    }
}
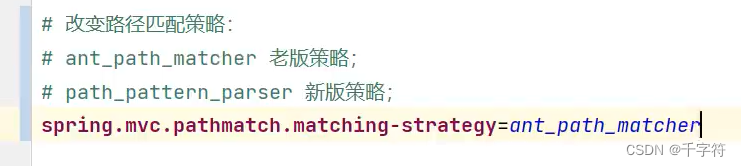
路径匹配
Spring5.3之前只支持AntPathMatcher,现在提供了PathPatternParser策略,并且可以指定使用哪种策略。默认使用新版策略。


内容协商

1.基于请求头:在请求头添加:Accept:application/数据格式(json,xml)
2.基于请求参数:在请求参数中添加format=数据格式(需要开启)
# 使用参数进行内容协商
spring.mvc.contentnegotiation.favor-parameter=true
# 自定义参数名 ,默认为format
spring.mvc.contentnegotiation.parameter-name=myparam
SpringBoot会自动就数据转换为对应的数据格式
默认支持把数据对象写成json,因为web启动器默认导入了jackson处理json的包:jackcon-core。
jackson也支持把数据对象写成xml,要导入xml相关的处理依赖
        <dependency>
			<groupId>com.fasterxml.jackson.dataformat</groupId>
			<artifactId>jackson-dataformat-xml</artifactId>
		</dependency>
在对象上添加注解
这样就可以根据请求返回xml数据对象了。
@Data
@JacksonXmlRootElement
public class People {
    private String name;
    private Integer sex;
}
自定义数据格式返回
内容协商原理-HttpMessageConverter
1.@ResponseBody 由 HttpMessageConverter 处理
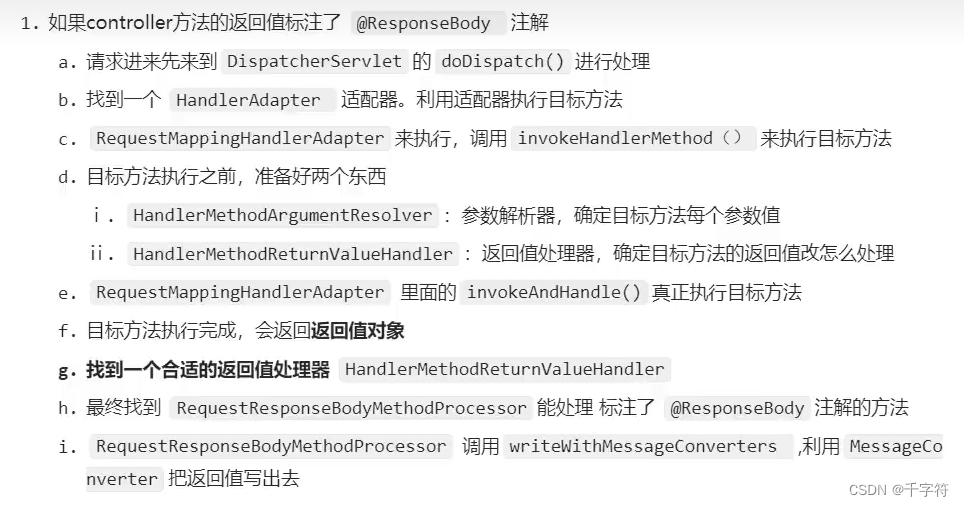

2.WebMvcAutoConfiguration提供几个默认HttpMessageConverters

系统里功能有限,只能返回json或普通数据,要返回新的类型需要增加新的HttpMessageConverter。
WebMvcConfigurationSupport
提供了很多的默认配置
如果手动把它放到ioc容器,SpringBoot关于web的自动配置就会失效
该类判断系统中是否有相应的包,如果有,就加入相应的HttpMessageConverter,但顶多也就json和xml等,向yaml等依然不支持。
static {
        ClassLoader classLoader = WebMvcConfigurationSupport.class.getClassLoader();
        romePresent = ClassUtils.isPresent("com.rometools.rome.feed.WireFeed", classLoader);
        jaxb2Present = ClassUtils.isPresent("jakarta.xml.bind.Binder", classLoader);
        jackson2Present = ClassUtils.isPresent("com.fasterxml.jackson.databind.ObjectMapper", classLoader) && ClassUtils.isPresent("com.fasterxml.jackson.core.JsonGenerator", classLoader);
        jackson2XmlPresent = ClassUtils.isPresent("com.fasterxml.jackson.dataformat.xml.XmlMapper", classLoader);
        jackson2SmilePresent = ClassUtils.isPresent("com.fasterxml.jackson.dataformat.smile.SmileFactory", classLoader);
        jackson2CborPresent = ClassUtils.isPresent("com.fasterxml.jackson.dataformat.cbor.CBORFactory", classLoader);
        gsonPresent = ClassUtils.isPresent("com.google.gson.Gson", classLoader);
        jsonbPresent = ClassUtils.isPresent("jakarta.json.bind.Jsonb", classLoader);
        kotlinSerializationCborPresent = ClassUtils.isPresent("kotlinx.serialization.cbor.Cbor", classLoader);
        kotlinSerializationJsonPresent = ClassUtils.isPresent("kotlinx.serialization.json.Json", classLoader);
        kotlinSerializationProtobufPresent = ClassUtils.isPresent("kotlinx.serialization.protobuf.ProtoBuf", classLoader);
    }
操作
想要自定义数据格式,只需要编写WebMvcConfigurer接口的实现类提供的configureMessageConverters底层,修改底层的MessageConverter即可。
示例:yaml类型
添加依赖:
<!--		支持返回yaml包-->
		<dependency>
			<groupId>com.fasterxml.jackson.dataformat</groupId>
			<artifactId>jackson-dataformat-yaml</artifactId>
		</dependency>
配置application文件:
# 增加一种新的内容类型
spring.mvc.contentnegotiation.media-types.yaml = application/yaml
编写一个格式转换器:
public class MyYamlHttpMessageConverter extends AbstractHttpMessageConverter<Object> {
    private ObjectMapper objectMapper = null;//该属性就是来把对象转成yaml
    public MyYamlHttpMessageConverter(){
        YAMLFactory yamlFactory = new YAMLFactory().disable(YAMLGenerator.Feature.WRITE_DOC_START_MARKER/*取消yaml的文档分隔符*/);
        this.objectMapper = new ObjectMapper(yamlFactory);
    }
    //支持把什么类型写成yaml格式
    @Override
    protected boolean supports(Class<?> clazz) {
        //可以在此判断
        return true;
    }

    @Override //@RequestBody
    protected Object readInternal(Class<?> clazz, HttpInputMessage inputMessage) throws IOException, HttpMessageNotReadableException {
        return null;
    }

    @Override //@ResponseBody 怎么把对象写成对应格式
    protected void writeInternal(Object methodReturnValue, HttpOutputMessage outputMessage) throws IOException, HttpMessageNotWritableException {
//        OutputStream body = outputMessage.getBody();
//        try {
//            this.objectMapper.writeValue(body,methodReturnValue);
//        }finally {
//            body.close();
//        }
        //try-with写法,自动关流
        try (OutputStream os = outputMessage.getBody()){
            this.objectMapper.writeValue(os,methodReturnValue);
        }
    }
}
把转换器和配置文件设置的类型关联起来:
转换器类继承的抽象类的构造方法可以传入mediatype,在传入的mediatype可以配置和配置文件设置的媒体类型一样的属性,这样两者就关联起来了。
在转换器的构造方法修改:
public MyYamlHttpMessageConverter(){
        //告诉springboot这个类型转换器支持哪种媒体类型
        super( new MediaType("application", "yaml", Charset.forName("UTF-8")));
        YAMLFactory yamlFactory = new YAMLFactory().disable(YAMLGenerator.Feature.WRITE_DOC_START_MARKER/*取消yaml的文档分隔符*/);
        this.objectMapper = new ObjectMapper(yamlFactory);
    }
把转换器配置到springboot:
@Configuration
public class MyConfig implements WebMvcConfigurer {
    @Override   //配置一个能把对象转换为yaml的messageConverter
    public void configureMessageConverters(List<HttpMessageConverter<?>> converters) {
        converters.add(new MyYamlHttpMessageConverter());
    }
}
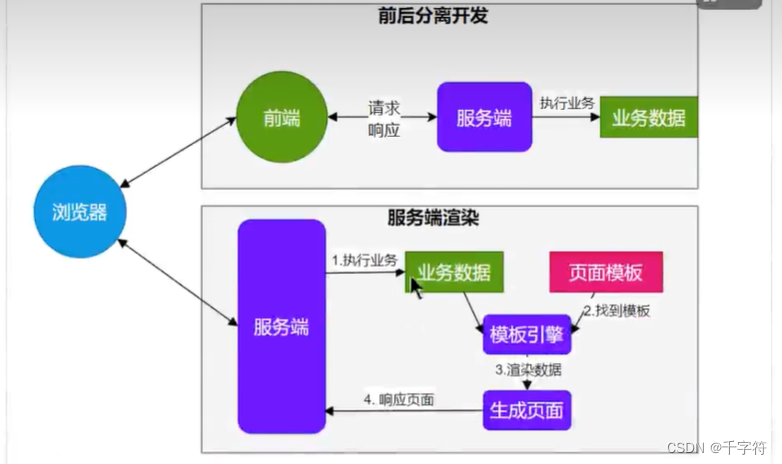
模板引擎
由于SpringBoot使用嵌入式Servlet容器,默认不能使用JSP。需要服务器页面渲染,优先考虑使用模板引擎。
模板引擎默认放到 /src/main/resources/templates
SpringBoot包含以下模板引擎的自动配置:
- FreeMarker
- Groovy
- Thymeleaf(推荐)官网:Thymeleaf
- Mustache
Thymeleaf整合
导入启动器:
<dependency>
<groupId>org.springframework.boot</groupId>
<artifactId>spring-boot-starter-thymeleaf</artifactId>
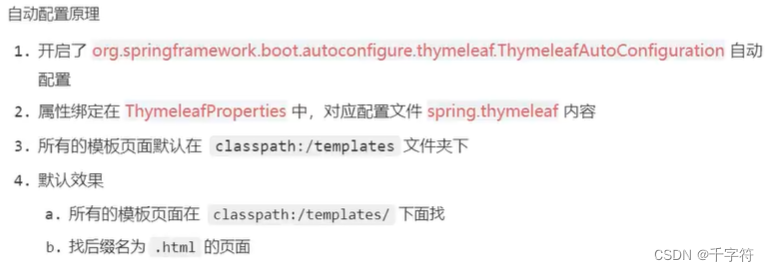
</dependency>自动配置原理:
在ThymeleafAutoConfiguration下:
- 将属性与配置文件下 spring.thymeleaf 绑定
- 设置前缀 classpath:/templates/
- 设置后缀 .html
SpringBoot如果整合了Thymeleaf,默认是到 classpath:/templates/下找文件
编写服务:
//这时要返回页面,不能使用RestController
@Controller
public class WelcomeController {
    //请求路径:localhost:8080/welcome?name=qiu
    //就是name参数来填写到要返回的页面上
    @GetMapping("welcome")
    public String welcome(String name, Model model){
        //将msg:name放到model中,在模板引擎中就可以直接使用msg映射name的值
        model.addAttribute("msg",name);
        //返回页面的话,由于整合了Thymeleaf,将返回的字符串与设置的前后缀拼接在访问器中搜索并返回
        //    前缀(默认:classpath:/templates/) + welcome(返回字符串) + 后缀(默认:.html)
        return "welcome";
    }
}
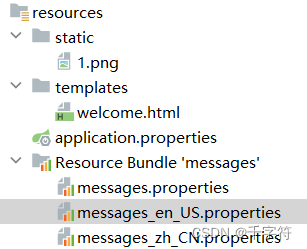
在 \src\main\resources\templates 下创建文件 welcome.html
<!DOCTYPE html>
<html lang="en">
<head>
<meta charset="UTF-8">
<title>Title</title>
</head>
<body>
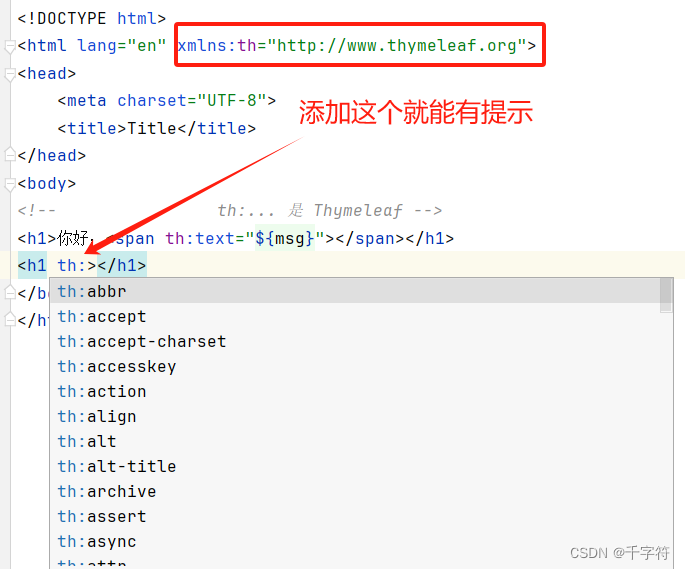
<!-- th:... 是 Thymeleaf -->
<h1>你好:<span th:text="${msg}"></span></h1>
</body>
</html>启动服务访问:localhost:8080/welcome?name=qiu

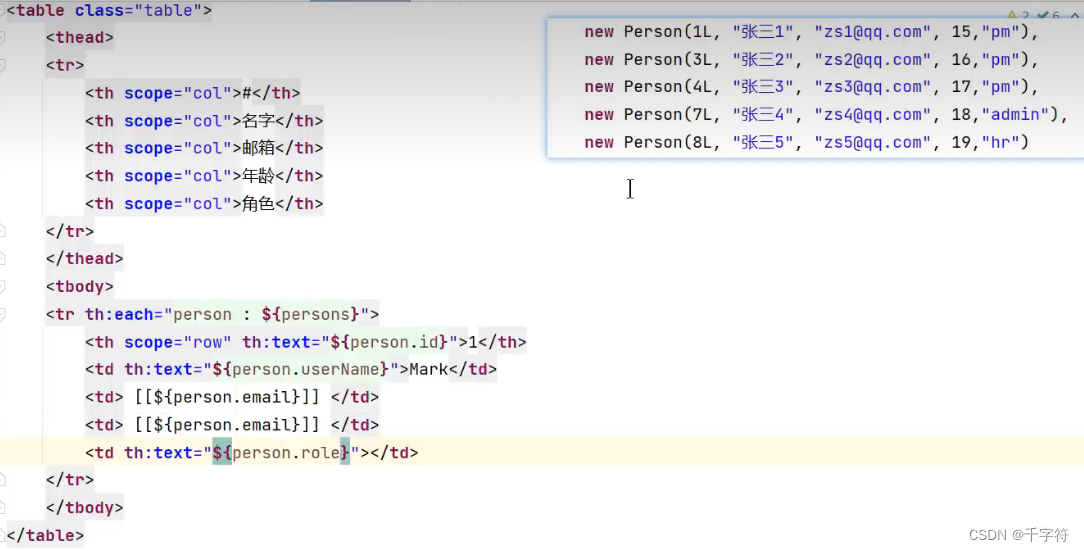
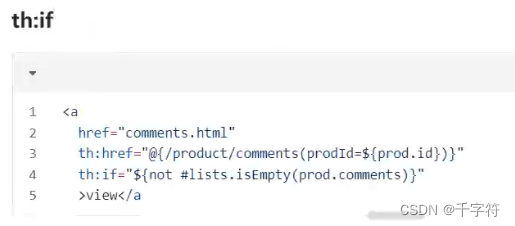
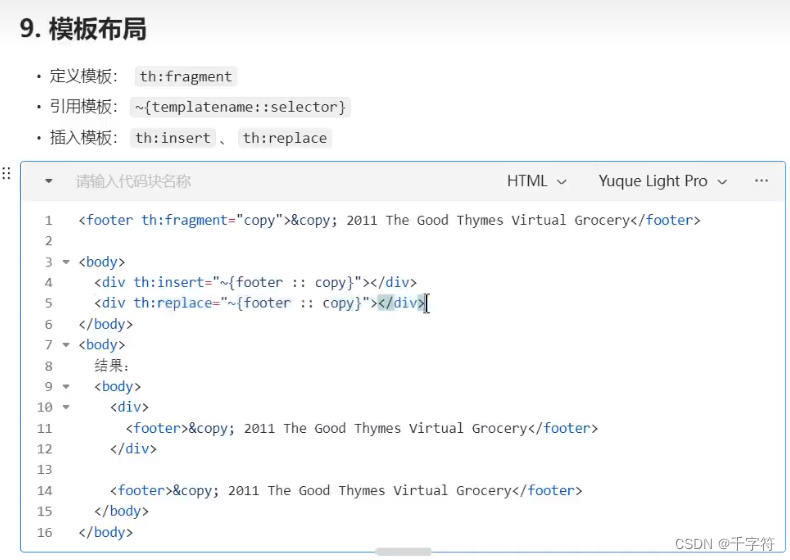
使用


SpringBoot开发工具
导入SpringBoot提供的依赖
<!--		热启动功能-->
		<dependency>
			<groupId>org.springframework.boot</groupId>
			<artifactId>spring-boot-devtools</artifactId>
		</dependency>
修改代码或页面后按 ctrl + f9, 项目就热启动了。
如果修改的是java代码,最好重启项目,不然可能有一些bug。
国际化
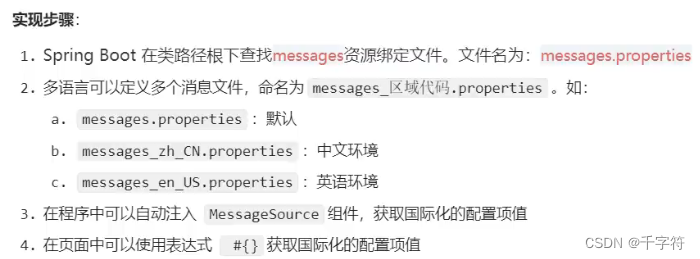
在resources下创建文件:messages.properties,messages_zh_CN.properties,messages_en_US.properties。
idea会自动识别形成以下目录:
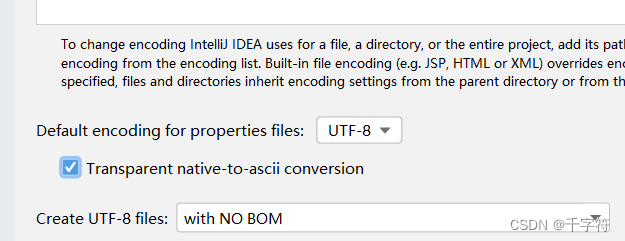
国际化要成功使用,项目编码要是UTF-8:File->Settings->搜索 file encodings
messages.properties:
login=Login
sign=Sign-Up
messages_zh_CN.properties:
login=登录
sign=注册
messages_en_US.properties:
login=Login
sign=Sign-Up-US
在模板中:
<!-- 会根据当前状态使用中文或者英文-->
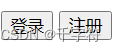
<button th:text="#{login}"></button>
<button th:text="#{sign}"></button>
错误处理
错误处理的自动化配置在ErrorMvcAutoConfiguration中,两大核心机制:
1.SpringBoot会自适应处理错误,响应页面或JSON数据
2.SpringMVC的错误处理机制仍然保留,MVC处理不了才会交给boot处理
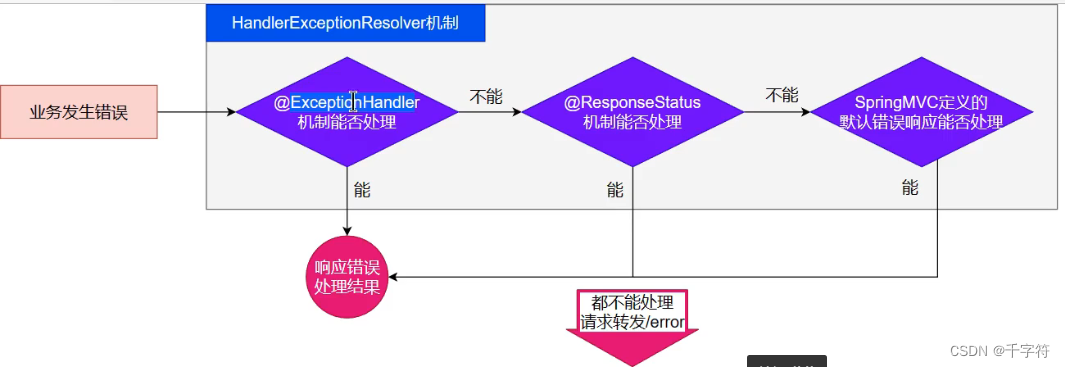
MVC处理机制:
可以在当前controller上添加处理方法:
    @ResponseBody
    @ExceptionHandler(Exception.class)
    public String handlerException(Exception e){
        System.out.println("异常处理代码");
        return e.getMessage();
    }
也可以创建一个异常处理类:
@ControllerAdvice   //这个类集中处理所有controller发生的错误
public class GlobaExceptionHandler {
    @ResponseBody
    @ExceptionHandler(Exception.class)
    public String handlerException(Exception e){
        System.out.println("异常处理");
        return e.getMessage();
    }
}
如果MVC机制无法解决,就提交boot机制处理。
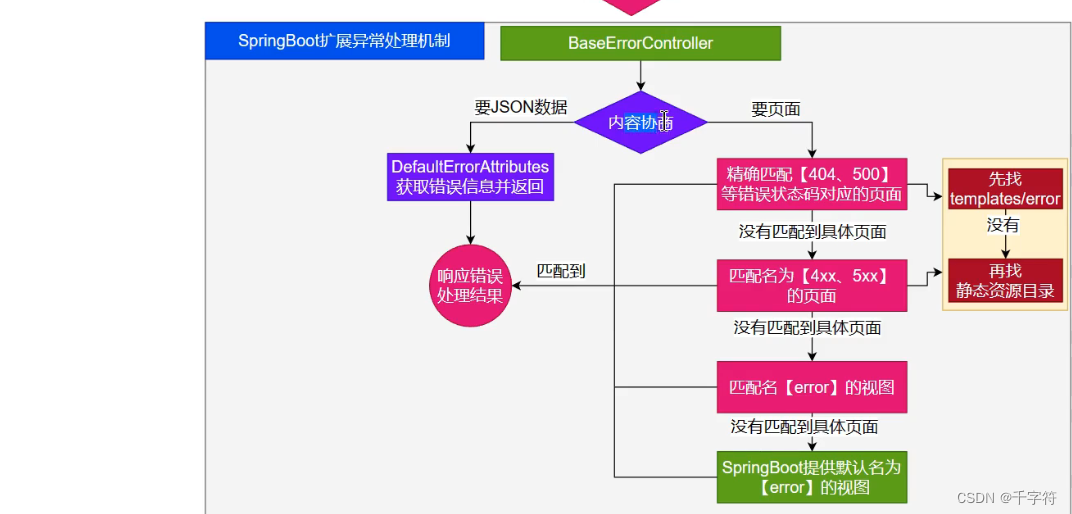
boot机制:
boot会默认将MVC无法处理的异常转发到项目路径为: /error 下 ,boot底层设计了一个BasicErrorController 处理请求,server.error.path不修改默认为 /error 。

@Controller
@RequestMapping({"${server.error.path:${error.path:/error}}"})
public class BasicErrorController extends AbstractErrorController {
在该controller下,会先判断请求的是页面和JSON数据
如果是JSON:
- boot封装了JSON格式的错误信息:DefaultErrorAttributes
- 当发生JSON请求错误时,将错误信息放到DefaultErrorAttributes中并返回
如果是页面:
- 如果发生了500,404,503等错误
- 如果有模板引擎,默认返回classpath:/templates/error/错误码.html
- 如果没有,默认返回 静态资源下的错误码.html
- 如果没有匹配到错误码,就模糊匹配(4xx.html或5xx.html)
- 如果有模板引擎,默认返回classpath:/templates/error/5xx.html(还真是5xx.html或4xx.html)
- 如果没有,默认返回 静态资源下的5xx.html
- 否则返回templates下的error.html(templates/error.html)
- 如果templates没有error.html,返回SpringBoot自己的默认error页面
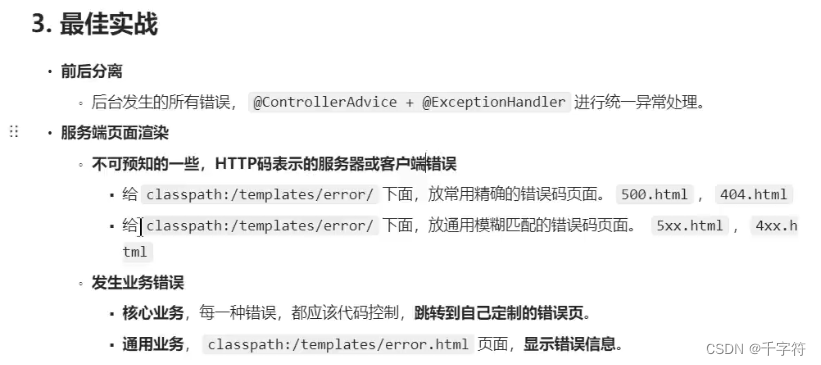
最佳实战
嵌入式容器
SpringBoot关于嵌入式容器的自动化配置为:ServletWebServerFactoryAutoConfiguration
SpringBoot默认使用Tomcat为内置Servlet容器。
SpringBoot支持3种Servlet容器:
- Tomcat(默认)
- Jetty
- Undertow
SpringBoot关于各个容器的配置类以 server.容器 为前缀:
server.tomcat.accept-count=100
server.jetty.accesslog.append=false
要替换SpringBoot的Servlet容器方法:
- 在导入web启动器时手动切换:
		<dependency>
			<groupId>org.springframework.boot</groupId>
			<artifactId>spring-boot-starter-web</artifactId>
			<exclusions>
				<exclusion>
					<groupId>org.springframework.boot</groupId>
					<artifactId>spring-boot-starter-tomcat</artifactId>
				</exclusion>
			</exclusions>
		</dependency>
		<dependency>
			<groupId>org.springframework.boot</groupId>
			<artifactId>spring-boot-starter-jetty</artifactId>
		</dependency>
Web新特性
Problemdetails
错误信息返回新格式
在web自动化配置中将 ProblemDetailsExceptionHandler 放到ioc容器中:
    //web自动化配置类
    static class ProblemDetailsErrorHandlingConfiguration {
        ProblemDetailsErrorHandlingConfiguration() {
        }

        @Bean
        @ConditionalOnMissingBean({ResponseEntityExceptionHandler.class})
        @Order(0)
        ProblemDetailsExceptionHandler problemDetailsExceptionHandler() {
            return new ProblemDetailsExceptionHandler();
        }
    }
    //ProblemDetailsExceptionHandler源码
    @ControllerAdvice//异常处理类
    final class ProblemDetailsExceptionHandler extends ResponseEntityExceptionHandler {
        ProblemDetailsExceptionHandler() {
        }
    }
它来处理以下异常:
    @ExceptionHandler(
            HttpRequestMethodNotSupportedException.class,
            HttpMediaTypeNotSupportedException.class,
            HttpMediaTypeNotAcceptableException.class,
            MissingPathVariableException.class,
            MissingServletRequestParameterException.class,
            MissingServletRequestPartException.class,
            ServletRequestBindingException.class,
            MethodArgumentNotValidException.class,
            NoHandlerFoundException.class,
            AsyncRequestTimeoutException.class,
            ErrorResponseException.class,
            ConversionNotSupportedException.class,
            TypeMismatchException.class,
            HttpMessageNotReadableException.class,
            HttpMessageNotWritableException.class,
            BindException.class})
如果系统出现这些异常,SpringBoot以 RFC 7807 规范方式返回数据。
不过该功能默认关闭,需要在配置文件中手动开启:
spring.mvc.problemdetails.enabled=true


 322
322


 被折叠的 条评论
为什么被折叠?
被折叠的 条评论
为什么被折叠?
 到【灌水乐园】发言


