


CDP and LLDP are discovery protocols that allow devices (or hosts in the case of ESXi) to share network information with the networking equipment they are connected to. Discovery protocols are most commonly used between switches and routers, but can also be configured on an ESXi host. CDP stands for Cisco Discovery Protocol, and is Cisco proprietary, whilst LLDP stands for Link Layer Discovery Protocol and is an open standard. Both protocols perform similar functions, and the choice between the two generally comes down to which protocol the physical networking equipment supports and is configured to use.
- Cisco Discovery Protocol (CDP) can be used on standard and distributed vSwitches which are connected to Cisco network equipment.
- Link Layer Discovery Protocol (LLDP) can be used on dvSwitches that are version 5.0 or later. LLDP is vendor neutral.
On a standard vSwitch you can view CDP information by clicking on the ‘speech’ icon next to the physical adapters:

Configuring Cisco Discovery Protocol (CDP) on ESXi Hosts
CDP is enabled by default on standard vSwitches, though you can view and configure CDP status using command line tools.
CDP can be disabled or configured on a per vSwitch basis. If it is enabled, it will be running in one of three possible modes:
- Listen – When in listen mode the host will display information about the physical switch it is connect to, but will not send CDP data, so CDP information on the vSwitch will not be available on the physical switch.
- Advertise – In this mode, the host will send CDP information to the physical switch, but will not display any information about the physical switch. Therefore this is the opposite of the listen mode.
- Both – When Both is set as the mode the host both receives/displays CDP data and sends CDP to the physical switch.
To view the CDP status for a vSwitch you can run:
~ # esxcfg-vswitch vSwitch0 -b
listen
To change the mode that CDP is running in you can run:
~ # esxcfg-vswitch vSwitch0 -B both
Using ‘both’ as the mode in the example above means that CDP on that vSwitch will both listen for and advertise CDP information. The following segment from the help file shows the possible CDP modes that can be set:
-B|--set-cdp                Set the CDP status for a given virtual switch.
                            To set pass one of "down", "listen", "advertise", "both".
-b|--get-cdp                Print the current CDP setting for this switch.
You can also view and change the status using ESXCLI. For example, to set the CDP status to ‘both’, you can run the following:
~ # esxcli network vswitch standard set --cdp-status=both -v vSwitch0
And to view CDP status for a vSwitch you can run:
~ # esxcli network vswitch standard list
vSwitch0
   Name: vSwitch0
   Class: etherswitch
   Num Ports: 128
   Used Ports: 5
   Configured Ports: 128
   MTU: 1500
   CDP Status: both
   Beacon Enabled: false
   Beacon Interval: 1
   Beacon Threshold: 3
   Beacon Required By:
   Uplinks: vmnic1, vmnic0
   Portgroups: vMotion, Management Network
CDP Configuration on a dvSwitch
CDP is configured on a dvSwitch by editing the dvSwitch settings. On the Properties tab, Click Advanced, then set the discovery protocol as required:

Configuring Link Layer Discovery Protocol (LLDP) on ESXi Hosts
LLDP is available only on distributed switches. It is configured in the Advanced settings of the dvSwitch:
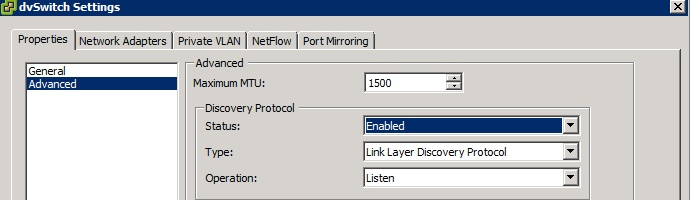
As with CDP, there are the different modes of operation (Listen, Advertise and Both) or LLDP can be disabled entirely.
通过 PowerCLI 获取 CDP 信息
要使用 PowerCLI 来显示 CDP 信息,请执行以下操作:
- 使用 PowerCLI 来连接 ESX 主机或 vCenter Server:
# Connect-VIServer esx-or-vc-hostname
- 在 PowerCLI 中运行以下脚本:
Get-VMHost | Where-Object {$_.State -eq "Connected"} |
%{Get-View $_.ID} |
%{$esxname = $_.Name; Get-View $_.ConfigManager.NetworkSystem} |
%{ foreach($physnic in $_.NetworkInfo.Pnic){
$pnicInfo = $_.QueryNetworkHint($physnic.Device)
foreach($hint in $pnicInfo){
Write-Host $esxname $physnic.Device
if( $hint.ConnectedSwitchPort ) {
$hint.ConnectedSwitchPort
}
else {
Write-Host "No CDP information available."; Write-Host
}
}
}
}
此时会显示连接的每台 ESX 主机上每个物理网络接口的 CDP 信息。
例如:
esxhostname vmnic0
CdpVersion : 2
Timeout : 0
Ttl : 177
Samples : 54732
DevId : example-lab-b2-c02
Address : 10.11.12.254
PortId : GigabitEthernet1/0/7 <<< Switch Port ID >>>
DeviceCapability : VMware.Vim.PhysicalNicCdpDeviceCapability
SoftwareVersion : Cisco IOS Software, C3750 Softw
HardwarePlatform : cisco WS-C3750G-24TS-1U
IpPrefix : 0.0.0.0
IpPrefixLen : 0
Vlan : 1 <<< VLan ID >>>
FullDuplex : True
Mtu : 0
SystemName :
SystemOID :
MgmtAddr : 10.11.12.254
Location :
- 要获取有关上行链路 Cisco 交换机以及为 CDP 配置的相关物理交换机端口的信息,请在 PowerCLI 中运行以下脚本:
param($VMHost)
$vmh = Get-VMHost $VMHost
If ($vmh.State -ne "Connected") {
Write-Output "Host $($vmh) state is not connected, skipping."
}
Else {
Get-View $vmh.ID | `
% { $esxname = $_.Name; Get-View $_.ConfigManager.NetworkSystem} | `
% { foreach ($physnic in $_.NetworkInfo.Pnic) {
$pnicInfo = $_.QueryNetworkHint($physnic.Device)
foreach( $hint in $pnicInfo ){
# Write-Host $esxname $physnic.Device
if ( $hint.ConnectedSwitchPort ) {
$hint.ConnectedSwitchPort | select @{n="VMHost"e={$esxname}},@{n="VMNic";
e={$physnic.Device}},DevId,Address,PortId,HardwarePlatform
}
else {
Write-Host "No CDP information available."
}
}
}
}
}
例如,如果此脚本另存为 Get-mVMHostCDPInfo.ps1:
# Get-mVMHostCDPInfo.ps1 -VMHost esxhostname | ft -a
VMHost VMNic DevId Address PortId HardwarePlatform
------ ----- ----- ------- ------ ----------------
esxhostname vmnic0 esx1.mon.com 1.1.1.1 GigabitEthernet1/0/9 cisco WS-C3750G-24TS-1U
esxhostname vmnic1 esx1.mon.com 1.1.1.1 GigabitEthernet2/0/21 cisco WS-C3750G-24TS-1U
esxhostname vmnic2 esx1.mon.com 1.1.1.1 GigabitEthernet1/0/10 cisco WS-C3750G-24TS-1U
esxhostname vmnic3 esx1.mon.com 1.1.1.1 GigabitEthernet2/0/10 cisco WS-C3750G-24TS-1U
esxhostname vmnic4 esx1.mon.com 1.1.1.1 GigabitEthernet1/0/11 cisco WS-C3750G-24TS-1U
esxhostname vmnic5 esx1.mon.com 1.1.1.1 GigabitEthernet2/0/11 cisco WS-C3750G-24TS-1U
esxhostname vmnic6 esx2.mon.com 1.1.1.2 GigabitEthernet1/0/6 cisco WS-C3750G-24TS-1U
esxhostname vmnic7 esx2.mon.com 1.1.1.2 GigabitEthernet1/0/8 cisco WS-C3750G-24TS-1U
通过 ESX/ESXi 命令行获取 CDP 信息
要使用 ESX/ESXi 命令行查看 CDP 信息,请执行以下操作:
- 以 root 身份通过 SSH 或控制台登录到 ESX/ESXi。
- 运行以下命令来查看 CDP 信息:
对于 ESX 4.x:
# vmware-vim-cmd hostsvc/net/query_networkhint
对于 ESXi 4.x 和 5.x:
# vim-cmd hostsvc/net/query_networkhint
对于 ESXi 4.x 和 5.x,如果您希望仅指定一个物理网卡进行查询,请运行:
# vim-cmd hostsvc/net/query_networkhint --pnic-name=vmnic[xx]
注意:从控制台登录到 ESXi 主机。有关详细信息,请参见用来获得紧急支持的技术支持模式 (1003677) (Tech Support Mode for Emergency Support (1003677))。
此时会显示连接的每台 ESX 主机上每个物理网络接口的 CDP 信息。
例如:
(vim.host.PhysicalNic.NetworkHint) [
(vim.host.PhysicalNic.NetworkHint) {
dynamicType = <unset>,
device = "vmnic3",
subnet = (vim.host.PhysicalNic.NetworkHint.IpNetwork) [
(vim.host.PhysicalNic.NetworkHint.IpNetwork) {
dynamicType = <unset>,
vlanId = 0,
ipSubnet = "10.21.4.1-10.21.7.254",
}
],
connectedSwitchPort = (vim.host.PhysicalNic.CdpInfo) null,
},
(vim.host.PhysicalNic.NetworkHint) {
dynamicType = <unset>,
device = "vmnic1",
subnet = (vim.host.PhysicalNic.NetworkHint.IpNetwork) [
(vim.host.PhysicalNic.NetworkHint.IpNetwork) {
dynamicType = <unset>,
vlanId = 0,
ipSubnet = "10.21.3.1-10.21.3.15",
}
],
connectedSwitchPort = (vim.host.PhysicalNic.CdpInfo) {
dynamicType = <unset>,
cdpVersion = 0,
timeout = 0,
ttl = 169,
samples = 2982,
devId = "PA-3210-2-R15-SW1",
address = "10.21.10.115",
portId = "GigabitEthernet1/0/7", <<< Switch Port ID >>>
deviceCapability = (vim.host.PhysicalNic.CdpDeviceCapability) {
dynamicType = <unset>,
router = false,
transparentBridge = false,
sourceRouteBridge = false,
networkSwitch = true,
host = false,
igmpEnabled = true,
repeater = false,
},
softwareVersion = "Cisco IOS Software, C3750 Softw",
hardwarePlatform = "cisco WS-C3750G-48TS",
ipPrefix = "0.0.0.0",
ipPrefixLen = 0,
vlan = 3, <<< VLan ID >>>
fullDuplex = true,
mtu = 0,
systemName = "",
systemOID = "",
mgmtAddr = "10.21.10.115",
location = "",
},
},
] - 也可以通过运行以下命令来找到相同的 CDP 信息:
# esxcfg-info | less
搜索特定的 vmnic#(在本示例中为 vmnic0)来查找 CDP 信息。
示例输出:
|----Name........................................vmnic0
|----PCI Bus.....................................3
|----PCI Slot....................................0
|----PCI function................................0
|----MAC Address.................................xx:xx:xx:xx:xx:xx
|----Virtual MAC Address.........................xx:xx:xx:xx:xx:xy
|----Driver......................................bnx2
|----Network Hint................................0 10.112.100.0/255.255.252.0
|----MTU.........................................1500
|----Configured Speed............................1000
|----Actual Speed................................1000
|----Configured Duplex...........................1
|----Actual Duplex...............................1
|----Link Up.....................................true
|----enabled.....................................true
|----Wake on LAN supported ......................true
|----Wake on LAN enabled ........................true
|----Resource scheduler allowed ................true
|----Resource scheduler supported ...............true
|----CDP Network.................................true
\==+CDP Summary :
|----Cdp Version.............................2
|----Timeout.................................0
|----Time-to-live............................177
|----Samples.................................20131
|----Device Id...............................c2960G-lab-c18
|----Ip Address..............................10.112.106.86
|----Ip Prefix...............................0.0.0.0/0
|----Port Id.................................GigabitEthernet0/35
|----Capabilities............................40
|----Version.................................Cisco IOS Software, C2960 Software
|----Platform................................cisco WS-C2960G-48TC-L
|----Vlan....................................1032
|----Duplex..................................true
|----MTU.....................................0
|----System Name.............................
|----System OID..............................
|----Mgmt Ip Address.........................10.112.106.86
使用 PowerCLI 设置 CDP 信息
$esxcli = Get-EsxCli -VMHost $myhost
$esxcli.network.vswitch.standard.set("both","1500","vSwitch0")
使用 esxcli 命令在 ESXi 5.x 上设置 CDP 信息
# esxcli network vswitch standard set –c both –v vSwitch#
注意:请使用 vSwitch 编号来替换 #。
使用 esxcli 设置链路层发现协议 (LLDP) 信息
# esxcli network vswitch standard list -v vSwitch#


 3109
3109

 被折叠的 条评论
为什么被折叠?
被折叠的 条评论
为什么被折叠?
 到【灌水乐园】发言


