


Netty源码解析-EventLoop-DefaultEventLoop启动过程
Netty version : 4.1.53.Final
有任何错误或者建议可以留言交流,谢谢
DefaultEventLoop
DefaultEventLoop是EventLoop的一个最简单实现,为方便更好理解后面NioEventLoop做准备。
继承关系

DefaultEventLoop初始化

从new DefaultEventLoop()开始进入

新建一个ThreadFactory对象,主要用来新建线程,同时传入的DefaultEventLoop.class用于帮助生成线程的命名。

到父类SingleThreadEventExecutor

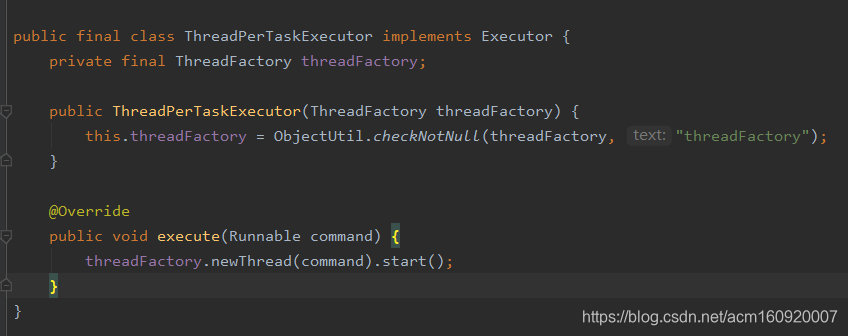
这里新建了一个ThreadPerTaskExecutor对象,该类的主要作用是调用threadfactory的newThread()方法并启动线程
在调用父类的构造方法,一直跟踪代码到SingleThreadEventExecutor的构造方法

这里的addTaskWakesUp属性看意思是添加任务时将线程唤醒。
maxPendingTasks:最多可以有多少任务等待执行。不设置就是Integer.MAX_VALUE
下面赋值操作比较重要,进一步跟进

这个方法返回了一个exector势力,重写了execute方法,这个方法用于使用传入的commend触发executor(ThreadPerTaskExecutor)的execute方法,前面可以看到ThreadPerTaskExecutor的executor方法会新建线程同时执行start()方法。在进入apply方法

这里新建一个匿名任务,用于直接调用commend的run()方法。在返回到SingleThreadEventExecutor类,

这里我们知道了exector属性用来启动一个线程并执行一个任务,这里绕了几层。在后是初始化任务队列和拒绝策略。至此初始化工作大致完成
DefaultEventLoop提交任务

这里分析submit方法。进入代码一直到AbstractExecutorService的submit()方法

这里会执行execute方法,然后跟踪到SingleThreadEventExecutor的方法

这里判断inEventLoop也就是判断当前线程是不是和这个DefaultEventLoop实例绑定的线程。前面没有设置这个属性,所以返回为false,然后添加任务再进入if里面,在跟踪进入startThread方法

这里判断是否已经启动过,然后设置状态,然后进入doStartThread()方法代码如下:
   private void doStartThread() {
        assert thread == null;
        executor.execute(new Runnable() {
            @Override
            public void run() {
                thread = Thread.currentThread();
                if (interrupted) {
                    thread.interrupt();
                }

                boolean success = false;
                updateLastExecutionTime();
                try {
                    SingleThreadEventExecutor.this.run();
                    success = true;
                } catch (Throwable t) {
                    logger.warn("Unexpected exception from an event executor: ", t);
                } finally {
                    for (;;) {
                        int oldState = state;
                        if (oldState >= ST_SHUTTING_DOWN || STATE_UPDATER.compareAndSet(
                                SingleThreadEventExecutor.this, oldState, ST_SHUTTING_DOWN)) {
                            break;
                        }
                    }

                    // Check if confirmShutdown() was called at the end of the loop.
                    if (success && gracefulShutdownStartTime == 0) {
                        if (logger.isErrorEnabled()) {
                            logger.error("Buggy " + EventExecutor.class.getSimpleName() + " implementation; " +
                                    SingleThreadEventExecutor.class.getSimpleName() + ".confirmShutdown() must " +
                                    "be called before run() implementation terminates.");
                        }
                    }

                    try {
                        // Run all remaining tasks and shutdown hooks. At this point the event loop
                        // is in ST_SHUTTING_DOWN state still accepting tasks which is needed for
                        // graceful shutdown with quietPeriod.
                        for (;;) {
                            if (confirmShutdown()) {
                                break;
                            }
                        }

                        // Now we want to make sure no more tasks can be added from this point. This is
                        // achieved by switching the state. Any new tasks beyond this point will be rejected.
                        for (;;) {
                            int oldState = state;
                            if (oldState >= ST_SHUTDOWN || STATE_UPDATER.compareAndSet(
                                    SingleThreadEventExecutor.this, oldState, ST_SHUTDOWN)) {
                                break;
                            }
                        }

                        // We have the final set of tasks in the queue now, no more can be added, run all remaining.
                        // No need to loop here, this is the final pass.
                        confirmShutdown();
                    } finally {
                        try {
                            cleanup();
                        } finally {
                            // Lets remove all FastThreadLocals for the Thread as we are about to terminate and notify
                            // the future. The user may block on the future and once it unblocks the JVM may terminate
                            // and start unloading classes.
                            // See https://github.com/netty/netty/issues/6596.
                            FastThreadLocal.removeAll();

                            STATE_UPDATER.set(SingleThreadEventExecutor.this, ST_TERMINATED);
                            threadLock.countDown();
                            int numUserTasks = drainTasks();
                            if (numUserTasks > 0 && logger.isWarnEnabled()) {
                                logger.warn("An event executor terminated with " +
                                        "non-empty task queue (" + numUserTasks + ')');
                            }
                            terminationFuture.setSuccess(null);
                        }
                    }
                }
            }
        });
    }
这里调用exector.execute方法并传入任务,这里这个exector就是前面初始化的时候exector,这个方法会创建一个线程来运行任务。所以进一步会到

这里apply方法再包装了一层并调用run()方法

再到start方法

这个时候我们通过idea调试切换到新建的线程

由于我之前在代码设置了断点 所有新建的线程停止在了断点处

在进入commend.run()方法,也就是之前贴上的代码:

这里绑定thread属性同时调用 SingleThreadEventExecutor.this.run();方法这个方法就是一个死循环,(finally里面的方法暂时还不知道具体意义暂时不分析)这个run方法也就是DefaultEventLoop重写的run()方法
这里获取任务然后执行,如果任务为零,takeTask()方法将会阻塞,如下:
 protected Runnable takeTask() {
        assert inEventLoop();
        if (!(taskQueue instanceof BlockingQueue)) {
            throw new UnsupportedOperationException();
        }

        BlockingQueue<Runnable> taskQueue = (BlockingQueue<Runnable>) this.taskQueue;
        for (;;) {
            ScheduledFutureTask<?> scheduledTask = peekScheduledTask();
            if (scheduledTask == null) {
                Runnable task = null;
                try {
                    task = taskQueue.take();
                    if (task == WAKEUP_TASK) {
                        task = null;
                    }
                } catch (InterruptedException e) {
                    // Ignore
                }
                return task;
            } else {
                long delayNanos = scheduledTask.delayNanos();
                Runnable task = null;
                if (delayNanos > 0) {
                    try {
                        task = taskQueue.poll(delayNanos, TimeUnit.NANOSECONDS);
                    } catch (InterruptedException e) {
                        // Waken up.
                        return null;
                    }
                }
                if (task == null) {
                    // We need to fetch the scheduled tasks now as otherwise there may be a chance that
                    // scheduled tasks are never executed if there is always one task in the taskQueue.
                    // This is for example true for the read task of OIO Transport
                    // See https://github.com/netty/netty/issues/1614
                    fetchFromScheduledTaskQueue();
                    task = taskQueue.poll();
                }

                if (task != null) {
                    return task;
                }
            }
        }
    }
方法首先判断是否是绑定的线程,然后任务队列是BlockingQueue类型,没有任务将会阻塞,这里有两种任务队列,因为Default本身是实现了ScheduledExecutorService并实现了定时任务的运行,所以这里会从两个队列里面获取任务。
参考资料:
《Netty in action 》 v5
《Netty 4 核心原理》


 449
449


 被折叠的 条评论
为什么被折叠?
被折叠的 条评论
为什么被折叠?
 到【灌水乐园】发言


