


整了一两天,终于把Spring整合Hessian整出来了,现在把这个过程以及过程中遇到的问题记录下来。
其实原理很简单,那么就让我们结合例子来理解吧(随着以后对这方面的理解加深,会随时更新)
声明:本文中使用的例子参考http://blog.csdn.net/harderxin/article/details/22720659
准备工作:去这里下载所依赖的所有jar包 http://download.csdn.net/detail/coincidencewq/8498797
那么开始吧第一部分 服务端的整合
首先创建服务端web工程HessianSpringServer,在WEB_INF/lib下导入我们下载的jar包。Hessian的远程服务是基于接口的,所以我们需要一个接口类,还需要一个接口的实现类来提供真正的服务,本例中我们另外创建一个实体类来在客户端和服务端之间进行传输,所以该实体类必须实现Serializable接口来进行王略通信。
实体类User:
package com.server.bean;
import java.io.Serializable;
public class User implements Serializable{
/**
*
*/
private static final long serialVersionUID = 7175134832651443717L;
// 用户编号
private int id;
// 用户名
private String userName;
// 密码
private String password;
public int getId() {
return id;
}
public void setId(int id) {
this.id = id;
}
public String getUserName() {
return userName;
}
public void setUserName(String userName) {
this.userName = userName;
}
public String getPassword() {
return password;
}
public void setPassword(String password) {
this.password = password;
}
public User(int id, String userName, String password) {
super();
this.id = id;
this.userName = userName;
this.password = password;
}
@Override
public int hashCode() {
final int prime = 31;
int result = 1;
result = prime * result + id;
result = prime * result
+ ((password == null) ? 0 : password.hashCode());
result = prime * result
+ ((userName == null) ? 0 : userName.hashCode());
return result;
}
@Override
public boolean equals(Object obj) {
if (this == obj)
return true;
if (obj == null)
return false;
if (getClass() != obj.getClass())
return false;
User other = (User) obj;
if (id != other.id)
return false;
if (password == null) {
if (other.password != null)
return false;
} else if (!password.equals(other.password))
return false;
if (userName == null) {
if (other.userName != null)
return false;
} else if (!userName.equals(other.userName))
return false;
return true;
}
}
接口类 UserService:
package com.server.service;
import java.util.List;
import com.server.bean.User;
public interface UserService {
public List<User> getUser();
}
接口实现类 UserServiceImpl:
package com.server.service.impl;
import java.util.ArrayList;
import java.util.List;
import com.server.bean.User;
import com.server.service.UserService;
public class UserServiceImpl implements UserService {
@Override
public List<User> getUser() {
List<User> list=new ArrayList<User>();
list.add(new User(1,"Mary","123456"));
list.add(new User(2,"Jack","236547"));
list.add(new User(3,"Joy","362541"));
return list;
}
}
接下来创建Spring配置文件springremoting-servlet.xml,将UserServiceImpl 作为一个远程服务来进行发布。
<?xml version="1.0" encoding="UTF-8"?>
<beans xmlns="http://www.springframework.org/schema/beans"
xmlns:xsi="http://www.w3.org/2001/XMLSchema-instance"
xsi:schemaLocation="http://www.springframework.org/schema/beans
http://www.springframework.org/schema/beans/spring-beans.xsd">
<!-- Hessian服务接口Impl注入 -->
<bean id="userService" class="com.server.service.impl.UserServiceImpl" />
<!-- 使用HessianServiceExporter为服务接口Impl在网络地址中映射一个Hessian服务 -->
<!-- 完整的远程调用请求 Url:http://localhost:8080/HessianSpringServer/sr/userService,前部分在web.xml中已经进行了配置 -->
<bean name="/userService"
class="org.springframework.remoting.caucho.HessianServiceExporter">
<!-- Hessian服务的接口 -->
<property name="serviceInterface" value="com.server.service.UserService" />
<!-- Hessian服务的接口Impl -->
<property name="service" ref="userService"></property>
</bean>
</beans>
配置web.xml,加载springremoting-servlet.xml
<?xml version="1.0" encoding="UTF-8"?>
<web-app version="2.5"
xmlns="http://java.sun.com/xml/ns/javaee"
xmlns:xsi="http://www.w3.org/2001/XMLSchema-instance"
xsi:schemaLocation="http://java.sun.com/xml/ns/javaee
http://java.sun.com/xml/ns/javaee/web-app_2_5.xsd">
<servlet>
<!-- 完整的远程调用请求Url:http://localhost:8080/HessianSpringServer/sr/* -->
<servlet-name>springremoting</servlet-name>
<servlet-class>org.springframework.web.servlet.DispatcherServlet</servlet-class>
<load-on-startup>1</load-on-startup>
</servlet>
<servlet-mapping>
<servlet-name>springremoting</servlet-name>
<url-pattern>/sr/*</url-pattern>
</servlet-mapping>
<welcome-file-list>
<welcome-file>index.jsp</welcome-file>
</welcome-file-list>
</web-app>
有些地方会在DispatcherServlet的下面配置
-
- <init-param>
- <param-name>contextConfigLocation</param-name>
- <!-- 服务启动加载 springremoting-servlet.xml-->
- <param-value>classpath:springremoting-servlet.xml</param-value>
- </init-param>
其实,当不进行上述配置时,spring会默认加载<servlet-name>-servlet.xml文件,所以在这里我们没有配置。
此时我们的服务端就创建好了。把我们的User实体类和接口类导出为jar文件,以备将来我们的客户端使用。
将服务端项目导出为war包,放在tomcat的webapps下。
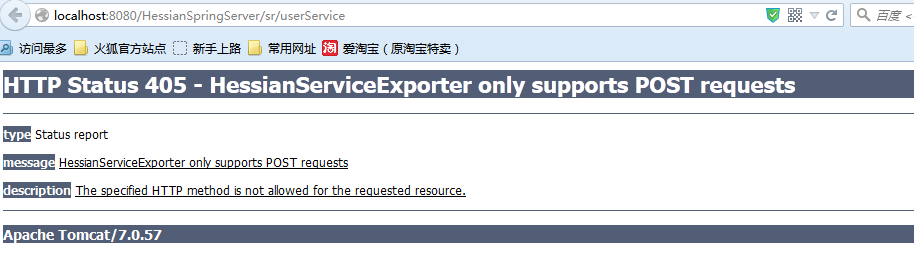
启动tomcat,在浏览器中访问http://localhost:8080/HessianSpringServer/sr/userService
如果出现405,如下图,就说明服务端没有问题;如果出现404或者其他错误,证明服务端有问题,重新查看你的服务端配置文件。
第二部分 客户端的整合
1.客户端不适用Spring
创建java工程,引入hessian包和我们上面所说的导出的User实体类和接口类的jar包。
创建客户端 UserServiceTest :
package com.client.test;


import java.util.List;

import com.caucho.hessian.client.HessianProxyFactory;
import com.server.bean.User;
import com.server.service.UserService;

public class UserServiceTest {
	public static void main(String[] args) {

		String url="http://localhost:8080/HessianSpringServer/sr/userService";
		//获得HessianProxyFactory实例
		HessianProxyFactory factory=new HessianProxyFactory();
		try {

			//UserService userService=(UserService)factory.create(url);
			//执行服务端方法
			List<User> users=userService.getUser();
			//遍历输出
			for(User user:users){
				System.out.println("id="+user.getId()+",name="+user.getUserName()+",pwd="+user.getPassword());
			}
		} catch (Exception e) {
			e.printStackTrace();
		}
	}
}

上面我们已经启动了tomcat,运行我们的客户端类 run as java application。输出
id=1,name=Mary,pwd=123456
id=2,name=Jack,pwd=236547
id=3,name=Joy,pwd=362541

2.客户端使用Spring,那么需要除了需要引入hessian包和实体类包,以及接口类包之外,我们还需要引入spring.jar包。
我们需要创建Spring配置文件springremoting-client.xml,来把服务代理类交由Spring容器管理。

<?xml version="1.0" encoding="UTF-8"?>
<beans xmlns="http://www.springframework.org/schema/beans"
    xmlns:xsi="http://www.w3.org/2001/XMLSchema-instance"
    xsi:schemaLocation="http://www.springframework.org/schema/beans
        http://www.springframework.org/schema/beans/spring-beans.xsd">
    <bean id="userService"
    class="org.springframework.remoting.caucho.HessianProxyFactoryBean">
    <!-- 注入我们的接口类 -->
    <property name="serviceInterface" value="com.server.service.UserService" />
    <!-- 服务器访问地址 -->
    <property name="serviceUrl"
        value="http://localhost:8080/HessianSpringServer/sr/userService" />
    </bean>
</beans>

把这个配置文件放在客户端项目的根目录下。

创建我们的测试类UserSpringClient:

package com.client.test;

import java.util.List;

import org.springframework.context.ApplicationContext;
import org.springframework.context.support.ClassPathXmlApplicationContext;

import com.server.bean.User;
import com.server.service.UserService;

public class UserSpringClient {

    public static void main(String[] args) {
        //加载我们的Spring配置文件
        ApplicationContext context=new ClassPathXmlApplicationContext("/springremoting-client.xml");
        //获取我们的接口类
        UserService userService=(UserService)context.getBean("userService");
        List<User> users=userService.getUser();
        //遍历输出
        for(User user:users){
            System.out.println("id="+user.getId()+",name="+user.getUserName()+",pwd="+user.getPassword());
        }
    }

}

启动tomcat服务后,运行客户端,输出:
id=1,name=Mary,pwd=123456
id=2,name=Jack,pwd=236547
id=3,name=Joy,pwd=362541

第三部分:过程中遇到的问题:
1. 在浏览器中访问http://localhost:8080/HessianSpringServer/sr/userService时出现错误hessian.java.lang.reflect.UndeclareThrowableException
这是因为你的服务端和客户端的hessian包版本不一致,或者版本过低。
2.运行在客户端使用Spring的客户端时,抛出错误,说在spring的配置文件中:文档根元素"beans"必须匹配DOCTYPE根 "null",这是因为Spring.jar的版本问题,
下载最新的spring.jar引入。


 821
821


 被折叠的 条评论
为什么被折叠?
被折叠的 条评论
为什么被折叠?
 到【灌水乐园】发言


