


Spring是一个开源,轻量化,具有IOC和AOP两大核心功能的容器型框架。
Spring Boot是简化新Spring应用的初始搭建以及开发过程。
下面介绍一下Spring Boot IOC。
1 IOC简介
IOC(Inversion of Control):控制反转。
DI(Dependency Injection):依赖注入。
传统:手动new对象。
IOC:统一的容器对对象进行管理(创建、销毁、协调)。
2 springboot IOC简介
Spring实现IOC的两种方法:
1 配置文件管理
2 注解
Spring Boot 特性:
绝对没有代码生成和对XML没有要求配置,采用注解配置。
所以Spring Boot 只有注解实现IOC。
springboot 注解 实现IOC的三种方法:
1 @Configuration注解和@Bean注解来实现。
2 @Component、@Repository、@Service、@Controller注解。
3 @Configuration注解和@ComponentScan注解来实现。
2.1 @Configuration注解和@Bean注解
第1步:先定义一个普通的bean;
public class ConfigurationBean {
    private String server = "";
    private int port;
    private String style = "";

    public String getServer() {
        return server;
    }

    public void setServer(String server) {
        this.server = server;
    }

    public int getPort() {
        return port;
    }

    public void setPort(int port) {
        this.port = port;
    }

    public String getStyle() {
        return style;
    }

    public void setStyle(String style) {
        this.style = style;
    }
}
第2步:定义@Configuration
注解的bean来获取ConfigurationBean ;
@Configuration
public class BeanIOC {
    //获取配置参数
    @Bean(name="configurationBean")
    public ConfigurationBean getConfigBean(){
        ConfigurationBean configBean = new ConfigurationBean();
        configBean.setServer("127.0.0.1");
        configBean.setPort(8081);
        configBean.setStyle("通过bean注解装配到IOC容器");
        return configBean;
    }
}
第3步:使用ConfigurationBean 时,@Autowired注入:
@RestController
@RequestMapping(value = "/ioc")
public class IOCController {
    @Autowired
    private BeanIOC beanIOC;

    @RequestMapping(value = "/beanStyle", method = RequestMethod.GET)
    public String beanStyle() {
        return JSON.toJSONString(beanIOC.getConfigBean());
    }
}
最后Postman请求url:127.0.0.1:8080/ioc/beanStyle验证:

可见ConfigurationBean 这个bean创建调用成功。
2.2 @Component、@Repository、@Service、@Controller注解实现IOC
| 注解 | 使用范围 |
|---|---|
| @Controller | RequestMapping 处理相关 |
| @Repository | 存储相关 |
| @Service | 模型相关 |
| @Component | 其它相关 |
@Repository、@Service、@Controller比较普遍。
比如`:
@RestController
public class UserController {

    @Autowired
    private UserService userService;
    ...
}
我们需要UserService 这个bean的通过注解@Autowired直接来获取。
这里以@Component举例说明IOC的实现:
第1步:自定义bean,注解@Component。
@Component("componentIOC")
public class ComponentIOC {
    @Value("127.0.0.2")
    private String host;

    @Value("8082")
    private int port;

    @Value("通过Component注解扫描注入bean到IOC容器")
    private String style = "";

    public String getHost() {
        return host;
    }

    public void setHost(String host) {
        this.host = host;
    }

    public int getPort() {
        return port;
    }

    public void setPort(int port) {
        this.port = port;
    }

    public String getStyle() {
        return style;
    }

    public void setStyle(String style) {
        this.style = style;
    }
}
第2步:使用ComponentIOC 时,@Autowired注入:
@RestController
@RequestMapping(value = "/ioc")
public class IOCController {
    @Autowired
    private ComponentIOC componentIOC;

    @RequestMapping(value = "/componentStyle", method = RequestMethod.GET)
    public String componentStyle() {
        return JSON.toJSONString(componentIOC);
    }
}
最后Postman请求url:127.0.0.1:8080/ioc/componentStyle验证:
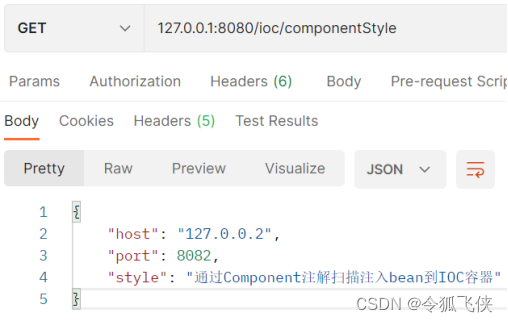
可见ComponentIOC 这个bean创建调用成功。
2.3 @Configuration和@ComponentScan
第1步:定义@Configuration和@ComponentScan同时注解的bean;
@Configuration
@ComponentScan
public class ComponentScanIOC {
    @Value("127.0.0.3")
    private String host;

    @Value("8083")
    private int port;

    @Value("通过ComponentScan注解扫描注入bean到IOC容器")
    private String style = "";

    public String getHost() {
        return host;
    }

    public void setHost(String host) {
        this.host = host;
    }

    public int getPort() {
        return port;
    }

    public void setPort(int port) {
        this.port = port;
    }

    public String getStyle() {
        return style;
    }

    public void setStyle(String style) {
        this.style = style;
    }
}
第2步:使用ComponentScanIOC 时,@Autowired注入:
@RestController
@RequestMapping(value = "/ioc")
public class IOCController {
    @Autowired
    private ComponentScanIOC componentScanIOC;

    @RequestMapping(value = "/componentScanStyle", method = RequestMethod.GET)
    public String componentScanStyle() {
        //return JSON.toJSONString(componentScanIOC);报错
        JSONObject jsonObject = new JSONObject();
        jsonObject.put("host", componentScanIOC.getHost());
        jsonObject.put("port", componentScanIOC.getPort());
        jsonObject.put("style", componentScanIOC.getStyle());
        return  jsonObject.toJSONString();
    }
}
最后Postman请求url:127.0.0.1:8080/ioc/componentScanStyle验证:

可见ComponentScanIOC 这个bean创建调用成功。
有个遗留问题:如果修改为注释中的代码,报错。
return JSON.toJSONString(componentScanIOC);
下次再好好研究一下。


 1562
1562


 被折叠的 条评论
为什么被折叠?
被折叠的 条评论
为什么被折叠?
 到【灌水乐园】发言


