


先上效果图
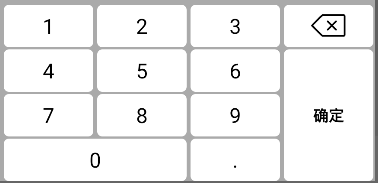
效果一
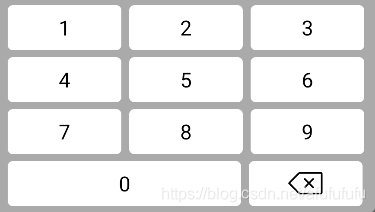
效果二
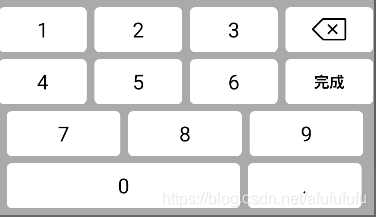
效果三
一:代码如下:
<Keyboard android:keyWidth="24.9%p"
    android:keyHeight="49dp"
    android:horizontalGap="1%p"
    android:verticalGap="5px"
    xmlns:android="http://schemas.android.com/apk/res/android">
    <Row android:keyWidth="23%p">
        <Key android:codes="49" android:keyEdgeFlags="left" android:keyLabel="1" />
        <Key android:codes="50" android:keyLabel="2" />
        <Key android:codes="51" android:keyLabel="3" />
        <Key android:codes="-5" android:keyIcon="@mipmap/ic_delete" android:isRepeatable="true"/>
    </Row>
    <Row android:keyWidth="23%p">
        <Key  android:codes="52" android:keyLabel="4"/>
        <Key android:codes="53" android:keyLabel="5" />
        <Key android:codes="54" android:keyLabel="6" />
        <Key android:codes="\u5b8c\u6210" android:keyHeight="19%p" android:keyLabel="确定" />
    </Row>
    <Row android:keyWidth="23%p" >
        <Key android:codes="55" android:keyEdgeFlags="left" android:keyLabel="7" />
        <Key android:codes="56" android:keyLabel="8" />
        <Key android:codes="57" android:keyLabel="9" />
    </Row>
    <Row>
        <Key android:codes="48" android:keyLabel="0" android:keyEdgeFlags="left" android:keyWidth="47%p" />
        <Key android:codes="46" android:keyLabel="." android:keyWidth="23%p" />
    </Row>
</Keyboard>
二:代码如下:
<Keyboard xmlns:android="http://schemas.android.com/apk/res/android"
   android:horizontalGap="0px"
   android:verticalGap="0px"
   android:keyHeight="6.5%p"
   android:keyWidth="29.2%p"
   >
   <Row android:verticalGap="1%p">
       <Key android:codes="49" android:keyLabel="1" android:horizontalGap="2%p"/>
       <Key android:codes="50" android:keyLabel="2" android:horizontalGap="2%p"/>
       <Key android:codes="51" android:keyLabel="3" android:horizontalGap="2%p"/>

   </Row>
   <Row android:verticalGap="1%p">
       <Key  android:codes="52" android:keyLabel="4" android:horizontalGap="2%p"/>
       <Key android:codes="53" android:keyLabel="5"  android:horizontalGap="2%p"/>
       <Key android:codes="54" android:keyLabel="6"  android:horizontalGap="2%p"/>
   </Row>
   <Row android:verticalGap="1%p" >
       <Key android:codes="55" android:keyLabel="7"  android:horizontalGap="2%p"/>
       <Key android:codes="56" android:keyLabel="8"  android:horizontalGap="2%p"/>
       <Key android:codes="57" android:keyLabel="9"  android:horizontalGap="2%p"/>
   </Row>
   <Row android:verticalGap="1%p" >
       <Key android:codes="48" android:keyLabel="0"  android:keyWidth="60%p" android:horizontalGap="2%p" />
       <Key android:codes="-5" android:isRepeatable="true" android:keyIcon="@mipmap/ic_delete" android:horizontalGap="2%p"/>
   </Row>
   </Keyboard>
三:代码如下:
<Keyboard xmlns:android="http://schemas.android.com/apk/res/android"
android:horizontalGap="0px"
android:verticalGap="0px"
android:keyHeight="6.5%p"
android:keyWidth="29.2%p"
>
<Row android:verticalGap="1%p">
<Key android:codes="49" android:keyLabel="1" android:horizontalGap="2%p"/>
<Key android:codes="50" android:keyLabel="2" android:horizontalGap="2%p"/>
<Key android:codes="51" android:keyLabel="3" android:horizontalGap="2%p"/>
<Key android:codes="-5" android:isRepeatable="true" android:keyIcon="@mipmap/ic_delete" android:horizontalGap="2%p"/>
</Row>
<Row android:verticalGap="1%p">
<Key android:codes="52" android:keyLabel="4" android:horizontalGap="2%p"/>
<Key android:codes="53" android:keyLabel="5" android:horizontalGap="2%p"/>
<Key android:codes="54" android:keyLabel="6" android:horizontalGap="2%p"/>
<Key android:codes="-3" android:isRepeatable="true" android:keyLabel="完成" android:horizontalGap="2%p" />
<!–android:keyHeight="20%p"–>
</Row>
<Row android:verticalGap="1%p">
<Key android:codes="55" android:keyLabel="7" android:horizontalGap="2%p"/>
<Key android:codes="56" android:keyLabel="8" android:horizontalGap="2%p"/>
<Key android:codes="57" android:keyLabel="9" android:horizontalGap="2%p"/>
</Row>
<Row android:verticalGap="1%p" >
<Key android:codes="48" android:keyLabel="0" android:keyWidth="60%p" android:horizontalGap="2%p" />
<Key android:codes="46" android:keyLabel="." android:horizontalGap="2%p"/>
</Row>
</Keyboard>
以上是自定义键盘的三种效果


 8070
8070


 被折叠的 条评论
为什么被折叠?
被折叠的 条评论
为什么被折叠?
 到【灌水乐园】发言


