


Animations
动画
Animations are applied to property changes. An animation defines the interpolation curve from one value to another value when a property value changes. These animation curves create smooth transitions from one value to another.
动画将应用于属性的更改。当属性值更改时,动画将定义从一个值到另一个值的插值曲线。这些动画曲线创建从一个值到另一个值的平滑过渡。
An animation is defined by a series of target properties to be animated, an easing curve for the interpolation curve, and a duration. All animations in Qt Quick are controlled by the same timer and are therefore synchronized. This improves the performance and visual quality of animations.
动画由一系列要动的目标属性、插值后的缓和曲线、持续时间定义。Qt Quick中的所有动画都由同一个计时器控制,因此是同步的。这将提高动画的性能和视觉质量。
Animations control how properties change using value interpolation
动画使用插值控制属性值的变化
This is a fundamental concept. QML is based on elements, properties, and scripting. Every element provides dozens of properties, each property is waiting to get animated by you. In the book, you will see this is a spectacular playing field.
这是一个基本概念。QML基于元素类型、属性和脚本。每个元素都提供几十个属性,每个属性都在等待您设置动画。在书中,你会看到这是一个精彩的动画。
You will catch yourself looking at some animations and just admiring their beauty, and your creative genius, too. Please remember then: animations control property changes and every element has dozens of properties at your disposal.
你会发现自己在看一些动画,欣赏它们的美丽,还有你的创造力。请记住:动画控制属性更改,每个元素都有几十个属性供您使用。
Unlock the power!
现在开始!
// AnimationExample.qml
import QtQuick
Image {
id: root
source: "assets/background.png"
property int padding: 40
property int duration: 4000
property bool running: false
Image {
id: box
x: root.padding;
y: (root.height-height)/2
source: "assets/box_green.png"
NumberAnimation on x {
to: root.width - box.width - root.padding
duration: root.duration
running: root.running
}
RotationAnimation on rotation {
to: 360
duration: root.duration
running: root.running
}
}
MouseArea {
anchors.fill: parent
onClicked: root.running = true
}
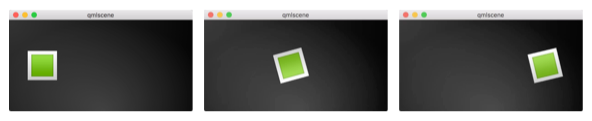
}The example above shows a simple animation applied on the x and rotation properties. Each animation has a duration of 4000 milliseconds (msec) and loops forever. The animation on x moves the x-coordinate from the object gradually over to 240px. The animation on rotation runs from the current angle to 360 degrees. Both animations run in parallel and are started as soon as the UI is loaded.
上面的示例显示了应用于x和旋转(rotation )属性的简单动画。每个动画的持续时间为4000毫秒(毫秒),并且永远循环。x上的动画将x坐标从对象逐渐移动到240px。旋转时的动画从当前角度运行到360度。这两个动画并行运行,并在加载UI后,鼠标点击后,立即启动。
You can play around with the animation by changing the to and duration properties, or you could add another animation (for example, on the opacity or even the scale). Combining these it could look like the object is disappearing into deep space. Try it out!
可以通过更改“to”(到)和“duration ”(持续时间)属性来播放动画,也可以添加另一个动画(例如,在不透明度属性opacity 甚至缩放属性scale上)。把这些结合起来,看起来这个物体正在消失在深空中。试试看!
Animation Elements
动画元素类型
There are several types of animation elements, each optimized for a specific use case. Here is a list of the most prominent animations:
有几种类型的动画元素,每种都针对特定的情景进行了优化。以下是最主要的动画元素列表:
-
PropertyAnimation- Animates changes in property values -
PropertyAnimation-属性值变化时的动画
-
NumberAnimation- Animates changes in qreal-type values -
NumberAnimation-qreal类型值变化时的动画
-
ColorAnimation- Animates changes in color values -
ColorAnimation-颜色值变化时的动画
-
RotationAnimation- Animates changes in rotation values -
RotationAnimation-旋转值变化时的动画
Besides these basic and widely used animation elements, Qt Quick also provides more specialized animations for specific use cases:
除了这些基本且广泛使用的动画元素类型外,Qt Quick还为特定情景提供了更特殊的动画元素类型:
-
PauseAnimation- Provides a pause for an animation -
PauseAnimation-为动画提供暂停
-
SequentialAnimation- Allows animations to be run sequentially -
SequentialAnimation-允许按顺序运行动画
-
ParallelAnimation- Allows animations to be run in parallel -
ParallelAnimation-允许并行运行动画
-
AnchorAnimation- Animates changes in anchor values -
AnchorAnimation-锚定值变化时的动画
-
ParentAnimation- Animates changes in parent values -
ParentAnimation-为父元素对象中,值发生变化时的动画
-
SmoothedAnimation- Allows a property to smoothly track a value -
SmoothDaniation-允许属性平滑跟踪值
-
SpringAnimation- Allows a property to track a value in a spring-like motion -
SpringAnimation-允许特性跟踪类似弹簧的运动中的值
-
PathAnimation- Animates an item alongside a path -
PathAnimation-一个项沿路径变化的动画
-
Vector3dAnimation- Animates changes in QVector3d values -
Vector3dAnimation-为QVector3d值发生变化时的动画
Later we will learn how to create a sequence of animations. While working on more complex animations, there is sometimes a need to change a property or to run a script during an ongoing animation. For this Qt Quick offers the action elements, which can be used everywhere where the other animation elements can be used:
稍后我们将学习如何创建动画序列。在处理更复杂的动画时,有时需要在正在进行的动画期间更改属性或运行脚本。为此,Qt Quick提供了动作元素类型,可以在任何可以使用其他动画元素的地方,使用这些元素:
-
PropertyAction- Specifies immediate property changes during animation -
PropertyAction动画期间,立即更改指定的属性
-
ScriptAction- Defines scripts to be run during an animation -
ScriptAction-定义要在动画期间运行的脚本
The major animation types will be discussed in this chapter using small, focused examples.
主要的动画类型将在本章中使用小而集中的示例进行讨论。
Applying Animations
使用动画
Animation can be applied in several ways:
动画可以通过多种方式使用:
-
Animation on property - runs automatically after the element is fully loaded
-
属性上的动画-在元素完全加载后自动运行
-
Behavior on property - runs automatically when the property value changes
-
属性上的行为-当属性值变化时自动运行
-
Standalone Animation - runs when the animation is explicitly started using
start()orrunningis set to true (e.g. by a property binding) -
独立动画-使用start()显式启动动画或将running设置为true(例如,通过属性绑定)时运行
Later we will also see how animations can be used inside state transitions.
稍后我们还将看到如何在状态转换中使用动画。
Clickable Image V2
可点击图像V2
To demonstrate the usage of animations we reuse our ClickableImage component from an earlier chapter and extended it with a text element.
为了演示动画的使用,我们重用了前一章中的ClickableImage组件,并使用文本元素对其进行了扩展。
// ClickableImageV2.qml
// Simple image which can be clicked

import QtQuick

Item {
    id: root
    width: container.childrenRect.width
    height: container.childrenRect.height
    property alias text: label.text
    property alias source: image.source
    signal clicked

    Column {
        id: container
        Image {
            id: image
        }
        Text {
            id: label
            width: image.width
            horizontalAlignment: Text.AlignHCenter
            wrapMode: Text.WordWrap
            color: "#ececec"
        }
    }

    MouseArea {
        anchors.fill: parent
        onClicked: root.clicked()
    }
}
To organize the element below the image we used a Column positioner and calculated the width and height based on the column’s childrenRect property. We exposed text and image source properties, and a clicked signal. We also wanted the text to be as wide as the image, and for it to wrap. We achieve the latter by using the Text element's wrapMode property.
为了组织图像下方的元素,我们使用了列定位器,并根据列的childrenRect属性计算了宽度和高度。我们公开了文本和图像源属性,以及单击的信号。我们还希望文本与图像一样宽,并且可以进行包装。我们通过使用文本元素的wrapMode属性来实现后者。
Parent/child geometry dependency
父/子几何依赖关系
Due to the inversion of the geometry-dependency (parent geometry depends on child geometry), we can’t set a width/height on the ClickableImageV2, as this will break our width/height binding.
由于几何体依赖关系的反转(父几何体依赖于子几何体),我们无法在ClickableImageV2上设置宽度/高度(width/height),因为这将破坏我们的宽度/高度(width/height)绑定。
You should prefer the child’s geometry to depend on the parent’s geometry if the item is more like a container for other items and should adapt to the parent's geometry.
如果项目更像其他项目的容器,并且应该适应父项目的几何图形,则您应该更希望子项目的几何图形依赖于父项目的几何图形。
The objects ascending
对象的上移

The three objects are all at the same y-position (y=200). They all need to travel to y=40, each of them using a different method with different side-effects and features.
三个对象都处于相同的y位置(y=200)。他们都需要移动到y=40,每个都使用不同的方法,具有不同的效果和特征。
First object
第一个对象
The first object travels using the Animation on <property> strategy. The animation starts immediately.
第一个对象使用Animation on <property>策略上的动画移动。动画立即开始。
ClickableImageV2 {
    id: greenBox
    x: 40; y: root.height-height
    source: "assets/box_green.png"
    text: qsTr("animation on property")
    NumberAnimation on y {
        to: 40; duration: 4000
    }
}
When an object is clicked, its y-position is reset to the start position, and this applies to all of the objects. On the first object, the reset does not have any effect as long as the animation is running.
单击对象时,其y位置将重置为开始位置,这适用于所有对象。在第一个对象上,只要动画正在运行,重置就不会产生任何效果。
This can be visually disturbing, as the y-position is set to a new value for a fraction of a second before the animation starts. Such competing property changes should be avoided.
这可能会在视觉上造成干扰,因为y位置在动画开始前的几分之一秒内被设置为新值。应避免此类相互竞争资源的变动
Second object
第二个对象
The second object travels using a Behavior on animation. This behavior tells the property it should animate each change in value. The behavior can be disabled by setting enabled: false on the Behavior element.
第二个对象使用Behavior on进行移动。此行为告诉属性它应该在属性值发生变化时开始动画。可以通过在行为元素上设置enabled:false来禁用该行为元素。
ClickableImageV2 {
    id: blueBox
    x: (root.width-width)/2; y: root.height-height
    source: "assets/box_blue.png"
    text: qsTr("behavior on property")
    Behavior on y {
        NumberAnimation { duration: 4000 }
    }

    onClicked: y = 40
    // random y on each click  每次单击时随机设置y
    // onClicked: y = 40 + Math.random() * (205-40)
}
The object will start traveling when you click it (its y-position is then set to 40). Another click has no influence, as the position is already set.
单击对象时,该对象将开始移动(其y位置随后设置为40)。再次单击没有影响,因为位置已设置。
You could try to use a random value (e.g. 40 + (Math.random() \* (205-40)) for the y-position. You will see that the object will always animate to the new position and adapt its speed to match the 4 seconds to the destination defined by the duration of the animation.
您可以尝试为y位置使用随机值(例如40+(Math.random()\*(205-40))。您将看到,对象将始终设置为新位置的动画,并调整其速度以使4秒与动画持续时间定义的目标相匹配。
Third object
第三个对象
The third object uses a standalone animation. The animation is defined as its own element and can be almost anywhere in the document.
第三个对象使用独立动画。动画被定义为自己的元素,几乎可以位于文档中的任何位置。
ClickableImageV2 {
    id: redBox
    x: root.width-width-40; y: root.height-height
    source: "assets/box_red.png"
    onClicked: anim.start()
    // onClicked: anim.restart()

    text: qsTr("standalone animation")

    NumberAnimation {
        id: anim
        target: redBox
        properties: "y"
        to: 40
        duration: 4000
    }
}
The click will start the animation using the animation's start() function. Each animation has start(), stop(), resume(), and restart() functions. The animation itself contains much more information than the other animation types earlier.
单击将使用动画的start()函数启动动画。每个动画都有start()、stop()、resume()和restart()函数。动画本身包含的信息比之前的其他动画类型多得多。
We need to define the target, which is the element to be animated, along with the names of the properties that we want to animate. We also need to define a to value, and, in this case, a from value, which allows a restart of the animation.
我们需要定义target,即要设置动画的元素对象,以及要设置动画的属性的名称。我们还需要定义一个to值,在本例中还可以定义一个from值,这将允许重新启动动画。

A click on the background will reset all objects to their initial position. The first object cannot be restarted except by re-starting the program which triggers the re-loading of the element.
单击背景会将所有对象重置为其初始位置。第一个对象不能重新启动,除非重新启动触发元素重新加载的程序。
Other ways to control Animations
控制动画的其他方法
Another way to start/stop an animation is to bind a property to the running property of an animation. This is especially useful when the user-input is in control of properties:
启动/停止动画的另一种方法是将属性running绑定到动画。当用户控制属性时,这尤其有用:
NumberAnimation {
    // [...]
    // animation runs when mouse is pressed 当按下鼠标时,动画将运行
    running: area.pressed
}
MouseArea {
    id: area
}
Easing Curves
缓和曲线
The value change of a property can be controlled by an animation. Easing attributes allow influencing the interpolation curve of a property change.
属性的值变化可以由动画控制。缓和特性允许影响属性更改的插值曲线。
All animations we have defined by now use a linear interpolation because the initial easing type of an animation is Easing.Linear. It’s best visualized with a small plot, where the y-axis is the property to be animated and the x-axis is the time (duration). A linear interpolation would draw a straight line from the from value at the start of the animation to the to value at the end of the animation. So the easing type defines the curve of change.
我们现在定义的所有动画都使用线性插值,因为动画的初始缓和类型是Easing.Linear。最好通过一个小的绘图进行可视化下,其中y轴是要设置动画的属性,x轴是时间(持续时间)。线性插值将从动画开始时的“from”值到动画结束时的“to”值绘制一条直线。因此,缓和类型定义了曲线的变化。
Easing types should be carefully chosen to support a natural fit for a moving object. For example, when a page slides out, the page should initially slide out slowly and then gain momentum to finally slide out at high speed, similar to turning the page of a book.
应仔细选择缓和类型,以支持对移动对象的自然适应。例如,当一页滑出时,该页最初应缓慢滑出,然后获得速度,最终以高速滑出,类似于翻书。
Animations should not be overused.
不应过度使用动画。
As with other aspects of UI design, animations should be designed carefully to support the UI flow, not dominate it. The eye is very sensitive to moving objects and animations can easily distract the user.
与UI设计的其他方面一样,动画应该仔细设计以支持UI流,而不是控制它。眼睛对移动的物体非常敏感,动画很容易分散用户的注意力。
In the next example, we will try some easing curves. Each easing curve is displayed by a clickable image and, when clicked, will set a new easing type on the square animation and then trigger a restart() to run the animation with the new curve.
在下一个示例中,我们将尝试一些缓和曲线。每个缓和曲线都由可单击的图像显示,单击后,将在square动画上设置新的缓和类型,然后触发restart()以运行新曲线的动画。
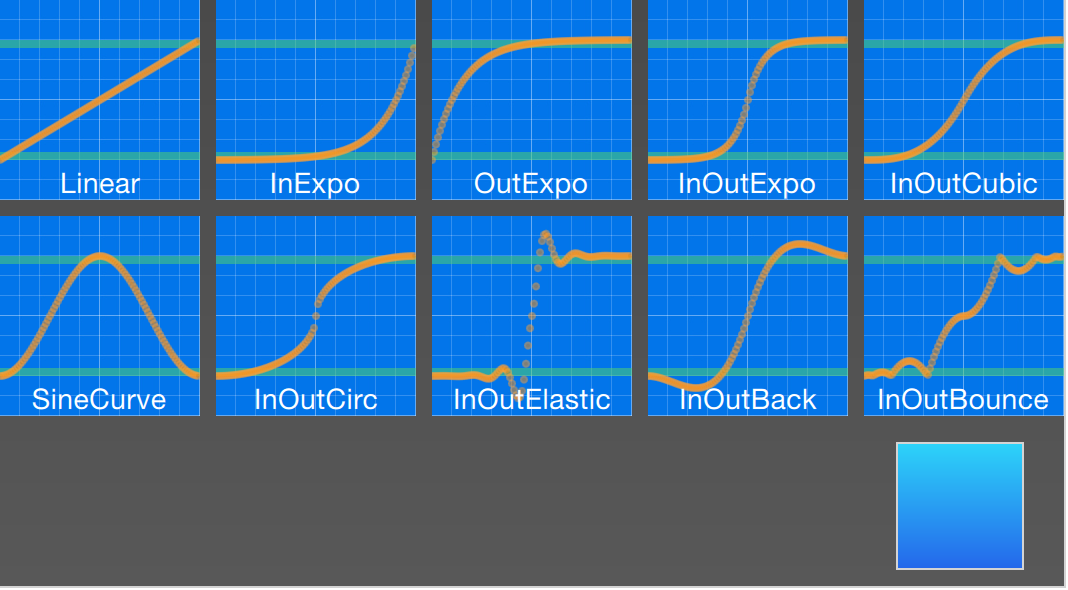
The code for this example was made a little bit more complicated. We first create a grid of EasingTypes and a Box which is controlled by the easing types. An easing type just displays the curve which the box shall use for its animation. When the user clicks on an easing curve the box moves in a direction according to the easing curve. The animation itself is a standalone animation with the target set to the box and configured for x-property animation with a duration of 2 seconds.
这个例子的代码变得有点复杂。我们首先创建一个EasingTypes网格和一个由缓和类型控制的Box。缓和类型仅显示长方体应用的动画曲线。当用户单击缓和曲线时,长方体将按照缓和曲线的方向移动。动画本身是一个独立的动画,目标设置为长方体,并配置为持续时间为2秒的x属性动画。
TIP
注
The internals of the EasingType renders the curve in real time, and the interested reader can look it up in the EasingCurves example.
EasingType的内部实时渲染曲线,感兴趣的读者可以在EasingCurves示例中查找它。
// EasingCurves.qml

import QtQuick
import QtQuick.Layouts

Rectangle {
    id: root
    width: childrenRect.width
    height: childrenRect.height

    color: '#4a4a4a'
    gradient: Gradient {
        GradientStop { position: 0.0; color: root.color }
        GradientStop { position: 1.0; color: Qt.lighter(root.color, 1.2) }
    }

    ColumnLayout {
        Grid {
            spacing: 8
            columns: 5
            EasingType {
                easingType: Easing.Linear
                title: 'Linear'
                onClicked: {
                    animation.easing.type = easingType
                    box.toggle = !box.toggle
                }
            }
            EasingType {
                easingType: Easing.InExpo
                title: "InExpo"
                onClicked: {
                    animation.easing.type = easingType
                    box.toggle = !box.toggle
                }
            }
            EasingType {
                easingType: Easing.OutExpo
                title: "OutExpo"
                onClicked: {
                    animation.easing.type = easingType
                    box.toggle = !box.toggle
                }
            }
            EasingType {
                easingType: Easing.InOutExpo
                title: "InOutExpo"
                onClicked: {
                    animation.easing.type = easingType
                    box.toggle = !box.toggle
                }
            }
            EasingType {
                easingType: Easing.InOutCubic
                title: "InOutCubic"
                onClicked: {
                    animation.easing.type = easingType
                    box.toggle = !box.toggle
                }
            }
            EasingType {
                easingType: Easing.SineCurve
                title: "SineCurve"
                onClicked: {
                    animation.easing.type = easingType
                    box.toggle = !box.toggle
                }
            }
            EasingType {
                easingType: Easing.InOutCirc
                title: "InOutCirc"
                onClicked: {
                    animation.easing.type = easingType
                    box.toggle = !box.toggle
                }
            }
            EasingType {
                easingType: Easing.InOutElastic
                title: "InOutElastic"
                onClicked: {
                    animation.easing.type = easingType
                    box.toggle = !box.toggle
                }
            }
            EasingType {
                easingType: Easing.InOutBack
                title: "InOutBack"
                onClicked: {
                    animation.easing.type = easingType
                    box.toggle = !box.toggle
                }
            }
            EasingType {
                easingType: Easing.InOutBounce
                title: "InOutBounce"
                onClicked: {
                    animation.easing.type = easingType
                    box.toggle = !box.toggle
                }
            }
        }
        Item {
            height: 80
            Layout.fillWidth: true
            Box {
                id: box
                property bool toggle
                x: toggle ? 20 : root.width - width - 20
                anchors.verticalCenter: parent.verticalCenter
                gradient: Gradient {
                    GradientStop { position: 0.0; color: "#2ed5fa" }
                    GradientStop { position: 1.0; color: "#2467ec" }
                }
                Behavior on x {
                    NumberAnimation {
                        id: animation
                        duration: 500
                    }
                }
            }
        }
    }
}
Please play with the example and observe the change of speed during an animation. Some animations feel more natural for the object and some feel irritating.
请运行该示例,并观察动画过程中速度的变化。有些动画让对象感觉更自然,有些则让人感觉违和。
Besides the duration and easing.type, you are able to fine-tune animations. For example, the general PropertyAnimation type (from which most animations inherit) additionally supports easing.amplitude, easing.overshoot, and easing.period properties, which allow you to fine-tune the behavior of particular easing curves.
除了持续时间duration和缓和类型easing.type,还可以微调动画。例如,常用的PropertyAnimation类型(大多数动画从中继承)还额外支持缓和幅度easing.amplitude,缓和过冲easing.overshoot和缓和周期easing.period属性,允许您微调特定缓和曲线的行为。
Not all easing curves support these parameters. Please consult the easing table from the PropertyAnimation documentation to check if an easing parameter has an influence on an easing curve.
并非所有缓和曲线都支持这些参数。请参考PropertyAnimation文档中的缓和曲线表,以检查缓和参数是否对缓和曲线有影响。
Choose the right Animation
选择正确的动画
Choosing the right animation for the element in the user interface context is crucial for the outcome. Remember the animation shall support the UI flow; not irritate the user.
在用户界面上下文中为元素选择正确的动画对于结果至关重要。记住动画应该支持UI流;不要激怒用户。
Grouped Animations
分组动画
Often animations will be more complex than just animating one property. You might want to run several animations at the same time or one after another or even execute a script between two animations.
通常,动画将比仅为一个属性设置动画更复杂。您可能希望同时或一个接一个地运行多个动画,甚至在两个动画之间执行脚本。
For this, grouped animations can be used. As the name suggests, it’s possible to group animations. Grouping can be done in two ways: parallel or sequential. You can use the SequentialAnimation or the ParallelAnimation element, which act as animation containers for other animation elements. These grouped animations are animations themselves and can be used exactly as such.
为此,可以使用分组动画。顾名思义,可以对动画进行分组。分组有两种方式:并行或串行。可以使用SequentialAnimation或ParallelAnimation元素类型,它们充当其他动画元素类型的动画容器。这些分组的动画本身就是动画,可以准确地使用。

Parallel animations
并行动画
All direct child animations of a parallel animation run in parallel when started. This allows you to animate different properties at the same time.
并行动画的所有直接子动画在启动时并行运行。这允许您同时设置不同属性的动画。
// ParallelAnimationExample.qml
import QtQuick

BrightSquare {
    id: root

    property int duration: 3000
    property Item ufo: ufo

    width: 600
    height: 400

    Image {
        anchors.fill: parent
        source: "assets/ufo_background.png"
    }

    ClickableImageV3 {
        id: ufo
        x: 20; y: root.height-height
        text: qsTr('ufo')
        source: "assets/ufo.png"
        onClicked: anim.restart()
    }

    ParallelAnimation {
        id: anim
        NumberAnimation {
            target: ufo
            properties: "y"
            to: 20
            duration: root.duration
        }
        NumberAnimation {
            target: ufo
            properties: "x"
            to: 160
            duration: root.duration
        }
    }
}
Sequential animations
串行动画
A sequential animation runs each child animation in the order in which it is declared: top to bottom.
串行动画按声明顺序运行每个子动画:从上到下。
// SequentialAnimationExample.qml
import QtQuick

BrightSquare {
    id: root

    property int duration: 3000
    property Item ufo: ufo

    width: 600
    height: 400

    Image {
        anchors.fill: parent
        source: "assets/ufo_background.png"
    }

    ClickableImageV3 {
        id: ufo
        x: 20; y: root.height-height
        text: qsTr('rocket')
        source: "assets/ufo.png"
        onClicked: anim.restart()
    }

    SequentialAnimation {
        id: anim
        NumberAnimation {
            target: ufo
            properties: "y"
            to: 20
            // 60% of time to travel up
            duration: root.duration * 0.6
        }
        NumberAnimation {
            target: ufo
            properties: "x"
            to: 400
            // 40% of time to travel sideways
            duration: root.duration * 0.4
        }
    }
}
Nested animations
嵌套动画
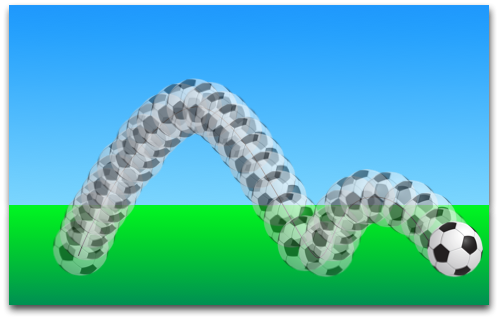
Grouped animations can also be nested. For example, a sequential animation can have two parallel animations as child animations, and so on. We can visualize this with a soccer ball example. The idea is to throw a ball from left to right and animate its behavior.
分组动画也可以嵌套。例如,串行动画可以有两个并行动画作为子动画,依此类推。我们可以用一个足球的例子来说明这一点。这个想法是从左到右投掷一个球,并为其行为设置动画。
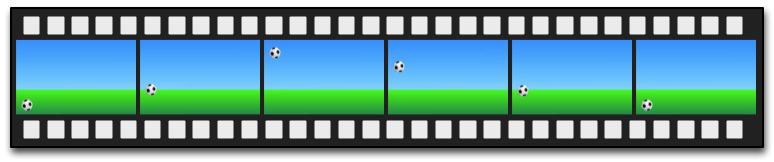
To understand the animation we need to dissect it into the integral transformations of the object. We need to remember that animations animate property changes. Here are the different transformations:
为了理解动画,我们需要将其分解为对象的整体变换。我们需要记住,动画可以设置属性更改的动画。以下是不同的变换:
-
An x-translation from left-to-right (
X1) -
x轴上,是从左到右的x平移(X1)
-
A y-translation from bottom to top (
Y1) followed by a translation from up to down (Y2) with some bouncing -
y轴上,是从下到上(Y1)的y平移,然后是从上到下(Y2)的平移,并伴随一些反弹
-
A rotation of 360 degrees over the entire duration of the animation (
ROT1) -
旋转属性上,是在整个动画持续时间内旋转360度(ROT1)
The whole duration of the animation should take three seconds.
动画的整个持续时间为三秒。

We start with an empty item as the root element of the width of 480 and height of 300.
我们从一个空项开始,作为宽度为480、高度为300的根元素对象。
import QtQuick

Item {
    id: root

    property int duration: 3000

    width: 480
    height: 300

    // [...]
}
We have defined our total animation duration as a reference to better synchronize the animation parts.
我们已将总动画持续时间定义,以便为同步动画部分作好地的参考。
The next step is to add the background, which in our case are 2 rectangles with green and blue gradients.
下一步是添加背景,在我们的例子中,背景是两个带有绿色和蓝色渐变的矩形。
Rectangle {
    id: sky
    width: parent.width
    height: 200
    gradient: Gradient {
        GradientStop { position: 0.0; color: "#0080FF" }
        GradientStop { position: 1.0; color: "#66CCFF" }
    }
}
Rectangle {
    id: ground
    anchors.top: sky.bottom
    anchors.bottom: root.bottom
    width: parent.width
    gradient: Gradient {
        GradientStop { position: 0.0; color: "#00FF00" }
        GradientStop { position: 1.0; color: "#00803F" }
    }
}
The upper blue rectangle takes 200 pixels of the height and the lower one is anchored to the top of the sky and to the bottom of the root element.
上部蓝色矩形的高度为200像素,下部矩形锚定在天空顶部和根元素对象底部。
Let’s bring the soccer ball onto the green. The ball is an image, stored under “assets/soccer_ball.png”. For the beginning, we would like to position it in the lower left corner, near the edge.
让我们把足球带到草坪上。球是一张图像,存储在“assets/soccer_ball.png”下。首先,我们想把它放在左下角,靠近边缘。
Image {
    id: ball
    x: 0; y: root.height-height
    source: "assets/soccer_ball.png"

    MouseArea {
        anchors.fill: parent
        onClicked: {
            ball.x = 0
            ball.y = root.height-ball.height
            ball.rotation = 0
            anim.restart()
        }
    }
}
The image has a mouse area attached to it. If the ball is clicked, the position of the ball will reset and the animation is restarted.
图像上附着了一个鼠标区域。如果单击球,球的位置将重置,动画将重新启动。
Let’s start with a sequential animation for the two y translations first.
让我们先从两个y平移的串行动画开始。
SequentialAnimation {
    id: anim
    NumberAnimation {
        target: ball
        properties: "y"
        to: 20
        duration: root.duration * 0.4
    }
    NumberAnimation {
        target: ball
        properties: "y"
        to: 240
        duration: root.duration * 0.6
    }
}
This specifies that 40% of the total animation duration is the up animation and 60% the down animation, with each animation running after the other in sequence. The transformations are animated on a linear path but there is no curving currently. Curves will be added later using the easing curves, at the moment we’re concentrating on getting the transformations animated.
这指定总动画持续时间的40%是向上动画,60%是向下动画,每个动画依次运行。变换在线性路径上设置动画,但当前没有曲线。稍后将使用缓和曲线添加曲线,此时我们将集中精力实现变换动画化。
Next, we need to add the x-translation. The x-translation shall run in parallel with the y-translation, so we need to encapsulate the sequence of y-translations into a parallel animation together with the x-translation.
接下来,我们需要添加x平移。x平移应与y平移并行运行,因此我们需要将y平移序列与x平移一起封装到并行动画中。
ParallelAnimation {
    id: anim
    SequentialAnimation {
        // ... our Y1, Y2 animation
    }
    NumberAnimation { // X1 animation
        target: ball
        properties: "x"
        to: 400
        duration: root.duration
    }
}

In the end, we would like the ball to be rotating. For this, we need to add another animation to the parallel animation. We choose RotationAnimation, as it’s specialized for rotation.
最后,我们希望球能够旋转。为此,我们需要向并行动画添加另一个动画。我们选择旋转动画RotationAnimation,因为它专门用于旋转的动画类型。
ParallelAnimation {
    id: anim
    SequentialAnimation {
        // ... our Y1, Y2 animation
    }
    NumberAnimation { // X1 animation
        // X1 animation
    }
    RotationAnimation {
        target: ball
        properties: "rotation"
        to: 720
        duration: root.duration
    }
}
That’s the whole animation sequence. The one thing that's left is to provide the correct easing curves for the movements of the ball. For the Y1 animation, we use a Easing.OutCirc curve, as this should look more like a circular movement. Y2 is enhanced using an Easing.OutBounce to give the ball its bounce, and the bouncing should happen at the end (try with Easing.InBounce and you will see that the bouncing starts right away).
这就是整个动画序列。剩下的一件事是为球的运动提供正确的缓和曲线。对于Y1动画,我们使用了一个缓和曲线Easing.OutCirc,因为这看起来更像一个圆周运动。Y2通过将缓和曲线设置为Easing.OutBounce使球反弹,反弹应该发生在最后(可以尝试下Easing.InBounce,你会看到反弹立即开始)。
The X1 and ROT1 animation are left as-is, with a linear curve.
X1和ROT1动画保持原样,仍然使用线性曲线。
Here is the final animation code for your reference:
以下是供您参考的最终动画代码:
ParallelAnimation {
    id: anim
    SequentialAnimation {
        NumberAnimation {
            target: ball
            properties: "y"
            to: 20
            duration: root.duration * 0.4
            easing.type: Easing.OutCirc
        }
        NumberAnimation {
            target: ball
            properties: "y"
            to: root.height-ball.height
            duration: root.duration * 0.6
            easing.type: Easing.OutBounce
        }
    }
    NumberAnimation {
        target: ball
        properties: "x"
        to: root.width-ball.width
        duration: root.duration
    }
    RotationAnimation {
        target: ball
        properties: "rotation"
        to: 720
        duration: root.duration
    }
}示例源码下载


 1787
1787


 被折叠的 条评论
为什么被折叠?
被折叠的 条评论
为什么被折叠?
 到【灌水乐园】发言


