


第十一章 RSYNC 文件同步
备份服务器数据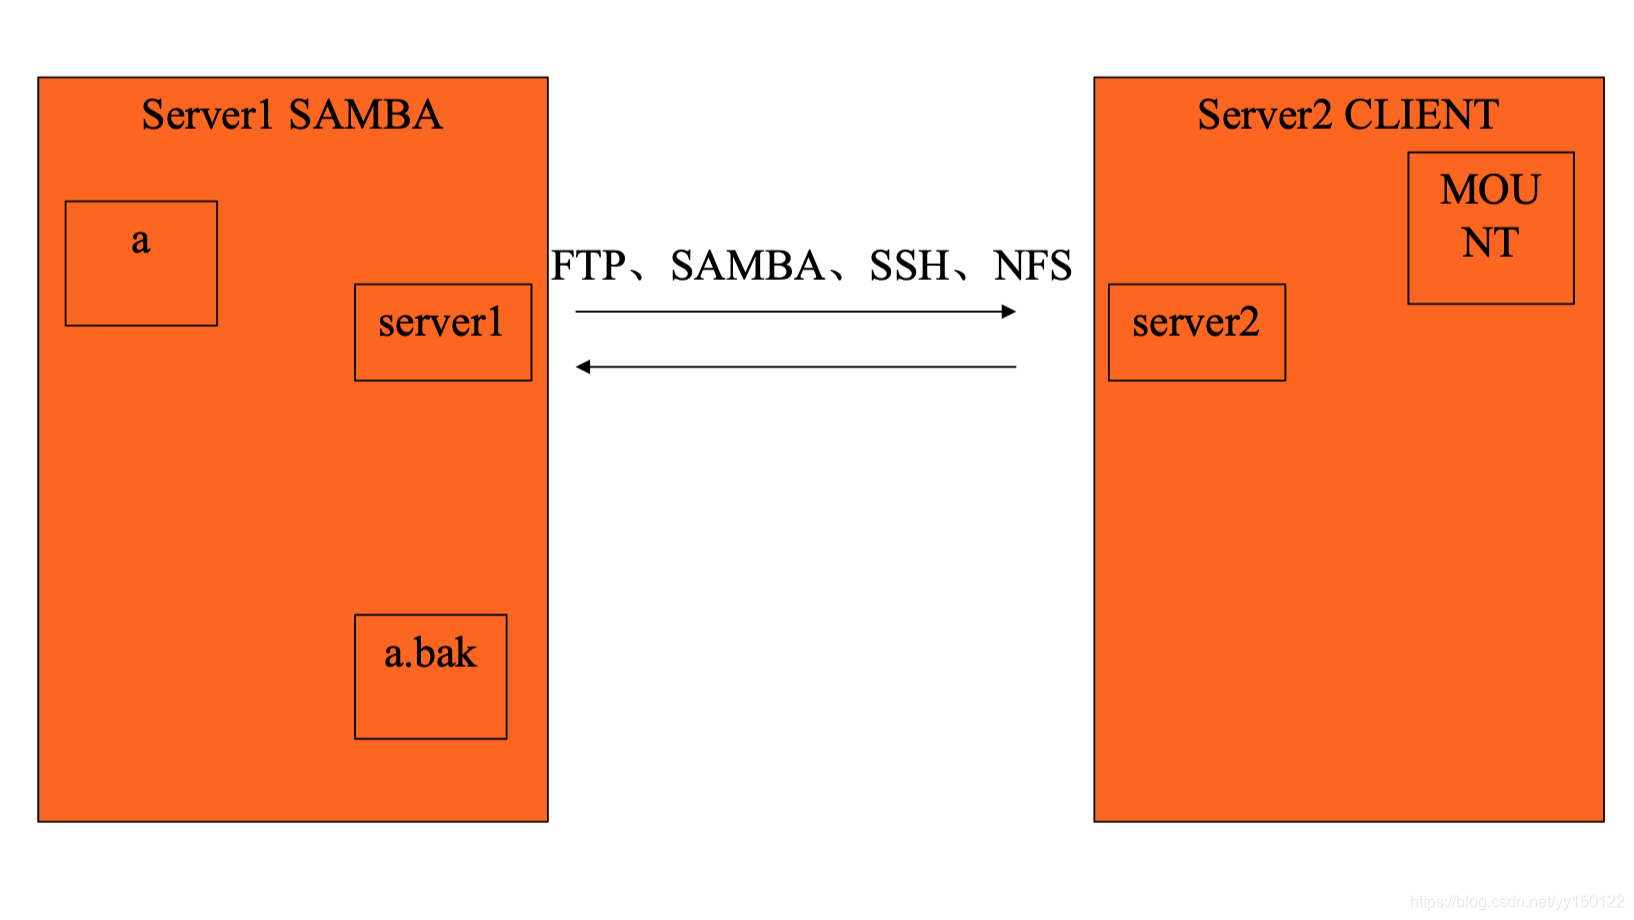
Samba只不过是映射点,并不能保存,数据还在服务器
所以我们需要一个文件同步的工具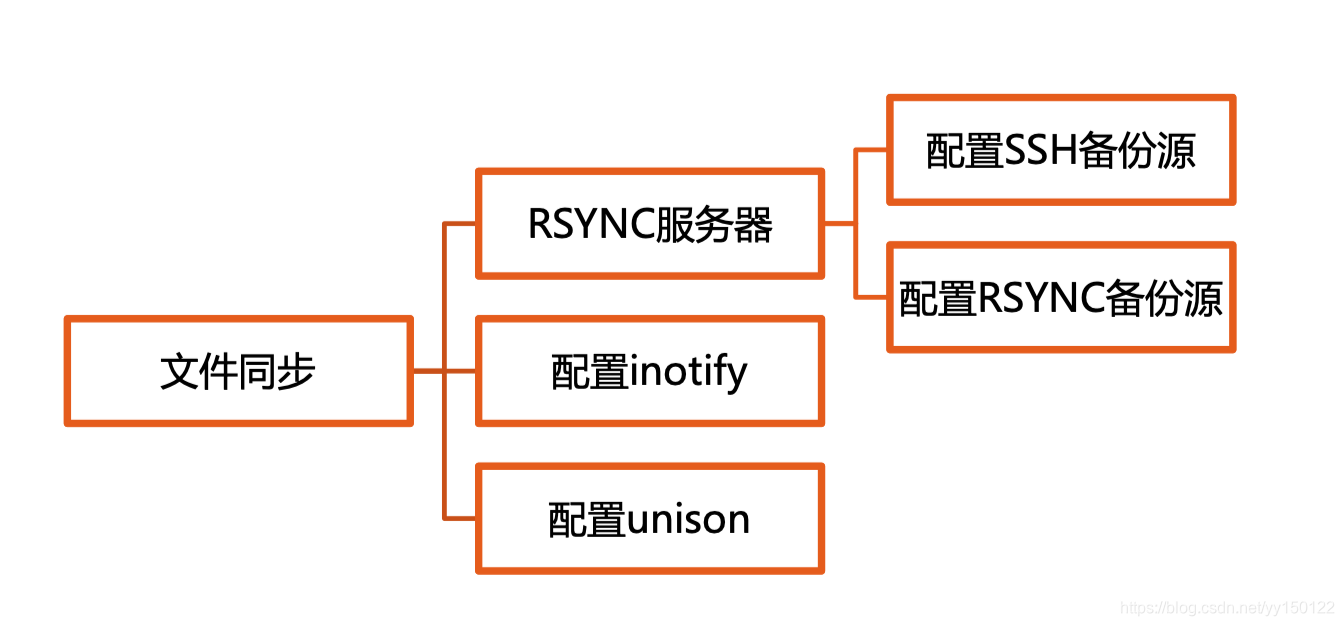
关于RSYNC
- 一款快速增量备份工具
- Remote Sync,远程同步
- 支持本地复制,或者与其他SSH、rsync主机同步
- 官方网站:http://rsync.samba.org/
Rsync(remote synchronize)是一个远程数据同步工具,可通过LAN/WAN快速同步多台主机间的文件,也可以使用 Rsync 同步本地硬盘中的不同目录。
Rsync 是用于取代rcp的一个工具,Rsync使用所谓的 “Rsync 算法” 来使本地和远程两个主机之间的文件达到同步,这个算法只传送两个文件的不同部分(校验和),而不是每次都整份传送,因此速度相当快。您可以参考 How Rsync Works A Practical Overview 进一步了解rsync 的运作机制。
Rsync支持大多数的类Unix系统,无论是Linux、Solaris还是BSD上都经过了良好的测试。此外,它在windows平台下也有相应的版本,比较知名的有cwRsync和Sync2NAS
特点:
- 能更新整个目录和树和文件系统;
- 有选择性的保持符号链链、硬链接、文件属于、权限、设备以及时间等;
- 对于安装来说,无任何特殊权限要求;
- 能用rsh、ssh 或直接端口做为传输入端口;
- 支持匿名rsync 同步文件,是理想的镜像工具
同步源与发起端
rsync同步源: 指备份操作的远程服务器,也称为备份源主要包括两种:rsync源、SSH源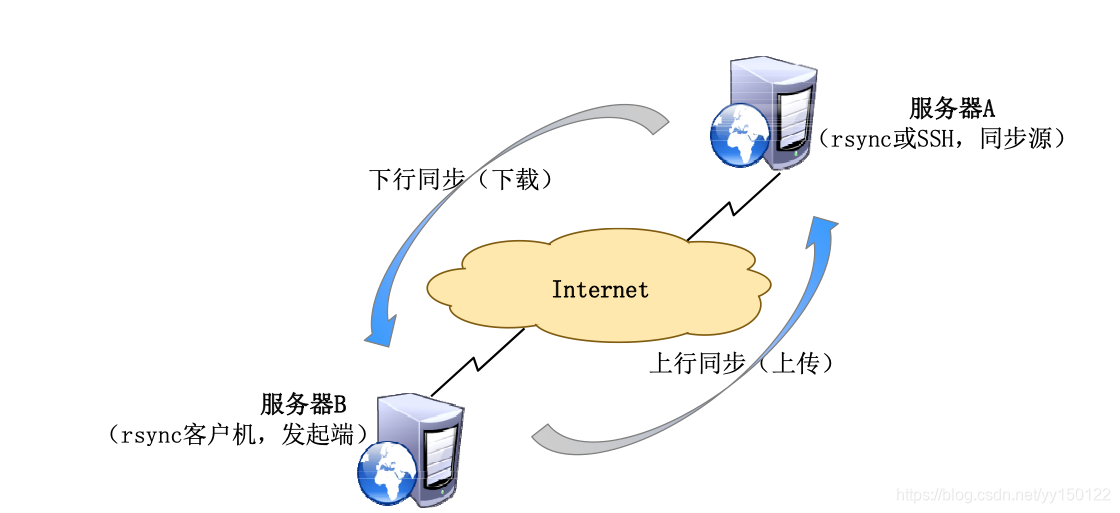
搭建同步源
- 1.基于ssh的同步源
- 2.基于RSYNC的同步源
1.基于ssh的同步源
在/var/www/html文件夹下面创建vim网页文件
vim /var/www/html/index.html
写入网站内容
保存退出
在另一台虚拟机上运行命令
curl 服务器IP
就可以显示网页所写的内容啦
如果需要备份网站内容,使用ssh同步源备份到另一台服务器
如果两台服务器需要使用rsync同步,两台服务器全需要下载yum -y install rsync
同步命令:rsync -avz 同步源的一个账户@同步源IP:同步源目录 发起端目录
rsync命令的用法:
基本格式:rsync [选项] 原始位置 目标位置
常用选项:
-a:归档模式,递归并保留对象属性,等同于 -rlptgoD
-v:显示同步过程的详细(verbose)信息
-z:在传输文件时进行压缩(compress)
-H:保留硬连接文件
-A:保留ACL属性信息
–delete:删除目标位置有而原始位置没有的文件
-r:递归模式,包含目录及子目录中所有文件
-l:对于符号链接文件仍然复制为符号链接文件
-p:保留文件的权限标记-t:保留文件的时间标记
-g:保留文件的属组标记(仅超级用户使用)
-o:保留文件的属主标记(仅超级用户使用)
-D:保留设备文件及其他特殊文件
- rsync -avz 同步源的一个账户@同步源IP:同步源目录 发起端目录 下行同步
- rsync -avz 发起端目录 同步源的一个账户@同步源IP:同步源目录 上行同步(发送到同步源)
这一步需要在同步源设置接收文件夹的权限 最好使用ACL
2.基于RSYNC的同步源
数据下行同步
- 生成配置文件
vim /etc/rsyncd.conf
写入工作方式
全局配置部分:
address = IP
port = 873
pid file = /var/run/rsyncd.pid
log file = /var/log/rsyncd.log
共享配置部分
[share]
comment = soft
path = /server/rsync
read only = yes
dont compress = *.gz *.bz2 *.zip
auth users = wang
secrets file = /etc/rsyncd_users.db
接着创建文件
vim /etc/rsyncd_users.db
wang:123456
rsync不支持特别复杂的密码设定
因为他是通过超级守护进程xinetd
来管理的,需要输入
rsync --daemon
来进行启动
创建目录:
mkdir -p /server/rsync
创建测试文件
touch rsync.txt
客户端创建目录:
mkdir -p /client/rsync
输入命令:
rsync -avz wang@192.168.1.14::share /client/rsync/
这时会报错
@ERROR: auth failed on module share
rsync error: error starting client-server protocol (code 5) at main.c(1649) [Receiver=3.1.2]
因为rsync的密码文件的权限必须为600
服务器执行
chmod 600 /etc/rsyncd_users.db
数据上行同步
- 客户端创建测试文件
touch client.txt
修改配置文件
vim /etc/rsyncd.conf
read only = no
保存退出
杀死进程
pkill rsync
重启
rsync --daemon
修改上传目录的写入权限
setfacl -m u:nobody:rwx /server/rsync
这个时候客户端执行:
rsync -avz /client/rsync/ wang@192.168.1.14::share
会发现有以下信息:
sending incremental file list
client.txt
rsync: chgrp “/.client.txt.ce66QW” (in share) failed: Operation not permitted (1)*
sent 111 bytes received 121 bytes 92.80 bytes/sec
total size is 0 speedup is 0.00
rsync error: some files/attrs were not transferred (see previous errors) (code 23) at main.c(1179) [sender=3.1.2]
去服务器端查看发现文件已经传输过去了
这是因为新版本需要在配置文件share模块中加入
fake super = yes #无需rsync以root身份运行,允许接受数据
修改配置文件
杀死进程
rsync --daemon
重启就可以啦
需要主要rsync -avz /client/rsync/* wang@192.168.1.14/share
这种书写格式也可以上传
命令格式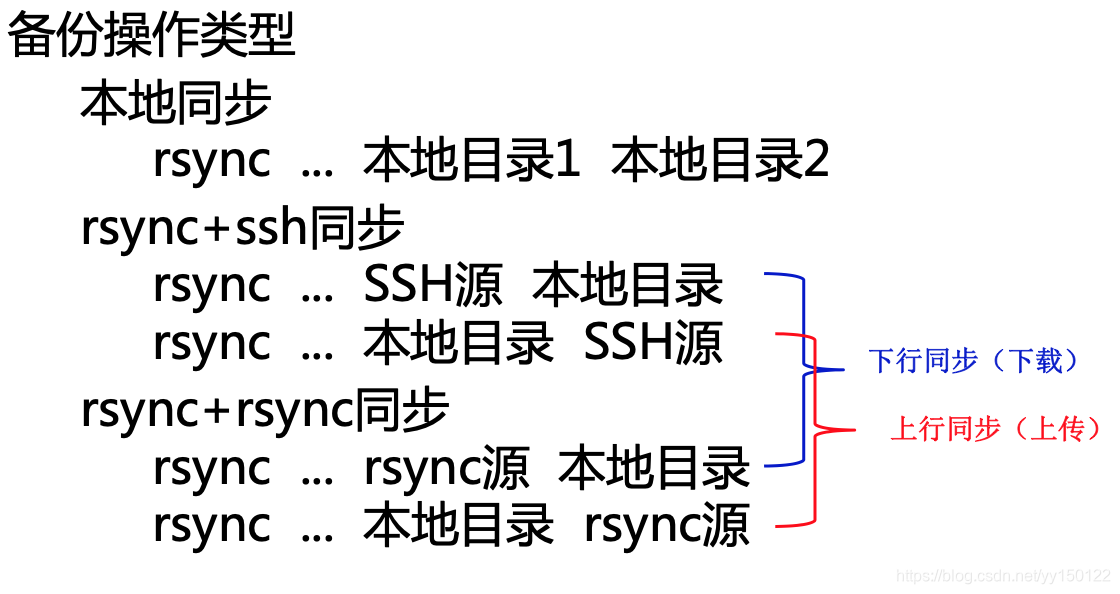
免密码验证
-
基于ssh的免密码同步
生成密钥对
ssh-keygen -t rsa
公钥上传到服务器
ssh-copy-id server@服务器IP
此时同步不需要密码了 -
基于rsync的免密码同步
系统为rsync准备了变量
RSYNC_PASSWORD
我们只需要为这个变量赋值
echo $RSYNC_PASSWORD
查看这个变量,此时为空
给他赋值,为我们刚开始设置的rsync的密码
export RSYNC_PASSWORD=123456
这回下行同步就不需要密码了
同步的优缺点
- 定期同步的不足:
执行备份的时间固定,延迟明显、实时性差
当同步源长期不变化时,密集的定期任务是不必要的 - 实时同步的优点:
一旦同步源出现变化,立即启动备份
只要同步源无变化,则不执行备份
inotify实现实时同步
安装gcc
yum -y install gcc
安装inotifu-tools
wget http://github.com/downloads/rvoicilas/inotify-tools/inotify-tools-3.14.tar.gz
解压 tar -zxvf inotify-tools-3.14.tar.gz
进入解压好的包
./configure && make && make install*
如何你希望使用效果高,可以调整inotify内核参数
调整inotify内核参数
max_queue_events:监控队列大小 max_user_instances:最多监控实例数
max_user_watches:每个实例最多监控文件数
你需要在官方网站查看不同版本的系统不同的内核参数
到/etc/sysctl.conf里面添加参数
安装inotify-tools辅助工具
inotifywait:用于持续监控,实时输出结果inotifywatch:用于短期监控,任务完成后再出结果
[root@localhost ~]# inotifywait -mrq -e modify,create,move,delete /var/www/html
Setting up watches. Beware: since -r was given, this may take a while! Watches established.
/var/www/html/ CREATE index.php /var/www/html/ MODIFY index.php /var/www/html/ MOVED_FROM index.php /var/www/html/ MOVED_TO test.php
………
实时监控
inotifywait -mrq -e modify,create,move,delete /var/www/html
选项:
-m:表示持续监控
-r:表示递归监控
-q:表示输出数据简化
-e:指定你要监控的哪些数据,比如create,move,delete,多个命令用逗号隔开
这条命令输入后,界面会被锁死,需要换一个终端连接,咋检测的目录下创建删除文件,这个锁死的终端就会显示信息
ctrl+c退出界面
实时同步实现
- inotify+rsync
基于ssh的实时同步
利用inotify有输出这一特性可以进行与脚本的配合,实时监控数据的增删,进行同步
**先进行免密认证
然后在服务器端写脚本
cd
vim 1.sh
#!/bin/bash**
*a=“/usr/local/bin/inotifywait -mrq -e create /var/www/html/”
b=“/usr/bin/rsync -avz /var/www/html/* 192.168.1.13:/client/ssh”
$a | while read directory event file
do
	$b
done
- 1
- 2
- 3
- 4
- 5
- 6
- 7
保存退出
执行
bash 1.sh &
- inotify+unsion
服务器建立目录
mkdir /server1
客户端建立目录
mkdir /server2
服务器安装gcc
yum -y install gcc*
服务器与客户端直接相互生成密钥对
服务器:
ssh-keygen -t rsa
ssh-copy-id 客户端IP
客户端:
ssh-keygen -t rsa
ssh-copy-id 服务器端IP
服务器:
安装ocaml-3.10.1tar.gz
wget http://caml.inria.fr/pub/distrib/ocaml-3.10/ocaml-3.10.1.tar.gz
解压
tar -zxvf ocaml-3.10.1.tar.gz
cd ocaml-3.10.1
./configure
make world opt
make install
安装unison
wget https://www.seas.upenn.edu/~bcpierce/unison/download/releases/unison-2.13.16/unison-2.13.16.tar.gz
解压
tar -zxvf unison-2.13.16.tar.gz
cd unison-2.13.16
make UISTYLE=text THREADS=true STATIC=true
cp unison /usr/local/bin/
客户端:
安装gcc
yum -y install gcc*
安装inotifu-tools
wget http://github.com/downloads/rvoicilas/inotify-tools/inotify-tools-3.14.tar.gz
解压 tar -zxvf inotify-tools-3.14.tar.gz
进入解压好的包
./configure && make && make install
安装ocaml-3.10.1tar.gz
wget http://caml.inria.fr/pub/distrib/ocaml-3.10/ocaml-3.10.1.tar.gz
解压
tar -zxvf ocaml-3.10.1.tar.gz
cd ocaml-3.10.1
./configure
make world opt
make install
安装unison
wget https://www.seas.upenn.edu/~bcpierce/unison/download/releases/unison-2.13.16/unison-2.13.16.tar.gz
解压
tar -zxvf unison-2.13.16.tar.gz
cd unison-2.13.16
make UISTYLE=text THREADS=true STATIC=true
cp unison /usr/local/bin/
全部安装完成后
服务器:
写脚本:
vim 2.sh
#!/bin/bash
a=“/usr/local/bin/inotifywait -mrq -e create,delete /server1”
b=“/usr/local/bin/unison -batch /server1 ssh://客户端IP//server2”
$a | while read directory event file
do
	$b
done
- 1
- 2
- 3
- 4
- 5
- 6
- 7
scp 2.sh 客户端IP:/root
客户端:
vim 2.sh
#!/bin/bash
a="/usr/local/bin/inotifywait -mrq -e create,delete /server2"
b="/usr/local/bin/unison -batch /server1 ssh://服务器IP//server1"

$a | while read directory event file
do
        $b
done
- 1
- 2
- 3
- 4
- 5
- 6
- 7
- 8
服务器:
bash 2.sh &
这回就全部完成啦
可以自己在服务器/server1中的文件夹里面创建文件,观察客户端/server2中的变化


 663
663


 被折叠的 条评论
为什么被折叠?
被折叠的 条评论
为什么被折叠?
 到【灌水乐园】发言


