


前言
本系列将以肯德基自助点餐页面为模板,搭建一款自助点餐系统,第一次开发移动端h5项目,免不了有所差错和不足,欢迎各位大佬指正。在上一章我们已经完成了商品页面、购物车弹出层、导航栏双向联动等功能,但是提交订单按钮点击后还是空的,那么在这章,我们将要继续设计点击提交订单按钮后,修改或新增地址、确认订单、提交订单的功能。
一、路由设计
在之前的设计中,我们只在一个整体布局中进行操作,没有使用嵌套路由,只有一个<router-view>,但如果要涉及提交订单,就得设计新的订单页面,因此我们要把之前的路由改一改,改成嵌套路由的模式。
1.1、更改项目结构
首先新建一个pages文件夹放父页面,文件夹中创建一个Home.vue,将原本App.vue中的内容转移到Home.vue中,然后将App.vue改为:
<template>
  <router-view> </router-view>
</template>

<script setup lang="ts"></script>
<style lang="less"></style>
这里的App.vue中的<router-view> </router-view>放置父级路由(即page中的页面)。
Home.vue的内容如下:
<template>
  <!-- swipe轮播图 -->
  <Swipe></Swipe>
  <!-- header标题栏 -->
  <van-sticky
    ><Header></Header>
    <!-- navigation导航页 -->
    <Nav></Nav
  ></van-sticky>
  <!-- content内容页 包括侧边导航和主体 -->
  <router-view v-slot="{ Component }">
    <keep-alive>
      <component :is="Component" />
    </keep-alive>
  </router-view>
</template>
<script setup lang="ts">
import Swipe from "@/components/swipe/Swipe.vue";
import Header from "@/components/header/Header.vue";
import Nav from "@/components/nav/Nav.vue";
</script>
<style lang="less"></style>
这里的Home.vue中的<router-view> </router-view>放置子级路由(即component)。
1.2、嵌套路由
修改router文件夹中index.ts为嵌套路由模式:
/**
 * createRouter 这个为创建路由的方法
 * createWebHashHistory 这个就是vue2中路由的模式,
 *                      这里的是hash模式,这个还可以是createWebHistory等
 * RouteRecordRaw 这个为要添加的路由记录,也可以说是routes的ts类型
 */
import { createRouter, createWebHashHistory, RouteRecordRaw } from "vue-router";
// 路由记录,这个跟vue2中用法一致,就不做过多解释了
const routes: Array<RouteRecordRaw> = [
  {
    path: "/",
    name: "Home",
    component: () => import("@/pages/Home.vue"),
    alias: "/home",
    meta: {
      title: "点单页面",
    },
    children: [
      {
        path: "",
        name: "Goods",
        component: () => import("@/components/goods/Goods.vue"),
        alias: "/goods",
        meta: {
          title: "商品页面",
        },
      },
      {
        path: "kitchen",
        name: "Kitchen",
        component: () => import("@/components/kitchen/Kitchen.vue"),
        alias: "/kitchen",
        meta: {
          title: "自在厨房",
        },
      },
      {
        path: "about",
        name: "About",
        component: () => import("@/components/about/About.vue"),
        alias: "/about",
        meta: {
          title: "关于我们",
        },
      },
    ],
  },
  {
    path: "/order",
    name: "Order",
    component: () => import("@/pages/Order.vue"),
    alias: "/order",
    meta: {
      title: "订单页面",
    },
  },
];

const router = createRouter({
  history: createWebHashHistory(),
  routes,
});
export default router;
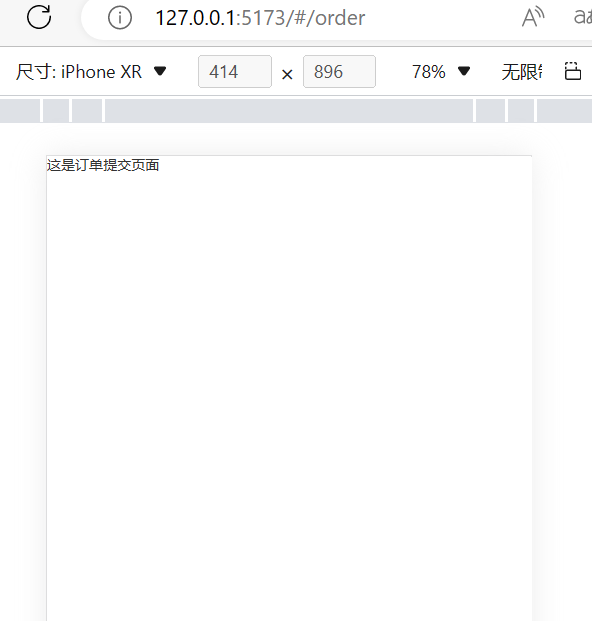
即将Goods.vue、Kitchen.vue、About.vue作为home下的子路由,另一个父级路由为/order,pages文件夹下新建一个Order.vue,内容就写如下代码,进行测试
<template>
  <div>这是订单提交页面</div>
</template>
<script setup lang="ts"></script>
<style lang="less"></style>
然后我们可以在地址栏输入http://127.0.0.1:5173/#/order查看,如果成功跳转显示如下页面,则代表路由配置成功:
1.3、订单提交的跳转
这一步需要给前面商品和购物车弹出层的“提交订单”按钮增加点击事件sumbitCart(),点击后通过router.push来跳转路由,我们不采用路由传参的方式,因为购物车的store已经保存了提交订单所需的完整状态。
const sumbitCart = () => {
  router.push({ path: "/order", name: "Order" });
};
二、订单设计
2.1、订单类型设计
与商品的设计方法类似,我们在utils/interface/index.ts中同样设计一个shoppingOrder接口类型,其结构如下,包括店铺名、店铺地址、订单类型、取餐时间、订单列表、是否需要餐具和订单备注。
export interface shoppingOrder {
  // 店铺名
  shopName: string;
  // 店铺地址
  shopAddress: string;
  // 订单类型:外带或堂食
  orderType: string;
  // 取餐时间
  pickupTime: string;
  // 订单列表
  myCart: shoppingCart;
  // 是否需要餐具
  tableware: boolean;
  // 订单备注
  note: string;
}
然后同样在store/modules/modules.ts中设计useorderStore,如下:
export const useorderStore = defineStore("order", {
  state: (): shoppingOrder => {
    return {
      // 店铺名
      shopName: "",
      // 店铺地址
      shopAddress: "",
      // 订单类型:外带或堂食
      orderType: "堂食",
      // 取餐时间
      pickupTime: "",
      // 订单列表
      myCart: { carts: [], totalPrice: 0 },
      // 是否需要餐具
      tableware: false,
      // 订单备注
      note: "",
    };
  },
  /*
        类似于组件的computed,用来封装计算属性,有缓存的功能
    */
  getters: {},
  /*
        类似于methods,封装业务逻辑,修改state
    */
  actions: {
    // 清空订单
    clearOrder() {
      this.orderType = "";
      this.pickupTime = "";
      this.myCart = { carts: [], totalPrice: 0 };
      this.note = "";
    },
  },
});
2.2、订单布局分析
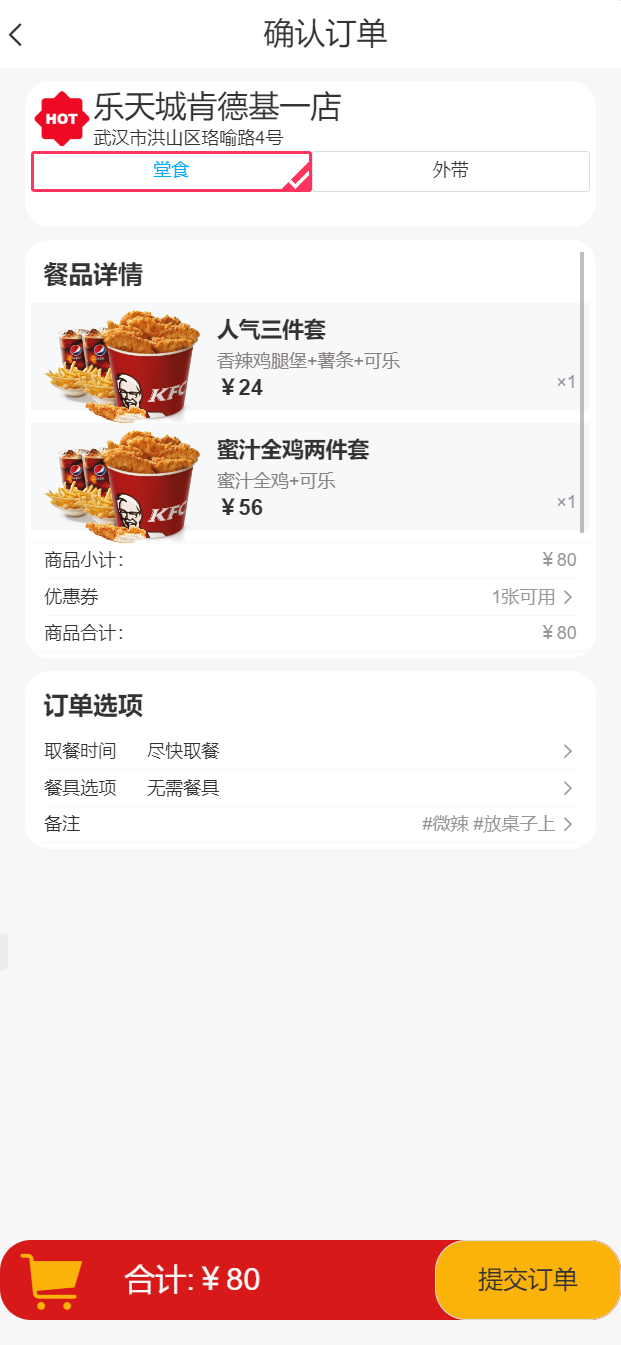
分析一下肯德基的提交订单的页面,主要可以分为,顶端的确认订单以及返回商品选择(固定),头部的说明(店铺、取餐时间和堂食/外带选项),中间的订单(包括购物车列表、优惠券信息),下部的选项(餐具、备注、开票)和最底部的确认提交订单。

2.3、订单布局设计
2.3.1、顶部说明

顶部很简单,包括左边的箭头用于回退到上一页面,中部的确认订单用于提示,需要注意的是头部需要使用粘性,这里可以采用<van-sticky>组件将其包裹起来,代码如下:
    <van-sticky>
          <div class="order-top">
        <van-icon name="arrow-left" size="20" @click="returnGoods()" />
        <div class="order-top-text">确认订单</div>
      </div></van-sticky
    >
2.3.2、底部确认提交订单
底部确认与前面的类似也是使用<van-sticky>组件,采用吸底方法:
<!-- 底部提交 -->
<van-sticky position="bottom" offset-bottom="4vw"
><div class="cart">
<div class="cart-content">
<van-icon class="cart-content-icon" size="5vh" name="shopping-cart" />
<div class="cart-content-num">
<!-- 未选购商品 -->
<span v-if="cartStore.totalPrice == 0">还未选购商品</span>
<!-- 已选购商品 -->
<span v-else>合计:¥{{ cartStore.totalPrice }}</span>
</div>
<van-button class="cart-content-button" @click="sumbitOrder()"
>提交订单</van-button
>
</div>
</div>
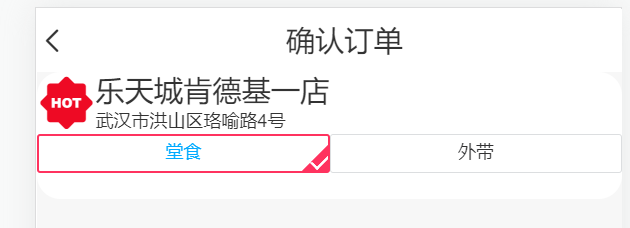
</van-sticky>2.3.3、头部信息
头部信息主要由店铺、取餐时间和堂食/外带选项组成,新建order文件夹,在order文件夹中新建一个header.vue用于写头部组件,在堂食和外带选项中,我们使用伪类元素::after和::before设计了选中进行标记,主要代码如下,不熟悉的同学可以看这篇文章:解决方案:实现Vue3.2+Vant点击选中按钮,右下角显示三角形勾选 + 破碎图片占位-CSDN博客
<template>
  <div class="order-header">
    <div class="order-header-shop">
      <van-icon name="hot" color="#ee0a24" size="10vw" />
      <div>
        <div class="shopname">{{ orderStore.shopName }}</div>
        <div class="shopaddress">{{ orderStore.shopAddress }}</div>
      </div>
    </div>

    <div class="order-header-type">
      <div class="type">
        <div class="type-content">
          <van-button
            type="default"
            size="large"
            :class="orderStore.orderType === '堂食' ? 'select' : ''"
            @click="clickType('堂食')"
          >
            <!-- <template #icon><van-icon name="shop-o" /> </template> -->
            <span class="type-content-text">堂食</span></van-button
          >
          <van-button
            type="default"
            size="large"
            :class="orderStore.orderType === '外带' ? 'select' : ''"
            @click="clickType('外带')"
            >外带</van-button
          >
        </div>
      </div>
    </div>
  </div>
</template>

<script setup lang="ts">
import { useorderStore } from "@/store/modules/module.js";

const orderStore = useorderStore();
const clickType = (str: string) => {
  orderStore.orderType = str;
};
</script>

<style lang="less" scoped>
.order-header {
  height: 10vh;
  background-color: #ffffff;
  border-radius: 4vw;

  .order-header-shop {
    display: flex;
    align-items: center;
    // text-align: center;
    .shopname {
      font-size: 5vw;
      font-weight: 400;
    }
    .shopaddress {
      font-size: 2vw;
    }
  }
  .order-header-type {
    .type {
      display: flex;
      .type-content {
        // align-items: center;
        // justify-content: center;
        display: flex;
        width: 100vw;
        height: 5vh;
        .select {
          position: relative;
          text-align: left;
          color: #00aaff;
          border: 0.5vw solid #ff335f;
          overflow: hidden;
          ::after {
            content: "";
            position: absolute;
            right: -3vw;
            bottom: -3vw;
            width: 6vw;
            height: 6vw;
            background-color: #ff335f;
            transform: rotate(45deg);
          }
          ::before {
            content: "";
            width: 1vw;
            height: 4vw;
            position: absolute;
            right: 0vw;
            bottom: 0vw;
            border: 0.5vw solid #fff;
            border-top-color: transparent;
            border-left-color: transparent;
            transform: rotate(45deg);
            z-index: 999;
          }
        }
      }
    }
  }
}
</style>
效果如下:
2.3.4、中部订单信息
首先来分析一下肯德基的中部订单内容:

可以看到,中部订单信息是这个页面的主体,其包括标题栏餐品详情字样、餐品列表、餐品推荐、下方的商品小计、卡券优惠和合计金额。餐品列表我们可以用循环+van-card来做,而原始的vant-card比较丑,我们用插槽的方法来重写一些样式和内容:
<div
        class="middle-cart"
        v-for="(item, index) in cartStore.carts"
        :key="index"
      >
        <van-card style="height: 8vh; margin-bottom: 2vw">
          <template #title>
            <div
              style="
                padding-left: 15vw;
                padding-top: 1vw;
                font-size: 3.5vw;
                font-weight: 600;
              "
            >
              {{ item.good.name }}
            </div>
          </template>
          <template #desc>
            <div
              style="
                padding-left: 15vw;
                padding-top: 1vw;
                font-size: 1vw;
                color: #868080;
              "
            >
              {{ item.good.description }}
            </div>
          </template>
          <template #num>
            <div>×{{ item.quantity }}</div>
          </template>
          <template #price>
            <div style="padding-left: 15vw; padding-top: 1vw; font-size: 3.5vw">
              ¥{{ item.good.price }}
            </div>
          </template>
          <template #thumb>
            <van-image
              width="25vw"
              style="max-height: 7vh"
              :src="item.good.image_path"
              alt="1"
            />
          </template>
        </van-card>
      </div>
餐品推荐我们暂时放一放,后面再来做,到本步,效果如下:
2.3.5、下部选项
下部订单选项主要都是一些信息的选择项,我们使用输入框field配合弹出层popup实现,即点击输入框后将editTableware置为true,弹出以van-picker为方法的选项栏,点击选项栏或者点击无关区域时将editTableware置为false。
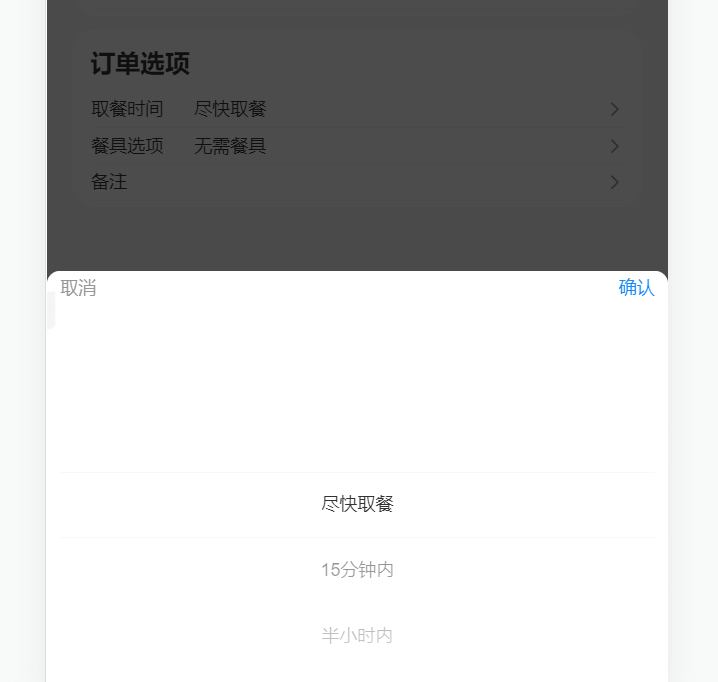
在备注部分中,额外使用了button做为标签按钮,为他绑定事件,当点击对应标签后,自动加入备注:
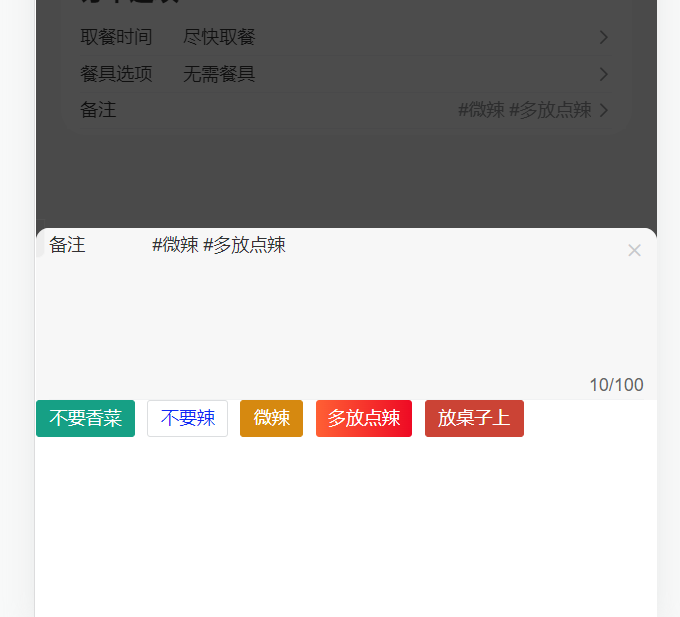
这一部分完整的代码如下
<!-- src/components/order/Footer.vue -->
<template>
  <div class="order-footer">
    <div class="footer">
      <div class="footer-text">订单选项</div>
      <van-field
        v-model="time"
        is-link
        readonly
        label="取餐时间"
        placeholder=""
        @click="editTime = true"
      >
      </van-field>
      <van-field
        v-model="tableware"
        is-link
        readonly
        label="餐具选项"
        placeholder=""
        @click="editTableware = true"
      />
      <van-cell
        title="备注"
        :value="orderStore.note"
        is-link
        arrow-direction="right"
        @click="editNote = true"
      ></van-cell>

      <van-popup v-model:show="editTime" round position="bottom">
        <van-picker
          :columns="timeColumns"
          @cancel="editTime = false"
          @confirm="timeConfirm"
        />
      </van-popup>

      <van-popup v-model:show="editTableware" round position="bottom">
        <van-picker
          :columns="tablewareColumns"
          @cancel="editTableware = false"
          @confirm="tablewareConfirm"
        />
      </van-popup>
      <van-popup
        v-model:show="editNote"
        round
        closeable
        position="bottom"
        teleport="body"
        :style="{ height: '30%' }"
      >
        <van-field
          class="note"
          v-model="orderStore.note"
          style="background-color: #f7f7f7"
          rows="7"
          autosize
          label="备注"
          type="textarea"
          maxlength="100"
          placeholder="请输入备注"
          show-word-limit
        />
        <van-button
          style="margin-right: 2vw"
          color="#16A085"
          @click="addNote('不要香菜')"
          >不要香菜</van-button
        >
        <van-button
          style="color: #112af4; margin-right: 2vw"
          plain
          @click="addNote('不要辣')"
          >不要辣</van-button
        >
        <van-button
          style="margin-right: 2vw"
          color="#D68910"
          @click="addNote('微辣')"
          >微辣</van-button
        >
        <van-button
          style="margin-right: 2vw"
          color="linear-gradient(to right, #ff6034, #ee0a24)"
          @click="addNote('多放点辣')"
        >
          多放点辣
        </van-button>
        <van-button
          style="margin-right: 2vw"
          color="#cb4335"
          @click="addNote('放桌子上')"
          >放桌子上</van-button
        >
      </van-popup>
    </div>
  </div>
</template>

<script setup lang="ts">
import { ref } from "vue";
import { useorderStore } from "@/store/modules/module.js";
const orderStore = useorderStore();
const editTime = ref(false);
const editTableware = ref(false);
const editNote = ref(false);
const timeColumns = [
  { text: "尽快取餐", value: "now" },
  { text: "15分钟内", value: "15min" },
  { text: "半小时内", value: "30min" },
  { text: "一小时内", value: "1hour" },
  { text: "一小时后", value: "later" },
];
const tablewareColumns = [
  { text: "无需餐具", value: "not-need" },
  { text: "需要餐具", value: "need" },
];

const time = ref("尽快取餐");
const tableware = ref("无需餐具");

const timeConfirm = ({ selectedOptions }: any) => {
  editTime.value = false;
  time.value = selectedOptions[0].text;
  orderStore.pickupTime = selectedOptions[0].text;
};

const tablewareConfirm = ({ selectedOptions }: any) => {
  editTableware.value = false;
  tableware.value = selectedOptions[0].text;
  orderStore.tableware = selectedOptions[0].text;
};

const addNote = (note: string) => {
  orderStore.note = orderStore.note + "#" + note + " ";
};
</script>

<style lang="less" scoped>
.order-footer {
  margin-left: 4vw;
  margin-right: 4vw;
  margin-top: 2vw;
  padding: 1vw;
  border-radius: 4vw;
  background-color: #ffffff;
  .footer {
    max-height: 40vh;
    overflow-y: scroll;
    .footer-text {
      font-size: 4vw;
      font-weight: 800;
      padding: 2vw 2vw;
    }
    van-contact-card {
      height: 20vh;
    }
  }
}
</style>
<style>
:root:root {
  --van-contact-card-title-line-height: 4vw;
  --van-dialog-message-line-height: 6vw;
  --van-field-label-width: 15vw;
}
</style>
到此,我们就已经成功设计好了订单页面的基本框架,最终订单的布局设计效果为:


 2124
2124

 被折叠的 条评论
为什么被折叠?
被折叠的 条评论
为什么被折叠?
 到【灌水乐园】发言


