


一.安装vite
搭建vite
yarn create vite
安装依赖
npm i
启动项目
yarn dev
选择Vue3+TS的版本即可
二、安装pinia
npm add pinia@next
挂载Pinia
在——main.ts——配置
/* pinia */
import { createPinia } from "pinia";
//下载数据持久化才可以引入 (npm i  pinia-plugin-persistedstate )
import piniaPluginPersistedstate from "pinia-plugin-persistedstate";

const pinia = createPinia();
pinia.use(piniaPluginPersistedstate);

const app = createApp(App);
//挂载到vue根实例
app.use(pinia);

app.mount("#app");
局部引入Pinia (store/index.ts)
import { defineStore } from "pinia";
使用例子
1.在——(src)store/index.ts—— 配置
import { defineStore } from 'pinia'

interface IState {
    hasReceivingList: boolean;
    ppRunCap: string;
    cusmgrName: string;

}

const useStore = defineStore("index", {
    state: ():IState => ({
        hasReceivingList: true,
        ppRunCap: "",
        cusmgrName: "",
    }),
    persist: {
        paths: [
            "appRunCap",
            "cusmgrName",
            "hasReceivingList"
        ]
    }
})

export {useStore}
三、安装vant3
//两种都可以
npm i vant
npm i vant@next -s
安装插件(可以自动按需引入组件)
# 通过 npm 安装
npm i unplugin-vue-components -D
# 通过 yarn 安装
yarn add unplugin-vue-components -D
# 通过 pnpm 安装
pnpm add unplugin-vue-components -D
安装插件(可以自动按需引入样式)
npm install vite-plugin-style-import

npm install @types/node -D (配置路径别名)
安装插件
npm install vite-plugin-vconsole
在vite项目配置插件
在——vite.config.ts——配置
import vue from "@vitejs/plugin-vue";

/* unplugin element-plus (配置完之后使用ref reactive watch 等无须import 导入,可以直接使用) */
import AutoImport from "unplugin-auto-import/vite";

import Components from "unplugin-vue-components/vite";
/* vant */
import { VantResolver } from "unplugin-vue-components/resolvers";
import styleImport, { VantResolve } from "vite-plugin-style-import";
/* vConsole */
import { viteVConsole } from "vite-plugin-vconsole";
import { resolve } from "path";

// https://vitejs.dev/config/
export default defineConfig({
  resolve: {
    alias: {
      "@/": `${resolve(__dirname, "src")}/`,
      "~/": `${resolve(__dirname, "public")}/`,
    },
  },
  plugins: [
    vue(),
    viteVConsole({
      entry: resolve("src/main.ts"), // 或者可以使用这个配置: [path.resolve('src/main.ts')]
      localEnabled: false,
      enabled: true,
      config: {
        maxLogNumber: 1000,
        // theme: "dark"
      },
    }),
    styleImport({
      resolves: [VantResolve()],
      libs: [
        {
          libraryName: "vant",
          esModule: true,
          resolveStyle: name => `../es/${name}/style`,
        },
      ],
    }),
    AutoImport({
      include: [
        /\.[tj]sx?$/, // .ts, .tsx, .js, .jsx
        /\.vue$/,
        /\.vue\?vue/, // .vue
        /\.md$/, // .md
      ],
      imports: ["vue", "vue-router"], // 自动导入
    }),
    Components({
      resolvers: [
        VantResolver(), // Auto register Vant components
      ],
      // 自动导入组件目录
      dirs: ["src/components", "src/layouts"],
      dts: true,
    }),
  ]
})
在mian.ts中引入vant 组件
import { createApp } from "vue";
const app = createApp();
四、安装router4
npm install vue-router
在——(src)router/index.ts——配置
import {createRouter, createWebHashHistory, RouteRecordRaw } from "vue-router"

import Home from '../views/list.vue'

const routes:Array<RouteRecordRaw> =[
    {
        path: '/',
        name: 'index',
        component: Home,
        meta:{
            title:"首页",
        }
      },
]

const router=createRouter({
    history: createWebHashHistory(),
    routes
})

export default router;
main.ts配置项
import router from './router/index'
app.use(router)
五、安装axios
npm install axios
在——(src)utils/request.ts—— 配置
import axios, { AxiosRequestConfig, AxiosResponse } from "axios";
import { ApiResponse } from "../types/axios";
// 默认配置
const defaultConfig: AxiosRequestConfig = {
// 基础路径,
baseURL: 'xxx',
headers: {
"Content-Type": "application/json; charset=utf-8",
},
timeout: 60000 // request timeout
}
// axios 实例
const service = axios.create(defaultConfig);
// 请求拦截器
service.interceptors.request.use(
function (config: AxiosRequestConfig) {
return config;
},
function (error) {
/* 错误处理 */
error.data = {
message: "服务器异常,请联系管理员!",
};
return Promise.reject(error);
}
)
// 响应拦截器
service.interceptors.response.use(
function (response: AxiosResponse<any>) {
return response;
},
function (error) {
console.warn("请求超时或服务器异常");
return Promise.reject(error);
}
);
// 封装请求的方法
const http=async <T>(config: AxiosRequestConfig): Promise<ApiResponse<T>> => {
const response = await service.request<ApiResponse<T>>(config);
console.log(response)
return response.data;
};
//注释:ApiResponse这个类型 导入了一个文件类型
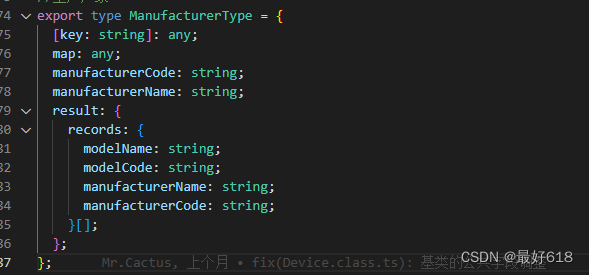
export interface ApiResponse<T> {
code: number; // http状态码
resultCode?: string; //
msg: string; //
success: boolean;
data: T;
result:T;
}
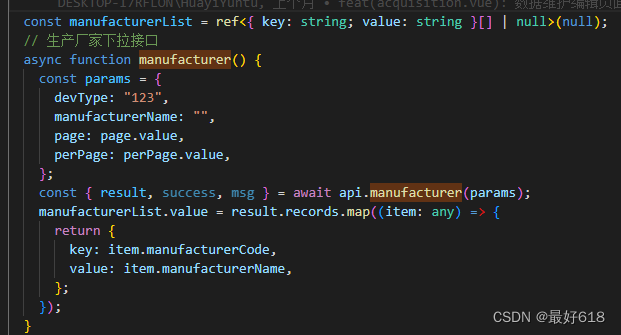
在——(src)api/index.ts—— 配置,
1.先写类型
2.分具体的模块,写具体的接口,
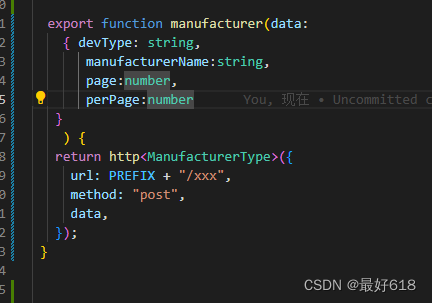
3.引入到index.ts中
import * as  devInfo from "./modules/devInfo"
const api = {
  ...devInfo
};

export default api;
4.在文件中使用
import api from "@/api/index";
六、适配方案
Viewport 布局
Vant 默认使用 px 作为样式单位,如果需要使用 viewport 单位 (vw, vh, vmin, vmax),推荐使用 postcss-px-to-viewport 进行转换。
postcss-px-to-viewport 是一款 PostCSS 插件,用于将 px 单位转化为 vw/vh 单位。
和src 同级 ,新建postcssrc.js,里面具体代码
module.exports = {
  plugins: {
    // "postcss-import": {},
    // "postcss-url": {},
    // to edit target browsers: use "browserslist" field in package.json
    // autoprefixer: {},
    "postcss-px-to-viewport": {
      unitToConvert: "px", // 要转化的单位
      viewportWidth: 375, // UI设计稿的宽度
      unitPrecision: 6, // 转换后的精度,即小数点位数
      propList: ["*"], // 指定转换的css属性的单位,*代表全部css属性的单位都进行转换
      viewportUnit: "vw", // 指定需要转换成的视窗单位,默认vw
      fontViewportUnit: "vw", // 指定字体需要转换成的视窗单位,默认vw
      selectorBlackList: ["wrap"], // 指定不转换为视窗单位的类名,
      minPixelValue: 1, // 默认值1,小于或等于1px则不进行转换
      mediaQuery: false, // 是否在媒体查询的css代码中也进行转换,默认false
      replace: true, // 是否转换后直接更换属性值
      exclude: [/node_modules/] // 设置忽略文件,用正则做目录名匹配
      // landscape: true, // 是否处理横屏情况
      // landscapeUnit: "vw", // (String) 横屏时使用的单位
      // landscapeWidth: "1334" // (Number) 横屏时使用的视口宽度
    }
  }
};
七、views页面
<template>
  <div>1</div>
  <van-button type="primary">主要按钮</van-button>
</template>
<script lang="ts" setup></script>
<style></style>
最终可以看到的页面


 3985
3985


 被折叠的 条评论
为什么被折叠?
被折叠的 条评论
为什么被折叠?
 到【灌水乐园】发言


