此篇文章主要是用koa2学习初步搭建一个后端项目
Koa2
一、Koa2安装
创建一个空白目录,然后进入终端,并在终端对koa进行安装:
# 项目初始化
npm init -y

# 安装koa2
npm i koa2 -S

# 安装nodemon
npm i nodemon -D
二、入口文件
在项目根目录创建 app.js 文件,并在上一步操作中生成的 package.json 里配置:
{
  "scripts": {
    "test": "echo "Error: no test specified" && exit 1",
    "start": "nodemon app.js"
  },
}
在 app.js 中:
const Koa = require('koa2');
const app = new Koa();
const port = 9000;

/*
	解释下面这段代码:
	app.use()方法是:将给定的中间件方法添加到此应用程序。简单说就是调用中间件
	app.use() 返回 this, 因此可以链式表达
*/
app.use(async (ctx)=>{
    ctx.body = "Hello, Koa";
  	// ctx.body是ctx.response.body的简写
})

app.listen(port, ()=>{
    console.log('Server is running at http://localhost:'+port);
})
然后运行 npm run start ,并在浏览器输入 http://localhost:9000/ 即可看到页面效果。
提示:
为了以后对端口和IP的管理方便,其实可以将IP与端口放在一个文件导出,然后导入使用,这样就可以方便管理:
// 生产环境域名:http://xxx.com    开发环境域名:http://localhost
const host = "http://localhost";
// 生产环境端口:自定义         开发环境域名:9000
const port = 9000;

module.exports = {
    host, port
}
然后到app.js或者需要使用IP与端口的文件中导入使用:
const {host, port} = require("./utils")

app.listen(port, ()=>{
    console.log(`Server is running at ${host}:${port}`);
})
三、洋葱模型
学Koa必须要了解 洋葱模型 :
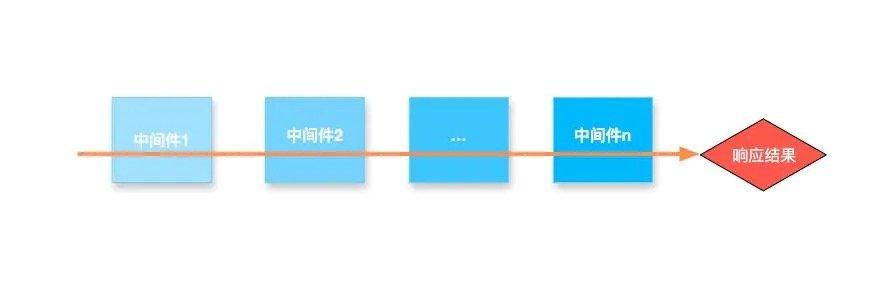
Koa 和 Express 都会使用到中间件,Express的中间件是顺序执行,从第一个中间件执行到最后一个中间件,发出响应:
Koa是从第一个中间件开始执行,遇到 next 进入下一个中间件,一直执行到最后一个中间件,在逆序,执行上一个中间件 next 之后的代码,一直到第一个中间件执行结束才发出响应。
对于这个洋葱模型,我们用代码来解释一下。假如把上面的代码改写成:
const Koa = require('koa2');
const app = new Koa();
const port = 9000;

app.use(async (ctx, next)=>{
    console.log(1)
    await next();
    console.log(2)
})

app.use(async (ctx, next)=>{
    console.log(3)
    await next();
    console.log(4)
})

app.use(async (ctx)=>{
    console.log(5)
})

app.listen(port, ()=>{
    console.log('Server is running at http://localhost:'+port);
})
那么在浏览器刷新后,控制台得到的顺序是:
1
3
5
4
2
现在可以看到,我们通过 next可以先运行下个中间件,等中间件结束后,再继续运行当前 next() 之后的代码。
四、路由安装
当需要匹配不同路由时,可以安装:
npm i koa-router
将 app.js 修改:
const Koa = require('koa2');
const Router = require('koa-router');
const app = new Koa();
const router = new Router();
const port = 9000;

router.get('/', async (ctx)=>{
    ctx.body = "根路径";
})

router.get('/manage', async (ctx)=>{
    ctx.body = "管理界面接口";
})

app.use(router.routes(), router.allowedMethods());

app.listen(port, ()=>{
    console.log(`Server is running at http://localhost:${port}`);
})
此时,到浏览器刷新并在地址栏最后添加 /manage 即可得到根路径内容和列表模块内容。
备注:
// 调用router.routes()来组装匹配好的路由,返回一个合并好的中间件
// 调用router.allowedMethods()获得一个中间件,当发送了不符合的请求时,会返回 `405 Method Not Allowed` 或 `501 Not Implemented`

allowedMethods方法可以做以下配置:
app.use(router.allowedMethods({
    // throw: true, // 抛出错误,代替设置响应头状态
    // notImplemented: () => '不支持当前请求所需要的功能',
    // methodNotAllowed: () => '不支持的请求方式'
}))
五、路由拆分
当项目较大,路由较多时,我们需要划分模块。此时,就需要对路由进行拆分。这个项目的后端要服务于Web官网和后台管理系统,因此我们将路由划分成两个模块:web与manage。
1、创建 router 文件夹
创建router文件夹,并在其中创建:index.js (路由总入口文件)、manage/index.js (manage模块路由入口文件)、web/index.js (web模块路由入口文件):
// app.js
const Koa = require("koa2");
const router = require("./router")
const app = new Koa();
const port = 9000;

// 调用router中间件
app.use(router.routes(), router.allowedMethods());

app.listen(port, ()=>{
    console.log(`Server is running at http://localhost:${port}`);
})

// index.js
const Router = require("koa-router");
const manage = require("./manage");
const web = require("./web");
const router = new Router();

router.get("/", async ctx=>{
    ctx.body = "根路径"
})

router.use("/manage", manage.routes(), manage.allowedMethods());
router.use("/web", web.routes(), web.allowedMethods());

module.exports = router;


// manage/index.js
const Router = require("koa-router")
const router = new Router();

router.get('/', async ctx=>{
    ctx.body = "管理系统"
})

module.exports = router;


// web/index.js
const Router = require("koa-router")
const router = new Router();

router.get('/', async ctx=>{
    ctx.body = "官网"
})

module.exports = router;
到浏览器刷新 localhost:9000/manage 与 localhost:9000/web 即可得到manage和web两个模块返回的数据。
2、路由重定向
那么有同学会问了,如果我想直接从 localhost:9000 重定向到 localhost:9000/home 该怎么办?
我们可以在 router/index.js 中做如下配置:
router.use('/home', home.routes(), home.allowedMethods());
...
router.redirect('/', '/home');
3、404无效路由
如果被访问到无效路由,那么我们可以统一返回404页面:
在 router 下 errorPage.js :
const Router = require('koa-router');
const errorPage = new Router();

errorPage.get('/', async (ctx) => {
    ctx.body = "访问页面不存在";
})

module.exports = errorPage;
在 router/index.js 中:
const errorPage = require("./errorPage")

// 404页面路由
router.use("/404", errorPage.routes(), errorPage.allowedMethods());
在 app.js 中引用:
// 匹配不到页面的全部跳转去404
app.use(async (ctx, next) => {
    await next();
    if (parseInt(ctx.status) === 404) {
        ctx.response.redirect("/404")
    }
})
app.use(router.routes(), router.allowedMethods());
六、后端允许跨域
前端想跨域,可以设置proxy。如果后端允许跨域,可以如下操作:
// 安装koa2-cors
$ cnpm i koa2-cors

// 引入koa2-cors中间件
const cors = require("koa2-cors");
// 这里cors中间件一定要写在路由之前
app.use(cors());

app.use(router.routes(), router.allowedMethods())
七、读取静态资源文件
首先安装 koa-static,命令行代码如下:
yarn add koa-static
然后在项目的根目录下创建 assets 后,将图片资源(图片自己随便找一张)文件夹 images 放到其中。我们假定404页面需要返回一张错误警告图,可以在 app.js 中执行以下操作:
// 引入
const path = require('path')
const static = require('koa-static')

// 获取静态资源文件夹
app.use(static(path.join(__dirname, '/assets')));
...
app.use(router.routes(), router.allowedMethods())
假设其中有一张图片叫做 404.gif,那么我们打开浏览器,访问:http://localhost:9000/images/404.gif 即可得到图片。这里注意:
路径上不需要写assets,因为我们已经指定了访问资源时, http://localhost:9000 自动指向 assets 文件夹。由此,我们知道数据库中图片的地址只需要填写
/images/404.gif即可。
如果我们希望打开404页面就显示这张图,就需要做如下步骤:
#1、安装mime-types
$ npm i mime-types
2、使用fs读取文件
修改errorPage.js:
const Router = require("koa-router")
const router = new Router();
const fs = require("fs")
const path = require("path")
const mime = require("mime-types")

router.get('/', async ctx=>{
    const filePath = path.join(__dirname, "../assets/images/404.gif");
    const file = fs.readFileSync(filePath); // 读取文件
    const mimeType = mime.lookup(filePath)  // 读取文件类型
    ctx.set("content-type", mimeType);  // 设置返回类型(这一步很重要)
    ctx.body = file;    // 返回图片
})

module.exports = router;


 271
271


 被折叠的 条评论
为什么被折叠?


