


常用的基本控件
TextView
跑马灯效果
在TextView标签中写入如下属性,就可以实现跑马灯效果:
<TextView
android:ellipsize="marquee"
android:focusable="true"
android:focusableInTouchMode="true"
android:singleLine="true"/>
自动连接
在TextView中可以设置打电话,打开网页,地图,发送Email等链接。比如打电话:
<TextView
android:text="电话:13562198561"
android:autoLink="phone"/>
如果不在xml中写android:autoLink=”phone”这个属性的话,也可以在Activity中,用setAutoLinkMask(Linkify.PHONE_NUMBERS)方法来实现此功能,其他功能的实现与此类似。
其他属性
android:drawableTop=”@drawable/ic_launcher”将图片放在该文本的上边
android:drawableLeft=”@drawable/ic_launcher”将图片放在该文本的左边
android:drawableRight=”@drawable/ic_launcher”将图片放在该文本的右边
android:drawableBottom=”@drawable/ic_launcher”将图片放在该文本的下边
android:gravity=”center_horizontal”设置对齐方式
android:textColor=”@color/red”设置颜色
android:paddingTop设置到上边的距离
android:paddingLeft设置到左边的距离
android:paddingRight设置到右边的距离
android:paddingBottom设置到下边的距离
EditText
属性
输入框中用来提示用户输入的内容,当用户输入,该提示内容消失
android:hint=”请输入用户名”
android:inputType=”” 表示输入框的类型
android:password 表示为密码框
android:digits=”1234567890” 指定输入的内容范围
android:drawableLeft=”@drawable/ic_launcher”将图片放在该输入框的左边
输入内容的显示与隐藏
setTransformationMethod(HideReturnsTransformationMethod.getInstance());//表示显示当前输入内容
setTransformationMethod(PasswordTransformationMethod.getInstance());//表示隐藏当前输入内容
postInvalidate();//表示刷新界面,此方法可以在线程中直接调用
Button
属性
android:background=”@drawable/ic_launcher”将图片设置为按钮背景
如果将一张图片作为按钮,根据按钮的大小,图片会拉伸扭曲变形,这时就要用到ninePatch图片(.9)。
具体做法,打开SDK->tools->draw9Patch.bat,会弹出绘制.9图片的界面,将所要绘制的图片拖入即可。
注意:
上,左:表示拉伸的位置
下,右:表示内容的范围
按下按钮改变按钮背景
在drawable文件下新建xml文件btn_change.xml
<selector xmlns:android="http://schemas.android.com/apk/res/android" >
    <item android:drawable="@drawable/back_pressed"android:state_pressed="true"/>
    <item android:drawable="@drawable/back"/>
</selector>
然后在Button标签下写入如下属性:
android:background="@drawable/btn_change"综合的示例
activity_main.xml
<RelativeLayout xmlns:android="http://schemas.android.com/apk/res/android"
    android:layout_width="match_parent"
    android:layout_height="match_parent" >
    <LinearLayout
        android:layout_width="match_parent"
        android:layout_height="wrap_content"
        android:orientation="vertical"
        android:layout_alignParentTop="true">
    <TextView
        android:id="@+id/tv_paomadeng"
        android:layout_width="match_parent"
        android:layout_height="0dp"
        android:layout_weight="1"
        android:ellipsize="marquee"
        android:focusable="true"
        android:focusableInTouchMode="true"
        android:singleLine="true" />
    <TextView
        android:id="@+id/tv_shenglue"
        android:layout_width="match_parent"
        android:layout_height="0dp"
        android:layout_weight="1"
        android:text="电话:13562198561"
        android:autoLink="phone"/>
    </LinearLayout>
    <TableLayout
        android:layout_width="match_parent"
        android:layout_height="wrap_content"
        android:layout_centerInParent="true" >
        <TableRow>
            <TextView
                android:layout_height="wrap_content"
                android:text="用户名:" />
            <EditText
                android:layout_height="wrap_content"
                android:layout_span="2"
                android:hint="请输入用户名" />
        </TableRow>
        <TableRow>
            <TextView
                android:layout_height="wrap_content"
                android:text="密码:" />
            <EditText
                android:id="@+id/edittext"
                android:layout_height="wrap_content"
                android:drawableRight="@drawable/ic_launcher"
                android:hint="请输入密码"
                android:inputType="textPassword"
                />
            <Button
                android:id="@+id/button_show"
                android:layout_height="wrap_content"
                android:text="显示密码"
                android:background="@drawable/btn_change"/>
        </TableRow>
        <TableRow>
            <Button
                android:layout_height="wrap_content"
                android:layout_span="3"
                android:text="登录"
                android:background="@drawable/btn_change"
                />
        </TableRow>
    </TableLayout>
    <LinearLayout
        android:layout_width="match_parent"
        android:layout_height="wrap_content"
        android:layout_alignParentBottom="true"
        android:orientation="horizontal" >
        <TextView
            android:layout_width="0dp"
            android:layout_height="wrap_content"
             android:layout_weight="1"
            android:drawableTop="@drawable/ic_launcher"
            android:gravity="center_horizontal"
            android:text="@string/message"
            android:textColor="@color/red" />
        <TextView
            android:layout_width="0dp"
            android:layout_height="wrap_content"
             android:layout_weight="1"
            android:drawableTop="@drawable/ic_launcher"
            android:gravity="center_horizontal"
            android:text="@string/contact"
            android:textColor="@color/red" />
        <TextView
            android:layout_width="0dp"
            android:layout_height="wrap_content"
            android:layout_weight="1"
            android:drawableTop="@drawable/ic_launcher"
            android:gravity="center_horizontal"
            android:text="@string/active"
            android:textColor="@color/red" />
        <TextView
            android:layout_width="0dp"
            android:layout_height="wrap_content"
            android:layout_weight="1"
            android:drawableTop="@drawable/ic_launcher"
            android:gravity="center_horizontal"
            android:text="@string/more"
            android:textColor="@color/red" />
    </LinearLayout>
</RelativeLayout>
MainActivity.java
import android.os.Bundle;
import android.app.Activity;
import android.text.method.HideReturnsTransformationMethod;
import android.text.method.PasswordTransformationMethod;
import android.view.View;
import android.view.View.OnClickListener;
import android.widget.Button;
import android.widget.EditText;
import android.widget.TextView;

public class MainActivity extends Activity {
    private EditText edittext;
    private boolean show = false;

    @Override
    protected void onCreate(Bundle savedInstanceState) {
        super.onCreate(savedInstanceState);
        setContentView(R.layout.activity_main);
        TextView tv_paomadeng =(TextView) findViewById(R.id.tv_paomadeng);
        tv_paomadeng.setText("等格式是东莞市是个风飒飒十大高手都干撒是个傻大个是大嘎达 哥是个大法师哥发的帅哥傻大个");
        Button button = (Button) findViewById(R.id.button_show);
        edittext = (EditText) findViewById(R.id.edittext);
        button.setOnClickListener(new OnClickListener() {
            //动态实现输入密码的可见和隐藏
            @Override
            public void onClick(View arg0) {
                if (!show) {
                    edittext.setTransformationMethod(HideReturnsTransformationMethod.getInstance());//隐藏密码
                }else{
                    edittext.setTransformationMethod(PasswordTransformationMethod.getInstance());//显示密码
                }
                show=!show;
                edittext.postInvalidate();//刷新界面
            }
        });
    }
}
btn_change.xml
注意:所有添加的改变的内容都要写在不改变内容的前面。
<?xml version="1.0" encoding="utf-8"?>
<selector xmlns:android="http://schemas.android.com/apk/res/android" >
<item android:drawable="@drawable/back_pressed" android:state_pressed="true"/>
<item android:drawable="@drawable/back"/>
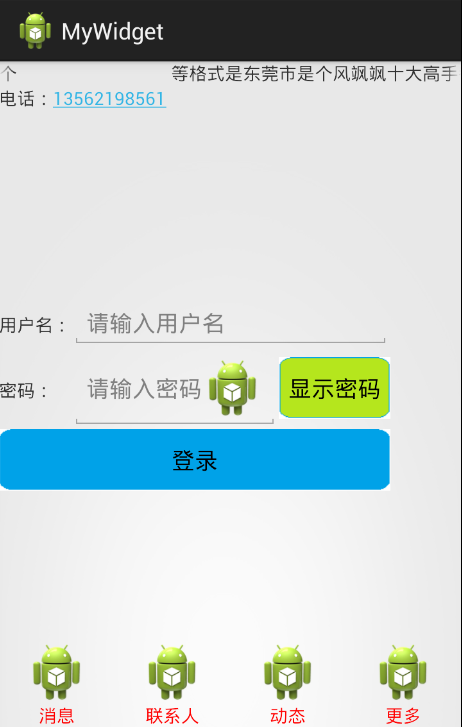
</selector>运行结果:
最上边的TextView会展示跑马灯效果,点击电话号码会跳转到电话界面,输入密码,不可见,点击显示密码,密码可见,再次点击,密码不可见。点击登录按钮,按钮更改背景,释放按钮恢复原背景
富文本
可以给文本文字添加颜色,在文本中间加入图片,给文本添加中划线,下划线,省略显示文本。下面有给出具体实现示例。
添加颜色
<font color='#ff0000'>富文本</font>添加图片
<img src='weheartit'/>利用 Html.fromHtml()返回一个spanned对象,然后调用该TextView对象的的setText()方法,将该spanned对象作为参数传入。
添加划线
setPaintFlags(Paint.STRIKE_THRU_TEXT_FLAG)此方法添加中划线
setPaintFlags(Paint.UNDERLINE_TEXT_FLAG)此方法添加下划线
省略显示文本
在此TextView标签中添加如下属性:
android:ellipsize="middle"
android:singleLine="true"
RadioGroup和RadioButton
表示一组RadioButton的集合。
RadioGroup
在xml中的属性:
android:orientation=”horizontal” 设置包含的RadioButton的排列方式
android:checkedButton=”@+id/具体的RadioButton的id”
表示默认选中该RadioButton
方法:
getCheckedRadioButtonId();表示选中的RadioButton的id
RadioButton
RadioButton和Button一样,也能更换背景图片,具体方法和Button一样。
综合示例
MainActivity.java
import java.lang.reflect.Field;
import android.os.Bundle;
import android.app.Activity;
import android.graphics.Paint;
import android.graphics.drawable.Drawable;
import android.text.Html;
import android.text.Html.ImageGetter;
import android.text.Spanned;
import android.widget.RadioButton;
import android.widget.RadioGroup;
import android.widget.RadioGroup.OnCheckedChangeListener;
import android.widget.TextView;
import android.widget.Toast;

public class MainActivity extends Activity {

    @Override
    protected void onCreate(Bundle savedInstanceState) {
        super.onCreate(savedInstanceState);
        setContentView(R.layout.activity_main);
        TextView tv_price = (TextView) findViewById(R.id.tv_price);
        tv_price.setPaintFlags(Paint.STRIKE_THRU_TEXT_FLAG);// 中划线
        TextView tv_shenglue = (TextView) findViewById(R.id.tv_shenglue);
        tv_shenglue.setText("司法地方阿范德萨发发送到防守打法阿萨德发爱妃大概多少个大概是帝国时代广东省格式规范地方个帅哥");
        tv_shenglue.setPaintFlags(Paint.UNDERLINE_TEXT_FLAG);// 下划线
        TextView tv_image = (TextView) findViewById(R.id.tv_image);
        String text = "我是一个<font color='#ff0000'>富文本</font>,然后<img src='weheartit'/>加一个图片";
        Spanned spanned = Html.fromHtml(text, new ImageGetter() {
            @Override
            public Drawable getDrawable(String source) {
                int id = R.drawable.ic_launcher;//随便给id赋一个初始值
                //利用反射得到要插入图片的id
                Class clazz = R.drawable.class;
                try {
                    Field field = clazz.getDeclaredField(source);
                    id = field.getInt(clazz);
                } catch (NoSuchFieldException e) {
                    e.printStackTrace();
                } catch (IllegalArgumentException e) {
                    e.printStackTrace();
                } catch (IllegalAccessException e) {
                    e.printStackTrace();
                }
                Drawable drawable = getResources().getDrawable(id);
                drawable.setBounds(0, 0, drawable.getIntrinsicWidth(),
                        drawable.getIntrinsicHeight());
                return drawable;
            }
        }, null);
        tv_image.setText(spanned);
        RadioGroup radioGroup = (RadioGroup) findViewById(R.id.radiogroup);
        radioGroup.setOnCheckedChangeListener(new OnCheckedChangeListener() {

            @Override
            public void onCheckedChanged(RadioGroup group, int checkedId) {
                //根据选中的id得到此radioButton
                RadioButton radioButton = (RadioButton) findViewById(checkedId);
                String message = "你选中的性别为"+radioButton.getText();
                //使用Toast短暂显示选中的内容
                Toast.makeText(MainActivity.this, message, Toast.LENGTH_SHORT).show();
            }
        });
    }
}
activity_main.xml
<LinearLayout xmlns:android="http://schemas.android.com/apk/res/android"
    android:layout_width="match_parent"
    android:layout_height="match_parent"
    android:orientation="vertical" >
    <TextView
        android:id="@+id/tv_price"
        android:layout_width="wrap_content"
        android:layout_height="wrap_content"
        android:text="原价998" />
    <TextView
        android:id="@+id/tv_image"
        android:layout_width="wrap_content"
        android:layout_height="wrap_content" />
    <TextView
        android:id="@+id/tv_shenglue"
        android:layout_width="wrap_content"
        android:layout_height="wrap_content"
        android:ellipsize="middle"
        android:singleLine="true" />
    <RadioGroup
        android:id="@+id/radiogroup"
        android:layout_width="wrap_content"
        android:layout_height="wrap_content"
        android:checkedButton="@+id/man"
        android:orientation="horizontal" >
        <TextView
            android:layout_width="wrap_content"
            android:layout_height="wrap_content"
            android:text="性别" />
        <RadioButton
            android:id="@+id/man"
            android:layout_width="wrap_content"
            android:layout_height="wrap_content"
            android:text="男" />
        <RadioButton
            android:layout_width="wrap_content"
            android:layout_height="wrap_content"
            android:text="女" />
        <RadioButton
            android:layout_width="wrap_content"
            android:layout_height="wrap_content"
            android:text="其他" />
    </RadioGroup>
    <RadioGroup
        android:layout_width="wrap_content"
        android:layout_height="wrap_content"
        android:checkedButton="@+id/countryside"
        android:orientation="horizontal" >
        <TextView
            android:layout_width="wrap_content"
            android:layout_height="wrap_content"
            android:text="户口" />
        <RadioButton
            android:id="@+id/countryside"
            android:layout_width="wrap_content"
            android:layout_height="wrap_content"
            android:button="@drawable/checked"
            android:text="农村" />
        <RadioButton
            android:layout_width="wrap_content"
            android:layout_height="wrap_content"
            android:button="@drawable/checked"
            android:text="城镇" />
    </RadioGroup>
</LinearLayout>
在drawable文件夹下创建checked.xml
<?xml version="1.0" encoding="utf-8"?>
<selector xmlns:android="http://schemas.android.com/apk/res/android" >
<item android:drawable="@drawable/a_radbtn_select" android:state_checked="true"/>
<item android:drawable="@drawable/a_radbtn"/>
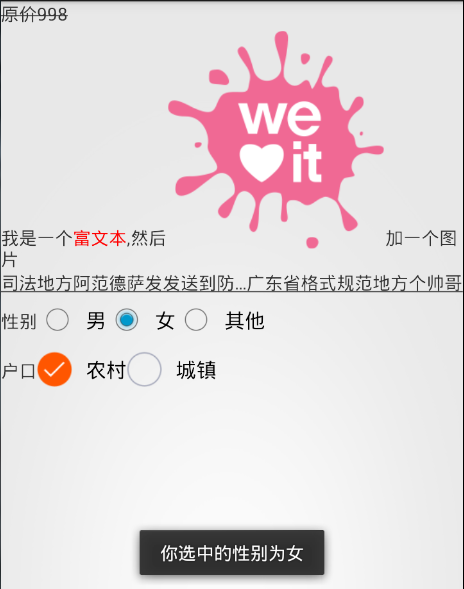
</selector>运行结果:
显示中划线,富文本,省略显示和下划线,在RadioButton中,当我们点击一个时,会短暂显示我们选择的内容。通过和更改Button背景一样,替换掉了
RadioButton前面的选择图标。


 656
656

 被折叠的 条评论
为什么被折叠?
被折叠的 条评论
为什么被折叠?
 到【灌水乐园】发言


