


javaSE:OOP
mysql:持久化
html+css+js+jquery+框架:视图,框架不熟练,css不好;
javaweb:独立开发MVC三层架构
ssm:框架:简化开发流程
war:tomcat运行
spring再简化:SpringBoot-jar:内嵌tomcat;微服务架构!
服务越来越多:springCloud
Spring
Spring为了解决企业级应用开发的复杂性而创建
IOC(依赖注入)和AOP(切面)
来龙去脉,历史,理论,谈资
30:经理
30:程序员,淘汰
程序=数据结构+算法(集合框架);程序员
程序=面向对象+框架;码农
软实力:聊天+举止+谈吐+见解
你主导面试官 13k 聊天
面试官主导你 8k
1.第一个Springboot程序
- jdk1.8
- maven 3.6.1
- springboot最新版
- IDEA
官方,Idea集成
- 官网直接下载后,导入Idea,https://start.spring.io/
- 直接Idea创建Springboot项目
[外链图片转存失败,源站可能有防盗链机制,建议将图片保存下来直接上传(img-zkhjrPQt-1690218425746)(C:\Users\kuxulei\AppData\Roaming\Typora\typora-user-images\image-20221111172404035.png)]
[外链图片转存失败,源站可能有防盗链机制,建议将图片保存下来直接上传(img-Km971aND-1690218425750)(C:\Users\kuxulei\AppData\Roaming\Typora\typora-user-images\image-20221129160822457.png)]
删除以下文件
[外链图片转存失败,源站可能有防盗链机制,建议将图片保存下来直接上传(img-KiTTBFXa-1690218425751)(C:\Users\kuxulei\AppData\Roaming\Typora\typora-user-images\image-20221129161136141.png)]
pom.xml
<?xml version="1.0" encoding="UTF-8"?>
<project xmlns="http://maven.apache.org/POM/4.0.0" xmlns:xsi="http://www.w3.org/2001/XMLSchema-instance"
         xsi:schemaLocation="http://maven.apache.org/POM/4.0.0 https://maven.apache.org/xsd/maven-4.0.0.xsd">
    <modelVersion>4.0.0</modelVersion>
    <!--父项目-->
    <parent>
        <groupId>org.springframework.boot</groupId>
        <artifactId>spring-boot-starter-parent</artifactId>
        <version>2.7.5</version>
        <relativePath/> <!-- lookup parent from repository -->
    </parent>
    <groupId>com.example</groupId>
    <artifactId>demo</artifactId>
    <version>0.0.1-SNAPSHOT</version>
    <name>demo</name>
    <description>Demo project for Spring Boot</description>
    <properties>
        <java.version>1.8</java.version>
    </properties>
    <dependencies>
        <!--web依赖:tomcat,dispatcherServlet-->
        <dependency>
            <groupId>org.springframework.boot</groupId>
            <artifactId>spring-boot-starter-web</artifactId>
        </dependency>
        <!--单元测试-->
        <!-- https://mvnrepository.com/artifact/org.springframework.boot/spring-boot-starter-test -->
        <dependency>
            <groupId>org.springframework.boot</groupId>
            <artifactId>spring-boot-starter-test</artifactId>
            <version>2.7.5</version>
            <scope>test</scope>
        </dependency>

        <!-- https://mvnrepository.com/artifact/org.junit.vintage/junit-vintage-engine -->
        <dependency>
            <groupId>org.junit.vintage</groupId>
            <artifactId>junit-vintage-engine</artifactId>
            <version>5.9.0-RC1</version>
            <scope>test</scope>
        </dependency>

    </dependencies>
    <!--打jar包插件-->
<build>
    <plugins>
        <plugin>
                <groupId>org.springframework.boot</groupId>
                <artifactId>spring-boot-maven-plugin</artifactId>
                <version>2.7.5</version>
        </plugin>
    </plugins>
</build>


</project>
编写一个http接口
1、在主程序的同级目录下,新建一个controller包,一定要在同级目录下,否则识别不到
2、在包中新建一个HelloController类
@RestController
public class HelloController {

    //接口: http://localhost:8080/hello
    @RequestMapping("/hello")
    public String hello(){
        //调用业务,接收前端的参数 如 8 vfcr5d4
        // .+参数
        return "hello world";

    }
}
更改端口号
application.properties里设置
#springboot核心配置文件
#更改项目的端口号
server.port=8081
pom.xml里加入打包插件
    <!--打jar包插件-->
<build>
    <plugins>
        <plugin>
                <groupId>org.springframework.boot</groupId>
                <artifactId>spring-boot-maven-plugin</artifactId>
                <version>2.7.5</version>
        </plugin>
    </plugins>
</build>
右边mvn里package打包
如果打包成功,则会在target目录下生成一个 jar 包
java -jar即可启动
改springbootbanner
resouces里新建banner.txt
//                          _ooOoo_                               //
//                         o8888888o                              //
//                         88" . "88                              //
//                         (| ^_^ |)                              //
//                         O\  =  /O                              //
//                      ____/`---'\____                           //
//                    .'  \\|     |//  `.                         //
//                   /  \\|||  :  |||//  \                        //
//                  /  _||||| -:- |||||-  \                       //
//                  |   | \\\  -  /// |   |                       //
//                  | \_|  ''\---/''  |   |                       //
//                  \  .-\__  `-`  ___/-. /                       //
//                ___`. .'  /--.--\  `. . ___                     //
//              ."" '<  `.___\_<|>_/___.'  >'"".                  //
//            | | :  `- \`.;`\ _ /`;.`/ - ` : | |                 //
//            \  \ `-.   \_ __\ /__ _/   .-` /  /                 //
//      ========`-.____`-.___\_____/___.-`____.-'========         //
//                           `=---='                              //
//      ^^^^^^^^^^^^^^^^^^^^^^^^^^^^^^^^^^^^^^^^^^^^^^^^^^        //
//            佛祖保佑       永不宕机     永无BUG                    //
2.原理初探
自动配置:
pom.xml
- spring-boot-dependencies:核心依赖在父工程中
启动器
		<dependency>
            <groupId>org.springframework.boot</groupId>
            <artifactId>spring-boot-starter</artifactId>
        </dependency>
- springboot的启动场景,会将所有功能场景变成启动器
- API在SpringBoot官网-springboot-Learn- Reference Doc.-Usingspringboot-strarters
主程序
//@SpringBootApplication:标注这个类是一个springboot的应用
@SpringBootApplication
public class DemoApplication {

    public static void main(String[] args) {
        //将SpringBoot应用启动
        SpringApplication.run(DemoApplication.class, args);
    }
}
-
注解
-
@SpringBootConfiguration:SpringBoot的配置
	@Configuration:spring配置类
	@Component:说明这也是一个spring的组件

@EnableAutoConfiguration:自动配置
	@AutoConfigurationPackage:自动配置包
		@Import({AutoConfigurationPackage.Registrar.class}):自动配置包注册
	@Import({AutoConfigurationImportSelector.class}):自动导入选择

//获取所有配置
List<String> configurations = this.getCandidateConfigurations(annotationMetadata, attributes);
获取候选的配置
-
protected List<String> getCandidateConfigurations(AnnotationMetadata metadata, AnnotationAttributes attributes) {
       List<String> configurations = new ArrayList(SpringFactoriesLoader.loadFactoryNames(this.getSpringFactoriesLoaderFactoryClass(), this.getBeanClassLoader()));
       ImportCandidates.load(AutoConfiguration.class, this.getBeanClassLoader()).forEach(configurations::add);
       Assert.notEmpty(configurations, "No auto configuration classes found in META-INF/spring.factories nor in META-INF/spring/org.springframework.boot.autoconfigure.AutoConfiguration.imports. If you are using a custom packaging, make sure that file is correct.");
       return configurations;
   }
META-INF/spring.factories:自动配置的核心文件
[外链图片转存失败,源站可能有防盗链机制,建议将图片保存下来直接上传(img-Oq3IwOK6-1690218425752)(C:\Users\kuxulei\AppData\Roaming\Typora\typora-user-images\image-20221129231612440.png)]
Properties properties = PropertiesLoaderUtils.loadProperties(resource);
所有的资源加载到配置类中
-
springboot所有自动配置都是在启动的时候扫描并加载:spring.factories所有自动配置类都在这里面,导入对应star即可自动装配成
-
Springboot启动时从类路径下/META-INF/spring.factories获取指定的值,进行自动装配
-
所有导入的组件以类名方式返回
-
autoConfigration文件即自动导入文件配置,@Configration
[外链图片转存失败,源站可能有防盗链机制,建议将图片保存下来直接上传(img-WNjKq5BQ-1690218425754)(C:\Users\kuxulei\AppData\Roaming\Typora\typora-user-images\image-20221130052618606.png)]
[外链图片转存失败,源站可能有防盗链机制,建议将图片保存下来直接上传(img-nRAwzIy6-1690218425755)(C:\Users\kuxulei\AppData\Roaming\Typora\typora-user-images\image-20221130052636927.png)]
[外链图片转存失败,源站可能有防盗链机制,建议将图片保存下来直接上传(img-BgUM0icn-1690218425756)(C:\Users\kuxulei\AppData\Roaming\Typora\typora-user-images\image-20221130052650899.png)]
关于SpringBoot,谈谈你的理解
-
自动装配
-
run()
1、推断应用的类型是普通的项目还是Web项目
2、推断并设置main方法的定义类,找到运行的主类
-

3.SpringBoot配置
-
application.properties
-
- 语法结构 :key=value
-
application.yml
-
-
语法结构 :key:空格 value
空格不能省略
-
对象、Map(键值对)
#对象、Map格式k: v1: v2:
在下一行来写对象的属性和值得关系,注意缩进;比如:
student:
  name: ku
  age: 3
行内写法
student: {name: ku, age: 3}
数组
#数组
pets:
  - cat
  - dog
  - pig
行内写法
pets:[cat, dog, pig]
yaml可以直接给实体类赋值
@Component     //可以被springboot扫描到
public class Dog {
    @Value("旺财") //赋值
    private String name;
测试方法,Springboot02ApplicationTests
@SpringBootTest
class Springboot02ApplicationTests {
    @Autowired
    private Dog dog;
    @Test
    void contextLoads() {
        System.out.println(dog);
    }
}
Person
@Component
@ConfigurationProperties(prefix = "person")//加注解,爆红加下面依赖
public class Person {
    @Value("旺财")
    private String name;
    @Value("3")
    private int age;
    private boolean happy;
    private Date birth;
    private Map<String, Object> maps;
    private List<Object> lists;
    private Dog dog;
pom.xml
   <dependency>
            <groupId>org.springframework.boot</groupId>
            <artifactId>spring-boot-configuration-processor</artifactId>
        <optional>true</optional>
        </dependency>
application.yaml
person:
  name: ku
  age: 3
  happy: false
  birth: 1996/11/02
  maps: {k1: v1, k2: v2}
  lists:
    - code
    - music
    - girl
  dog:
    name: 旺财
    age: 3
测试
@SpringBootTest
class Springboot02ApplicationTests {
    @Autowired
    private Person person;
    @Test
    void contextLoads() {
        System.out.println(person);
    }
}
properties绑定
resource下新建ku.properties
name=ku
Person类里加
@PropertySource(value = "classpath:ku.properties")
public class Person {
    @Value("${name}")
    private String name;
更推荐yaml格式
yaml可以设随机数
person:
  name: ku${random.int}
  age: 3
  happy: false
  birth: 1996/11/02
  maps: {k1: v1, k2: v2}
  lists:
    - code
    - music
    - girl
  dog:
    name: ${person.hello:hello}_旺财//没有定义person.hello的话,输出hello_旺财
    age: 3
[外链图片转存失败,源站可能有防盗链机制,建议将图片保存下来直接上传(img-ET1I8aLm-1690218425758)(C:\Users\kuxulei\AppData\Roaming\Typora\typora-user-images\image-20221201233554901.png)]
松散绑定:比如yml中写的last-name,这个和lastName是一样的, - 后面跟着的字母默认是大写的。这就是松散绑定
JSR303数据校验 , 这个就是我们可以在字段是增加一层过滤器验证 , 可以保证数据的合法性()
@Validated
//@PropertySource(value = "classpath:ku.properties")
public class Person {
//    @Value("${name}")
    private String name;
//    @Value("3")
@Email(message = "邮箱错了")
pom.xml
        <dependency>
            <groupId>org.springframework.boot</groupId>
            <artifactId>spring-boot-starter-validation</artifactId>
            <optional>true</optional>
        </dependency>
jsr303所有注解
常见参数

@NotNull(message="名字不能为空")
private String userName;
@Max(value=120,message="年龄最大不能查过120")
private int age;
@Email(message="邮箱格式错误")
private String email;

空检查
@Null       验证对象是否为null
@NotNull    验证对象是否不为null, 无法查检长度为0的字符串
@NotBlank   检查约束字符串是不是Null还有被Trim的长度是否大于0,只对字符串,且会去掉前后空格.
@NotEmpty   检查约束元素是否为NULL或者是EMPTY.

Booelan检查
@AssertTrue     验证 Boolean 对象是否为 true
@AssertFalse    验证 Boolean 对象是否为 false

长度检查
@Size(min=, max=) 验证对象(Array,Collection,Map,String)长度是否在给定的范围之内
@Length(min=, max=) string is between min and max included.

日期检查
@Past       验证 Date 和 Calendar 对象是否在当前时间之前
@Future     验证 Date 和 Calendar 对象是否在当前时间之后
@Pattern    验证 String 对象是否符合正则表达式的规则
4、复杂类型封装,yml中可以封装对象 , 使用value就不支持
4个可以写yaml文件的位置
[外链图片转存失败,源站可能有防盗链机制,建议将图片保存下来直接上传(img-Hd5IAmYv-1690218425759)(C:\Users\kuxulei\AppData\Roaming\Typora\typora-user-images\image-20221202000137490.png)]
多配置文件
我们在主配置文件编写的时候,文件名可以是 application-{profile}.properties/yml , 用来指定多个环境版本;
例如:
application-test.properties 代表测试环境配置
application-dev.properties 代表开发环境配置
默认使用application.properties主配置文件;
我们需要通过一个配置来选择需要激活的环境:
spring.profiles.active=dev
4.yaml的多文档块
和properties配置文件中一样,但是使用yml去实现不需要创建多个配置文件,更加方便了 !
server:
  port: 8081
#选择要激活那个环境块
spring:
  profiles:
    active: prod

---
server:
  port: 8083
spring:
  profiles: dev #配置环境的名称


---

server:
  port: 8084
spring:
  profiles: prod  #配置环境的名称
指定位置加载配置文件
java -jar spring-boot-config.jar --spring.config.location=F:/application.properties
5.自动配置原理
根据当前不同的条件判断,决定这个配置类是否生效!
**xxxxAutoConfigurartion:自动配置类;**给容器中添加组件
xxxxProperties:封装配置文件中相关属性;
在application.yaml启用 debug=true属性;来让控制台打印自动配置报告,可以知道哪些自动配置类生效
#开启springboot的调试类
debug=true
Positive matches:(自动配置类启用的:正匹配)
Negative matches:(没有启动,没有匹配成功的自动配置类:负匹配)
Unconditional classes: (没有条件的类)
6.SpringBootWeb开发
jar:webapp
自动配置
springboot都帮我们配了什么,能不能修改,能修改哪些,能不能扩展
**xxxxAutoConfigurartion:自动配置类;**给容器中添加组件
xxxxProperties:装配自定义的内容
要解决的问题:
- 导入静态资源
- 首页
- jsp,模板引擎,Thymeleaf
- 装配扩展springmvc
- 增删改查
- 拦截器
- 国际化
静态资源
测试项目,controller包下建class
@RestController
public class HelloController {
        @GetMapping("/hello")
        public String hello() {
            return "hello";
        }
}
        public void addResourceHandlers(ResourceHandlerRegistry registry) {
            if (!this.resourceProperties.isAddMappings()) {
                logger.debug("Default resource handling disabled");
            } else {
                this.addResourceHandler(registry, "/webjars/**", "classpath:/META-INF/resources/webjars/");
                this.addResourceHandler(registry, this.mvcProperties.getStaticPathPattern(), (registration) -> {
                    registration.addResourceLocations(this.resourceProperties.getStaticLocations());
                    if (this.servletContext != null) {
                        ServletContextResource resource = new ServletContextResource(this.servletContext, "/");
                        registration.addResourceLocations(new Resource[]{resource});
                    }

                });
            }
        }
去webjars官网https://www.webjars.org/找到jquery的maven导入
查看导入的jquery目录
http://localhost:8080/webjars/github-com-jquery-jquery/3.6.0/jquery.js去网站查看是否成功
以下四个目录存放的静态资源可以被我们识别,即js文件可以放入以下目录:
"classpath:/META-INF/resources/"
"classpath:/resources/"
"classpath:/static/"
"classpath:/public/"
建文件src/main/resources/public/1.js
访问:http://localhost:8080/1.js
优先级:resource>static>public
自定义静态资源路径
我们也可以自己通过配置文件来指定一下,哪些文件夹是需要我们放静态资源文件的,在application.properties中配置;
spring.resources.static-locations=classpath:/coding/,classpath:/kuang/
首页定制
index.html默认主页
图片重命名为favicon.ico,放在static文件夹下,设置图标,不行的话需要清浏览器图片缓存,application.properties里关默认图标
#关闭默认图标
spring.mvc.favicon.enabled=false
[外链图片转存失败,源站可能有防盗链机制,建议将图片保存下来直接上传(img-Fd6zEoMx-1690218425760)(C:\Users\kuxulei\AppData\Roaming\Typora\typora-user-images\image-20221202025342891.png)]
Thymeleaf模板引擎
引入,给大家三个网址:
Thymeleaf 官网:https://www.thymeleaf.org/
Thymeleaf 在Github 的主页:https://github.com/thymeleaf/thymeleaf
Spring官方文档:找到我们对应的版本
https://docs.spring.io/spring-boot/docs/2.2.5.RELEASE/reference/htmlsingle/#using-boot-starter
依赖
		<dependency>
			<groupId>org.thymeleaf</groupId>
			<artifactId>thymeleaf-spring5</artifactId>
		</dependency>
		<dependency>
			<groupId>org.thymeleaf.extras</groupId>
			<artifactId>thymeleaf-extras-java8time</artifactId>
		</dependency>
双击shit搜ThymeleafProperties源码
@ConfigurationProperties(
    prefix = "spring.thymeleaf"
)
public class ThymeleafProperties {
    private static final Charset DEFAULT_ENCODING;
    public static final String DEFAULT_PREFIX = "classpath:/templates/";
    public static final String DEFAULT_SUFFIX = ".html";
    private boolean checkTemplate = true;
    private boolean checkTemplateLocation = true;
    private String prefix = "classpath:/templates/";
    private String suffix = ".html";
    private String mode = "HTML";
    private Charset encoding;
把我们的html页面放在类路径下的templates下,thymeleaf就可以帮我们自动渲染了。
测试
templates下所有页面只能通过controller来跳转
1、编写一个TestController
@Controller
public class TestController {

    @RequestMapping("/t1")
    public String test1(){
        //classpath:/templates/test.html
        return "test";
    }

}
2、编写一个测试页面 test.html 放在 templates 目录下
<!DOCTYPE html>
<html lang="en">
<head>
    <meta charset="UTF-8">
    <title>Title</title>
</head>
<body>
<h1>测试页面</h1>

</body>
</html>
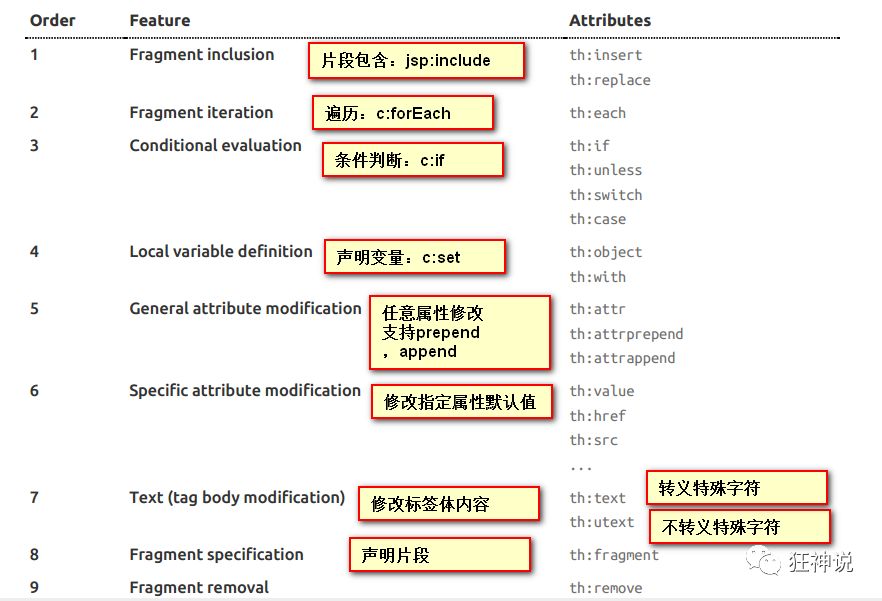
Thymeleaf 语法学习
向html导约束
<html xmlns:th="http://www.thymeleaf.org"
前端页面
<!DOCTYPE html>
<html lang="en" xmlns:th="http://www.thymeleaf.org">
<head>
    <meta charset="UTF-8">
    <title>Title</title>
</head>
<body>
<div th:text="${msg}"></div>
</body>
</html>
controller
@Controller
public class HelloController {
        @RequestMapping("/test")
            public Object test(Model model){
            model.addAttribute("msg","hello world");
            return model;
        }
}
例数组
model.addAttribute("users", Arrays.asList("ku","kk"));
html
<h3 th:each="user:${users}" th:text="${user}"></h3>
或者<h3 th:each="user:${users}" >[[${user}]]</h3>
语法
Simple expressions:(表达式语法)
Variable Expressions: ${...}:获取变量值;OGNL;
    1)、获取对象的属性、调用方法
    2)、使用内置的基本对象:#18
         #ctx : the context object.
         #vars: the context variables.
         #locale : the context locale.
         #request : (only in Web Contexts) the HttpServletRequest object.
         #response : (only in Web Contexts) the HttpServletResponse object.
         #session : (only in Web Contexts) the HttpSession object.
         #servletContext : (only in Web Contexts) the ServletContext object.

    3)、内置的一些工具对象:
      #execInfo : information about the template being processed.
      #uris : methods for escaping parts of URLs/URIs
      #conversions : methods for executing the configured conversion service (if any).
      #dates : methods for java.util.Date objects: formatting, component extraction, etc.
      #calendars : analogous to #dates , but for java.util.Calendar objects.
      #numbers : methods for formatting numeric objects.
      #strings : methods for String objects: contains, startsWith, prepending/appending, etc.
      #objects : methods for objects in general.
      #bools : methods for boolean evaluation.
      #arrays : methods for arrays.
      #lists : methods for lists.
      #sets : methods for sets.
      #maps : methods for maps.
      #aggregates : methods for creating aggregates on arrays or collections.
==================================================================================

  Selection Variable Expressions: *{...}:选择表达式:和${}在功能上是一样;
  Message Expressions: #{...}:获取国际化内容
  Link URL Expressions: @{...}:定义URL;
  Fragment Expressions: ~{...}:片段引用表达式

Literals(字面量)
      Text literals: 'one text' , 'Another one!' ,…
      Number literals: 0 , 34 , 3.0 , 12.3 ,…
      Boolean literals: true , false
      Null literal: null
      Literal tokens: one , sometext , main ,…

Text operations:(文本操作)
    String concatenation: +
    Literal substitutions: |The name is ${name}|

Arithmetic operations:(数学运算)
    Binary operators: + , - , * , / , %
    Minus sign (unary operator): -

Boolean operations:(布尔运算)
    Binary operators: and , or
    Boolean negation (unary operator): ! , not

Comparisons and equality:(比较运算)
    Comparators: > , < , >= , <= ( gt , lt , ge , le )
    Equality operators: == , != ( eq , ne )

Conditional operators:条件运算(三元运算符)
    If-then: (if) ? (then)
    If-then-else: (if) ? (then) : (else)
    Default: (value) ?: (defaultvalue)

Special tokens:
    No-Operation: _
装配扩展SPringMVC(可再看)
文档地址 :https://docs.spring.io/spring-boot/docs/2.2.5.RELEASE/reference/htmlsingle/#boot-features-spring-mvc-auto-configuration
自定义MVC
//扩展MVC
    @Configuration
public class MyMvcConfig implements WebMvcConfigurer {

        @Bean
        public ViewResolver viewResolver() {
            return new MyViewResolve();
        }
    //ViewRes
    public static class MyViewResolve implements ViewResolver{
        @Override
        public View resolveViewName(String viewName, Locale locale)throws Exception {
            return null;
        }

    }

}
Spring MVC Auto-configuration
// Spring Boot为Spring MVC提供了自动配置,它可以很好地与大多数应用程序一起工作。
Spring Boot provides auto-configuration for Spring MVC that works well with most applications.
// 自动配置在Spring默认设置的基础上添加了以下功能:
The auto-configuration adds the following features on top of Spring’s defaults:
// 包含视图解析器
Inclusion of ContentNegotiatingViewResolver and BeanNameViewResolver beans.
// 支持静态资源文件夹的路径,以及webjars
Support for serving static resources, including support for WebJars
// 自动注册了Converter:
// 转换器,这就是我们网页提交数据到后台自动封装成为对象的东西,比如把"1"字符串自动转换为int类型
// Formatter:【格式化器,比如页面给我们了一个2019-8-10,它会给我们自动格式化为Date对象】
Automatic registration of Converter, GenericConverter, and Formatter beans.
// HttpMessageConverters
// SpringMVC用来转换Http请求和响应的的,比如我们要把一个User对象转换为JSON字符串,可以去看官网文档解释;
Support for HttpMessageConverters (covered later in this document).
// 定义错误代码生成规则的
Automatic registration of MessageCodesResolver (covered later in this document).
// 首页定制
Static index.html support.
// 图标定制
Custom Favicon support (covered later in this document).
// 初始化数据绑定器:帮我们把请求数据绑定到JavaBean中!
Automatic use of a ConfigurableWebBindingInitializer bean (covered later in this document).

/*
如果您希望保留Spring Boot MVC功能,并且希望添加其他MVC配置(拦截器、格式化程序、视图控制器和其他功能),则可以添加自己
的@configuration类,类型为webmvcconfiguer,但不添加@EnableWebMvc。如果希望提供
RequestMappingHandlerMapping、RequestMappingHandlerAdapter或ExceptionHandlerExceptionResolver的自定义
实例,则可以声明WebMVCregistrationAdapter实例来提供此类组件。
*/
If you want to keep Spring Boot MVC features and you want to add additional MVC configuration
(interceptors, formatters, view controllers, and other features), you can add your own
@Configuration class of type WebMvcConfigurer but without @EnableWebMvc. If you wish to provide
custom instances of RequestMappingHandlerMapping, RequestMappingHandlerAdapter, or
ExceptionHandlerExceptionResolver, you can declare a WebMvcRegistrationsAdapter instance to provide such components.

// 如果您想完全控制Spring MVC,可以添加自己的@Configuration,并用@EnableWebMvc进行注释。
If you want to take complete control of Spring MVC, you can add your own @Configuration annotated with @EnableWebMvc.
ContentNegotiatingViewResolver 内容协商视图解析器
找到 WebMvcAutoConfiguration , 然后搜索ContentNegotiatingViewResolver。找到如下方法!
@Bean
@ConditionalOnBean(ViewResolver.class)
@ConditionalOnMissingBean(name = "viewResolver", value = ContentNegotiatingViewResolver.class)
public ContentNegotiatingViewResolver viewResolver(BeanFactory beanFactory) {
    ContentNegotiatingViewResolver resolver = new ContentNegotiatingViewResolver();
    resolver.setContentNegotiationManager(beanFactory.getBean(ContentNegotiationManager.class));
    // ContentNegotiatingViewResolver使用所有其他视图解析器来定位视图,因此它应该具有较高的优先级
    resolver.setOrder(Ordered.HIGHEST_PRECEDENCE);
    return resolver;
}
找到对应的解析视图的代码;
@Nullable // 注解说明:@Nullable 即参数可为null
public View resolveViewName(String viewName, Locale locale) throws Exception {
    RequestAttributes attrs = RequestContextHolder.getRequestAttributes();
    Assert.state(attrs instanceof ServletRequestAttributes, "No current ServletRequestAttributes");
    List<MediaType> requestedMediaTypes = this.getMediaTypes(((ServletRequestAttributes)attrs).getRequest());
    if (requestedMediaTypes != null) {
        // 获取候选的视图对象
        List<View> candidateViews = this.getCandidateViews(viewName, locale, requestedMediaTypes);
        // 选择一个最适合的视图对象,然后把这个对象返回
        View bestView = this.getBestView(candidateViews, requestedMediaTypes, attrs);
        if (bestView != null) {
            return bestView;
        }
    }
    // .....
getCandidateViews中看到他是把所有的视图解析器拿来,进行while循环,挨个解析!

Iterator var5 = this.viewResolvers.iterator();
得出结论:ContentNegotiatingViewResolver 这个视图解析器就是用来组合所有的视图解析器的
protected void initServletContext(ServletContext servletContext) {
    // 这里它是从beanFactory工具中获取容器中的所有视图解析器
    // ViewRescolver.class 把所有的视图解析器来组合的
    Collection<ViewResolver> matchingBeans = BeanFactoryUtils.beansOfTypeIncludingAncestors(this.obtainApplicationContext(), ViewResolver.class).values();
    ViewResolver viewResolver;
    if (this.viewResolvers == null) {
        this.viewResolvers = new ArrayList(matchingBeans.size());
    }
    // ...............
}
可以自己给容器中去添加一个视图解析器;这个类就会帮我们自动的将它组合进来;
@Bean //放到bean中
public ViewResolver myViewResolver(){
    return new MyViewResolver();
}

//我们写一个静态内部类,视图解析器就需要实现ViewResolver接口
private static class MyViewResolver implements ViewResolver{
    @Override
    public View resolveViewName(String s, Locale locale) throws Exception {
        return null;
    }
}
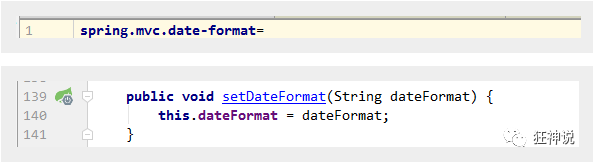
转换器和格式化器
找到格式化转换器
@Bean
@Override
public FormattingConversionService mvcConversionService() {
    // 拿到配置文件中的格式化规则
    WebConversionService conversionService =
        new WebConversionService(this.mvcProperties.getDateFormat());
    addFormatters(conversionService);
    return conversionService;
}
点击去:
public String getDateFormat() {
    return this.dateFormat;
}

/**
* Date format to use. For instance, `dd/MM/yyyy`. 默认的
 */
private String dateFormat;
如果配置了自己的格式化方式,就会注册到Bean中生效,我们可以在配置文件中配置日期格式化的规则
修改SpringBoot的默认配置
扩展使用SpringMVC 官方文档如下:
If you want to keep Spring Boot MVC features and you want to add additional MVC configuration (interceptors, formatters, view controllers, and other features), you can add your own @Configuration class of type WebMvcConfigurer but without @EnableWebMvc. If you wish to provide custom instances of RequestMappingHandlerMapping, RequestMappingHandlerAdapter, or ExceptionHandlerExceptionResolver, you can declare a WebMvcRegistrationsAdapter instance to provide such components
我们要做的就是编写一个@Configuration注解类,并且类型要为WebMvcConfigurer,还不能标注@EnableWebMvc注解;我们去自己写一个;我们新建一个包叫config,写一个类MyMvcConfig;
//应为类型要求为WebMvcConfigurer,所以我们实现其接口
//可以使用自定义类扩展MVC的功能
@Configuration
public class MyMvcConfig implements WebMvcConfigurer {

    @Override
    public void addViewControllers(ViewControllerRegistry registry) {
        // 浏览器发送/test , 就会跳转到test页面;
        registry.addViewController("/test").setViewName("test");
    }
}
我们去浏览器访问一下:http://localhost:8080/test
我们可以去分析一下原理:
1、WebMvcAutoConfiguration 是 SpringMVC的自动配置类,里面有一个类WebMvcAutoConfigurationAdapter
2、这个类上有一个注解,在做其他自动配置时会导入:@Import(EnableWebMvcConfiguration.class)
3、我们点进EnableWebMvcConfiguration这个类看一下,它继承了一个父类:DelegatingWebMvcConfiguration
public class DelegatingWebMvcConfiguration extends WebMvcConfigurationSupport {
    private final WebMvcConfigurerComposite configurers = new WebMvcConfigurerComposite();

  // 从容器中获取所有的webmvcConfigurer
    @Autowired(required = false)
    public void setConfigurers(List<WebMvcConfigurer> configurers) {
        if (!CollectionUtils.isEmpty(configurers)) {
            this.configurers.addWebMvcConfigurers(configurers);
        }
    }
}
protected void addViewControllers(ViewControllerRegistry registry) {
    this.configurers.addViewControllers(registry);
}
public void addViewControllers(ViewControllerRegistry registry) {
    Iterator var2 = this.delegates.iterator();

    while(var2.hasNext()) {
        // 将所有的WebMvcConfigurer相关配置来一起调用!包括我们自己配置的和Spring给我们配置的
        WebMvcConfigurer delegate = (WebMvcConfigurer)var2.next();
        delegate.addViewControllers(registry);
    }

}
所以得出结论:所有的WebMvcConfiguration都会被作用,不止Spring自己的配置类,我们自己的配置类当然也会被调用;
全面接管SpringMVC
官方文档:
If you want to take complete control of Spring MVC
you can add your own @Configuration annotated with @EnableWebMvc.
只需在我们的配置类中要加一个@EnableWebMvc。开发中,不推荐使用全面接管SpringMVC
看下源码:
@Import({DelegatingWebMvcConfiguration.class})
public @interface EnableWebMvc {
}
它继承了一个父类 WebMvcConfigurationSupport
public class DelegatingWebMvcConfiguration extends WebMvcConfigurationSupport {
  // ......
}
回顾一下Webmvc自动配置类

@Configuration(proxyBeanMethods = false)
@ConditionalOnWebApplication(type = Type.SERVLET)
@ConditionalOnClass({ Servlet.class, DispatcherServlet.class, WebMvcConfigurer.class })
// 这个注解的意思就是:容器中没有这个组件的时候,这个自动配置类才生效
@ConditionalOnMissingBean(WebMvcConfigurationSupport.class)
@AutoConfigureOrder(Ordered.HIGHEST_PRECEDENCE + 10)
@AutoConfigureAfter({ DispatcherServletAutoConfiguration.class, TaskExecutionAutoConfiguration.class,
    ValidationAutoConfiguration.class })
public class WebMvcAutoConfiguration {

}
总结一句话:@EnableWebMvc将WebMvcConfigurationSupport组件导入进来了;
而导入的WebMvcConfigurationSupport只是SpringMVC最基本的功能!
xxx Configuration可以帮助我们扩展配置
7.项目
首页实现
所有静态页面由thymeleaf接管,@{}
404等文件导入tmplates
[外链图片转存失败,源站可能有防盗链机制,建议将图片保存下来直接上传(img-mErHQgRi-1690218425763)(C:\Users\kuxulei\AppData\Roaming\Typora\typora-user-images\image-20221206182058336.png)]
css等文件导入static
[外链图片转存失败,源站可能有防盗链机制,建议将图片保存下来直接上传(img-0YzxClLj-1690218425763)(C:\Users\kuxulei\AppData\Roaming\Typora\typora-user-images\image-20221206182130227.png)]
伪造数据库
创建pojo下Department部门表
@Data
@AllArgsConstructor
@NoArgsConstructor
public class Department {
    private Integer id;
    private String departmentName;
}
Data报错导入lombok
        <dependency>
            <groupId>org.projectlombok</groupId>
            <artifactId>lombok</artifactId>
        </dependency>
创建pojo下employee员工表
//员工表
    @Data
//    @AllArgsConstructor //有参构造
    @NoArgsConstructor  //无参构造
public class Employee {
    private Integer id;
    private String lastname;
    private String email;
    private Integer gender;// 0:女,1:男
    private Department department;

    private Date birth;

    public Employee(Integer id, String lastname, String email, Integer gender, Department department) {
        this.id = id;
        this.lastname = lastname;
        this.email = email;
        this.gender = gender;
        this.department = department;
        //默认创建日期
        this.birth = new Date();
    }
}
创建dao下DepartmentDao
import java.util.Collection;
import java.util.HashMap;
import java.util.Map;

/**
 * @author kxl
 * @date 2022年12月6日 - 下午 04:58:58
 */
//部门表
@Repository
public class DepartmentDao {
    //模拟数据库中的数据
    private static Map<Integer, Department> departments = null;
    static {
        departments =new HashMap<Integer, Department>();//创建一个部门表
        departments.put(101, new Department(101, "教学部"));
        departments.put(102, new Department(102, "市场部"));
        departments.put(103, new Department(103, "教研部"));
        departments.put(104, new Department(104, "运营部"));
        departments.put(105, new Department(105, "后勤部"));
    }
    //获得所有部门信息
    public Collection<Department> getDepartments() {
        return departments.values();
    }
    //通过id得到部门
    public Department getDepartmentById(Integer id) {
        return departments.get(id);
    }
}
创建dao下EmployeeDao
import com.ku.springboot03web.pojo.Department;
import com.ku.springboot03web.pojo.Employee;
import org.springframework.beans.factory.annotation.Autowired;
import org.springframework.stereotype.Repository;

import java.util.Collection;
import java.util.HashMap;
import java.util.Map;

/**
 * @author kxl
 * @date 2022年12月6日 - 下午 05:06:50
 */
//员工Dao
    @Repository//托管
public class EmployeeDao {
    //模拟数据库中的数据
    private static Map<Integer, Employee> employees=null;
    @Autowired
    private DepartmentDao departmentDao;

    static {
        employees =new HashMap<Integer,Employee>();
        employees.put(1001,new Employee(1001,"AA","a246789356@qq.com",0,new Department(101,"教学部")));
        employees.put(1002,new Employee(1002,"BB","b246789356@qq.com",1,new Department(102,"市场部")));
        employees.put(1003,new Employee(1003,"CC","c246789356@qq.com",0,new Department(103,"教研部")));
        employees.put(1004,new Employee(1004,"DD","d246789356@qq.com",1,new Department(104,"运营部")));
        employees.put(1005,new Employee(1005,"EE","e246789356@qq.com",0,new Department(105,"后勤部")));
    }
    //主键自增
    private static Integer initid =1006;
    //增加一个员工
    public void save(Employee employee){
        if(employee.getId() == null) {
            employee.setId((initid++));
        }
        employee.setDepartment(departmentDao.getDepartmentById(employee.getDepartment().getId()));

        employees.put(employee.getId(),employee);
    }

    //查询全部员工信息
    public Collection<Employee> getAll(){
        return employees.values();
    }
    //通过id查询员工
    public  Employee getEmployeeById(Integer id){
        return employees.get(id);
    }

    //删除员工通过id
    public void delete(Integer id){
        employees.remove(id);
    }
}
controller下IndexController或者下面
@Controller
public class IndexController {
    @RequestMapping(value = {"/","/index.html"})
    public String index(){
        return "index";
    }
}
config下MyMvcConfig
@Configuration
public class MyMvcConfig implements WebMvcConfigurer {
    @Override
    public void addViewControllers(ViewControllerRegistry registry) {
        registry.addViewController("/").setViewName("index");
        registry.addViewController("/index.html").setViewName("index");
    }
}
修改tmp里的超链接加入
xmlns:th="http://www.thymeleaf.org"
超链接改为
link th:href="@{/css/bootstrap.min.css}"图片也要改
th:src="@{/img/bootstrap-solid.svg}
设置虚拟目录application.properties里,安装Spring Assistant插件会有提示
server.servlet.context-path=/ku
改后可以访问http://localhost:8080/ku/
页面国际化
设置文件编码为utf-8
[外链图片转存失败,源站可能有防盗链机制,建议将图片保存下来直接上传(img-6pvL3Zhs-1690218425765)(C:\Users\kuxulei\AppData\Roaming\Typora\typora-user-images\image-20221206185933720.png)]
resources下新建目录i18n(国际化缩写,i,18个字母,n和k8s类同)建文件login.properties和login_zh_CN.properties中文,新建en_US
[外链图片转存失败,源站可能有防盗链机制,建议将图片保存下来直接上传(img-i2LPwXos-1690218425765)(C:\Users\kuxulei\AppData\Roaming\Typora\typora-user-images\image-20221206190432105.png)]
[外链图片转存失败,源站可能有防盗链机制,建议将图片保存下来直接上传(img-PBA2ZjN6-1690218425766)(C:\Users\kuxulei\AppData\Roaming\Typora\typora-user-images\image-20221206190501106.png)]
[外链图片转存失败,源站可能有防盗链机制,建议将图片保存下来直接上传(img-FO3IdzE7-1690218425766)(C:\Users\kuxulei\AppData\Roaming\Typora\typora-user-images\image-20221206190720718.png)]
可视化配置
[外链图片转存失败,源站可能有防盗链机制,建议将图片保存下来直接上传(img-vyeXaAtU-1690218425767)(C:\Users\kuxulei\AppData\Roaming\Typora\typora-user-images\image-20221206191210903.png)]
login.btn=登录
login.password=密码
login.remember=记住我
login.tip=请登录
login.username=用户名

login.btn=Sign in
login.password=password
login.remember=Remember me
login.tip=Please sign in
login.username=UserName
默认,英中
SpringBoot对国际化的自动配置MessageSourceAutoConfiguration,
ResourceBundleMessageSource;

// 获取 properties 传递过来的值进行判断
@Bean
public MessageSource messageSource(MessageSourceProperties properties) {
    ResourceBundleMessageSource messageSource = new ResourceBundleMessageSource();
    if (StringUtils.hasText(properties.getBasename())) {
        // 设置国际化文件的基础名(去掉语言国家代码的)
        messageSource.setBasenames(
            StringUtils.commaDelimitedListToStringArray(
                                       StringUtils.trimAllWhitespace(properties.getBasename())));
    }
    if (properties.getEncoding() != null) {
        messageSource.setDefaultEncoding(properties.getEncoding().name());
    }
    messageSource.setFallbackToSystemLocale(properties.isFallbackToSystemLocale());
    Duration cacheDuration = properties.getCacheDuration();
    if (cacheDuration != null) {
        messageSource.setCacheMillis(cacheDuration.toMillis());
    }
    messageSource.setAlwaysUseMessageFormat(properties.isAlwaysUseMessageFormat());
    messageSource.setUseCodeAsDefaultMessage(properties.isUseCodeAsDefaultMessage());
    return messageSource;
}
设置application.properties
spring.messages.basename=i18n.login
用户名和密码
<h1 class="h3 mb-3 font-weight-normal" th:text="#{login.tip}">Please sign in</h1>
th:placeholder="#{login.password}"
按钮
th:text="#{login.btn}
记住我
<input type="checkbox" value="remember-me" > [[#{login.remember}]]
Spring中有一个国际化的Locale (区域信息对象);里面有一个叫做LocaleResolver (获取区域信息对象)的解析器
@Bean
@ConditionalOnMissingBean
@ConditionalOnProperty(prefix = "spring.mvc", name = "locale")
public LocaleResolver localeResolver() {
    // 容器中没有就自己配,有的话就用用户配置的
    if (this.mvcProperties.getLocaleResolver() == WebMvcProperties.LocaleResolver.FIXED) {
        return new FixedLocaleResolver(this.mvcProperties.getLocale());
    }
    // 接收头国际化分解
    AcceptHeaderLocaleResolver localeResolver = new AcceptHeaderLocaleResolver();
    localeResolver.setDefaultLocale(this.mvcProperties.getLocale());
    return localeResolver;
}
AcceptHeaderLocaleResolver 这个类中有一个方法
public Locale resolveLocale(HttpServletRequest request) {
    Locale defaultLocale = this.getDefaultLocale();
    // 默认的就是根据请求头带来的区域信息获取Locale进行国际化
    if (defaultLocale != null && request.getHeader("Accept-Language") == null) {
        return defaultLocale;
    } else {
        Locale requestLocale = request.getLocale();
        List<Locale> supportedLocales = this.getSupportedLocales();
        if (!supportedLocales.isEmpty() && !supportedLocales.contains(requestLocale)) {
            Locale supportedLocale = this.findSupportedLocale(request, supportedLocales);
            if (supportedLocale != null) {
                return supportedLocale;
            } else {
                return defaultLocale != null ? defaultLocale : requestLocale;
            }
        } else {
            return requestLocale;
        }
    }
}
修改一下前端页面的跳转连接:

<!-- 这里传入参数不需要使用 ?使用 (key=value)-->
<a class="btn btn-sm" th:href="@{/index.html(l='zh_CN')}">中文</a>
<a class="btn btn-sm" th:href="@{/index.html(l='en_US')}">English<
MyMvcConfig里加
@Bean
    public LocaleResolver localeResolver(){
        return new LocaleResolver() {
            @Override
            public Locale resolveLocale(HttpServletRequest request) {
                //获取请求中的语言参数
                String language = request.getParameter("l");
                Locale locale = Locale.getDefault();//如果没有就使用默认的
                System.out.println("debug: " + language);
                if (!StringUtils.isEmpty(language)) {
                    //zh_CN
                    String[] split = language.split("_");
                    locale = new Locale(split[0], split[1]);
                }
                return locale;
            }
            //自定义的国际化
            @Override
            public void setLocale(HttpServletRequest request, HttpServletResponse response,Locale locale) {}
        };
        };
- 配置i18n
- 配置组件LocalResolver配置到Bean中
登录界面实现
修改index
<form class="form-signin" th:action="@{/user/login}">
<input type="text" name="username"
			<!--@thymesVar id="msg" type="String"-->
			<p th:text="${msg}" th:if="${not #strings.isEmpty(msg)}"></p>
新建LoginController
@Controller
public class LoginController {
    @RequestMapping("/user/login")
//    @ResponseBody
// requestparam后括号的字母拷贝Index里的name值
    public String login(@RequestParam("username") String username,
                        @RequestParam("password") String password,
                        Model model) {
        //具体业务
        if (!StringUtils.isEmpty(username) && "123456".equals(password)){
         //   return "dashboard";
            return "redirect:/main.html";
        }else {
            //告诉用户登录失败
            model.addAttribute("msg","用户名或密码错误,请重新输入");
            return "index";
        }
    }
}
MyMvcConfig里
registry.addViewController("/main.html").setViewName("dashboard");
登录拦截器
config下新建类LoginHandlerInterceptor
public class LoginHandlerInterceptor implements HandlerInterceptor {
    @Override
    public boolean preHandle(HttpServletRequest request, HttpServletResponse  response, Object handler) throws Exception{
        //登录成功后,应该有用户的session,
        Object loginUser=request.getSession().getAttribute("loginUser");
        if (loginUser==null){
            request.setAttribute("msg", "没有权限,请先登录");
            request.getRequestDispatcher("/index.html").forward(request,response);
            return false;
        }else
        { return true;}

    }
}
LoginController下
        if (!StringUtils.isEmpty(username) && "123456".equals(password)){
             session.setAttribute("loginUser",username);
         //   return "dashboard";
            return "redirect:/main.html";
MyMvcConfig里加
    @Override
    public void addInterceptors(InterceptorRegistry registry){
        registry.addInterceptor(new LoginHandlerInterceptor())
                .addPathPatterns("/**")
                .excludePathPatterns("/index.html","/","/user/login","/css/*","js/**","/img/**");//图片等资源不阻拦

    }
更改登录名字,dashboard.html里改公司那
th:text="${session.loginUser}"
展示员工列表
dashboard里搜索customers,改成员工管理
controller下新建EmployeeController
@Controller
public class EmployeeController {
    @Autowired
    EmployeeDao employeeDao;
@RequestMapping("/emps")
    public String list(Model model) {
        Collection<Employee> employees=employeeDao.getAll();
        model.addAttribute("emps",employees);
        return "emp/list";
    }
}
把list.html移到emp文件夹下
修改员工管理上的标签
<a class="nav-link" th:href="@{/emps}">
修改list里的员工管理
							<li class="nav-item">
								<a class="nav-link" th:href="@{/emps}">
									员工管理
								</a>
							</li>
修改dashboard侧边栏
				<!--侧边栏-->
				<nav class="col-md-2 d-none d-md-block bg-light sidebar" th:fragment="sidebar">
将dashboard侧边栏插入list里
		<div class="container-fluid">
			<div class="row">
				<div th:insert="~{dashboard::sidebar}"></div>
同理修改导航栏
dashboard里
<nav class="navbar navbar-dark sticky-top bg-dark flex-md-nowrap p-0" th:fragment="topbar">
list里
<div th:insert="~{dashboard::topbar}"></div>
抽取dashboard里的导航栏和侧边栏放在commons文件夹下得common.html
<nav class="navbar navbar-dark sticky-top bg-dark flex-md-nowrap p-0" th:fragment="topbar">
    <a class="navbar-brand col-sm-3 col-md-2 mr-0" href="http://getbootstrap.com/docs/4.0/examples/dashboard/#" th:text="${session.loginUser}">Company name</a>
    <input class="form-control form-control-dark w-100" type="text" placeholder="Search" aria-label="Search">
    <ul class="navbar-nav px-3">
        <li class="nav-item text-nowrap">
            <a class="nav-link" href="http://getbootstrap.com/docs/4.0/examples/dashboard/#">注销</a>
        </li>
    </ul>
</nav>
<!--侧边栏-->
<nav class="col-md-2 d-none d-md-block bg-light sidebar" th:fragment="sidebar">
</nav>
修改dashboard.html
<div th:replace="~{commons/commons::topbar}"></div>

		<div class="container-fluid">
			<div class="row">
				<!--侧边栏-->
				<div th:replace="~{commons/commons::sidebar}"></div>
设置高亮
dashboard
<div th:replace="~{commons/commons::sidebar(active='list.html')}"
commons.html
首页
 <a th:class="${active=='main.html'?'nav-link active':'nav-link'}
员工管理
<a th:class="${active=='list.html'?'nav-link active':'nav-link'}"
list.html
<div th:replace="~{commons/commons::sidebar(active='list.html')}"
展示数据

修改list.html
<thead>
								<tr>
									<th>id</th>
									<th>lastname</th>
									<th>email</th>
									<th>gender</th>
									<th>department</th>
                                    <th>birth</th>
								</tr>
							</thead>
<tbody>
<tr th:each="emp:${emps}">
	<td th:text="${emp.getId()}"></td>
	<td>[[${emp.getLastName}]]</td>
	<td th:text="${emp.getEmail()}"></td>
	<td th:text="${emp.getGender()}"></td>
	<td th:text="${emp.department.getDepartmentName()}"></td>
	<td th:text="${emp.getBirth()}"></td>
</tr>
list.html增加编辑和删除
	<td th:text="${emp.getBirth()}"></td>
	<td>
		<button class="btn btn-sm btn-primary">编辑</button>//primary·主颜色
		<button class="btn btn-sm btn-danger">删除</button> //danger红色
	</td>
list.html改男女和时间
	<td th:text="${emp.getGender()==0?'女':'男'}"></td>
	<td th:text="${emp.department.getDepartmentName()}"></td>
	<td th:text="${#dates.format(emp.getBirth(),'yyyy-mm-dd hh:mm:ss')}"></td>
- 提取公共页面
- 列表循环展示
添加员工
- 增加按钮
- 增加前端页面
- 后端写跳页面逻辑和返回前端需要的值
- 修改from里的action,然后写成功后的重定向
-
按钮提交,测试
-
<h2><a class="btn btn-sm btn-success" th:href="@{/emp}" >添加员工</a></h2> //list里修改btn-success绿色
-
-
跳转到添加页面
复制List修改main,增加add.html
				<main role="main" class="col-md-9 ml-sm-auto col-lg-10 pt-3 px-4">
					<form th:action="@{/emp}" method="post">
						<div class="form-group">
							<label>LastName</label>
							<input type="text" name="lastName" class="form-control" placeholder="kuangshen">
						</div>
						<div class="form-group">
							<label>Email</label>
							<input type="email" name="email" class="form-control" placeholder="24736743@qq. com">
						</div>
						<div class="form-group">
							<label>Gender</label><br/>
							<div class="form-check form-check-inline">
								<input class="form-check-input" type="radio" name="gender" value="1">
								<label class="form-check-label">男</label>
							</div>
							<div class="form-check form-check-inline">
								<input class="form-check-input" type="radio" name="gender" value="0">
								<label class="form-check-label">女</label>
							</div></div>
						<div class="form-group">
							<label>department</label>
							<select class="form-control" name="department.id">
								<option th:each="dept:${departments}" th:text="${dept.getDepartmentName() }" th:value="${dept.getId()}"></option>
</select>
						</div>
						<div class="form-group">
							<label>Birth</label>
							<input type="text" name="birth" class="form-control" placeholder="kuangstudy"/>


						</div>
						<button type="submit" class="btn btn-primary">添加</button>
					</form>
				</main>
后端写跳页面逻辑,EmployeeController,先只写return试跳否
@Autowired DepartmentDao departmentDao; @GetMapping("/emp") public String toAddpage(Model model) { //查出所有部门信息 Collection<Department> departments = departmentDao.getDepartments(); model.addAttribute("departments",departments); //soutdepartments return "emp/add"; } -
添加员工成功
表单用post提交,保存信息
    @PostMapping("/emp")
    public String addEmp(Employee employee) {
        //查出所有部门信息
        //添加的操作
        employeeDao.save(employee);//保存员工信息
        return "redirect:/emps";
    }
自定义日期格式
#自定义的配置日期格式化 #spring.mvc.data-format=yyyy-MM-dd -
返回首页
修改员工
list.h
<a class="btn btn-sm btn-primary" th:href="@{/emp/}+${emp.getId()}">编辑</a>
复制add,EmployeeController
    public String toUpdateEmp() {
    return  "emp/update";
    }
修改update.html
	<input th:value="${emp.getLastName()}" type="text" name="lastName" class="form-control" placeholder="kuangshen">
	<input th:value="${emp.getEmail()}"
	<input th:checked="${emp.getGender()==1}"
	<input th:checked="${emp.getGender()==0}"
								<select class="form-control" name="department.id">
								<option th:selected="${dept.getId()==emp.getDepartment().getId()}" th:each="dept:$
							{departments}" th:text="${dept.getDepartmentName() }" th:value="${dept.getId()}"></option>
</select>
<input th:value="${#dates.format(emp.getBirth(),'yyyy/MM/dd')}"
					<form th:action="@{/updateEmp}" method="post">
										<input type="hidden" name="id" th:value="${emp.getId()}">
EmployeeController
    //去员工的修改页面
    @GetMapping("/emp/{id}")
    public String toUpdateEmp(@PathVariable("id") Integer id,Model model) {
    //查出原来的数据
      Employee employee = employeeDao.getEmployeeById(id);
      model.addAttribute("emp",employee);
        //查出所有部门信息
        Collection<Department> departments = departmentDao.getDepartments();
        model.addAttribute("departments",departments);
    return  "emp/update";
    }
保存信息EmployeeController
    @PostMapping("/updateEmp")
    public String updateEmp(Employee employee){
        employeeDao.save(employee);
        return "redirect:/emps";
    }
删除及404处理
删除
修改list.html
<a class="btn btn-sm btn-danger" th:href="@{/delemp/}+${emp.getId()}">删除</a>
EmployeeController
    //删除员工
    @GetMapping("/delemp/{id}")
    public String deleteEmp(@PathVariable("id") Integer id){
        employeeDao.delete(id);
        return "redirect:/emps";
    }
404处理
resources下的templats下建error文件夹放入404文件就好
注销
common.ht
<a class="nav-link" th:href="@{/user/logout}">注销</a>
前端
- 模板,别人写好的,改
- 框架:组件:自己手动拼接 bootstrap,LayUi,semantic-ui
- 栅格系统
- 导航栏
- 侧边栏
- 表单
做网站(一星期做博客)
-
前端搞定:页面样子:数据
-
设计数据库,难点
-
前端让他能够自动运行,独立化工程
-
数据接口对接:json,对象allinone
-
前后端联调
-
有一套自己熟悉的后台模板:工作必要 x-admin
-
前端界面,至少能够通过前端框架,组合出网站页面
- index
- about
- blog
- post
- user
让这个网站能独立运行,至少一个月
回顾
-
SpringBoot是什么
-
微服务
-
HelloWord
-
探究源码,自动装配原理
-
配置yaml
-
多文档环境切换
-
静态资源映射
-
Thymeleaf th:xxx
-
Springboot扩展mvc javaconfig
-
如何修改默认配置
-
CRUD
-
国际化
-
拦截器
-
定制首页错误页
本周
- JDBC
- Mybatis
- Druid
- Shiro:安全
- SpringSecurity:安全
- 异步任务
- Swaager
- Dubbo+Zokooper
JDBC
新建项目,JDBCAPI和MySqlDriver
新建application.yaml
spring:
  datasource:
    username: root
    password: root
    ##serverTimezone=UTC&时区
    url: jdbc:mysql://localhost:3306/mybatis?serverTimezone=UTC&useUnicode=true&characterEncoding=utf-8
    driver-class-name: com.mysql.jdbc.Driver
Springboot04DataApplicationTests里测试连接
    @Autowired
    DataSource dataSource;
    @Test
    void contextLoads() {
        //查看默认数据源 class com.zaxxer.hikari.HikariDataSource
        System.out.println(dataSource.getClass());
        Connection connection= null;
        try {
            connection = dataSource.getConnection();
        System.out.println(connection);
        connection.close();
        } catch (SQLException e) {
            e.printStackTrace();
        }
导入web依赖
        <dependency>
            <groupId>org.springframework.boot</groupId>
            <artifactId>spring-boot-starter-web</artifactId>
        </dependency>
新建Controller目录,JDBCController
@RestController
public class JDBCController {
    @Autowired
    JdbcTemplate jdbcTemplate;

    //查询数据库的所有信息
    //访问即可显示数据http://localhost:8080/userList
    @GetMapping("/userList")
    public List<Map<String ,Object>> userList(){
        String sql="select * from user";
        List <Map<String,Object>> list_maps=jdbcTemplate.queryForList(sql);
        return list_maps;
    }
}

//增 http://localhost:8080/addUser
    @GetMapping("/addUser")
    public String addUser(){
        String sql="insert into mybatis.user(id,name,pwd) values(6,'kk','123456')";
        int num=jdbcTemplate.update(sql);
        return "update_ok";
    }

    //改 http://localhost:8080/updateUser/6
        @GetMapping("/updateUser/{id}")
    public String updateUser(@PathVariable("id") int id){
        String sql="update mybatis.user set name=?,pwd=? where id="+id;

        //封装
        Object[] objects = new Object[2];
        objects[0] = "kk";
        objects[1] = "345678";
        jdbcTemplate.update(sql,objects);
        return "update_ok";
    }

 //删 http://localhost:8080/deleteUser/6
        @GetMapping("/deleteUser/{id}")
    public String deleteUser(@PathVariable("id") int id){
        String sql="delete from mybatis.user where id=?";
        jdbcTemplate.update(sql,id);
        return "delete_ok";
    }
**JdbcTemplate主要提供以下几类方法:**org.springframework.boot.autoconfigure.jdbc
- execute方法:可以用于执行任何SQL语句,一般用于执行DDL语句;
- update方法及batchUpdate方法:update方法用于执行新增、修改、删除等语句;batchUpdate方法用于执行批处理相关语句;
- query方法及queryForXXX方法:用于执行查询相关语句;
- call方法:用于执行存储过程、函数相关语句。
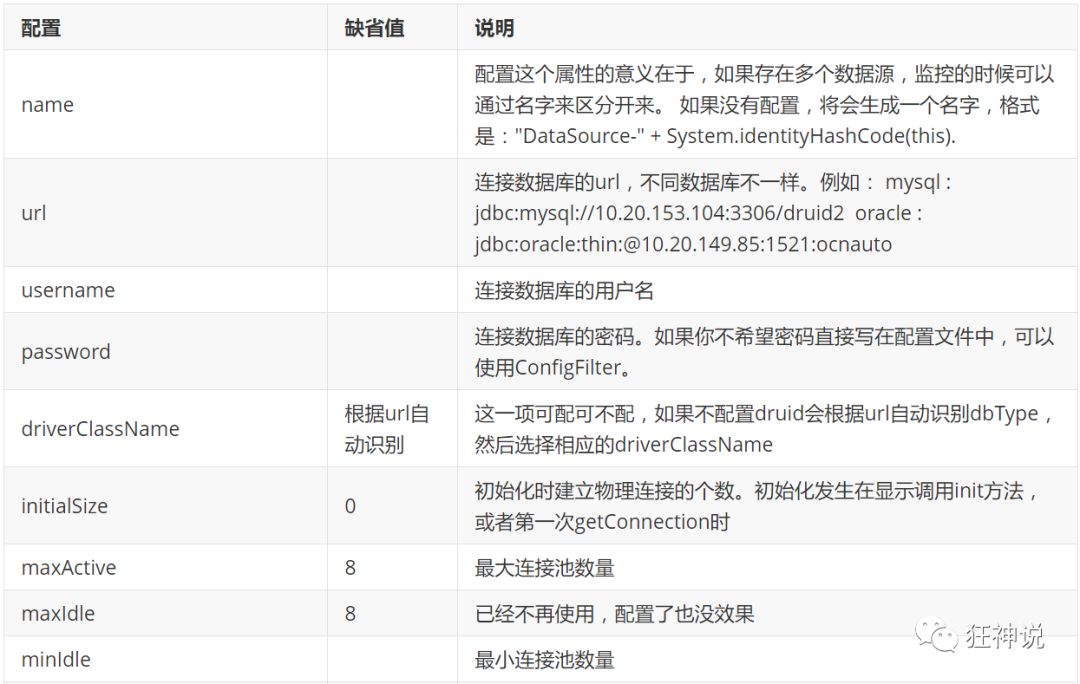
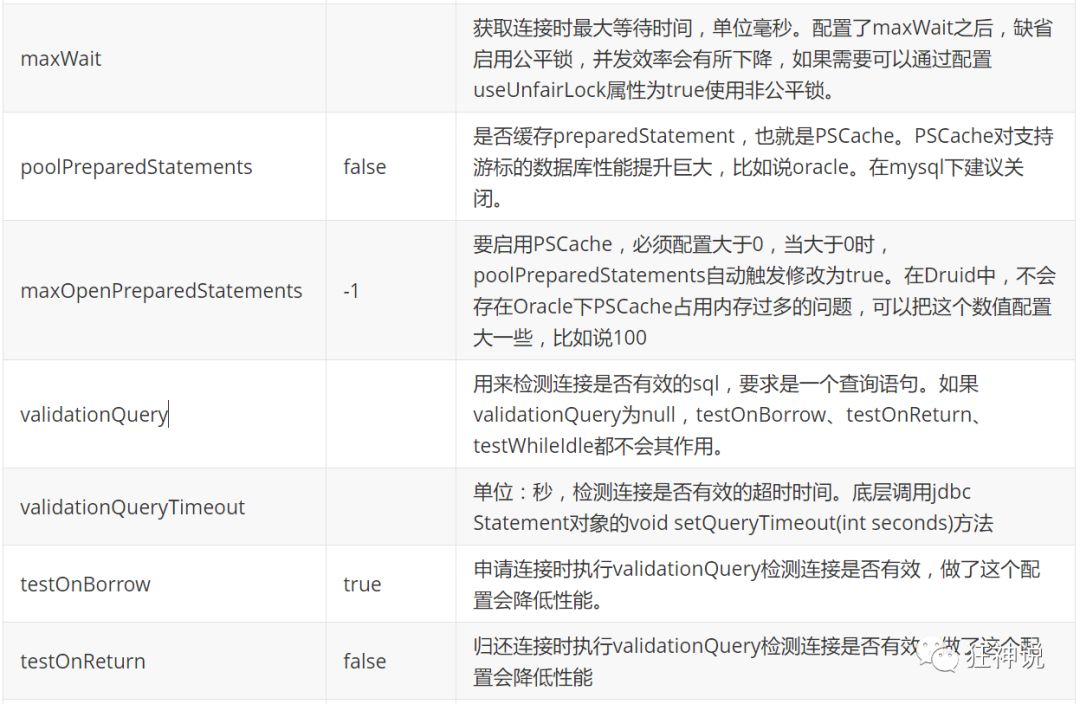
Druid
Github地址:https://github.com/alibaba/druid/
导入依赖
<!-- https://mvnrepository.com/artifact/com.alibaba/druid -->
<dependency>
    <groupId>com.alibaba</groupId>
    <artifactId>druid</artifactId>
    <version>1.2.15</version>
</dependency>
application.yaml
type: com.alibaba.druid.pool.DruidDataSource
log4j依赖
<!-- https://mvnrepository.com/artifact/log4j/log4j -->
<dependency>
    <groupId>log4j</groupId>
    <artifactId>log4j</artifactId>
    <version>1.2.17</version>
</dependency>
yaml
    #druid数据源专有配置
    initialSize: 5
    minIdle: 5
    maxActive: 20
    maxWait: 60000
    timeBetweenEvictionRunsMills: 600000
    minEvictableIdleTimeMillis: 300000
    validationQuery: SELECT 1 FROM DUAL
    testWhileIdle: true
    testOnBorrow: false
    testOnReturn: false
    poolPreparedStatements: true

    #配置监控统计拦截的filters: stat:监控软件、log4j:日志记录、wall:防御sql注入
    #如果允许时报错
    #导入log4j依赖即可
    filters: stat,wall,log4j
    maxPoolPreparedStatementPerConnectionSize: 20
    useGlobalDataSourceStat: true
    connectionProperties: druid.stat.mergeSql=true;druid.stat.slowSqlMillis=500
 config下新建DruidConfig
@Configuration
public class DruidConfig {
    @ConfigurationProperties(prefix = "spring.datasource")
    @Bean
    public DataSource druidDataSource(){
        return new DruidDataSource();
    }

    //后台监控: web.xml
    @Bean
    public ServletRegistrationBean StatViewServlet(){
        ServletRegistrationBean<StatViewServlet> bean  = new ServletRegistrationBean<>(new StatViewServlet(),"/druid/*");

        //后台需要有人登陆,账户密码配置
        HashMap<String, String> initParameters = new HashMap<>();
        //增加配置
        initParameters.put("loginUsername", "admin");//登录key是固定的,loginname,loginpassword
        initParameters.put("loginPassword", "123456");
//        //允许谁可以访问
//        initParameters.put("allow","");
//                //禁止谁能访问
//        initParameters.put("ku","192.168.1");
        bean.setInitParameters(initParameters);
        return bean;
    }
        //filter
    @Bean
    public FilterRegistrationBean webStatFilter(){
        FilterRegistrationBean bean=new FilterRegistrationBean();
        bean.setFilter(new WebStatFilter());
        //可以过滤哪些请求
        Map<String ,String> initParameters=new HashMap<>();
        initParameters.put("exclusions","*.js,*,*.css,/druid/*");

        return bean;
    }
}
登录,http://localhost:8080/druid,可以运行sql查看sql
MyBatis
官方文档:http://mybatis.org/spring-boot-starter/mybatis-spring-boot-autoconfigure/
Maven仓库地址:https://mvnrepository.com/artifact/org.mybatis.spring.boot/mybatis-spring-boot-starter/2.1.1
整合包
mybatis-spring-boot-starer依赖
        <!-- https://mvnrepository.com/artifact/org.mybatis.spring.boot/mybatis-spring-boot-starter -->
        <dependency>
            <groupId>org.mybatis.spring.boot</groupId>
            <artifactId>mybatis-spring-boot-starter</artifactId>
            <version>2.3.0</version>
        </dependency>
web,mysqlDriver,jdbc
application.properties
spring.datasource.username=root
spring.datasource.password=root
spring.datasource.url=jdbc:mysql://localhost:3306/mybatis?serverTimeZone=UTC&useUnicode=true&characterEncoding=utf-8
spring.datasource.driver-class-name=com.mysql.cj.jdbc.Driver
测试
    @Autowired
    DataSource dataSource;
    @Test
    void contextLoads() {
        System.out.println(dataSource.getClass());
        try {
            System.out.println(dataSource.getConnection());
        } catch (SQLException throwables) {
            throwables.printStackTrace();
        }
    }
导入lombok依赖
新建pojo下User类
@Data
@NoArgsConstructor
@AllArgsConstructor
public class User {
    private int id;
    private String name;
    private String pwd;
}
mapper下UserMapper
@Mapper//扫描mapper包方式或Application里@MapperScan("com.ku.mapper")
@Repository
public  interface UserMapper {
    List<User> queryUserList();

    User queryUserById(int id);

    int addUser(User user);

    int updateUser(User user);

    int deleteUser(int id);

}
resource下mybatis下UserMapper.xml
<?xml version="1.0" encoding="UTF-8" ?>
<!DOCTYPE mapper
        PUBLIC "-//mybatis.org//DTD Mapper 3.0//EN"
        "https://mybatis.org/dtd/mybatis-3-mapper.dtd">
<mapper namespace="com.ku.mapper.UserMapper">
   <!-- <cache>开启缓存</cache>-->
<select id="queryUserList" resultType="User">
    select * from user
</select>
    <select id="queryUserById" resultType="User">
        select * from user where id=#{id}
    </select>
    <insert id="addUser" parameterType="User">
        insert into mybatis.user(id,name,pwd) values(#{id},#{name},#{pwd});
    </insert>
    <update id="updateUser" parameterType="User">
        update mybatis.user set name=#{name},pwd=#{pwd} where id=#{id};
    </update>
    <delete id="deleteUser" parameterType="int">
        delete from mybatis.user where id=#{id};
    </delete>
</mapper>
application.properties里
#整合mybatis
mybatis.type-aliases-package=com.ku.pojo
mybatis.mapper-locations=classpath:mybatis/mapper/*.xml
controller下UserController
@RestController
public class UserController {
    @Autowired
    private UserMapper userMapper;

    @GetMapping("/queryUserList")
    public List<User> queryUserList(){
        List<User> userList=userMapper.queryUserList();
        for (User user : userList) {
            System.out.println(user);
        }
        return userList;
    }

    @GetMapping("/addUser")
    public String addUser(){
        userMapper.addUser(new User(7,"kk3","123456"));
        return "add_ok";
    }

    @GetMapping("/updateUser")
    public String updateUser(){
        userMapper.updateUser(new User(4,"hehe","787878"));
        return "update_ok";
    }

    @GetMapping("/deleteUser")
    public String deleteUser(){
userMapper.deleteUser(1);
        return "delete_ok";
    }
}
SpringSecurity
shiro,认证,授权
-
功能权限
-
访问
-
菜单
web,thymleaf依赖
application.properties
spring.thymeleaf.cache=false重要的类:
-
WebSecurityConfigurerAdapter:自定义Security策略
-
AuthenticationManagerBuilder:自定义认证策略
-
@EnableWebSecurity:开启WebSecurity模式
Spring Security的两个主要目标是“认证”和“授权”(访问控制)
“认证”(Authentication)
“授权”(Authorization)
参考官网:https://spring.io/projects
依赖
        <dependency>
            <groupId>org.springframework.boot</groupId>
            <artifactId>spring-boot-starter-security</artifactId>
        </dependency>
config下SecurityConfig,500未加密
-


 21万+
21万+


 被折叠的 条评论
为什么被折叠?
被折叠的 条评论
为什么被折叠?
 到【灌水乐园】发言


