


worker的源码分析代码就比较少了 , 整个worker.scala的代码只有不到600行 , 但是还得研究一下DriverRunner和ExecutorRunner的代码
1. Worker中的代码主要集中在
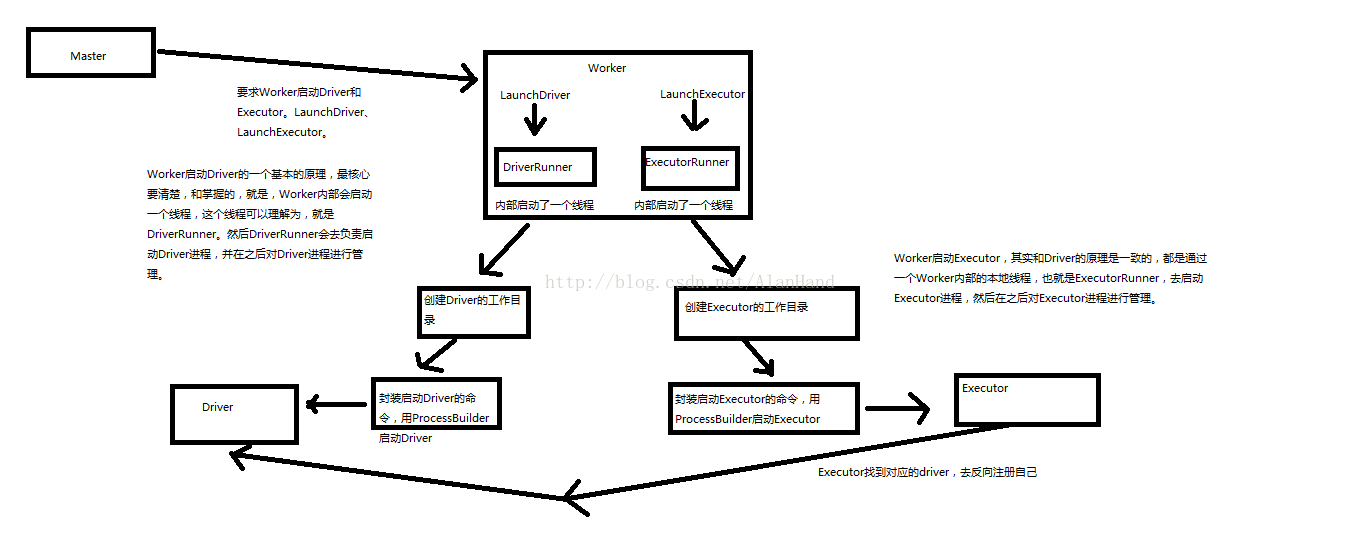
receiveWithLogging方法中 , 该方法接收别的组件发送过来的消息 , 就像master源码中发送过来的launchDriver()消息 , 代码如下 :
/*** 启动Driver*/case LaunchDriver(driverId, driverDesc) => {logInfo(s"Asked to launch driver $driverId")// 创建一个DriverRunner对象 , 里面会创建一个Thread(Java)对象val driver = new DriverRunner(conf,driverId,workDir,sparkHome,driverDesc.copy(command = Worker.maybeUpdateSSLSettings(driverDesc.command, conf)),self,akkaUrl)// 将创建的Driver加入drivers缓存队列中 , drivers是一个HashMap , 因此从这里可以看出若是worker节点内存充足的话是可以创建多个Driver的drivers(driverId) = driver// 启动driverdriver.start()// 增加当前worker已经使用的corescoresUsed += driverDesc.cores// 增加当前worker已经使用的内存memoryUsed += driverDesc.mem}
上述代码中会创建一个DriverRunner的对象 , 该对象的里面就会创建一个DriverRunner的Java线程 , 然后启动driver , 运行DriverRunner的start方法 , 该方法中的builder就会创建一个Driver进程 , 代码如下:
/** Starts a thread to run and manage the driver. */ /** * 启动driver , 内部会创建一个Java线程 */ def start() = { new Thread("DriverRunner for " + driverId) { override def run() { try { // 创建Driver的工作目录 val driverDir = createWorkingDirectory() // 下载上传的jar包到工作目录中 val localJarFilename = downloadUserJar(driverDir) def substituteVariables(argument: String): String = argument match { case "{{WORKER_URL}}" => workerUrl case "{{USER_JAR}}" => localJarFilename case other => other } // TODO: If we add ability to submit multiple jars they should also be added here // 创建ProcessBuilder , 用于封装启动Driver的命令 val builder = CommandUtils.buildProcessBuilder(driverDesc.command, driverDesc.mem, sparkHome.getAbsolutePath, substituteVariables) // 正式启动Driver launchDriver(builder, driverDir, driverDesc.supervise) } catch { case e: Exception => finalException = Some(e) } // 获取Driver状态 val state = if (killed) { DriverState.KILLED } else if (finalException.isDefined) { DriverState.ERROR } else { finalExitCode match { case Some(0) => DriverState.FINISHED case _ => DriverState.FAILED } } finalState = Some(state) // 最终worker将state信息作为参数会发送一个Driver状态改变的消息 worker ! DriverStateChanged(driverId, state, finalException) } }.start() }
里面的
createWorkingDirectory
()方法是创建Driver工作目录 , 用于存放jar包和日志打印 , 代码如下 :
/** * Creates the working directory for this driver. * Will throw an exception if there are errors preparing the directory. * * 创建Driver工作目录 , 返回一个文件对象 */ private def createWorkingDirectory(): File = { val driverDir = new File(workDir, driverId) if (!driverDir.exists() && !driverDir.mkdirs()) { throw new IOException("Failed to create directory " + driverDir) } driverDir }
下载jar包的源码如下 :
/** * Creates the working directory for this driver. * Will throw an exception if there are errors preparing the directory. * * 创建Driver工作目录 , 返回一个文件对象 */ private def createWorkingDirectory(): File = { val driverDir = new File(workDir, driverId) if (!driverDir.exists() && !driverDir.mkdirs()) { throw new IOException("Failed to create directory " + driverDir) } driverDir }
启动Driver的代码如下 :
/** * 启动Driver */ private def launchDriver(builder: ProcessBuilder, baseDir: File, supervise: Boolean) { // 设置builder的操作目录 builder.directory(baseDir) // 定义初始化process信息 def initialize(process: Process) = { // Redirect stdout and stderr to files // 下面就是定义日志输出文件 val stdout = new File(baseDir, "stdout") CommandUtils.redirectStream(process.getInputStream, stdout) val stderr = new File(baseDir, "stderr") val header = "Launch Command: %s\n%s\n\n".format( builder.command.mkString("\"", "\" \"", "\""), "=" * 40) Files.append(header, stderr, UTF_8) CommandUtils.redirectStream(process.getErrorStream, stderr) } //运行命令 runCommandWithRetry(ProcessBuilderLike(builder), initialize, supervise) }
会看到
runCommandWithRetry方法 , 该方法就是答应最终的log信息 , 代码如下
/** * 运行命令 */ private[deploy] def runCommandWithRetry(command: ProcessBuilderLike, initialize: Process => Unit, supervise: Boolean) { // Time to wait between submission retries. var waitSeconds = 1 // A run of this many seconds resets the exponential back-off. val successfulRunDuration = 5 var keepTrying = !killed while (keepTrying) { logInfo("Launch Command: " + command.command.mkString("\"", "\" \"", "\"")) synchronized { if (killed) { return } process = Some(command.start()) initialize(process.get) } val processStart = clock.getTimeMillis() val exitCode = process.get.waitFor() if (clock.getTimeMillis() - processStart > successfulRunDuration * 1000) { waitSeconds = 1 } if (supervise && exitCode != 0 && !killed) { logInfo(s"Command exited with status $exitCode, re-launching after $waitSeconds s.") sleeper.sleep(waitSeconds) waitSeconds = waitSeconds * 2 // exponential back-off } keepTrying = supervise && exitCode != 0 && !killed finalExitCode = Some(exitCode) } }
2.launchExecutor , 创建ExecutorRunner对象 , 并创建Executor进程
worker中launchExecutor方法如下:
/*** 发布ExecutorRunner信息*/case LaunchExecutor(masterUrl, appId, execId, appDesc, cores_, memory_) =>// 检查一下masterUrl是否正确if (masterUrl != activeMasterUrl) {logWarning("Invalid Master (" + masterUrl + ") attempted to launch executor.")} else {try {logInfo("Asked to launch executor %s/%d for %s".format(appId, execId, appDesc.name))// 创建Executor工作目录val executorDir = new File(workDir, appId + "/" + execId)if (!executorDir.mkdirs()) {throw new IOException("Failed to create directory " + executorDir)}// Create local dirs for the executor. These are passed to the executor via the// SPARK_LOCAL_DIRS environment variable, and deleted by the Worker when the// application finishes.val appLocalDirs = appDirectories.get(appId).getOrElse {Utils.getOrCreateLocalRootDirs(conf).map { dir =>Utils.createDirectory(dir).getAbsolutePath()}.toSeq}// 将Executor的目录信息加入缓存中 , 缓存对象为HashMapappDirectories(appId) = appLocalDirs// 创建ExecutorRunner对象 , 与DriverRunner一样 , 里面会创建一个Java线程对象val manager = new ExecutorRunner(appId,execId,appDesc.copy(command = Worker.maybeUpdateSSLSettings(appDesc.command, conf)),cores_,memory_,self,workerId,host,webUi.boundPort,publicAddress,sparkHome,executorDir,akkaUrl,conf,appLocalDirs, ExecutorState.LOADING)// 将Executor加入缓存队列中executors(appId + "/" + execId) = manager// 启动executor工作manager.start()// 增加已经使用的corecoresUsed += cores_// 增加已经使用的内存memoryUsed += memory_// 通过master的代理对象发送Executor状态改变的消息master ! ExecutorStateChanged(appId, execId, manager.state, None, None)} catch {case e: Exception => {logError(s"Failed to launch executor $appId/$execId for ${appDesc.name}.", e)if (executors.contains(appId + "/" + execId)) {executors(appId + "/" + execId).kill()executors -= appId + "/" + execId}master ! ExecutorStateChanged(appId, execId, ExecutorState.FAILED,Some(e.toString), None)}}}
上述代码中最重要的就是创建ExecutorRunner对象 , 然后通过start方法启动ExecutorRunner , 源码如下 :
/** * 启动executor */ def start() { // 创建Java线程对象 , run方法中会执行fetchAndRunExecutor方法 workerThread = new Thread("ExecutorRunner for " + fullId) { override def run() { fetchAndRunExecutor() } } // 启动workerThread线程 workerThread.start() // Shutdown hook that kills actors on shutdown. shutdownHook = new Thread() { override def run() { killProcess(Some("Worker shutting down")) } } Runtime.getRuntime.addShutdownHook(shutdownHook) }
启动workerThread线程就会调用fetchAndRunExecutor创建Executor进程 , 源码如下:
/** * Download and run the executor described in our ApplicationDescription */ def fetchAndRunExecutor() { try { // Launch the process // 创建进程构造器builder , 用于创建executor进程 val builder = CommandUtils.buildProcessBuilder(appDesc.command, memory, sparkHome.getAbsolutePath, substituteVariables) val command = builder.command() logInfo("Launch command: " + command.mkString("\"", "\" \"", "\"")) // 构建executor的进程目录 builder.directory(executorDir) builder.environment.put("SPARK_LOCAL_DIRS", appLocalDirs.mkString(",")) // In case we are running this from within the Spark Shell, avoid creating a "scala" // parent process for the executor command builder.environment.put("SPARK_LAUNCH_WITH_SCALA", "0") // Add webUI log urls val baseUrl = s"http://$publicAddress:$webUiPort/logPage/?appId=$appId&executorId=$execId&logType=" builder.environment.put("SPARK_LOG_URL_STDERR", s"${baseUrl}stderr") builder.environment.put("SPARK_LOG_URL_STDOUT", s"${baseUrl}stdout") // builder命令启动 process = builder.start() val header = "Spark Executor Command: %s\n%s\n\n".format( command.mkString("\"", "\" \"", "\""), "=" * 40) // Redirect its stdout and stderr to files val stdout = new File(executorDir, "stdout") stdoutAppender = FileAppender(process.getInputStream, stdout, conf) val stderr = new File(executorDir, "stderr") Files.write(header, stderr, UTF_8) stderrAppender = FileAppender(process.getErrorStream, stderr, conf) // Wait for it to exit; executor may exit with code 0 (when driver instructs it to shutdown) // or with nonzero exit code val exitCode = process.waitFor() state = ExecutorState.EXITED val message = "Command exited with code " + exitCode // worker发送Executor状态改变的消息 worker ! ExecutorStateChanged(appId, execId, state, Some(message), Some(exitCode)) } catch { case interrupted: InterruptedException => { logInfo("Runner thread for executor " + fullId + " interrupted") state = ExecutorState.KILLED killProcess(None) } case e: Exception => { logError("Error running executor", e) state = ExecutorState.FAILED killProcess(Some(e.toString)) } } }
该方法里面就会创建BuilderProcess对象 , 然后根据ApplicationDesc的信息创建Executor进程;
以上就是所有的Worker源码了 , scala代码写的程序源代码真少 !


 2089
2089


 被折叠的 条评论
为什么被折叠?
被折叠的 条评论
为什么被折叠?
 到【灌水乐园】发言


