


Secure Login System with PHP and MySQL
在本教程中,我将教您如何创建自己的安全 PHP 登录系统。登录表单是您网站的访问者可以用来登录您的网站以访问受限内容(例如个人资料页面)的表单。我们将利用 MySQL 从数据库中检索帐户数据。
高级包包括附加功能和源代码的下载链接。
1. 入门
在创建安全登录系统之前,我们需要采取一些步骤。我们需要设置我们的 Web 服务器环境并确保我们启用了所需的扩展。
1.1。要求
- 如果您没有设置本地 Web 服务器,我建议您下载并安装XAMPP。
- XAMPP 是一个跨平台的 Web 服务器包,其中包括后端开发人员的必需品。它包括 PHP、MySQL、Apache、phpMyAdmin 等。无需使用 XAMPP 单独安装所有软件。
1.2. 您将在本教程中学到什么
- 表单设计— 使用 HTML5 和 CSS3 设计登录表单。
- 准备好的 SQL 查询——如何正确准备 SQL 查询以防止 SQL 注入,从而防止您的数据库被暴露。
- 基本验证——验证使用 GET 和 POST 请求(用户名、密码、电子邮件等)发送到服务器的表单数据。
- 会话管理——初始化会话并存储检索到的数据库结果。会话保存在服务器上,并与保存在浏览器中的唯一 ID 相关联。
1.3. 文件结构和设置
我们现在可以启动我们的 Web 服务器并创建我们将用于登录系统的文件和目录。
- 打开XAMPP 控制面板
- 在 Apache 模块旁边单击开始
- 在 MySQL 模块旁边单击Start
- 导航到 XAMPP 的安装目录 ( C:\xampp )
- 打开htdocs目录
- 创建以下目录和文件:
文件结构
\-- phplogin
|-- index.html
|-- style.css
|-- authenticate.php
|-- logout.php
|-- home.php
|-- profile.php
每个文件将包含以下内容:
- index.html — 使用 HTML5 和 CSS3 创建的登录表单。我们不需要在这个文件中使用 PHP。因此,我们可以将其保存为纯 HTML。
- style.css — 我们安全登录系统的样式表 (CSS3)。
- authenticate.php — 验证用户、连接到数据库、验证表单数据、检索数据库结果以及创建新会话。
- logout.php — 销毁登录会话并将用户重定向到登录页面。
- home.php — 登录用户的基本主页。
- profile.php — 从我们的 MySQL 数据库中检索用户的帐户详细信息,并使用 PHP 和 HTML 填充它们。
2. 创建登录表单设计
我们现在将创建一个表单,我们的用户可以使用它来输入他们的详细信息并提交它们以供处理。我们将在本教程的这一部分使用 HTML 和 CSS,因为在此页面上不需要 PHP。
使用您喜欢的代码编辑器编辑index.html文件并添加以下代码:
<!DOCTYPE html>
<html>
	<head>
		<meta charset="utf-8">
		<title>Login</title>
		<link rel="stylesheet" href="https://use.fontawesome.com/releases/v5.7.1/css/all.css">
	</head>
	<body>
		<div class="login">
			<h1>Login</h1>
			<form action="authenticate.php" method="post">
				<label for="username">
					<i class="fas fa-user"></i>
				</label>
				<input type="text" name="username" placeholder="Username" id="username" required>
				<label for="password">
					<i class="fas fa-lock"></i>
				</label>
				<input type="password" name="password" placeholder="Password" id="password" required>
				<input type="submit" value="Login">
			</form>
		</div>
	</body>
</html>
如果我们在网络浏览器中导航到索引页面,它将如下所示:
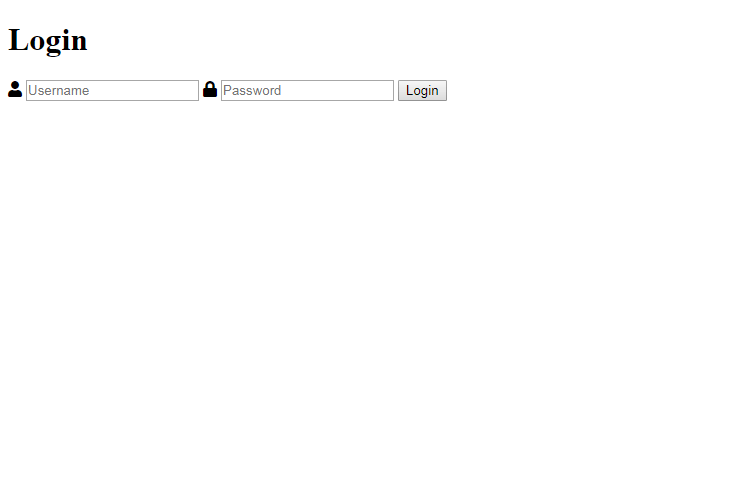
很基本吧?让我们编辑style.css文件并实现将改善表单外观的代码。
将以下代码添加到style.css文件中:
* {
  	box-sizing: border-box;
  	font-family: -apple-system, BlinkMacSystemFont, "segoe ui", roboto, oxygen, ubuntu, cantarell, "fira sans", "droid sans", "helvetica neue", Arial, sans-serif;
  	font-size: 16px;
  	-webkit-font-smoothing: antialiased;
  	-moz-osx-font-smoothing: grayscale;
}
body {
  	background-color: #435165;
}
.login {
  	width: 400px;
  	background-color: #ffffff;
  	box-shadow: 0 0 9px 0 rgba(0, 0, 0, 0.3);
  	margin: 100px auto;
}
.login h1 {
  	text-align: center;
  	color: #5b6574;
  	font-size: 24px;
  	padding: 20px 0 20px 0;
  	border-bottom: 1px solid #dee0e4;
}
.login form {
  	display: flex;
  	flex-wrap: wrap;
  	justify-content: center;
  	padding-top: 20px;
}
.login form label {
  	display: flex;
  	justify-content: center;
  	align-items: center;
  	width: 50px;
  	height: 50px;
  	background-color: #3274d6;
  	color: #ffffff;
}
.login form input[type="password"], .login form input[type="text"] {
  	width: 310px;
  	height: 50px;
  	border: 1px solid #dee0e4;
  	margin-bottom: 20px;
  	padding: 0 15px;
}
.login form input[type="submit"] {
  	width: 100%;
  	padding: 15px;
 	margin-top: 20px;
  	background-color: #3274d6;
  	border: 0;
  	cursor: pointer;
  	font-weight: bold;
  	color: #ffffff;
  	transition: background-color 0.2s;
}
.login form input[type="submit"]:hover {
	background-color: #2868c7;
  	transition: background-color 0.2s;
}我们需要在index.html文件中包含我们的样式表,因此我们必须将以下代码添加到 head 部分:
<link href="style.css" rel="stylesheet" type="text/css">现在,如果我们在 Web 浏览器中刷新index.html页面,我们的登录表单将看起来更有吸引力:
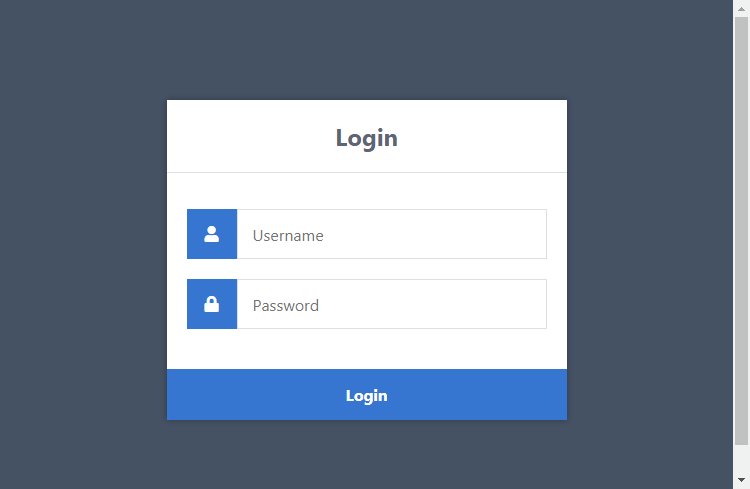
这样看起来好多了!让我们缩小表单元素的范围,以便更好地了解正在发生的事情。
- 表单——我们需要同时使用行动和邮政属性。这行动属性将设置为身份验证文件。提交表单时,会将表单数据发送到认证文件进行处理。除此之外方法被声明为邮政因为这将使我们能够使用 POST 请求方法处理表单数据。
- 输入(文本/密码) ——我们需要为表单字段命名,以便服务器能够识别它们。属性值姓名我们可以声明为用户名,我们可以使用它来检索身份验证文件中的 post 变量以获取数据,例如:$_POST['用户名'].
- 输入(提交) ——表单提交时,数据将被发送到我们的身份验证文件进行处理。
3. 创建数据库和设置表
对于这一部分,您将需要使用phpMyAdmin或您首选的 MySQL 数据库管理应用程序访问您的 MySQL 数据库。
如果您使用的是phpMyAdmin ,请按照以下说明操作。
- 导航到:http://localhost/phpmyadmin/
- 单击顶部的数据库选项卡
- 在Create database下,在文本框中输入phplogin
- 选择utf8_general_ci作为排序规则
- 单击创建
您可以使用自己的数据库名称,但在本教程中,我们将使用phplogin。
我们现在需要的是一个帐户表,因为它将存储在系统中注册的所有帐户(用户名、密码、电子邮件等)。
单击左侧面板上的数据库(phplogin)并执行以下 SQL 语句:
CREATE TABLE IF NOT EXISTS `accounts` (
	`id` int(11) NOT NULL AUTO_INCREMENT,
  	`username` varchar(50) NOT NULL,
  	`password` varchar(255) NOT NULL,
  	`email` varchar(100) NOT NULL,
    PRIMARY KEY (`id`)
) ;

INSERT INTO `accounts` (`id`, `username`, `password`, `email`) VALUES (1, 'test', 'test', 'test@test.com');在phpMyAdmin上,这应该如下所示:
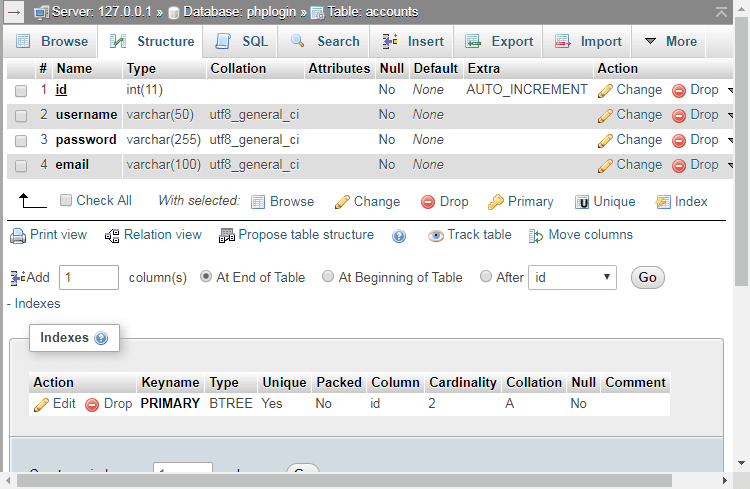
上面的 SQL 语句代码将创建包含列的帐户表ID,用户名,密码, 和电子邮件.
SQL 语句将使用用户名插入一个测试帐户:测试, 和密码:测试. 测试帐户将用于测试目的,以确保我们的登录系统正常运行。
4. 使用 PHP 认证用户
现在我们已经设置好了数据库,我们可以继续使用 PHP 进行编码。我们将从身份验证文件开始,它将处理和验证我们将从index.html文件发送的表单数据。
编辑authenticate.php文件并添加以下内容:
<?php
session_start();
// Change this to your connection info.
$DATABASE_HOST = 'localhost';
$DATABASE_USER = 'root';
$DATABASE_PASS = '';
$DATABASE_NAME = 'phplogin';
// Try and connect using the info above.
$con = mysqli_connect($DATABASE_HOST, $DATABASE_USER, $DATABASE_PASS, $DATABASE_NAME);
if ( mysqli_connect_errno() ) {
	// If there is an error with the connection, stop the script and display the error.
	exit('Failed to connect to MySQL: ' . mysqli_connect_error());
}
最初,代码将启动会话,因为这使我们能够在服务器上保留帐户详细信息,稍后将用于记住登录用户。
连接到数据库是必不可少的。没有它,我们如何检索和存储与用户相关的信息?因此,我们必须确保更新变量以反映我们的 MySQL 数据库凭据。
在下面添加:
// Now we check if the data from the login form was submitted, isset() will check if the data exists.
if ( !isset($_POST['username'], $_POST['password']) ) {
	// Could not get the data that should have been sent.
	exit('Please fill both the username and password fields!');
}
上面的代码将确保表单数据存在,而如果用户尝试访问文件而不提交表单,它将输出一个简单的错误。
在下面添加:
// Prepare our SQL, preparing the SQL statement will prevent SQL injection.
if ($stmt = $con->prepare('SELECT id, password FROM accounts WHERE username = ?')) {
	// Bind parameters (s = string, i = int, b = blob, etc), in our case the username is a string so we use "s"
	$stmt->bind_param('s', $_POST['username']);
	$stmt->execute();
	// Store the result so we can check if the account exists in the database.
	$stmt->store_result();


	$stmt->close();
}
?>
上面的代码将准备 SQL 语句,它将选择ID和密码帐户表中的列。此外,它将绑定用户名到 SQL 语句,执行,然后存储结果。
在以下行之后:
$stmt->store_result();
添加:
if ($stmt->num_rows > 0) {
	$stmt->bind_result($id, $password);
	$stmt->fetch();
	// Account exists, now we verify the password.
	// Note: remember to use password_hash in your registration file to store the hashed passwords.
	if (password_verify($_POST['password'], $password)) {
		// Verification success! User has logged-in!
		// Create sessions, so we know the user is logged in, they basically act like cookies but remember the data on the server.
		session_regenerate_id();
		$_SESSION['loggedin'] = TRUE;
		$_SESSION['name'] = $_POST['username'];
		$_SESSION['id'] = $id;
		echo 'Welcome ' . $_SESSION['name'] . '!';
	} else {
		// Incorrect password
		echo 'Incorrect username and/or password!';
	}
} else {
	// Incorrect username
	echo 'Incorrect username and/or password!';
}首先,我们需要检查查询是否返回了任何结果。如果用户名数据库中不存在,则不会有结果。
如果用户名存在,我们可以将结果绑定到$id和$密码变量。
随后,我们继续验证密码密码验证功能。仅使用创建的密码密码哈希功能将起作用。
如果您不想使用任何密码加密方法,您可以简单地替换以下代码:
if (password_verify($_POST['password'], $password)) {和:
if ($_POST['password'] === $password) {但是,我不建议删除散列函数,因为如果您的数据库以某种方式暴露,那么存储在帐户表中的所有密码也将暴露。此外,用户知道他们的密码是加密的,就会有一种隐私感。
在用户成功认证后,会话变量将被初始化并保留,直到它们被注销或会话到期销毁。这些会话变量存储在服务器上,并与存储在用户浏览器中的会话 ID 相关联。我们将使用这些变量来确定用户是否登录,并将会话变量与我们检索到的 MySQL 数据库结果相关联。
你可知道?session_regenerate_id() 函数将有助于防止会话劫持,因为它会重新生成存储在服务器上并作为浏览器中的 cookie 的用户会话 ID。
用户无法在浏览器中更改会话变量,因此您无需担心此类问题。他们可以更改的唯一变量是加密会话 ID,用于将用户与服务器会话相关联。
现在我们可以测试登录系统并确保身份验证正常工作。在浏览器中导航到http://localhost/phplogin/index.html 。
输入随机的用户名和密码,然后单击登录按钮。它应该输出如下所示的错误:

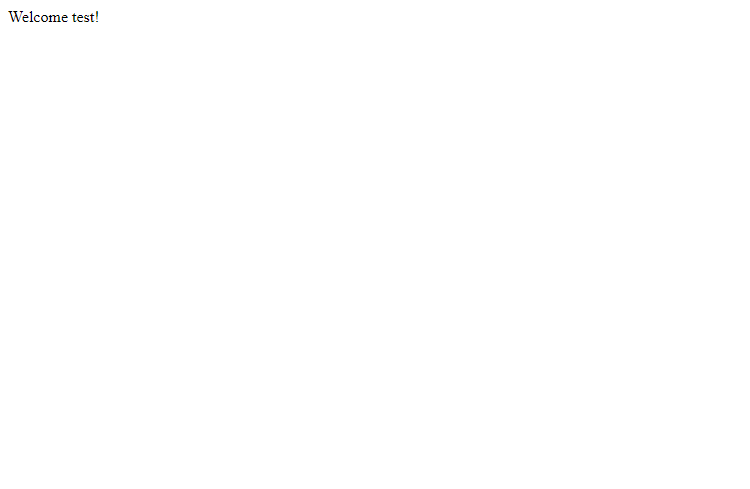
别担心,它没有坏!如果我们导航回我们的登录表单并为用户名和密码字段输入测试,则身份验证页面将如下所示:
如果您收到错误,请务必仔细检查您的代码以确保您没有遗漏任何内容或检查您的数据库中是否存在测试帐户。
5. 创建主页
主页将是我们的用户登录后看到的第一个页面。他们可以访问此页面的唯一方法是他们是否已登录,而如果他们没有登录,他们将被重定向回登录页面。
编辑home.php文件并添加以下代码:
<?php
// We need to use sessions, so you should always start sessions using the below code.
session_start();
// If the user is not logged in redirect to the login page...
if (!isset($_SESSION['loggedin'])) {
	header('Location: index.html');
	exit;
}
?>基本上,上面的代码会检查用户是否登录,如果没有,他们将被重定向到登录页面。记住$_SESSION['登录']我们在authenticate.php文件中定义的变量?这就是我们可以用来确定用户是否登录的方法。
现在我们可以添加一些 HTML 到我们的主页。在结束标记下方,添加以下代码:
<!DOCTYPE html>
<html>
	<head>
		<meta charset="utf-8">
		<title>Home Page</title>
		<link href="style.css" rel="stylesheet" type="text/css">
		<link rel="stylesheet" href="https://use.fontawesome.com/releases/v5.7.1/css/all.css">
	</head>
	<body class="loggedin">
		<nav class="navtop">
			<div>
				<h1>Website Title</h1>
				<a href="profile.php"><i class="fas fa-user-circle"></i>Profile</a>
				<a href="logout.php"><i class="fas fa-sign-out-alt"></i>Logout</a>
			</div>
		</nav>
		<div class="content">
			<h2>Home Page</h2>
			<p>Welcome back, <?=$_SESSION['name']?>!</p>
		</div>
	</body>
</html>
上面的代码就是我们主页的模板。在此页面上,用户将看到一条欢迎消息,同时显示他们的姓名。
我们需要为主页添加 CSS。将以下代码添加到style.css文件中:
.navtop {
	background-color: #2f3947;
	height: 60px;
	width: 100%;
	border: 0;
}
.navtop div {
	display: flex;
	margin: 0 auto;
	width: 1000px;
	height: 100%;
}
.navtop div h1, .navtop div a {
	display: inline-flex;
	align-items: center;
}
.navtop div h1 {
	flex: 1;
	font-size: 24px;
	padding: 0;
	margin: 0;
	color: #eaebed;
	font-weight: normal;
}
.navtop div a {
	padding: 0 20px;
	text-decoration: none;
	color: #c1c4c8;
	font-weight: bold;
}
.navtop div a i {
	padding: 2px 8px 0 0;
}
.navtop div a:hover {
	color: #eaebed;
}
body.loggedin {
	background-color: #f3f4f7;
}
.content {
	width: 1000px;
	margin: 0 auto;
}
.content h2 {
	margin: 0;
	padding: 25px 0;
	font-size: 22px;
	border-bottom: 1px solid #e0e0e3;
	color: #4a536e;
}
.content > p, .content > div {
	box-shadow: 0 0 5px 0 rgba(0, 0, 0, 0.1);
	margin: 25px 0;
	padding: 25px;
	background-color: #fff;
}
.content > p table td, .content > div table td {
	padding: 5px;
}
.content > p table td:first-child, .content > div table td:first-child {
	font-weight: bold;
	color: #4a536e;
	padding-right: 15px;
}
.content > div p {
	padding: 5px;
	margin: 0 0 10px 0;
}现在我们已经设置了主页,我们可以将用户从authenticate.php文件重定向到我们的主页,编辑authenticate.php并替换以下代码行:
echo 'Welcome ' . $_SESSION['name'] . '!';和:
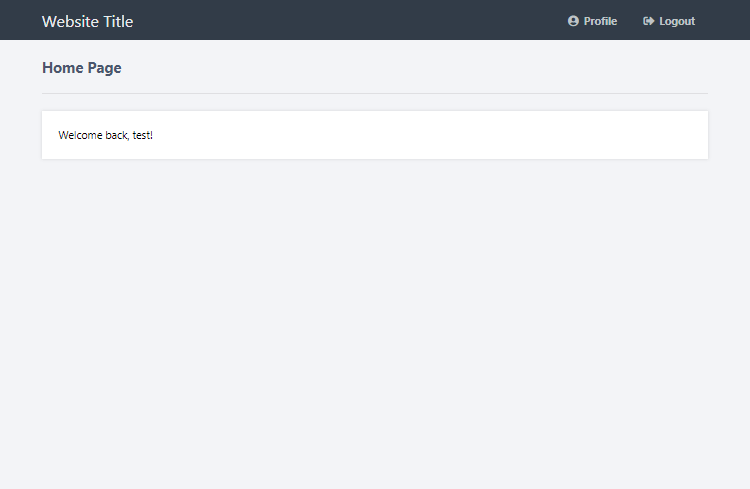
header('Location: home.php');如果您使用测试帐户登录,您应该会看到如下内容:
这是一个非常基本的主页。既然您了解了它的工作原理,您就可以将其自定义为您想要的方式。
6. 创建个人资料页面
个人资料页面将显示登录用户的帐户信息。
编辑profile.php文件并添加以下代码:
<?php
// We need to use sessions, so you should always start sessions using the below code.
session_start();
// If the user is not logged in redirect to the login page...
if (!isset($_SESSION['loggedin'])) {
	header('Location: index.html');
	exit;
}
$DATABASE_HOST = 'localhost';
$DATABASE_USER = 'root';
$DATABASE_PASS = '';
$DATABASE_NAME = 'phplogin';
$con = mysqli_connect($DATABASE_HOST, $DATABASE_USER, $DATABASE_PASS, $DATABASE_NAME);
if (mysqli_connect_errno()) {
	exit('Failed to connect to MySQL: ' . mysqli_connect_error());
}
// We don't have the password or email info stored in sessions so instead we can get the results from the database.
$stmt = $con->prepare('SELECT password, email FROM accounts WHERE id = ?');
// In this case we can use the account ID to get the account info.
$stmt->bind_param('i', $_SESSION['id']);
$stmt->execute();
$stmt->bind_result($password, $email);
$stmt->fetch();
$stmt->close();
?>
上面的代码从数据库中检索额外的账户信息,和之前的主页一样,我们不需要连接到数据库,因为我们检索了存储在会话中的数据。
我们将填充用户的所有帐户信息,因此我们必须检索密码和电子邮件数据库中的列。我们不需要检索用户名或者ID列,因为我们将它们存储在在authenticate.php文件中声明的会话变量中。
在结束标记之后,添加以下代码:
<!DOCTYPE html>
<html>
	<head>
		<meta charset="utf-8">
		<title>Profile Page</title>
		<link href="style.css" rel="stylesheet" type="text/css">
		<link rel="stylesheet" href="https://use.fontawesome.com/releases/v5.7.1/css/all.css">
	</head>
	<body class="loggedin">
		<nav class="navtop">
			<div>
				<h1>Website Title</h1>
				<a href="profile.php"><i class="fas fa-user-circle"></i>Profile</a>
				<a href="logout.php"><i class="fas fa-sign-out-alt"></i>Logout</a>
			</div>
		</nav>
		<div class="content">
			<h2>Profile Page</h2>
			<div>
				<p>Your account details are below:</p>
				<table>
					<tr>
						<td>Username:</td>
						<td><?=$_SESSION['name']?></td>
					</tr>
					<tr>
						<td>Password:</td>
						<td><?=$password?></td>
					</tr>
					<tr>
						<td>Email:</td>
						<td><?=$email?></td>
					</tr>
				</table>
			</div>
		</div>
	</body>
</html>将填充帐户信息的简单布局。如果您导航到profile.php文件,它将如下所示:

请记住,密码是加密的,因此除非您创建一个新的会话变量并将密码存储在authenticate.php文件中,否则您无法看到解密后的密码。
7. 创建注销脚本
创建注销脚本很简单。您需要做的就是销毁在身份验证文件中声明的会话。
编辑logout.php文件并添加以下代码:
<?php
session_start();
session_destroy();
// Redirect to the login page:
header('Location: index.html');
?>
初始化会话,销毁它们,并将用户重定向到登录页面。我们使用会话来确定用户是否登录,因此通过删除它们,用户将不会登录。
结论
您现在应该对登录系统如何与 PHP 和 MySQL 一起工作有了基本的了解。您可以自由使用源代码并将其合并到您自己的项目中。
下一步是创建一个注册系统,使访客能够注册。
不要忘记关注我们并分享这篇文章,因为它将帮助我们创建未来的教程并使用新功能更新现有内容。
本系列的下一个教程:使用 PHP 和 MySQL 的安全注册系统


 6591
6591


 被折叠的 条评论
为什么被折叠?
被折叠的 条评论
为什么被折叠?
 到【灌水乐园】发言


