


在本教程中,我将指导您如何开发一个弹簧启动 Web 应用程序来管理 Oracle 数据库中的数据。以下是将要使用的关键技术:
- 春季 JDBC 通过 Jdbc 模板访问关系数据库 (Oracle)。我们可以使用春季 JDBC 对单个表执行简单的 CRUD 操作,而不是休眠。您将看到弹簧如何简化 JDBC 的编程。
- 弹簧MVC用于控制器层,作为弹簧Web应用程序的标准。
- 百里叶用于视图层而不是经典的JSP,因为百里叶比JSP和JSTL更现代,更简单,更易于使用。
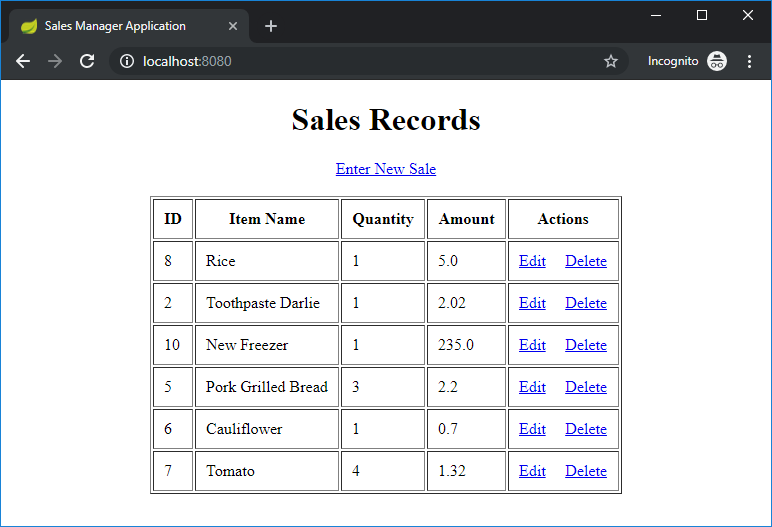
您将看到弹簧靴如何将所有这些部分连接在一起并大大简化了编码过程,而弹簧JDBC是满足简单需求的不错选择。通过完成本教程,您将能够开发一个如下所示的Spring Boot应用程序:此应用程序允许用户管理杂货店的日常销售。目录:
1. 创建数据库
我们的弹簧启动Web应用程序将管理具有以下结构的表中的数据:
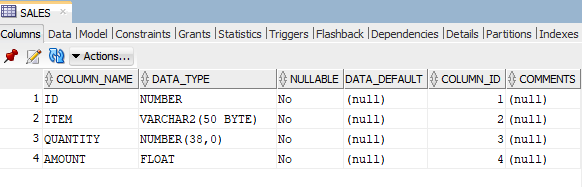
您可以在 SQL 开发人员工具中运行以下语句来创建此表:
|
1
2
3
4
5
6
7
|
CREATE TABLE "SALES" (
"ID" NUMBER NOT NULL ENABLE,
"ITEM" VARCHAR2(50 BYTE) NOT NULL ENABLE,
"QUANTITY" NUMBER(*,0) NOT NULL ENABLE,
"AMOUNT" FLOAT(126) NOT NULL ENABLE,
CONSTRAINT "SALES_PK" PRIMARY KEY ("ID")
)
|
由于 Oracle 不支持主键的自动递增属性,因此我们需要创建一个序列和一个触发器,以便可以自动生成 ID 列的值。运行以下语句以创建序列:
|
1
|
CREATE SEQUENCE "SALE_SEQUENCE" MINVALUE 1 MAXVALUE 100000 INCREMENT BY 1 START WITH 1;
|
并执行以下 Oracle SQL 脚本以创建触发器:
|
1
2
3
4
5
6
7
8
9
10
|
CREATE TRIGGER "SYSTEM"."SALE_PRIMARY_KEY_TRG"
before insert on "SYSTEM"."SALESABC"
for each row
begin
if inserting then
if :NEW."ID" is null then
select SALE_SEQUENCE_ABC.nextval into :NEW."ID" from dual;
end if;
end if;
end;
|
您可以使用 Oracle SQL 开发人员更轻松地创建序列和触发。
2. 在 Eclipse 中创建弹簧启动项目
创建一个名为“销售经理”的新 Maven 项目,并确保 pom.xml 文件包含以下内容:
|
1
2
3
4
5
6
7
8
9
10
11
12
13
14
15
16
17
18
19
20
21
22
23
24
25
26
27
28
29
30
31
32
33
34
35
36
37
38
39
40
41
42
43
44
45
46
47
48
|
<project ...>
<modelVersion>4.0.0</modelVersion>
<groupId>net.codejava</groupId>
<artifactId>SalesManager</artifactId>
<version>0.0.1-SNAPSHOT</version>
<properties>
<java.version>1.8</java.version>
</properties>
<parent>
<groupId>org.springframework.boot</groupId>
<artifactId>spring-boot-starter-parent</artifactId>
<version>2.1.8.RELEASE</version>
</parent>
<dependencies>
<dependency>
<groupId>org.springframework.boot</groupId>
<artifactId>spring-boot-starter-jdbc</artifactId>
</dependency>
<dependency>
<groupId>org.springframework.boot</groupId>
<artifactId>spring-boot-starter-web</artifactId>
</dependency>
<dependency>
<groupId>org.springframework.boot</groupId>
<artifactId>spring-boot-starter-thymeleaf</artifactId>
</dependency>
<dependency>
<groupId>com.oracle</groupId>
<artifactId>ojdbc8</artifactId>
<version>1.0</version>
<scope>system</scope>
<systemPath>C:/Path/To/Oracle/ojdbc8-full/ojdbc8.jar</systemPath>
</dependency>
</dependencies>
<build>
<plugins>
<plugin>
<groupId>org.springframework.boot</groupId>
<artifactId>spring-boot-maven-plugin</artifactId>
</plugin>
</plugins>
</build>
</project>
|
如您所见,我们使用弹簧启动版本 2.1.8,支持弹簧 JDBC(弹簧启动器-jdbc)、弹簧 MVC(弹簧启动启动器-Web)和胸腺(弹簧启动启动器-百里叶)。请注意,要使用 Oracle JDBC 驱动程序,您必须从 Oracle 的网站手动下载它(您必须使用 Oracle 的帐户登录)并将 ojdbc8.jar 文件放在计算机上的某个位置,并如上所述使用 Maven 依赖项。
3. 指定数据库连接属性
接下来,在项目的 src/主/资源目录下创建应用程序属性,其中包含以下内容:
|
1
2
3
4
|
spring.datasource.url=jdbc:oracle:thin:@localhost:1521:dbname
spring.datasource.username=user
spring.datasource.password=pass
logging.level.root=INFO
|
根据您的环境相应地更新数据库名称、用户名和密码。
4. 代码域模型类
使用映射到数据库中 SALES 表列的字段创建 Sale 类:
|
1
2
3
4
5
6
7
8
9
10
11
12
13
14
15
16
17
18
19
20
|
package net.codejava;
public class Sale {
private int id;
private String item;
private int quantity;
private float amount;
protected Sale() {
}
protected Sale(String item, int quantity, float amount) {
this.item = item;
this.quantity = quantity;
this.amount = amount;
}
// getters and setters go here...
}
|
请注意,为简洁起见,未显示获取器和设置器。因此,您必须使用 IDE 生成它们。
5. 码道类
接下来,我们需要编写一个类,该类使用春季 JDBC 对 SALES 表执行 CRUD 操作。使用以下结构创建销售道类:
|
1
2
3
4
5
6
7
8
9
10
11
12
13
14
15
16
17
18
19
20
21
22
23
24
25
26
27
28
29
30
31
32
|
package net.codejava;
import java.util.List;
import org.springframework.beans.factory.annotation.Autowired;
import org.springframework.jdbc.core.JdbcTemplate;
import org.springframework.stereotype.Repository;
import org.springframework.transaction.annotation.Transactional;
@Repository
@Transactional
public class SalesDAO {
@Autowired
private JdbcTemplate jdbcTemplate;
public List<Sale> list() {
return null;
}
public void save(Sale sale) {
}
public Sale get(int id) {
return null;
}
public void update(Sale sale) {
}
public void delete(int id) {
}
}
|
这里的关键点是,我们指定一个 JdbcTemplate 类的实例将由 Spring 自动创建和注入:
|
1
2
|
@Autowired
private JdbcTemplate jdbcTemplate;
|
然后,它将在类方法中用于执行 CRUD 操作。我们将逐步实现所有这些方法。另请注意,此 DAO 类使用@Transactional注释进行注释,因此 Spring 框架将自动注入代码以在 JDBC 事务中执行其方法。
6. 代码弹簧 MVC 控制器类
当我们开发一个Spring Boot Web应用程序时,我们需要有一个控制器类来处理来自客户端的请求。使用以下初始代码创建应用程序控制器类:
|
1
2
3
4
5
6
7
8
9
10
11
12
|
package net.codejava;
import org.springframework.stereotype.Controller;
@Controller
public class AppController {
@Autowired
private SalesDAO dao;
// handler methods go here...
}
|
这里的关键点是 SalesDAO 类的一个实例将由 Spring 自动创建和注入。然后在处理程序方法中,我们将调用其 CRUD 方法。
7. 代码弹簧启动应用程序主类
接下来,我们需要对主类进行编码以运行我们的弹簧启动 Web 应用程序。创建销售经理类,如下所示:
|
1
2
3
4
5
6
7
8
9
10
11
12
|
package net.codejava;
import org.springframework.boot.SpringApplication;
import org.springframework.boot.autoconfigure.SpringBootApplication;
@SpringBootApplication
public class SalesManager {
public static void main(String[] args) {
SpringApplication.run(SalesManager.class, args);
}
}
|
该程序将启动托管我们的弹簧启动Web应用程序的嵌入式Tomcat服务器。接下来,让我们看看如何详细实现每个 CRUD 函数。
8. 实现列表销售功能
该功能列出了主页上出售的所有商品。因此,为 SalesDAO 类的 list() 方法编写代码,如下所示:
|
1
2
3
4
5
6
7
8
|
public List<Sale> list() {
String sql = "SELECT * FROM SALES";
List<Sale> listSale = jdbcTemplate.query(sql,
BeanPropertyRowMapper.newInstance(Sale.class));
return listSale;
}
|
这里很酷的事情是,豆属性行映射器执行从 JDBC 结果集到 Java 对象的映射值。您需要确保 Sale 类中字段的名称与表中列的名称相同。然后,在应用控制器类中编写处理程序方法,如下所示:
|
1
2
3
4
5
6
|
@RequestMapping("/")
public String viewHomePage(Model model) {
List<Sale> listSale = dao.list();
model.addAttribute("listSale", listSale);
return "index";
}
|
现在我们编写第一个百合饼视图文件。在 src/主/资源下创建模板文件夹。使用以下代码在模板下创建索引.html文件:
|
1
2
3
4
5
6
7
8
9
10
11
12
13
14
15
16
17
18
19
20
21
22
23
24
25
26
27
28
29
30
31
32
33
34
35
36
37
38
39
|
<!DOCTYPE html>
<html xmlns="http://www.w3.org/1999/xhtml"
xmlns:th="http://www.thymeleaf.org">
<head>
<meta charset="utf-8"/>
<title>Sales Manager Application</title>
</head>
<body>
<div align="center">
<h1>Sales Records</h1>
<a href="/new">Enter New Sale</a>
<br/><br/>
<table border="1" cellpadding="10">
<thead>
<tr>
<th>ID</th>
<th>Item Name</th>
<th>Quantity</th>
<th>Amount</th>
<th>Actions</th>
</tr>
</thead>
<tbody>
<tr th:each="sale : ${listSale}">
<td th:text="${sale.id}">ID</td>
<td th:text="${sale.item}">Item Name</td>
<td th:text="${sale.quantity}">Quantity</td>
<td th:text="${sale.amount}">Amount</td>
<td>
<a th:href="/@{'/edit/' + ${sale.id}}">Edit</a>
<a th:href="/@{'/delete/' + ${sale.id}}">Delete</a>
</td>
</tr>
</tbody>
</table>
</div>
</body>
</html>
|
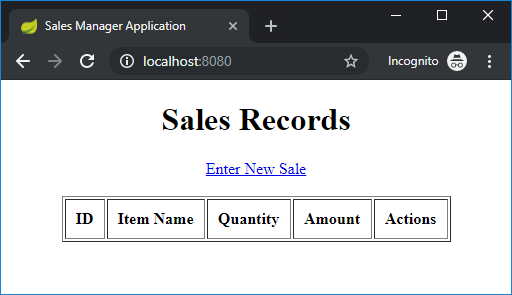
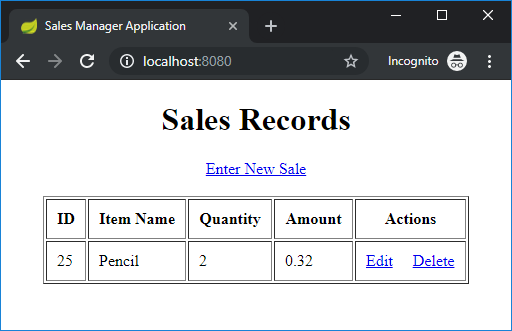
现在,我们可以运行弹簧启动应用程序进行测试了。运行销售经理类,您将看到“弹簧启动”徽标出现在控制台中,其中包含一些日志记录信息。打开Web浏览器并键入URL http://localhost:8080,您将看到一个空列表,如下所示:这是因为 SALES 表中没有数据。使用Oracle SQL开发人员工具插入一行并刷新网页,您将看到结果:瞧,它工作完美。
9. 实现创建销售功能
此功能允许用户输入已售商品的详细信息。在控制器类中添加另一个处理程序方法,如下所示:
|
1
2
3
4
5
6
7
|
@RequestMapping("/new")
public String showNewForm(Model model) {
Sale sale = new Sale();
model.addAttribute("sale", sale);
return "new_form";
}
|
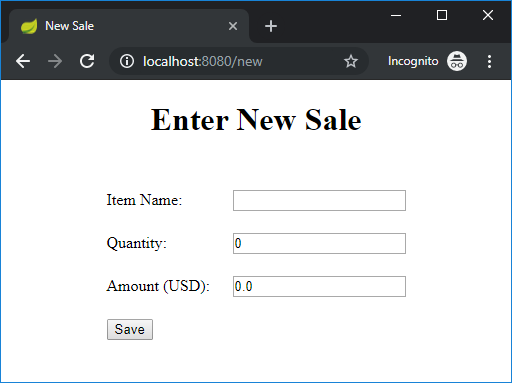
这将处理主页中“进入新销售”超链接的单击事件。对于视图,使用以下代码在模板文件夹中创建new_form.html文件:
|
1
2
3
4
5
6
7
8
9
10
11
12
13
14
15
16
17
18
19
20
21
22
23
24
25
26
27
28
29
30
31
32
33
34
|
<!DOCTYPE html>
<html xmlns="http://www.w3.org/1999/xhtml"
xmlns:th="http://www.thymeleaf.org">
<head>
<meta charset="utf-8" />
<title>New Sale</title>
</head>
<body>
<div align="center">
<h1>Enter New Sale</h1>
<br />
<form action="#" th:action="@{/save}" th:object="${sale}"
method="post">
<table border="0" cellpadding="10">
<tr>
<td>Item Name:</td>
<td><input type="text" th:field="*{item}" /></td>
</tr>
<tr>
<td>Quantity:</td>
<td><input type="text" th:field="*{quantity}" /></td>
</tr>
<tr>
<td>Amount (USD):</td>
<td><input type="text" th:field="*{amount}" /></td>
</tr>
<tr>
<td colspan="2"><button type="submit">Save</button> </td>
</tr>
</table>
</form>
</div>
</body>
|
现在终止销售经理程序并再次运行它进行测试。单击“输入新销售”,您将看到新表单:接下来,让我们编写代码来处理此表单上“保存”按钮的单击。在 SalesDAO 类中实现 save() 方法,如下所示:
|
1
2
3
4
5
6
7
|
public void save(Sale sale) {
SimpleJdbcInsert insertActor = new SimpleJdbcInsert(jdbcTemplate);
insertActor.withTableName("sales").usingColumns("item", "quantity", "amount");
BeanPropertySqlParameterSource param = new BeanPropertySqlParameterSource(sale);
insertActor.execute(param);
}
|
在这里,我们使用简单 Jdbc插入类,因此我们不必编写冗长的 SQL 插入语句。阅读本教程以了解有关简单Jdbc插入的更多信息。控制器类中 hander 方法的代码如下所示:
|
1
2
3
4
5
6
|
@RequestMapping(value = "/save", method = RequestMethod.POST)
public String save(@ModelAttribute("sale") Sale sale) {
dao.save(sale);
return "redirect:/";
}
|
现在,您可以再次停止/启动应用程序以测试创建新的销售功能。
10. 实施编辑/更新销售功能
此功能允许用户编辑和更新促销物料。请注意,列表中的每个项目旁边都有一个超链接“编辑”。在控制器类中添加以下处理程序方法:
|
1
2
3
4
5
6
7
8
|
@RequestMapping("/edit/{id}")
public ModelAndView showEditForm(@PathVariable(name = "id") int id) {
ModelAndView mav = new ModelAndView("edit_form");
Sale sale = dao.get(id);
mav.addObject("sale", sale);
return mav;
}
|
在 SalesDAO 类中实现 get() 方法,如下所示:
|
1
2
3
4
5
6
7
|
public Sale get(int id) {
String sql = "SELECT * FROM SALES WHERE id = ?";
Object[] args = {id};
Sale sale = jdbcTemplate.queryForObject(sql, args,
BeanPropertyRowMapper.newInstance(Sale.class));
return sale;
}
|
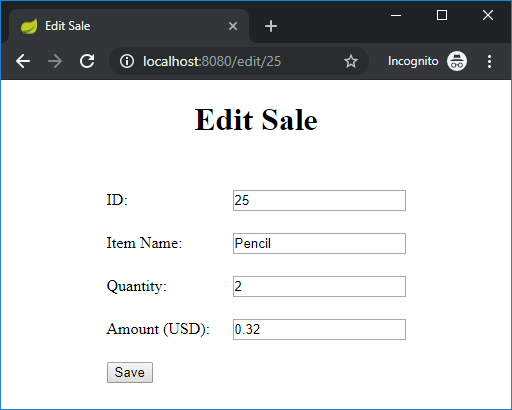
按如下方式对edit_form.html进行编码:
|
1
2
3
4
5
6
7
8
9
10
11
12
13
14
15
16
17
18
19
20
21
22
23
24
25
26
27
28
29
30
31
32
33
34
35
36
37
38
|
<!DOCTYPE html>
<html xmlns="http://www.w3.org/1999/xhtml"
xmlns:th="http://www.thymeleaf.org">
<head>
<meta charset="utf-8" />
<title>Edit Sale</title>
</head>
<body>
<div align="center">
<h1>Edit Sale</h1>
<br />
<form action="#" th:action="@{/update}" th:object="${sale}"
method="post">
<table border="0" cellpadding="10">
<tr>
<td>ID:</td>
<td><input type="text" th:field="*{id}" readonly="readonly" /></td>
</tr>
<tr>
<td>Item Name:</td>
<td><input type="text" th:field="*{item}" /></td>
</tr>
<tr>
<td>Quantity:</td>
<td><input type="text" th:field="*{quantity}" /></td>
</tr>
<tr>
<td>Amount (USD):</td>
<td><input type="text" th:field="*{amount}" /></td>
</tr>
<tr>
<td colspan="2"><button type="submit">Save</button> </td>
</tr>
</table>
</form>
</div>
</body>
|
编辑窗体如下所示:在控制器类中使用以下方法编写代码以处理编辑窗体的提交:
|
1
2
3
4
5
6
|
@RequestMapping(value = "/update", method = RequestMethod.POST)
public String update(@ModelAttribute("sale") Sale sale) {
dao.update(sale);
return "redirect:/";
}
|
并在 SalesDAO 类中对 update() 方法进行编码,如下所示:
|
1
2
3
4
5
6
7
|
public void update(Sale sale) {
String sql = "UPDATE SALES SET item=:item, quantity=:quantity, amount=:amount WHERE id=:id";
BeanPropertySqlParameterSource param = new BeanPropertySqlParameterSource(sale);
NamedParameterJdbcTemplate template = new NamedParameterJdbcTemplate(jdbcTemplate);
template.update(sql, param);
}
|
现在,您可以测试编辑/更新功能。
11. 实施删除销售功能
对 SalesDAO 类的删除() 方法进行编码,如下所示:
|
1
2
3
4
|
public void delete(int id) {
String sql = "DELETE FROM SALES WHERE id = ?";
jdbcTemplate.update(sql, id);
}
|
请注意,在主页中,每个项目旁边都有一个“删除”超链接。在控制器类中添加处理程序方法,如下所示:
|
1
2
3
4
5
|
@RequestMapping("/delete/{id}")
public String delete(@PathVariable(name = "id") int id) {
dao.delete(id);
return "redirect:/";
}
|
现在,您可以测试删除销售功能。
12. 打包并运行我们的弹簧启动 Web 应用程序
由于我们使用Oracle JDBC驱动程序作为系统范围,因此我们需要更新pom.xml文件中的构建部分,如下所示:
|
1
2
3
4
5
6
7
8
9
10
11
|
<build>
<plugins>
<plugin>
<groupId>org.springframework.boot</groupId>
<artifactId>spring-boot-maven-plugin</artifactId>
<configuration>
<includeSystemScope>true</includeSystemScope>
</configuration>
</plugin>
</plugins>
</build>
|
这告诉梅文在构建中包含系统 JAR。要将我们的Spring Boot Web应用程序打包为可执行的JAR文件,您可以在命令行提示符下运行mvn包命令,或者在Eclipse:右键单击该项目,单击以Maven构建>运行方式,然后输入包作为目标。然后,您将在项目的目标目录下看到销售经理-0.0.1-快照.jar文件。您可以双击要运行的 JAR 文件,也可以从命令提示符处键入以下命令:
|
1
|
java -jar SalesManager-0.0.1-SNAPSHOT.jar
|
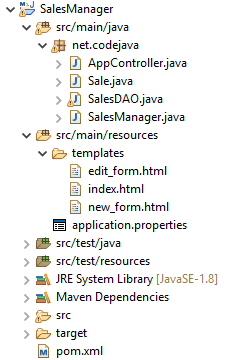
供您参考,这是Eclipse中项目结构的屏幕截图:这就是如何使用春季JDBC,春季MVC和百里叶开发访问Oracle数据库的春季启动Web应用程序。您可以在下面的附件部分中下载示例项目。您还可以观看下面的视频教程:查看以下教程以了解有关将 JDBC 与 Spring 配合使用的更多信息:
Download Java Code Example/Project - Spring Boot CRUD Web Application with JDBC - Thymeleaf - Oracle


 871
871


 被折叠的 条评论
为什么被折叠?
被折叠的 条评论
为什么被折叠?
 到【灌水乐园】发言


