


前言📇
- 本文参考博客魔改教程总结(一)、博客魔改教程总结(二)、Iconfont Inject、糖果屋微调合集
- 本系列基本上都是各位大佬造好的轮子,具体参考 Fomalhaut大佬。其目的在于防止各位大佬的链接失效,且个人复习总结使用,如有侵权请联系删除。
- 本系列起始空白的虚拟机,一步一步搭建魔改页面,使用本地端口。若想部署在其它平台,可自寻查找。
- 鉴于每个人的根目录名称都不一样,本帖博客根目录一律以
[BlogRoot]指代。- 本帖涉及魔改源码的内容,会使用diff代码块标识,复制时请不要忘记删除前面的
+、-符号。- 因为
.pug和.styl以及.yml等对缩进要求较为严格,请尽量不要使用记事本等无法提供语法高亮的文本编辑器进行修改。- 本系列基于
Butterfly主题进行魔改方案编写,hexo 版本6.3.0,Butterfly 版本4.12.0。- 魔改会过程常常引入自定义的css与js文件,具体方法见方法见Hexo博客添加自定义css和js文件
博客搭建与魔改系列教程导航🚥🚥🚥
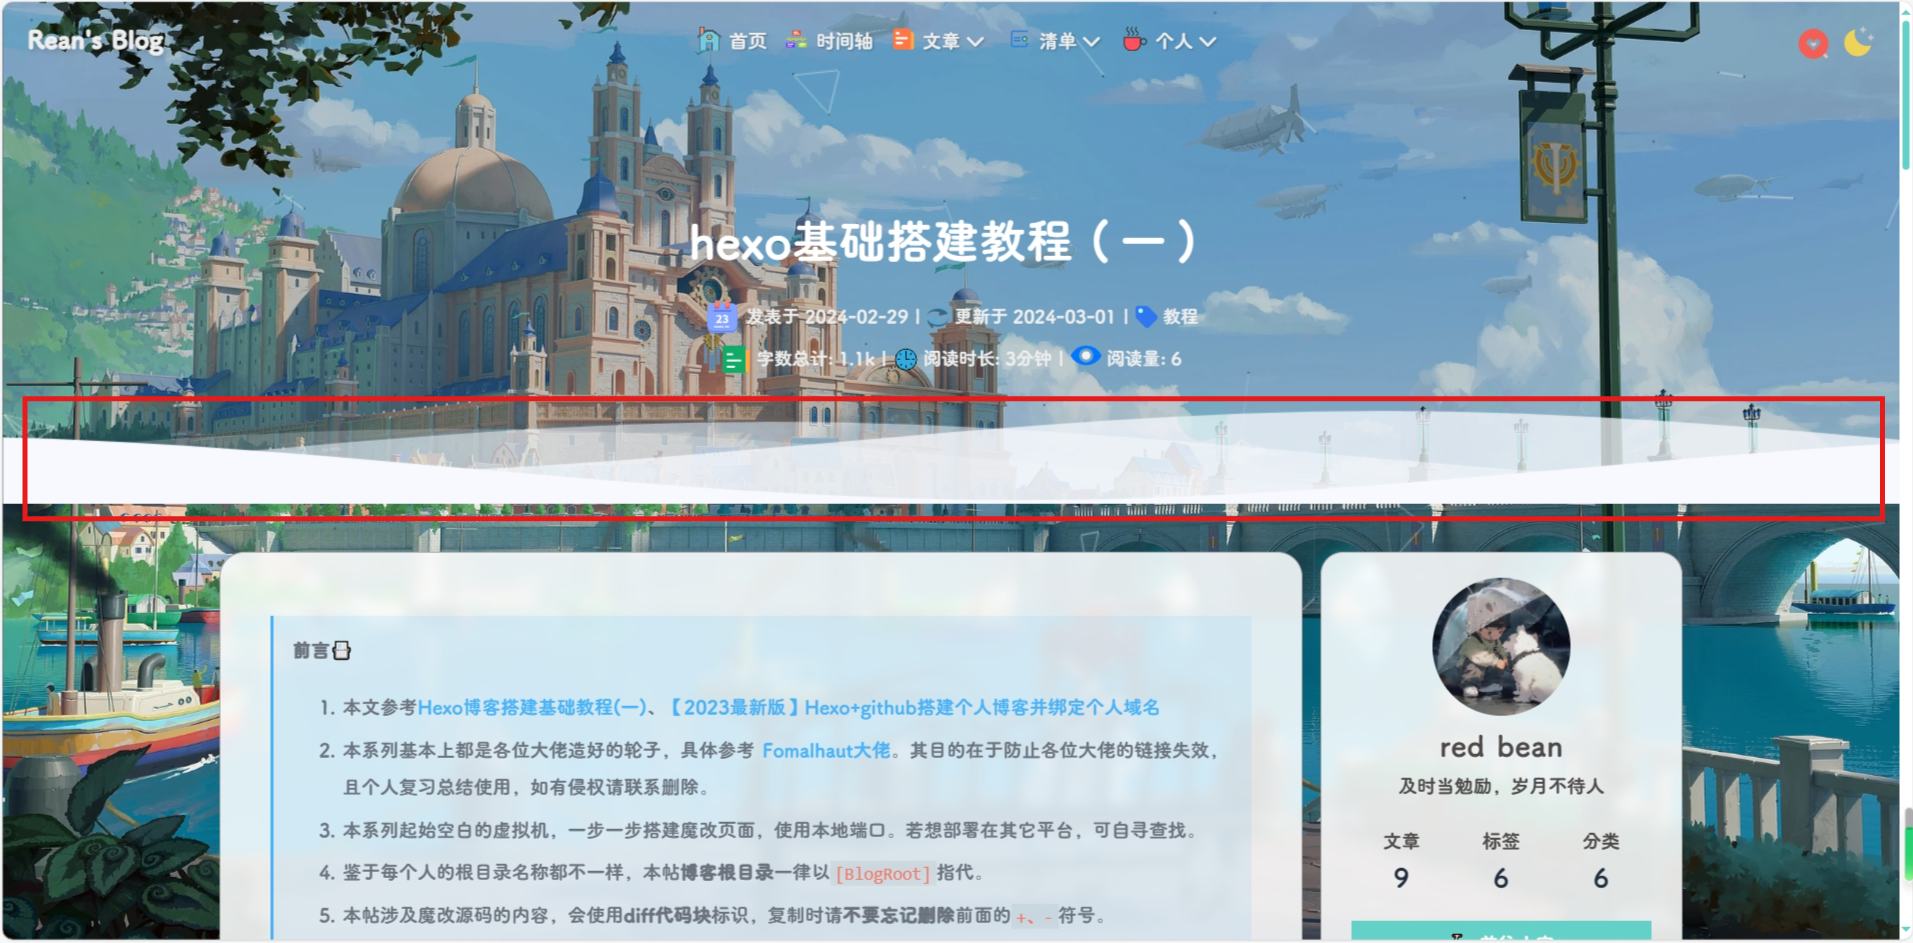
文章页顶波浪线(安知鱼)
{% folding cyan,点击查看教程 %}
{% hideBlock 预览效果 %}
{% endhideBlock %}
-
修改
[BlogRoor]\themes/butterfly/layout/includes/header/index.pug大概第 37 行左右if top_img !== false if is_post() include ./post-info.pug + section.main-hero-waves-area.waves-area + svg.waves-svg(xmlns='http://www.w3.org/2000/svg', xlink='http://www.w3.org/1999/xlink', viewBox='0 24 150 28', preserveAspectRatio='none', shape-rendering='auto') + defs + path#gentle-wave(d='M -160 44 c 30 0 58 -18 88 -18 s 58 18 88 18 s 58 -18 88 -18 s 58 18 88 18 v 44 h -352 Z') + g.parallax + use(href='#gentle-wave', x='48', y='0') + use(href='#gentle-wave', x='48', y='3') + use(href='#gentle-wave', x='48', y='5') + use(href='#gentle-wave', x='48', y='7') #post-top-cover img#post-top-bg(class='nolazyload' src=bg_img) else if is_home() #site-info h1#site-title=site_title if theme.subtitle.enable为了方便复制,提供一份需要修改的部分:
section.main-hero-waves-area.waves-area svg.waves-svg(xmlns='http://www.w3.org/2000/svg', xlink='http://www.w3.org/1999/xlink', viewBox='0 24 150 28', preserveAspectRatio='none', shape-rendering='auto') defs path#gentle-wave(d='M -160 44 c 30 0 58 -18 88 -18 s 58 18 88 18 s 58 -18 88 -18 s 58 18 88 18 v 44 h -352 Z') g.parallax use(href='#gentle-wave', x='48', y='0') use(href='#gentle-wave', x='48', y='3') use(href='#gentle-wave', x='48', y='5') use(href='#gentle-wave', x='48', y='7') -
在
[BlogRoor]\themes/butterfly/layout/includes/header/index.pug最底下加入else #page-site-info h1#site-title=site_title + //- 安知鱼波浪 + //- 归档页,关于页等其他不是文章页的 + section.main-hero-waves-area.waves-area + svg.waves-svg(xmlns='http://www.w3.org/2000/svg', xlink='http://www.w3.org/1999/xlink', viewBox='0 24 150 28', preserveAspectRatio='none', shape-rendering='auto') + defs + path#gentle-wave(d='M -160 44 c 30 0 58 -18 88 -18 s 58 18 88 18 s 58 -18 88 -18 s 58 18 88 18 v 44 h -352 Z') + g.parallax + use(href='#gentle-wave', x='48', y='0') + use(href='#gentle-wave', x='48', y='3') + use(href='#gentle-wave', x='48', y='5') + use(href='#gentle-wave', x='48', y='7') -
然后在
_config.butterfly.yml的[inject.head]或者自定义 css 中 引入以下 css/*-------------------------------- 文章页面波浪线 -------------------------*/ /* 波浪css */ .main-hero-waves-area { width: 100%; position: absolute; left: 0; bottom: -11px; z-index: 5; } .waves-area .waves-svg { width: 100%; height: 5rem; } /* Animation */ .parallax > use { animation: move-forever 25s cubic-bezier(0.55, 0.5, 0.45, 0.5) infinite; } .parallax > use:nth-child(1) { animation-delay: -2s; animation-duration: 7s; fill: #f7f9febd; } .parallax > use:nth-child(2) { animation-delay: -3s; animation-duration: 10s; fill: #f7f9fe82; } .parallax > use:nth-child(3) { animation-delay: -4s; animation-duration: 13s; fill: #f7f9fe36; } .parallax > use:nth-child(4) { animation-delay: -5s; animation-duration: 20s; fill: #f7f9fe; } /* 黑色模式背景 */ [data-theme="dark"] .parallax > use:nth-child(1) { animation-delay: -2s; animation-duration: 7s; fill: #18171dc8; } [data-theme="dark"] .parallax > use:nth-child(2) { animation-delay: -3s; animation-duration: 10s; fill: #18171d80; } [data-theme="dark"] .parallax > use:nth-child(3) { animation-delay: -4s; animation-duration: 13s; fill: #18171d3e; } [data-theme="dark"] .parallax > use:nth-child(4) { animation-delay: -5s; animation-duration: 20s; fill: #18171d; } @keyframes move-forever { 0% { transform: translate3d(-90px, 0, 0); } 100% { transform: translate3d(85px, 0, 0); } } /*Shrinking for mobile*/ @media (max-width: 768px) { .waves-area .waves-svg { height: 40px; min-height: 40px; } } /*-------------------------------- end -------------------------*/ -
需要注意的是 css 中
fill属性可以控制波浪颜色,最好使其中一个颜色与背景颜色一致,否则会显的有点奇怪,然后就是重启项目# git bash hexo cl && hexo g && hexo s # vscode hexo cl; hexo g; hexo s
{% endfolding %}
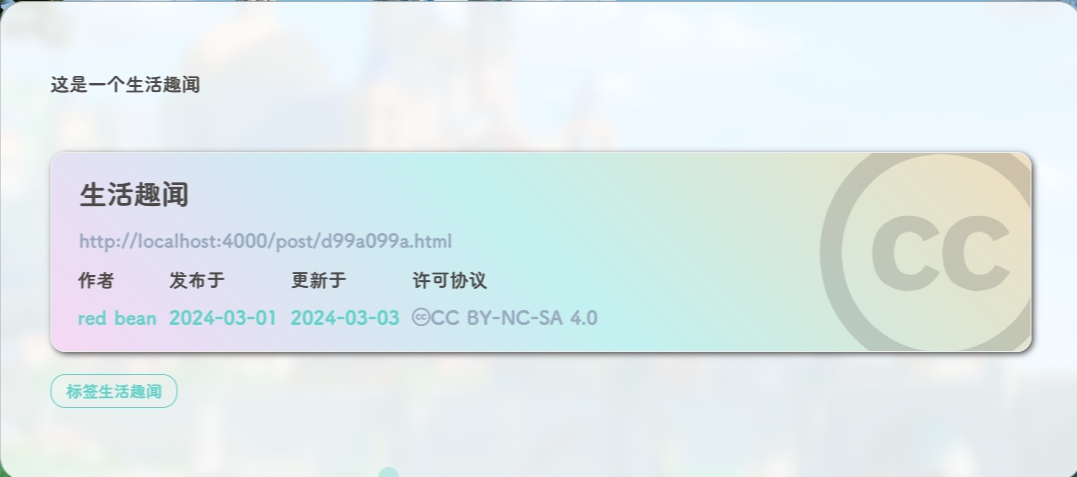
渐变色版权美化(店长+微调)
{% folding cyan,点击查看教程 %}
{% hideBlock 预览效果 %}
{% endhideBlock %}
-
修改
[BlogRoot]\themes\butterfly\layout\includes\post\post-copyright.pug,直接复制以下内容替换原文件内容。此处多次用到了三元运算符作为默认项设置,在确保有主题配置文件的默认项的情况下,也可以在相应文章的front-matter中重新定义作者,原文链接,开源许可协议等内容。if theme.post_copyright.enable && page.copyright !== false - let author = page.copyright_author ? page.copyright_author : config.author - let url = page.copyright_url ? page.copyright_url : page.permalink - let license = page.license ? page.license : theme.post_copyright.license - let license_url = page.license_url ? page.license_url : theme.post_copyright.license_url .post-copyright .post-copyright__title span.post-copyright-info h #[=page.title] .post-copyright__type span.post-copyright-info a(href=url_for(url))= theme.post_copyright.decode ? decodeURI(url) : url .post-copyright-m .post-copyright-m-info .post-copyright-a h 作者 .post-copyright-cc-info h=author .post-copyright-c h 发布于 .post-copyright-cc-info h=date(page.date, config.date_format) .post-copyright-u h 更新于 .post-copyright-cc-info h=date(page.updated, config.date_format) .post-copyright-c h 许可协议 .post-copyright-cc-info a.icon(rel='noopener' target='_blank' title='Creative Commons' href='https://creativecommons.org/') i.fab.fa-creative-commons a(rel='noopener' target='_blank' title=license href=url_for(license_url))=license -
修改
[BlogRoot]\themes\butterfly\source\css\_layout\post.styl,直接复制以下内容,替换原文件,这个文件就是自己调节样式的。其中,184行是白天模式的背景色,这里默认是我网站的渐变色,大家可以根据自己的喜好调节;253行是夜间模式的发光光圈颜色,大家也可以自行替换成自己喜欢的颜色:beautify() headStyle(fontsize) padding-left: unit(fontsize + 12, 'px') &:before margin-left: unit((-(fontsize + 6)), 'px') font-size: unit(fontsize, 'px') &:hover padding-left: unit(fontsize + 18, 'px') h1, h2, h3, h4, h5, h6 transition: all .2s ease-out &:before position: absolute top: calc(50% - 7px) color: $title-prefix-icon-color content: $title-prefix-icon line-height: 1 transition: all .2s ease-out @extend .fontawesomeIcon &:hover &:before color: $light-blue h1 headStyle(20) h2 headStyle(18) h3 headStyle(16) h4 headStyle(14) h5 headStyle(12) h6 headStyle(12) ol, ul p margin: 0 0 8px li &::marker color: $light-blue font-weight: 600 font-size: 1.05em &:hover &::marker color: var(--pseudo-hover) ul > li list-style-type: circle #article-container word-wrap: break-word overflow-wrap: break-word a color: $theme-link-color &:hover text-decoration: underline img display: block margin: 0 auto 20px max-width: 100% transition: filter 375ms ease-in .2s p margin: 0 0 16px iframe margin: 0 0 20px if hexo-config('anchor') a.headerlink &:after @extend .fontawesomeIcon float: right color: var(--headline-presudo) content: '\f0c1' font-size: .95em opacity: 0 transition: all .3s &:hover &:after color: var(--pseudo-hover) h1, h2, h3, h4, h5, h6 &:hover a.headerlink &:after opacity: 1 ol, ul ol, ul padding-left: 20px li margin: 4px 0 p margin: 0 0 8px if hexo-config('beautify.enable') if hexo-config('beautify.field') == 'site' beautify() else if hexo-config('beautify.field') == 'post' &.post-content beautify() > :last-child margin-bottom: 0 !important #post .tag_share .post-meta &__tag-list display: inline-block &__tags display: inline-block margin: 8px 8px 8px 0 padding: 0 12px width: fit-content border: 1px solid $light-blue border-radius: 12px color: $light-blue font-size: .85em transition: all .2s ease-in-out &:hover background: $light-blue color: var(--white) .post_share display: inline-block float: right margin: 8px 0 width: fit-content .social-share font-size: .85em .social-share-icon margin: 0 4px width: w = 1.85em height: w font-size: 1.2em line-height: w .post-copyright position: relative margin: 40px 0 10px padding: 10px 16px border: 1px solid var(--light-grey) transition: box-shadow .3s ease-in-out overflow: hidden border-radius: 12px!important background: linear-gradient(45deg, #f6d8f5, #c2f1f0, #f0debf); &:before background var(--heo-post-blockquote-bg) position absolute right -26px top -120px content '\f25e' font-size 200px font-family 'Font Awesome 5 Brands' opacity .2 &:hover box-shadow: 0 0 8px 0 rgba(232, 237, 250, .6), 0 2px 4px 0 rgba(232, 237, 250, .5) .post-copyright &-meta color: $light-blue font-weight: bold &-info padding-left: 6px a text-decoration: none word-break: break-word &:hover text-decoration: none .post-copyright-cc-info color: $theme-color; .post-outdate-notice position: relative margin: 0 0 20px padding: .5em 1.2em border-radius: 3px background-color: $noticeOutdate-bg color: $noticeOutdate-color if hexo-config('noticeOutdate.style') == 'flat' padding: .5em 1em .5em 2.6em border-left: 5px solid $noticeOutdate-border &:before @extend .fontawesomeIcon position: absolute top: 50% left: .9em color: $noticeOutdate-border content: '\f071' transform: translateY(-50%) .ads-wrap margin: 40px 0 .post-copyright-m-info .post-copyright-a, .post-copyright-c, .post-copyright-u display inline-block width fit-content padding 2px 5px [data-theme="dark"] #post .post-copyright background #07080a text-shadow #bfbeb8 0 0 2px border 1px solid rgb(19 18 18 / 35%) box-shadow 0 0 5px var(--theme-color) animation flashlight 1s linear infinite alternate .post-copyright-info color #e0e0e4 #post .post-copyright__title font-size 22px .post-copyright__notice font-size 15px .post-copyright box-shadow 2px 2px 5px -
默认项的配置
-
作者:
[BlogRoot]\_config.yml中的author配置项# Site title: Akilarの糖果屋 subtitle: Akilar.top description: keywords: author: Akilar #默认作者 language: zh-CN timezone: '' -
许可协议:
[BlogRoot]\_config.butterfly.yml中的license和license_url配置项post_copyright: enable: true decode: true license: CC BY-NC-SA 4.0 license_url: https://creativecommons.org/licenses/by-nc-sa/4.0/
-
-
页面覆写配置项,修改对应文章的
front-matter--- title: Copyright-beautify # 文章名称 date: 2021-03-02 13:52:46 # 文章发布日期 updated: 2021-03-02 13:52:46 # 文章更新日期 copyright_author: Nesxc # 作者覆写 copyright_url: https://www.nesxc.com/post/hexocc.html # 原文链接覆写 license: # 许可协议名称覆写 license_url: # 许可协议链接覆写 ---
{% endfolding %}
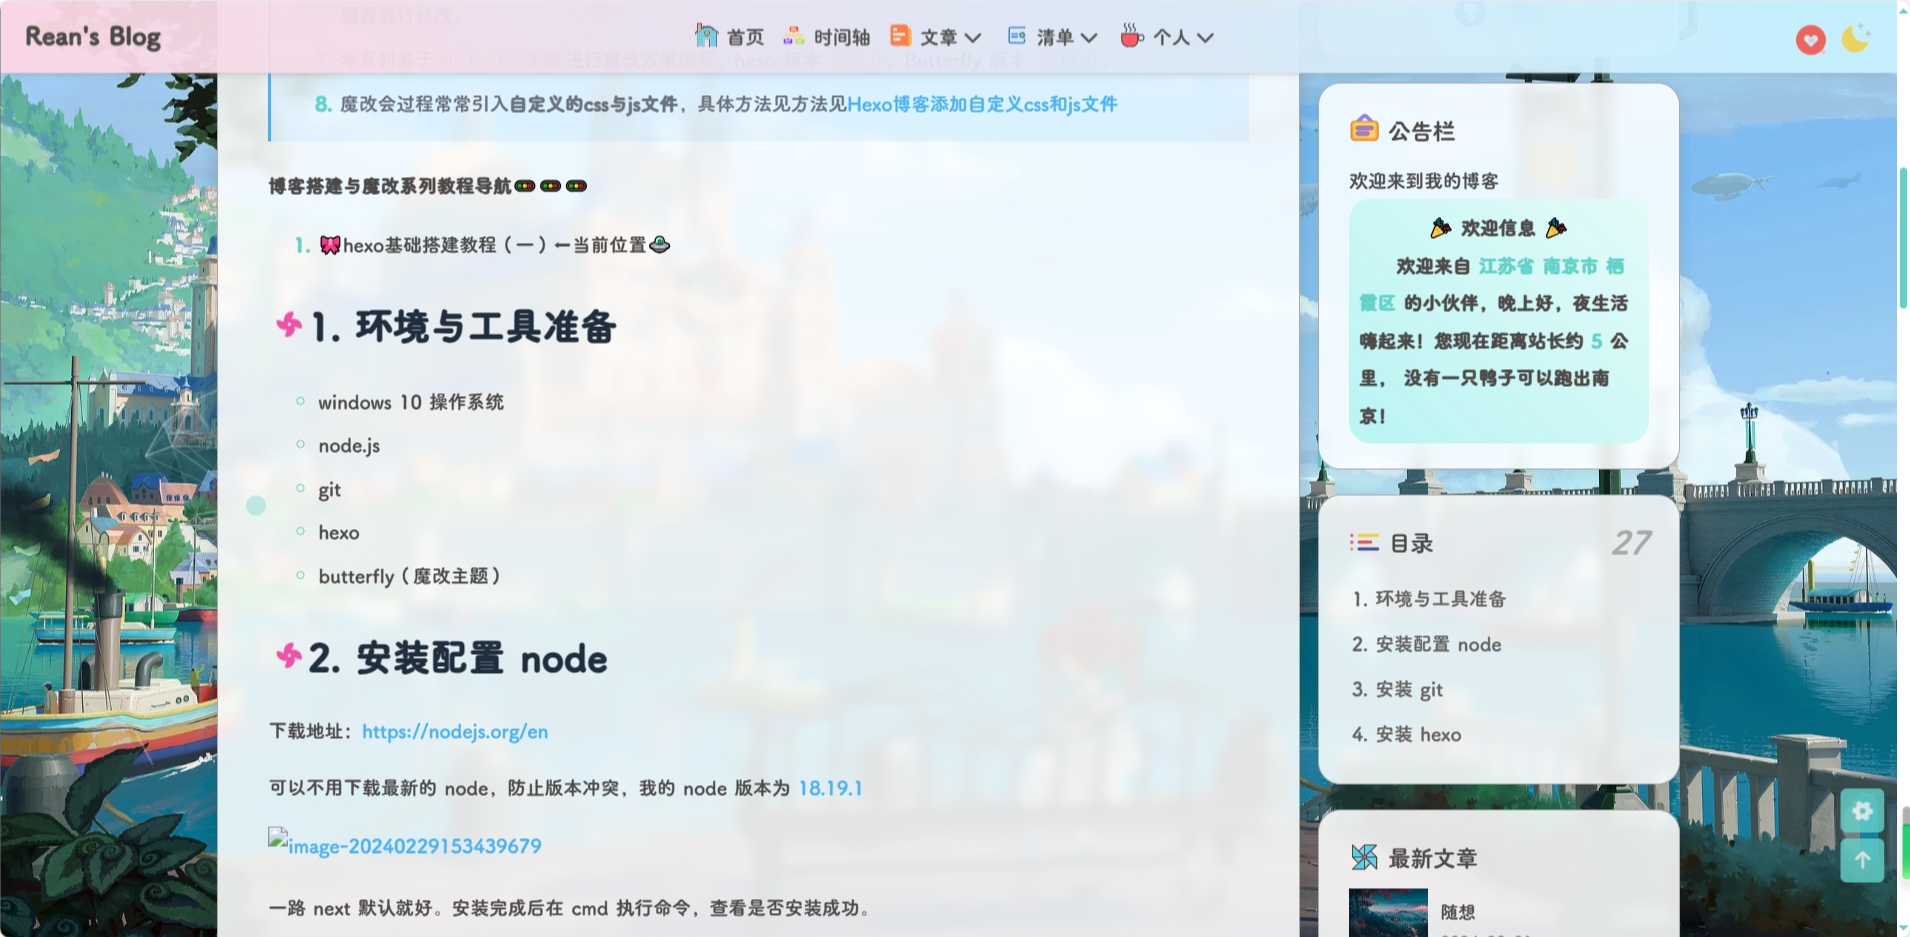
文章H1~H6标题小风车转动效果
{% folding cyan,点击查看教程 %}
{% hideBlock 预览效果 %}
{% endhideBlock %}
-
修改主题配置文件
_config.butterfly.yml文件的beautify配置项:beautify: enable: true field: post # site/post # title-prefix-icon: '\f0c1' 原内容 title-prefix-icon: '\f863' title-prefix-icon-color: "#F47466" -
在
[BlogRoot]\source\css\custom.css中加入以下代码,可以自己调节一下转速:/* 文章页H1-H6图标样式效果 */ /* 控制风车转动速度 4s那里可以自己调节快慢 */ h1::before, h2::before, h3::before, h4::before, h5::before, h6::before { -webkit-animation: ccc 4s linear infinite; animation: ccc 4s linear infinite; } /* 控制风车转动方向 -1turn 为逆时针转动,1turn 为顺时针转动,相同数字部分记得统一修改 */ @-webkit-keyframes ccc { 0% { -webkit-transform: rotate(0deg); transform: rotate(0deg); } to { -webkit-transform: rotate(-1turn); transform: rotate(-1turn); } } @keyframes ccc { 0% { -webkit-transform: rotate(0deg); transform: rotate(0deg); } to { -webkit-transform: rotate(-1turn); transform: rotate(-1turn); } } /* 设置风车颜色 */ #content-inner.layout h1::before { color: #ef50a8; margin-left: -1.55rem; font-size: 1.3rem; margin-top: -0.23rem; } #content-inner.layout h2::before { color: #fb7061; margin-left: -1.35rem; font-size: 1.1rem; margin-top: -0.12rem; } #content-inner.layout h3::before { color: #ffbf00; margin-left: -1.22rem; font-size: 0.95rem; margin-top: -0.09rem; } #content-inner.layout h4::before { color: #a9e000; margin-left: -1.05rem; font-size: 0.8rem; margin-top: -0.09rem; } #content-inner.layout h5::before { color: #57c850; margin-left: -0.9rem; font-size: 0.7rem; margin-top: 0rem; } #content-inner.layout h6::before { color: #5ec1e0; margin-left: -0.9rem; font-size: 0.66rem; margin-top: 0rem; } /* s设置风车hover动效 6s那里可以自己调节快慢*/ #content-inner.layout h1:hover, #content-inner.layout h2:hover, #content-inner.layout h3:hover, #content-inner.layout h4:hover, #content-inner.layout h5:hover, #content-inner.layout h6:hover { color: var(--theme-color); } #content-inner.layout h1:hover::before, #content-inner.layout h2:hover::before, #content-inner.layout h3:hover::before, #content-inner.layout h4:hover::before, #content-inner.layout h5:hover::before, #content-inner.layout h6:hover::before { color: var(--theme-color); -webkit-animation: ccc 6s linear infinite; animation: ccc 6s linear infinite; } /*--- 图片圆角 -------*/ /* 下一篇文章的圆角 */ .relatedPosts > .relatedPosts-list > div, #pagination.pagination-post, .postImgHover img, #pagination .prev-post img, #pagination .next-post img, .relatedPosts > .relatedPosts-list > div img { border-radius: 12px; } /*--- 文章页H1-H6图标样式效果end ---*/ -
在主题配置文件
_config.butterfly.yml的inject配置项进行引入(不再赘述)。
{% endfolding %}
版权下面标签排列
{% folding cyan,点击查看教程 %}
{% hideBlock 预览效果 %}

{% endhideBlock %}
-
首先在
[BlogRoot]\themes\butterfly\layout\post.pug中修改如下,大约在 14 行左右.tag_share if (theme.post_meta.post.tags) .post-meta__tag-list each item, index in page.tags.data + a(href=url_for(item.path)).post-meta__tags + .tags-punctuation + svg.faa-tada.icon(style="height:1.1em;width:1.1em;fill:currentColor;position:relative;margin-right:3px" aria-hidden="true") + use(xlink:href='#icon-zhifeiji') + =item.name include includes/third-party/share/index.pug -
在
custom.css中添加/*-------------- 版权下面标签排列 ---------*/ #post .tag_share .post-meta__tag-list { display: flex; } #post .tag_share .post-meta__tags { border: 1px solid var(--theme-color) !important; color: var(--theme-color); display: flex; border-radius: 20px; } a:hover { color: var(--theme-color); } #post .tag_share .post-meta__tags:hover { background: var(--theme-color) !important; } /*-------- 版权下面标签排列end ---------*/
{% endfolding %}
cdn.jsdelivr.net 挂载错误
{% folding cyan,点击查看教程 %}
目前jsdelivr被墙了,即被屏蔽,这导致国内大陆地区无法访问。很多插件、开源项目用到了jsdelivr,解决方法的核心思想就是换一个服务商,换一个cdn服务提供商。解决方法:①将所有 cdn.jsdelivr.net 更换为 fastly.jsdelivr.net实例:xxxx://cdn.jsdelivr.net/npm/xxxx/src/assets/images/logo.png改成xx
-
在
[BlogRoot]\themes\butterfly\layout\includes\head\preconnect.pug中修改const providers = { + 'jsdelivr': '//fastly.jsdelivr.net', 'cdnjs': '//cdnjs.cloudflare.com', 'unpkg': '//unpkg.com', 'custom': custom_format && custom_format.match(/^((https?:)?(\/\/[^/]+)|([^/]+))(\/|$)/)[1] } -
在
[BlogRoot]\themes\butterfly\scripts\events\cdn.js中修改const cdnSource = { local: cond === 'internal' ? `${cdnjs_file + verType}` : `/pluginsSrc/${name}/${file + verType}`, + jsdelivr: `https://fastly.jsdelivr.net/npm/${name}${verType}/${min_file}`, unpkg: `https://unpkg.com/${name}${verType}/${file}`, cdnjs: `https://cdnjs.cloudflare.com/ajax/libs/${cdnjs_name}/${version}/${min_cdnjs_file}`, custom: (CDN.custom_format || '').replace(/\$\{(.+?)\}/g, (match, $1) => value[$1]) }
{% endfolding %}
引入 csdn 图片错误
{% folding cyan,点击查看教程 %}
{% hideBlock 预览效果 %}

{% endhideBlock %}
由于图床安全问题,使用 csdn 的博客图床地址,但是由于 csdn 开启了防盗链,所以直接在自己的博客网站用引用地址会报错,所以需要设置一下
-
在
[BlogRoot]\themes\butterfly\layout\includes\head.pug中添加meta(name ="format-detection" content="telephone=no") meta(name="theme-color" content=themeColor) + //- 取消防盗链 + <meta name="referrer" content="never" /> //- Open_Graph include ./head/Open_Graph.pug
{% endfolding %}
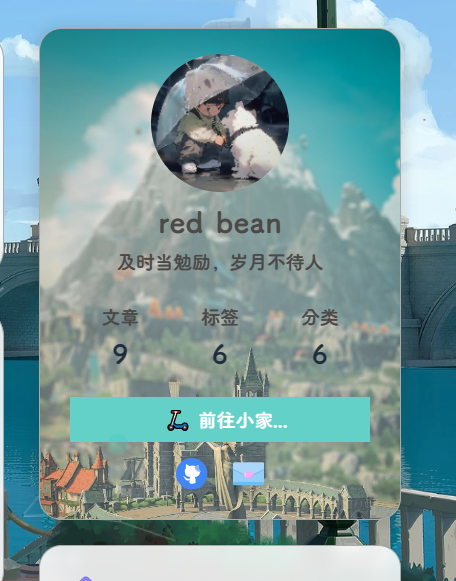
个人信息卡片背景图
{% folding cyan,点击查看教程 %}
{% hideBlock 预览效果 %}
{% endhideBlock %}
-
在
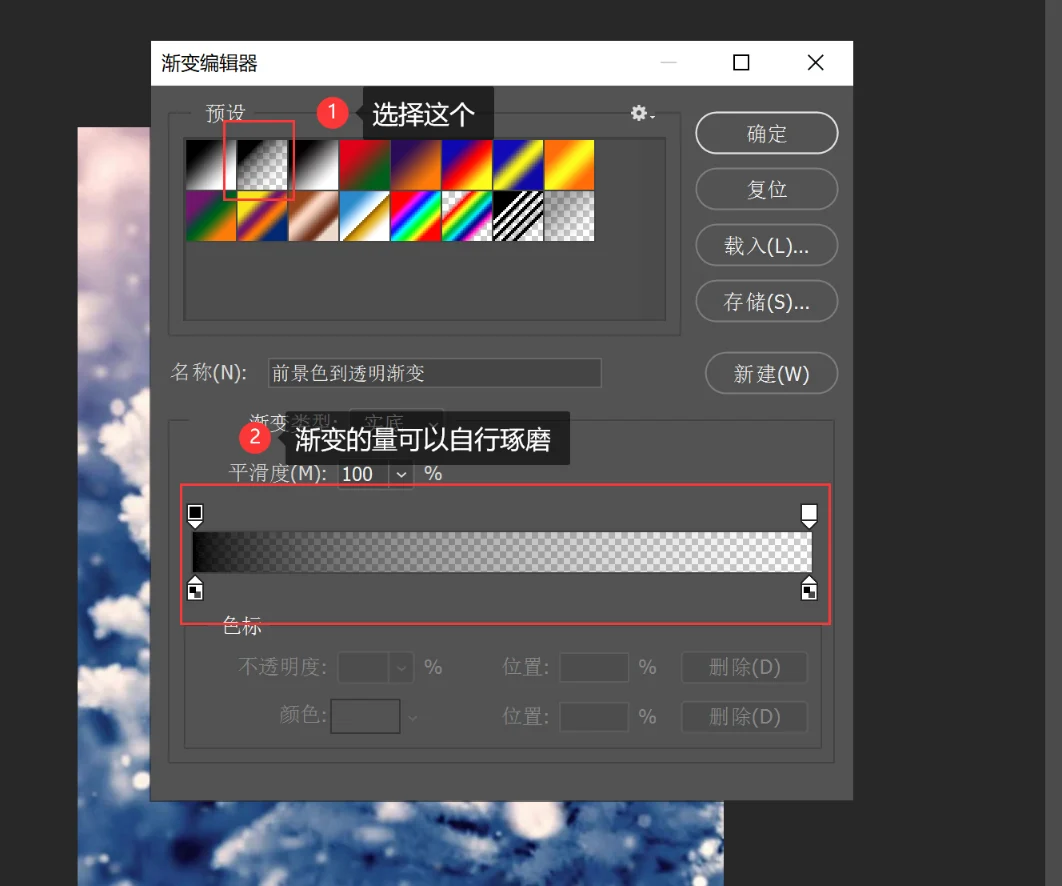
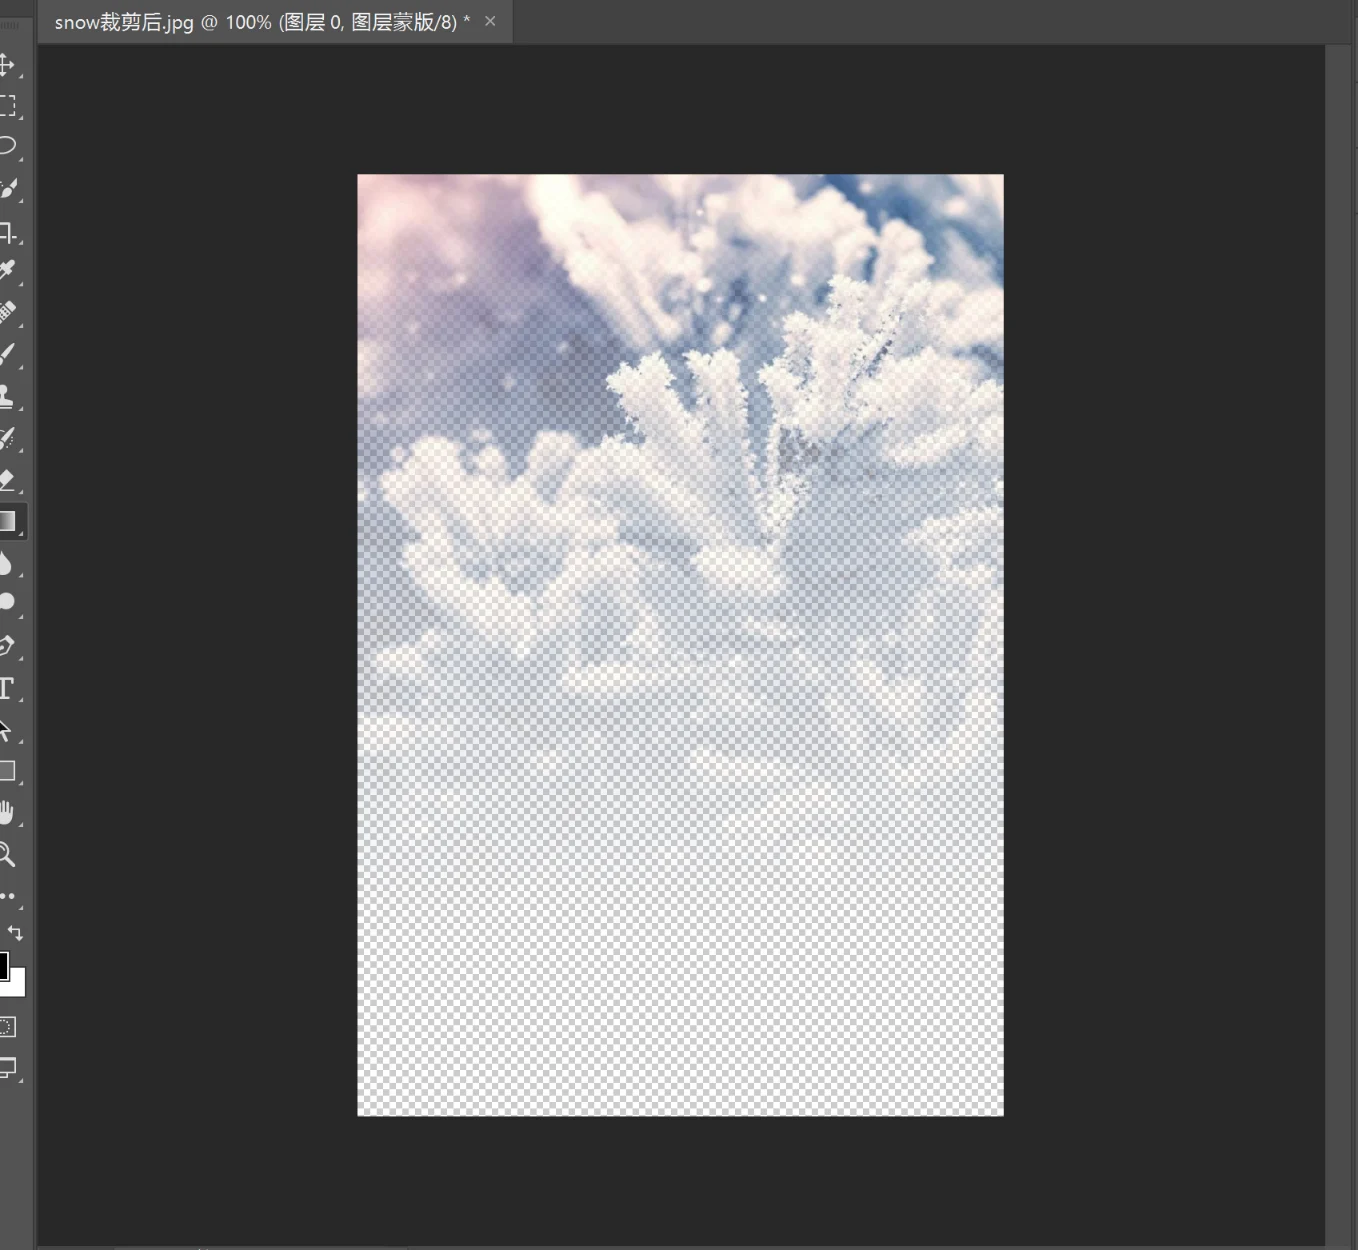
custom.css中加入以下样式:/* 个人信息卡片背景图 */ [data-theme="light"] #aside-content > .card-widget.card-info { background-image: url(https://sourcebucket.s3.ladydaily.com/img/snowflower.webp); background-repeat: no-repeat; background-attachment: inherit; background-size: 100%; } [data-theme="dark"] #aside-content > .card-widget.card-info { background-image: url(https://sourcebucket.s3.ladydaily.com/img/aurora.webp); background-repeat: no-repeat; background-attachment: inherit; background-size: 100%; }这里一个是白天模式,一个是夜间模式,可以根据自己的喜好选择图片,我的图片你可以下载下来,但是不能直接引用,因为开了防盗链。图片最好是下边透明,上边不透明的透明度连续渐变的形式,可以用PS制作。
-
制作这样的图片也不难,首先下载
PS,以及准备好一张尺寸大概在700*1000的图片,用PS打开图片,按照以下步骤给图片添加一个渐变遮罩就可以,然后将图片另存为PNG格式的,然后将图片用软件压缩一下,压缩图片具体方法见[网站性能优化的一些小技巧,最后只要不是太大就可以!
{% endfolding %}
控制台样式自定义(安知鱼)
{% folding cyan,点击查看教程 %}
{% hideBlock 预览效果 %}
{% endhideBlock %}
详见:console的高级用法
ASCII字符画生成器:https://tools.miku.ac/taag/,选择 ANSI Regular
-
新建js文件
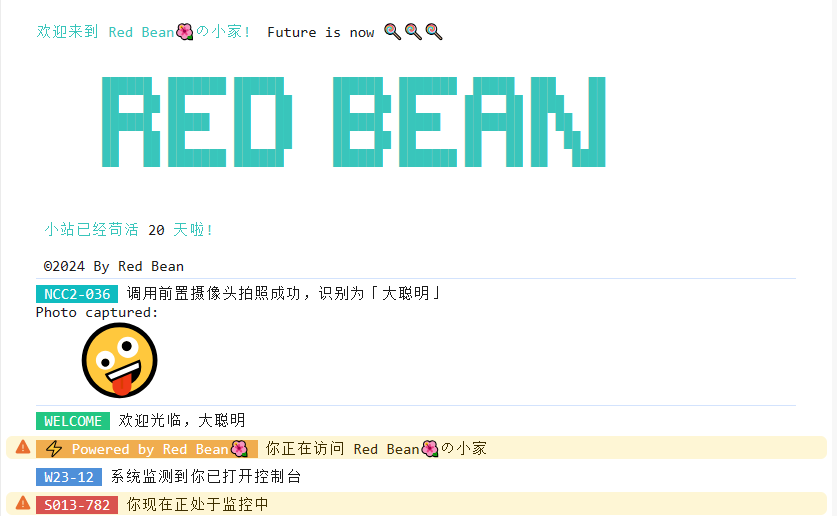
[BlogRoot]\source\js\console.js,并写入如下代码:var now1 = new Date(); function createtime1() { var grt = new Date("02/21/2024 00:00:00"); //此处修改你的建站时间或者网站上线时间 now1.setTime(now1.getTime() + 250); var days = (now1 - grt) / 1000 / 60 / 60 / 24; var dnum = Math.floor(days); var ascll = [ `欢迎来到 Red Bean🌺の小家!`, `Future is now 🍭🍭🍭`, ` ██████ ███████ ██████ ██████ ███████ █████ ███ ██ ██ ██ ██ ██ ██ ██ ██ ██ ██ ██ ████ ██ ██████ █████ ██ ██ ██████ █████ ███████ ██ ██ ██ ██ ██ ██ ██ ██ ██ ██ ██ ██ ██ ██ ██ ██ ██ ██ ███████ ██████ ██████ ███████ ██ ██ ██ ████ `, "小站已经苟活", dnum, "天啦!", "©2024 By Red Bean", ]; setTimeout( console.log.bind( console, `\n%c${ascll[0]} %c ${ascll[1]} %c ${ascll[2]} %c${ascll[3]}%c ${ascll[4]}%c ${ascll[5]}\n\n%c ${ascll[6]}\n`, "color:#39c5bb", "", "color:#39c5bb", "color:#39c5bb", "", "color:#39c5bb", "" ) ); } createtime1(); function createtime2() { var ascll2 = [`NCC2-036`, `调用前置摄像头拍照成功,识别为「大聪明」`, `Photo captured: `, ` 🤪 `]; setTimeout( console.log.bind( console, `%c ${ascll2[0]} %c ${ascll2[1]} %c \n${ascll2[2]} %c\n${ascll2[3]}`, "color:white; background-color:#10bcc0", "", "", 'background:url("https://unpkg.zhimg.com/anzhiyu-assets@latest/image/common/tinggge.gif") no-repeat;font-size:450%' ) ); setTimeout(console.log.bind(console, "%c WELCOME %c 欢迎光临,大聪明", "color:white; background-color:#23c682", "")); setTimeout( console.warn.bind( console, "%c ⚡ Powered by Red Bean🌺 %c 你正在访问 Red Bean🌺の小家", "color:white; background-color:#f0ad4e", "" ) ); setTimeout(console.log.bind(console, "%c W23-12 %c 系统监测到你已打开控制台", "color:white; background-color:#4f90d9", "")); setTimeout( console.warn.bind(console, "%c S013-782 %c 你现在正处于监控中", "color:white; background-color:#d9534f", "") ); } createtime2(); // 重写console方法 console.log = function () { }; console.error = function () { }; console.warn = function () { }; -
在主题配置文件
[BlogRoot]\_config.butterfly.yml中引入该js文件inject: bottom: + - <script async src="/js/console.js"></script> # 控制台打印 -
重启项目并按f12,看看控制台那一栏就可以看见效果
# git bash
hexo cl && hexo g && hexo s
# vscode
hexo cl; hexo g; hexo s
{% endfolding %}
网站恶搞标题
{% folding cyan,点击查看教程 %}
{% hideBlock 预览效果 %}
{% endhideBlock %}
-
新建文件
[BlogRoot]\source\js\title.js,写入以下内容://动态标题 var OriginTitile = document.title; var titleTime; document.addEventListener('visibilitychange', function () { if (document.hidden) { //离开当前页面时标签显示内容 document.title = '😲(#°Д°)网页突然崩溃了!!!'; clearTimeout(titleTime); } else { //返回当前页面时标签显示内容 document.title = '😝ヾ(≧▽≦*)o又好了'; //两秒后变回正常标题 titleTime = setTimeout(function () { document.title = OriginTitile; }, 2000); } }); -
在主题配置文件
_config.butterfly.yml引入该文件:inject: bottom: + - <script async src="/js/title.js"></script> # 网站恶搞标题 -
重启项目:
# git bash
hexo cl && hexo g && hexo s
# vscode
hexo cl; hexo g; hexo s
{% endfolding %}
Hexo 迁移到新电脑
{% folding cyan,点击查看教程 %}
参考教程:CSDN:Hexo博客迁移到新电脑
-
在新电脑行进行环境准备工作,具体的步骤和Hexo博客搭建基础教程(一)的第1-7步一模一样,大家在新电脑上跟着做即可(注意千万不要做第8步,
hexo init blog-demo这一步会覆盖并还原你原本的的源码文件) -
这时候新建一个文件夹
new-blog,用来装你的新博客源码的,进入这个文件夹,准备复制我们旧的博客源码进来,我们可以看到旧的博客项目结构是如下样子的: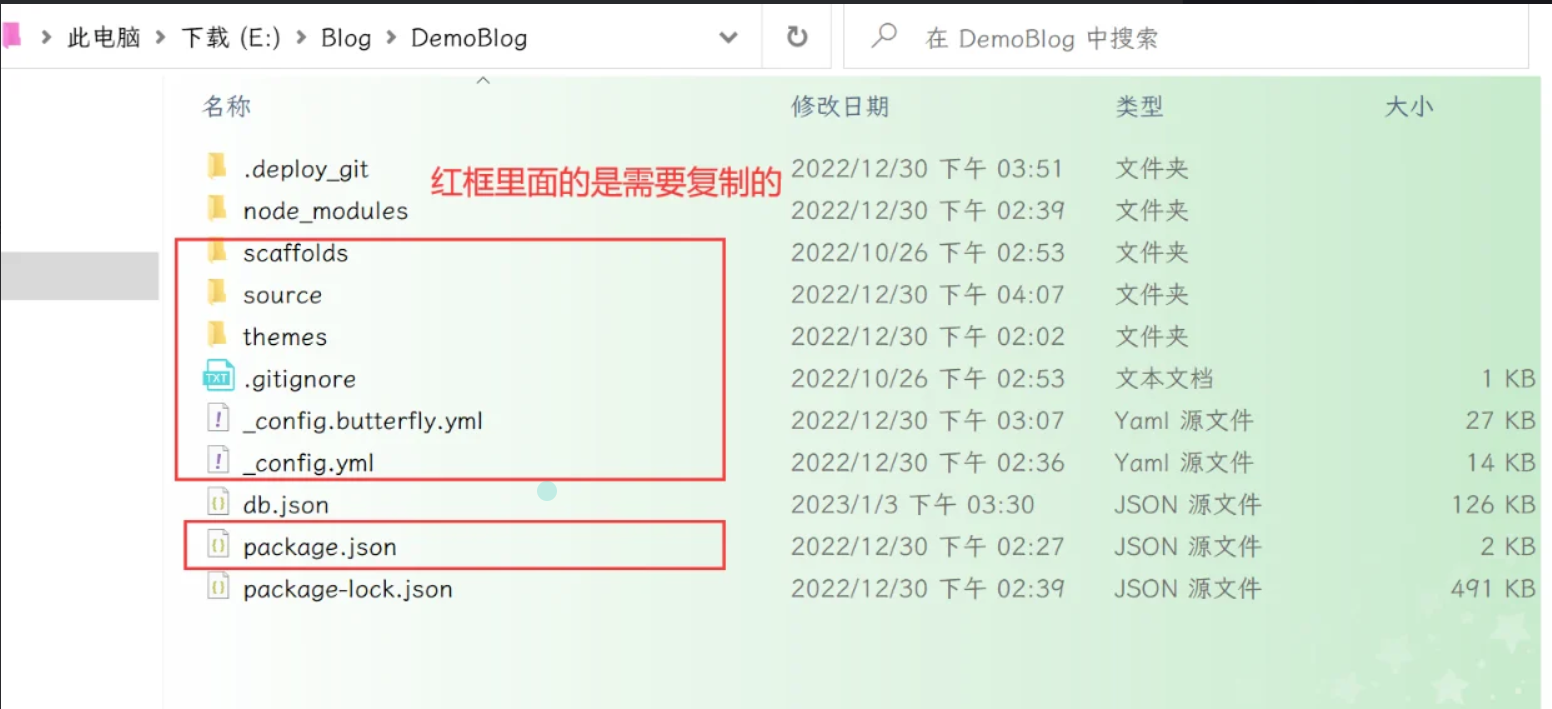
这里红框内的都是需要复制迁移到新的博客的,具体的要不要保留见下表:
需要复制的 需要删除的 _config.yml:站点配置文件 .git:无论是在站点根目录下,还是主题目录下的.git文件,都可以删掉 _config.butterfly.yml:主题配置文件,为了方便主题升级剥离出来的配置文件 node_modules: npm install会根据package.json生成package.json:说明使用哪些依赖包 public: hexo g会重新编译生成scaffolds:文章的模板 .deploy_git:在使用 hexo d时也会重新生成source:自己写的博客源码 db.json文件: hexo s快速启动所需的数据库themes:主题文件夹(魔改都在里面啦) package-lock.json:记录依赖之间的内部依赖关系,可以根据 package.json重新生成.gitignore:说明在提交时哪些文件可以忽略 -
复制所需的文件到新电脑的文件夹之后,在
git bash中切换目录到新拷贝的文件夹里,使用npm install命令,进行模块安装。这里绝对不能使用hexo init初始化,因为有的文件我们已经拷贝生成过来了,所以不必用hexo init去整体初始化,如果不慎用了,则站点的配置文件_config.yml里面内容会被重置,所以这一步一定要慎重:npm i -
执行以下命令情况并启动项目,进入
localhost:4000进行验证:# git bash hexo cl && hexo g && hexo s # vscode hexo cl; hexo g; hexo s -
当本地能成功启动,之后就可以部署到Github,执行以下代码:
hexo d如果出现
Deploy done,则说明部署成功,稍等两分钟,打开浏览器访问之前的域名就可以看到之前的博客,以后你可以在这台新电脑上魔改和写文章了~
{% endfolding %}
文章加密插件
{% folding cyan,点击查看教程 %}
{% hideBlock 预览效果 %}

{% endhideBlock %}
-
在根目录执行以下命令
npm install --save hexo-blog-encrypt -
Front matter配置方法
--- title: Hello World tags: - 作为日记加密 date: 2016-03-30 21:12:21 password: mikemessi abstract: 有东西被加密了, 请输入密码查看. message: 您好, 这里需要密码. theme: xray wrong_pass_message: 抱歉, 这个密码看着不太对, 请再试试. wrong_hash_message: 抱歉, 这个文章不能被校验, 不过您还是能看看解密后的内容. --- -
配置文件
[BlogRoot]\_config.yml中针对tags的加密# Security encrypt: # hexo-blog-encrypt abstract: 有东西被加密了, 请输入密码查看. message: 您好, 这里需要密码. tags: - {name: tagName, password: 密码A} - {name: tagName, password: 密码B} theme: xray wrong_pass_message: 抱歉, 这个密码看着不太对, 请再试试. wrong_hash_message: 抱歉, 这个文章不能被校验, 不过您还是能看看解密后的内容. -
你可以在线挑选你喜欢的主题,并应用到你的博客中:
-
重启项目进入对应的文章页面即可看到加密效果
# git bash
hexo cl && hexo g && hexo s
# vscode
hexo cl; hexo g; hexo s
{% note warning flat%}
- 采用 https 协议
- 本地部署可以看到效果,如果部署到云服务器需要购买 ssl 证书
{% endnote %}
{% endfolding %}
使用第三方托管平台部署博客
{% folding cyan,点击查看教程 %}
{% endfolding %}


 2万+
2万+


 被折叠的 条评论
为什么被折叠?
被折叠的 条评论
为什么被折叠?
 到【灌水乐园】发言


