


 本文深入探讨如何让照片动起来,重点解析关键点抽取模型在first order motion model中的作用。通过介绍抗锯齿插值、Hourglass模型、关键点数据抽取和雅各比矩阵的获取,逐步阐述模型工作原理。使用PyTorch实现,并借助tensorboard进行模型可视化。
概述
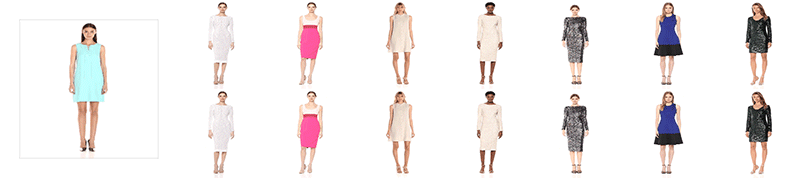
先看一下模型的最后效果
目前计算机视觉的发展如火如荼,让老照片动起来让大家惊艳于计算机视觉的发展。该如何实现该功能呢?本文将一步一步的帮您实现。在阅读本文之前建议有一些基本知识。
1、泰勒公式与雅各比行列式
2、图像上下采样
3、反向光流
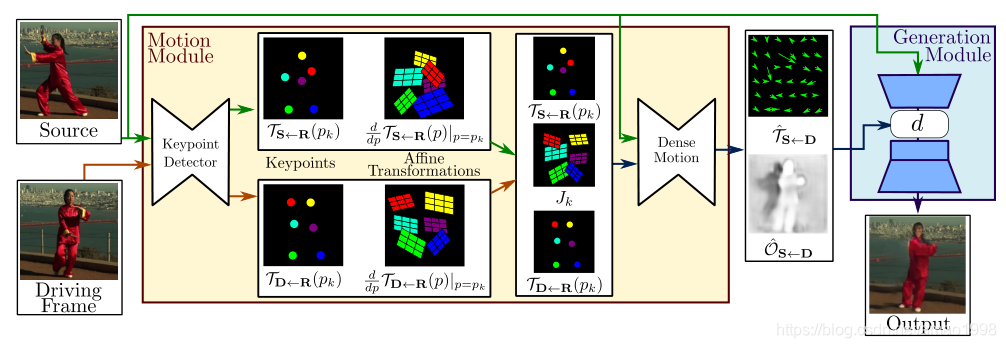
本文将分为几部分来完成。本章主要讲解关键点抽取模型,该模型主要为了定位关键点,将物体整体动画分解为背景(不变的)+关键点变化
模型结构
本文是关于first order motion model的pytorch具体实现
引入相关pytorch类库
from torch import nn
import torch
import torch.nn.functional as F
from imageio import imread
import numpy as np
from torchvision import models
1、模型配置
dataset_params:
  root_dir: data/vox-png
  frame_shape: [256, 256, 3]
  id_sampling: True
  pairs_list: data/vox256.csv
  augmentation_params:
    flip_param:
      horizontal_flip: True
      time_flip: True
    jitter_param:
      brightness: 0.1
      contrast: 0.1
      saturation: 0.1
      hue: 0.1


model_params:
  common_params:
    num_kp: 10
    num_channels: 3
    estimate_jacobian: True
  kp_detector_params:
     temperature: 0.1
     block_expansion: 32
     max_features: 1024
     scale_factor: 0.25
     num_blocks: 5
  generator_params:
    block_expansion: 64
    max_features: 512
    num_down_blocks: 2
    num_bottleneck_blocks: 6
    estimate_occlusion_map: True
    dense_motion_params:
      block_expansion: 64
      max_features: 1024
      num_blocks: 5
      scale_factor: 0.25
  discriminator_params:
    scales: [1]
    block_expansion: 32
    max_features: 512
    num_blocks: 4
    sn: True

train_params:
  num_epochs: 100
  num_repeats: 75
  epoch_milestones: [60, 90]
  lr_generator: 2.0e-4
  lr_discriminator: 2.0e-4
  lr_kp_detector: 2.0e-4
  batch_size: 40
  scales: [1, 0.5, 0.25, 0.125]
  checkpoint_freq: 50
  transform_params:
    sigma_affine: 0.05
    sigma_tps: 0.005
    points_tps: 5
  loss_weights:
    generator_gan: 0
    discriminator_gan: 1
    feature_matching: [10, 10, 10, 10]
    perceptual: [10, 10, 10, 10, 10]
    equivariance_value: 10
    equivariance_jacobian: 10

reconstruction_params:
  num_videos: 1000
  format: '.mp4'

animate_params:
  num_pairs: 50
  format: '.mp4'
  normalization_params:
    adapt_movement_scale: False
    use_relative_movement: True
    use_relative_jacobian: True

visualizer_params:
  kp_size: 5
  draw_border: True
  colormap: 'gist_rainbow'
可以将上面的代码存储成yaml文件然后用如下代码进行读取
import yaml
with open("conf/vox-256.yaml") as f:
    config = yaml.load(f,yaml.FullLoader)
2、关键点抽取模型-keypoint detector
2.1 图片预处理-图片缩放
AntiAlias Interpolation 抗锯齿插值算法
在原文中默认的图像大小是 ** 256*256 ** 但考虑到运算速度在真正进行模型调试时,会采用64*64的图片进行训练,此时会使用该模型为图片进行缩放
2.1.1 AntiAliasInterpolation2d源码
class AntiAliasInterpolation2d(nn.Module):
    """
    Band-limited downsampling, for better preservation of the input signal.
    """
    def __init__(self, channels, scale):
        super(AntiAliasInterpolation2d, self).__init__()
        #
        sigma = (1 / scale - 1) / 2
        kernel_size = 2 * round(sigma * 4) + 1
        self.ka = kernel_size // 2
        self.kb = self.ka - 1 if kernel_size % 2 == 0 else self.ka

        kernel_size = [kernel_size, kernel_size]
        sigma = [sigma, sigma]
        kernel = 1
        meshgrids = torch.meshgrid(
            [
                torch.arange(size, dtype=torch.float32)
                for size in kernel_size
                ]
        )
        for size, std, mgrid in zip(kernel_size, sigma, meshgrids):
            mean = (size - 1) / 2
            kernel *= torch.exp(-(mgrid - mean) ** 2 / (2 * std ** 2))

        # Make sure sum of values in gaussian kernel equals 1.
        kernel = kernel / torch.sum(kernel)
        # Reshape to depthwise convolutional weight
        kernel = kernel.view(1, 1, *kernel.size())
        kernel = kernel.repeat(channels, *[1] * (kernel.dim() - 1))

        self.register_buffer('weight', kernel)
        self.groups = channels
        self.scale = scale
        inv_scale = 1 / scal
最低0.47元/天 解锁文章


 被折叠的 条评论
为什么被折叠?
被折叠的 条评论
为什么被折叠?
 到【灌水乐园】发言


